
Baked Bloomin’ Apples: Juicy, Cinnamon-Spiced Delight!
Sensory-Rich Introduction with Immediate Craving
Imagine walking into a warm kitchen, the air thick with the sweet, spicy aroma of cinnamon and baked apples. As you approach the oven, the sight of golden-brown, bloomin’ apples, their skins slightly crisped and their insides tender, makes your mouth water. Each apple, stuffed to the brim with a crunchy, buttery topping, promises a delightful contrast of textures and flavors. This dessert is not just a treat; it’s a nostalgic embrace, reminiscent of cozy family gatherings and festive autumn evenings. Perfect for holiday celebrations or a simple weeknight indulgence, Baked Bloomin’ Apples are sure to become a cherished favorite in your home.
Why You’ll Love This Baked Bloomin’ Apples
- Texture Contrast: The soft, juicy apple flesh pairs beautifully with the crunchy, crumbly topping, creating a satisfying bite every time.
- Flavor Balance: The natural sweetness of the apples is perfectly complemented by the warm spices of cinnamon and nutmeg, with optional caramel adding a decadent touch.
- Versatility: These apples can be enjoyed as a dessert, breakfast treat, or even a snack, making them suitable for any time of day.
- Ease of Preparation: With just a few simple steps, you can create an impressive dessert that looks and tastes gourmet without the fuss.
- Universal Appeal: Loved by both kids and adults, this dish is a crowd-pleaser that can be adapted to suit various dietary preferences.
Essential Tools & Preparation Strategy
- Oven: Essential for baking the apples to achieve the perfect tenderness and caramelization.
- Baking Dish: A sturdy dish is needed to hold the apples and any added water for steaming, ensuring even cooking.
- Mixing Bowl: For combining the topping ingredients, a medium-sized bowl will suffice.
- Apple Corer: This tool makes it easy to remove the core without damaging the apple, ensuring a neat presentation.
- Measuring Cups and Spoons: Accurate measurements are crucial for achieving the best flavor balance.
- Spatula: Useful for mixing and transferring the topping mixture into the apples.
- Fork: To test the doneness of the apples, ensuring they are tender but not falling apart.
- Parchment Paper (optional): Lining the baking dish can make cleanup easier.
Ingredients & Their Roles in This Baked Bloomin’ Apples
- Apples (4 medium-sized, Granny Smith or Honeycrisp): The star of the dish, providing natural sweetness and a tender texture when baked.
- Brown Sugar (1/2 cup): Adds sweetness and a rich, caramel-like flavor to the topping.
- Rolled Oats (1/4 cup): Contributes to the crunchy texture of the topping while adding fiber.
- All-Purpose Flour (1/4 cup): Helps bind the topping ingredients together, creating a crumbly texture.
- Ground Cinnamon (1 teaspoon): Infuses the dish with warm, comforting spice.
- Nutmeg (1/4 teaspoon): Enhances the flavor profile with its aromatic notes.
- Unsalted Butter (1/4 cup, melted): Adds richness and moisture to the topping.
- Chopped Nuts (1/4 cup, walnuts or pecans): Provides additional crunch and a nutty flavor.
- Caramel Sauce (1/2 cup, optional): A decadent drizzle that elevates the dessert to new heights.
Step-by-Step Guide to Perfect Baked Bloomin’ Apples
- Preheat the Oven: Set your oven to 350°F (175°C) to ensure it’s hot enough for baking.
- Core the Apples: Carefully remove the core from each apple, leaving the bottom intact to hold the filling.
- Prepare the Topping: In a mixing bowl, combine brown sugar, oats, flour, cinnamon, nutmeg, melted butter, and chopped nuts until the mixture is crumbly.
- Stuff the Apples: Pack the topping mixture tightly into each cored apple, ensuring they are well-filled.
- Arrange in Baking Dish: Place the stuffed apples in a baking dish and pour a little water at the bottom to create steam during baking.
- Bake: Place the dish in the preheated oven and bake for 25-30 minutes, or until the apples are tender and the topping is golden brown.
- Finish with Caramel: Remove from the oven and drizzle with caramel sauce if desired before serving.
- Serve Warm: Enjoy your Baked Bloomin’ Apples warm for the best experience.
Chef’s Notes & Pro Tips for Flawless Results
- Make-Ahead Instructions: Prepare the apples and stuffing a day in advance; store them separately in the fridge until ready to bake.
- Storage: Leftovers can be stored in an airtight container in the fridge for up to 3 days.
- Equipment Recommendations: A sturdy baking dish is crucial; consider using a glass dish for even heat distribution.
- Customization Options: Feel free to experiment with different nuts or spices based on your preferences.
Avoid These Common Cooking Mistakes
- Not Coring the Apples Properly: This can lead to uneven cooking; ensure the core is fully removed.
- Overstuffing the Apples: This can cause the topping to spill out; pack it gently.
- Baking at Too High a Temperature: This can burn the topping before the apples are tender; stick to 350°F.
- Using the Wrong Type of Apple: Some apples become mushy when baked; choose firm varieties like Granny Smith or Honeycrisp.
- Not Adding Enough Moisture: This can lead to dry apples; always add water to the baking dish.
- Skipping the Resting Time: Letting the apples cool slightly enhances the flavor and texture.
- Not Checking for Doneness: Apples should be tender but not falling apart; test with a fork for the perfect texture.
Creative Variations & Customizations
- Gluten-Free Version: Substitute all-purpose flour and oats with gluten-free alternatives.
- Nut-Free Option: Omit the nuts or replace them with seeds for a similar crunch.
- Spiced Up: Add a pinch of cayenne pepper for a surprising kick.
- Fruit Additions: Mix in dried cranberries or raisins for added sweetness and texture.
- Seasonal Twist: Incorporate pumpkin spice for a fall-inspired variation.
Perfect Pairings: What to Serve With Baked Bloomin’ Apples
- Vanilla Ice Cream: The creamy texture complements the warm apples perfectly.
- Whipped Cream: Light and airy, it adds a delightful contrast.
- Caramel Sauce: Drizzle for an extra layer of sweetness.
- Spiced Chai Tea: A cozy beverage that enhances the dessert experience.
- Sea Salt: A sprinkle enhances the flavors and adds a gourmet touch.
- Yogurt: A tangy balance that cuts through the sweetness.
- Cheddar Cheese: The savory flavor pairs beautifully with the sweet apples.
- Warm Apple Cider: A seasonal treat that complements the dish perfectly.
Storage & Meal Prep Instructions
- Fridge Storage: Store leftovers in an airtight container for up to 3 days.
- Freezer Storage: For longer storage, freeze the baked apples in a single layer, then transfer to a freezer-safe container for up to 2 months.
- Reheating Methods: Reheat in the oven at 350°F for about 10-15 minutes or in the microwave for 1-2 minutes until warmed through.
Nutrition Facts & Health Insights
| Nutrient | Amount per Serving (1 stuffed apple) |
|---|---|
| Calories | 250 |
| Sugar | 20 grams |
| Sodium | 50 milligrams |
| Fat | 10 grams |
| Saturated Fat | 5 grams |
| Unsaturated Fat | 3 grams |
| Trans Fat | 0 grams |
| Carbohydrates | 38 grams |
| Fiber | 4 grams |
| Protein | 2 grams |
| Cholesterol | 15 milligrams |
Health Benefits: Apples are rich in fiber and antioxidants, while nuts provide healthy fats and protein, making this dessert a wholesome choice.
Frequently Asked Questions
- Can I use different types of apples?
Yes, but choose firm varieties to avoid mushiness. - What can I substitute for brown sugar?
Coconut sugar or maple syrup can be used as alternatives. - How do I know when the apples are done?
They should be tender but not falling apart; test with a fork. - Can I make this recipe vegan?
Substitute butter with coconut oil and use a plant-based caramel sauce. - What if I don’t have an apple corer?
A small knife can be used to carefully remove the core. - How can I make the topping healthier?
Reduce the sugar and add more oats or nuts for added fiber. - Can I prepare the apples in advance?
Yes, prepare and store them separately in the fridge until ready to bake. - What’s the best way to reheat leftovers?
Reheat in the oven for the best texture, or microwave for convenience.
Final Inspiration & Kitchen Confidence
As you savor the warm, cinnamon-spiced goodness of your Baked Bloomin’ Apples, take a moment to appreciate your culinary achievement. This delightful dessert not only fills your home with comforting aromas but also brings joy to those you share it with. Embrace your kitchen confidence and don’t hesitate to experiment with variations and pairings. Celebrate the simple pleasure of creating something delicious, and let each bite remind you of the warmth and love that home-cooked meals bring. Now, gather your ingredients and let the baking begin!
Print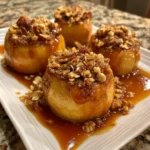
Baked Bloomin’ Apples: Juicy, Cinnamon-Spiced Delight!
- Total Time: 45 minutes
- Yield: 4 servings 1x
- Diet: Vegetarian
Description
Baked Bloomin’ Apples are a delightful dessert that combines the sweetness of tender, juicy apples with a warm, cinnamon-spiced aroma. Each bite reveals a soft, buttery texture, perfectly complemented by a crunchy topping that adds a satisfying contrast.
Ingredients
- 4 medium-sized apples (Granny Smith or Honeycrisp)
- 1/2 cup brown sugar
- 1/4 cup rolled oats
- 1/4 cup all-purpose flour
- 1 teaspoon ground cinnamon
- 1/4 teaspoon nutmeg
- 1/4 cup unsalted butter, melted
- 1/4 cup chopped nuts (walnuts or pecans)
- 1/2 cup caramel sauce (optional)
Instructions
- Preheat your oven to 350°F (175°C).
- Core the apples, making sure to leave the bottom intact.
- In a bowl, mix together brown sugar, oats, flour, cinnamon, nutmeg, melted butter, and chopped nuts until crumbly.
- Stuff the mixture into the cored apples, packing it tightly.
- Place the stuffed apples in a baking dish and pour a little water at the bottom to create steam.
- Bake in the preheated oven for 25-30 minutes, or until the apples are tender and the topping is golden brown.
- Remove from the oven and drizzle with caramel sauce if desired before serving.
Notes
- Make-ahead: You can prepare the apples and stuffing a day in advance; just store them separately in the fridge.
- Storage: Store leftovers in an airtight container in the fridge for up to 3 days.
- Substitutions: Use gluten-free oats and flour for a gluten-free version.
- Prep Time: 15 minutes
- Cook Time: 30 minutes
- Category: desserts
- Method: baking
- Cuisine: American
Nutrition
- Serving Size: 1 stuffed apple
- Calories: 250
- Sugar: 20 grams
- Sodium: 50 milligrams
- Fat: 10 grams
- Saturated Fat: 5 grams
- Unsaturated Fat: 3 grams
- Trans Fat: 0 grams
- Carbohydrates: 38 grams
- Fiber: 4 grams
- Protein: 2 grams
- Cholesterol: 15 milligrams
Keywords: Baked Bloomin’ Apples, baked apples, dessert, cinnamon apples, apple dessert, fall recipes, easy desserts, warm desserts, vegetarian dessert, caramel apples, healthy dessert, apple recipes, cozy desserts, holiday desserts, sweet treats


