
Introduction to Bloody Eyeball Cake Pops
As a busy mom, I know how challenging it can be to whip up something fun and festive, especially around Halloween. That’s why I absolutely adore these Bloody Eyeball Cake Pops! They’re not just a treat; they’re a conversation starter that will have your guests giggling and gasping in delight. Plus, they’re surprisingly easy to make, even on a hectic day. With just a few simple ingredients, you can create a spooky dessert that’s sure to impress your loved ones. So, let’s dive into this deliciously eerie adventure together!
Why You’ll Love This Bloody Eyeball Cake Pops
These Bloody Eyeball Cake Pops are the perfect blend of fun and flavor. They’re quick to make, which is a lifesaver for busy schedules. Plus, the kids will love helping out, turning baking into a family activity. The rich chocolate cake paired with creamy frosting creates a delightful treat that’s hard to resist. Trust me, these spooky pops will be the highlight of your Halloween festivities!
Ingredients for Bloody Eyeball Cake Pops
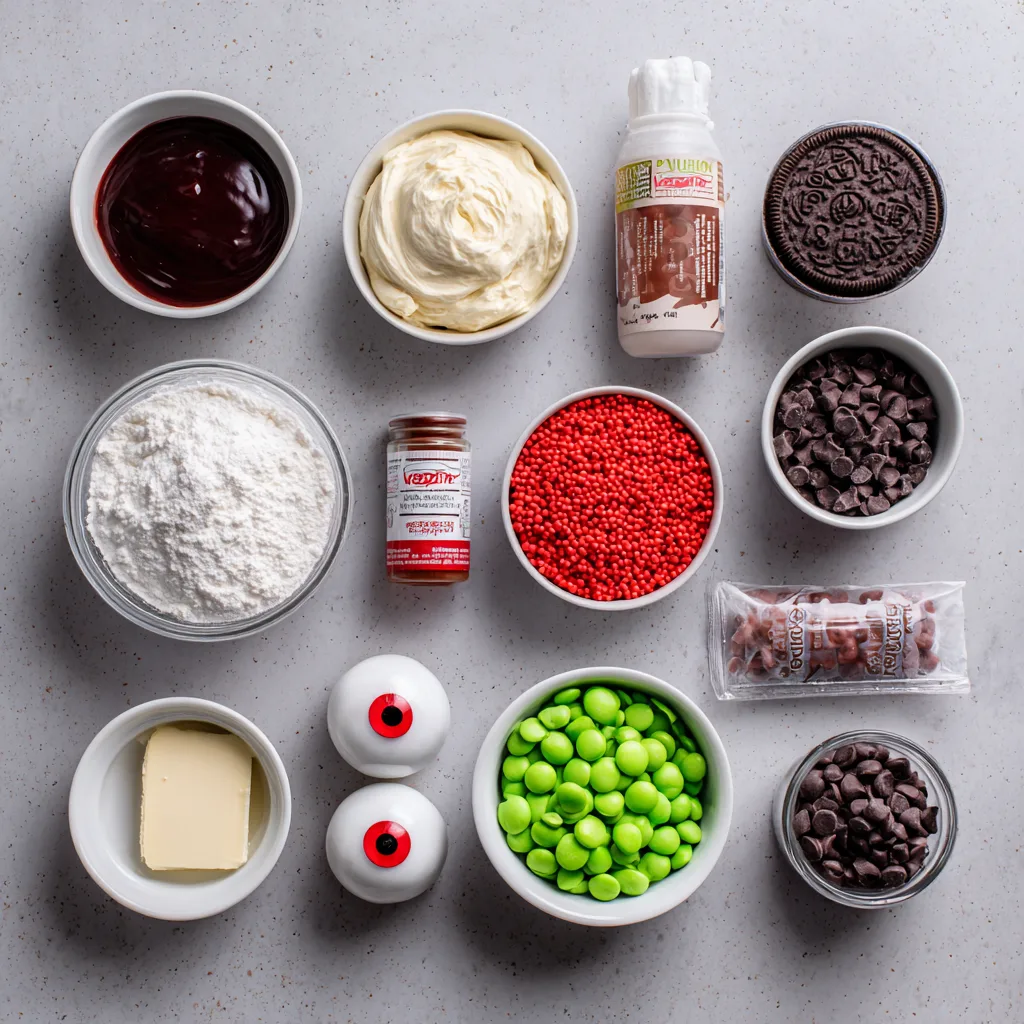
Gathering the right ingredients is half the fun! Here’s what you’ll need to create these spooky delights:
- Chocolate cake mix: This is the base of our cake pops. You can use a classic chocolate mix or even a dark chocolate one for a richer flavor.
- Frosting: A creamy frosting binds the cake together. I recommend chocolate or vanilla, but feel free to get creative with flavors!
- White chocolate melts: These are essential for coating the cake pops. They give that eerie eyeball look and a sweet crunch.
- Red food coloring: This is what makes our cake pops look delightfully gruesome! A little goes a long way to create that blood effect.
- Chocolate chips: These serve as the “pupil” of our eyeball. You can use mini chips for a more realistic look.
- Green candy melts: These create the colorful ring around the chocolate chip, adding a pop of color to your spooky treats.
For exact measurements, check the bottom of the article where you can find everything listed for easy printing. Happy baking!
How to Make Bloody Eyeball Cake Pops
Now that we have our ingredients ready, let’s get to the fun part—making these Bloody Eyeball Cake Pops! Follow these simple steps, and you’ll have a spooky treat that’s sure to impress.
Step 1: Prepare the Cake
Start by preparing the chocolate cake mix according to the package instructions. This usually involves mixing the dry ingredients with eggs, water, and oil. Once everything is combined, pour the batter into a greased baking pan and bake it in a preheated oven. The aroma of chocolate will fill your kitchen! After about 30 minutes, check for doneness with a toothpick. If it comes out clean, let the cake cool completely before moving on to the next step.
Step 2: Crumble the Cake
Once the cake has cooled, it’s time to crumble it. I like to use my hands for this part, as it’s a bit therapeutic! Break the cake into small pieces and place them in a large bowl. You want a fine crumble, so don’t be shy about getting in there. This is where the magic begins!
Step 3: Mix with Frosting
Now, add your frosting to the crumbled cake. I usually start with about a cup and mix it in with a spatula or my hands until everything is well combined. The mixture should be moist but not overly sticky. If it feels too dry, add a bit more frosting. This step is crucial for forming those perfect cake balls!
Step 4: Form Cake Balls
Next, it’s time to form the cake mixture into balls. I like to use a cookie scoop for even sizing, but you can also use your hands. Aim for about one-inch balls and place them on a baking sheet lined with parchment paper. This is where your cake pops start to take shape!
Step 5: Chill the Cake Balls
Chilling is key! Pop the baking sheet with your cake balls into the refrigerator for about 30 minutes. This helps them firm up, making it easier to dip them in chocolate later. Plus, it gives you a little break to clean up the kitchen or enjoy a cup of coffee!
Step 6: Melt the White Chocolate
While the cake balls chill, it’s time to melt the white chocolate melts. Place them in a microwave-safe bowl and heat in 30-second intervals, stirring in between. Be careful not to overheat; you want a smooth, pourable consistency. This will be the spooky coating for our cake pops!
Step 7: Dip the Cake Balls
Once your cake balls are chilled, it’s time to dip! Using a fork or a lollipop stick, dip each cake ball into the melted white chocolate. Make sure it’s fully coated, then gently tap off any excess chocolate. Place them back on the baking sheet to set. This is where they start to look like creepy eyeballs!
Step 8: Create the Eyeball
While the white chocolate is still wet, it’s time to add the chocolate chip. Press one chip into the center of each cake pop to create the “pupil.” This little detail makes all the difference and adds to the spooky effect!
Step 9: Add the Green Ring
Next, melt the green candy melts in a separate bowl. Once melted, use a piping bag or a small spoon to create a ring around the chocolate chip. This adds a pop of color and makes your eyeball cake pops even more eye-catching!
Step 10: Drizzle the Blood Effect
For the final touch, mix a few drops of red food coloring with a bit of melted white chocolate. Drizzle this mixture over the cake pops to create a “bloody” effect. It’s the perfect finishing touch that will have everyone talking!
Step 11: Let Set
Finally, let your cake pops set completely before serving. This usually takes about 30 minutes at room temperature. Once they’re set, you can display them on a spooky platter or in a fun Halloween-themed container. Get ready for the compliments to roll in!
Tips for Success
- Use a cookie scoop for uniform cake balls; it makes a big difference!
- Chill the cake balls thoroughly; this prevents them from falling apart during dipping.
- Don’t rush the melting process; heat the chocolate in short intervals to avoid burning.
- Experiment with different colors for the candy melts to create unique eyeball designs.
- Have fun with the decorating; let your creativity shine!
Equipment Needed
- Baking pan: A standard 9×13 inch pan works well, but any similar size will do.
- Mixing bowls: Use a large bowl for crumbling and a smaller one for melting chocolate.
- Cookie scoop: This helps form uniform cake balls; a tablespoon works too!
- Parchment paper: Line your baking sheet for easy cleanup.
- Microwave-safe bowl: Essential for melting chocolate safely.
Variations
- Gluten-Free: Substitute the chocolate cake mix with a gluten-free version to accommodate dietary needs.
- Vegan: Use a vegan chocolate cake mix and plant-based frosting for a delicious dairy-free option.
- Flavor Twists: Experiment with different cake flavors like red velvet or vanilla for a unique spin on the classic.
- Nutty Surprise: Add crushed nuts or toffee bits to the cake mixture for an extra crunch.
- Spooky Sprinkles: Decorate with Halloween-themed sprinkles for an added festive touch!
Serving Suggestions
- Pair these cake pops with a spooky punch or themed cocktails for a festive drink option.
- Serve on a black or orange platter to enhance the Halloween vibe.
- Consider adding a few fake spider decorations around the cake pops for an extra fright!
- Display them in a fun Halloween-themed container for a creative presentation.
- Offer alongside other Halloween treats like ghost-shaped cookies for a delightful dessert table.
FAQs about Bloody Eyeball Cake Pops
Can I make Bloody Eyeball Cake Pops in advance?
Absolutely! These spooky treats can be made a day in advance. Just store them in the refrigerator until you’re ready to serve. This makes them a perfect option for busy moms like us who want to plan ahead!
What can I use instead of white chocolate melts?
If you’re not a fan of white chocolate, you can use milk chocolate or even dark chocolate melts. Just keep in mind that it will change the overall look of your Bloody Eyeball Cake Pops, but they’ll still taste delicious!
How do I store leftover cake pops?
Store any leftover cake pops in an airtight container in the refrigerator. They’ll stay fresh for about a week, but I doubt they’ll last that long with how tasty they are!
Can I use different colors for the eyeball decorations?
Of course! Feel free to get creative with your colors. You can use blue or purple candy melts for a fun twist. The more colorful, the more fun they’ll be at your Halloween party!
What if my cake pops are falling apart when I dip them?
If your cake pops are crumbling, it might be because they weren’t chilled long enough. Make sure to chill them for at least 30 minutes. If they still fall apart, try adding a bit more frosting to the mixture to help bind them together.
Final Thoughts
Creating these Bloody Eyeball Cake Pops is more than just baking; it’s about making memories with your family and friends. The laughter and excitement that fill the kitchen as you decorate these spooky treats are priceless. Plus, the joy on your loved ones’ faces when they see these ghoulish delights is simply unforgettable. Whether you’re hosting a Halloween party or just looking to add some fun to your day, these cake pops are sure to bring smiles and a dash of creativity to your table. So, roll up your sleeves and enjoy this deliciously eerie adventure!
Print
Bloody Eyeball Cake Pops: A Spooktacular Treat!
- Total Time: 1 hour
- Yield: 24 cake pops 1x
- Diet: Vegetarian
Description
A fun and spooky dessert perfect for Halloween parties, these Bloody Eyeball Cake Pops are sure to impress your guests.
Ingredients
- 1 box of chocolate cake mix
- 1 cup of frosting
- White chocolate melts
- Red food coloring
- Chocolate chips
- Green candy melts
Instructions
- Prepare the chocolate cake mix according to package instructions and bake.
- Once cooled, crumble the cake into a large bowl.
- Add frosting to the crumbled cake and mix until well combined.
- Form the mixture into balls and place them on a baking sheet.
- Chill the cake balls in the refrigerator for about 30 minutes.
- Melt the white chocolate melts in a microwave-safe bowl.
- Dip each cake ball into the melted white chocolate and place back on the baking sheet.
- While the chocolate is still wet, place a chocolate chip in the center of each cake pop to create the eyeball.
- Use the green candy melts to create a ring around the chocolate chip.
- Mix red food coloring with a little melted white chocolate to create a blood effect and drizzle it over the cake pops.
- Let the cake pops set before serving.
Notes
- For a more intense flavor, use dark chocolate cake mix.
- Make sure to let the cake pops cool completely before dipping them in chocolate.
- These can be made a day in advance and stored in the refrigerator.
- Prep Time: 30 minutes
- Cook Time: 30 minutes
- Category: Dessert
- Method: Baking and Dipping
- Cuisine: American
Nutrition
- Serving Size: 1 cake pop
- Calories: 150
- Sugar: 10g
- Sodium: 50mg
- Fat: 7g
- Saturated Fat: 4g
- Unsaturated Fat: 2g
- Trans Fat: 0g
- Carbohydrates: 20g
- Fiber: 1g
- Protein: 2g
- Cholesterol: 20mg
Keywords: Bloody Eyeball Cake Pops, Halloween treats, spooky desserts


