Sensory-Rich Introduction with Immediate Craving
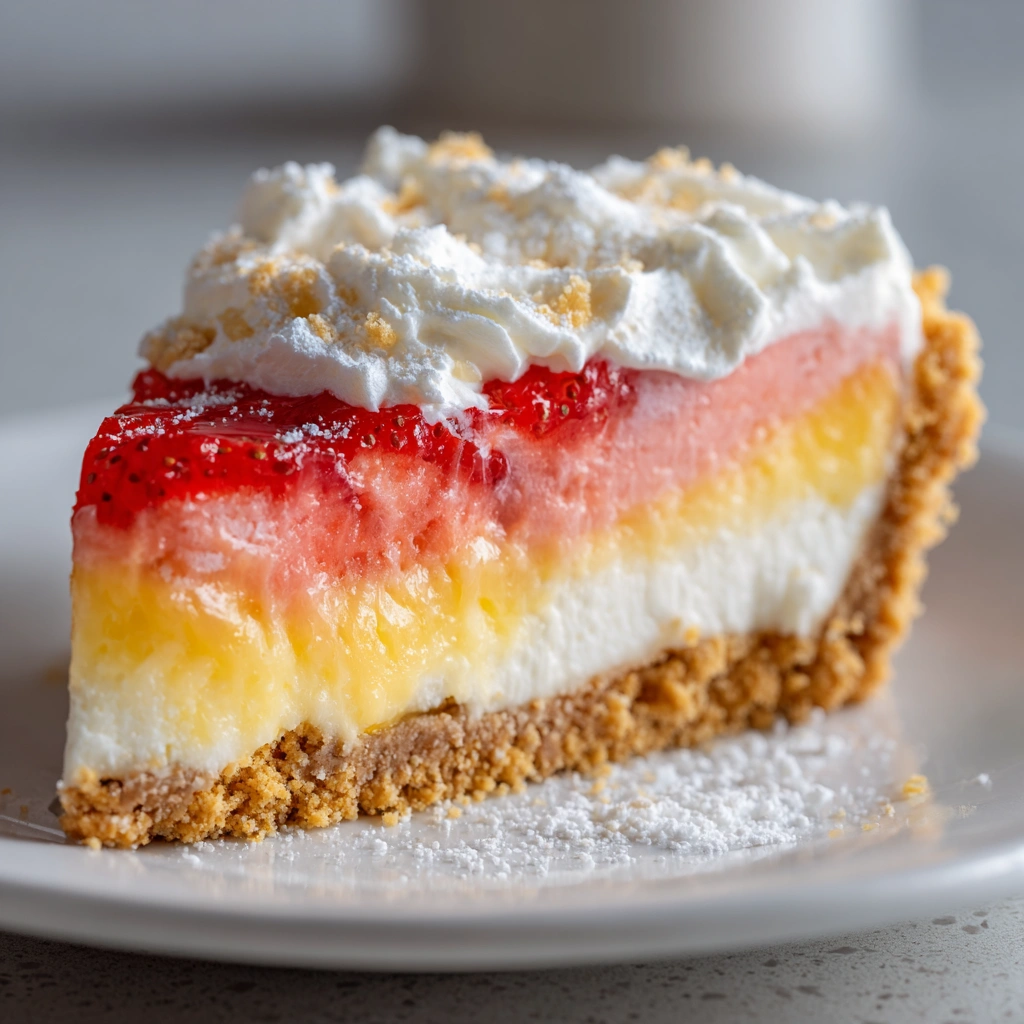
Imagine slicing into a Easter No Bake Jello Pie and revealing its stunning layers: a golden graham cracker crust cradling a luscious, creamy filling, topped with a vibrant, jewel-toned jello layer that glistens like spring sunshine. The moment you take a bite, the smooth, rich cream dances with the light, fruity jello, creating a delightful contrast that is both refreshing and indulgent. The aroma of vanilla wafts through the air, mingling with the sweet scent of strawberries, making it impossible to resist.
This pie holds a special place in my heart, as it has been a staple at our family Easter gatherings for as long as I can remember. I can still picture my grandmother, her hands deftly folding the whipped cream into the cream cheese mixture, her laughter filling the kitchen as we eagerly awaited the first slice. It was more than just a dessert; it was a symbol of love, tradition, and the joy of sharing something sweet with those we cherish.
Whether you’re hosting an Easter brunch, enjoying a spring picnic, or celebrating a festive gathering, this pie is the perfect centerpiece. Its vibrant colors and delightful flavors not only please the palate but also bring a sense of joy and nostalgia, reminding us of the simple pleasures of life spent with loved ones. So, let’s dive into the recipe and create a dessert that will surely become a cherished tradition in your home as well!
Why You’ll Love This Easter No Bake Jello Pie
Let me tell you, this Easter No Bake Jello Pie is not just a dessert; it’s an experience that will have you coming back for seconds (and maybe thirds!). Here’s why this pie deserves a spot on your spring dessert table:
- Texture Contrast: The moment you take a bite, you’ll notice the delightful contrast between the creamy filling and the light, airy jello. The smoothness of the cream melts in your mouth, while the jello adds a playful bounce that keeps things interesting.
- Flavor Balance: The sweetness of the jello perfectly complements the richness of the cream. It’s like a harmonious duet where each flavor enhances the other, creating a symphony of taste that dances on your palate.
- Versatility: One of the best things about this pie is its adaptability. Feel free to swap out the strawberry jello for raspberry, peach, or even a tropical flavor like pineapple. You can also mix in different fruits, making it a canvas for your creativity!
- Ease of Preparation: No baking means no fuss! This pie comes together quickly, making it a perfect choice for those busy days when you want to impress without spending hours in the kitchen. Just whip, fold, and chill!
- Universal Appeal: This dessert is a crowd-pleaser, delighting both kids and adults alike. Whether you’re serving it at a family gathering or a casual picnic, it’s sure to bring smiles and happy faces all around.
With its vibrant colors and delightful flavors, this pie is not just a treat for the taste buds but also a feast for the eyes. So, let’s get ready to whip up this delightful dessert that will surely become a favorite in your home!
Essential Tools & Preparation Strategy
Before diving into the delightful world of our Easter No Bake Jello Pie, let’s gather the essential tools that will make your baking experience smooth and enjoyable. Trust me, having the right equipment can turn a good recipe into a great one!
- 9-inch Pie Pan: This is your canvas! A sturdy pie pan is essential for shaping and holding the pie, ensuring it looks as good as it tastes.
- Mixing Bowls: You’ll need a couple of these for combining ingredients efficiently. I recommend using glass or stainless steel for easy mixing and cleaning.
- Electric Mixer: A must-have for achieving that perfect texture in the cream filling. If you don’t have one, a hand mixer will do just fine, but be prepared for a little arm workout!
- Measuring Cups and Spoons: Precision is key in baking. Accurate measurements ensure your pie turns out just right, so don’t skip this step!
- Rubber Spatula: This handy tool is perfect for folding ingredients without deflating your precious whipped cream. It’s a kitchen essential that I can’t live without!
- Whisk: Use this for mixing the jello and ensuring it dissolves completely. A good whisk can make all the difference in achieving a smooth consistency.
Alternative Tools
If you find yourself without an electric mixer, don’t fret! You can use a whisk and some elbow grease to whip the cream. Just be patient, and you’ll get there!
Organizational Tips
To make your cooking process as seamless as possible, consider these tips:
- Pre-measure your ingredients before you start. This not only saves time but also helps you avoid any last-minute scrambling.
- Set up your workspace by clearing off any clutter. A clean kitchen is a happy kitchen!
- Read through the entire recipe before starting. Familiarizing yourself with the steps can prevent any surprises along the way.
With your tools ready and your workspace organized, you’re all set to create a stunning Easter No Bake Jello Pie that will impress your family and friends. Let’s move on to the ingredients that will bring this pie to life!
Ingredients & Their Roles in This Easter No Bake Jello Pie
Every ingredient in our Easter No Bake Jello Pie plays a crucial role in creating the delightful layers of flavor and texture that make this dessert so special. Let’s break down each component and discover how they contribute to this creamy, fruity masterpiece!
Crust
- Graham cracker crumbs: These little gems provide a sweet, crunchy base that perfectly complements the creamy filling. Their subtle honey flavor adds a touch of warmth to the pie.
- Unsalted butter: This ingredient binds the crumbs together and adds richness, ensuring that every bite of the crust is buttery and satisfying.
- Granulated sugar: A sprinkle of sugar enhances the sweetness and flavor of the crust, making it a delightful contrast to the creamy filling.
Filling
- Heavy whipping cream: This is the secret to achieving a light, fluffy texture in the filling. When whipped to stiff peaks, it creates a cloud-like consistency that melts in your mouth.
- Cream cheese: Adding creaminess and a hint of tang, cream cheese is essential for balancing the sweetness of the pie and giving it that rich, decadent flavor.
- Powdered sugar: This sweetener dissolves easily, ensuring a smooth filling without any graininess. It’s the perfect choice for achieving that silky texture.
- Vanilla extract: A splash of vanilla infuses the filling with a warm, aromatic flavor that elevates the overall taste of the pie.
Jello Layer
- Strawberry jello: This vibrant layer provides not only a pop of color but also a fruity flavor that brightens the pie. It’s like a burst of spring in every bite!
- Boiling water: This is crucial for activating the jello powder, ensuring it dissolves completely and sets properly.
- Cold water: Balancing the temperature, cold water helps the jello set without cooking the cream filling beneath it.
- Sliced strawberries: Fresh or frozen, these juicy slices add a delightful texture and enhance the fruity flavor of the jello layer, making each bite even more enjoyable.
Substitutions
If you’re feeling adventurous or want to customize your pie, here are some options for different jello flavors and fruits:
- Swap out the strawberry jello for raspberry, peach, or even blueberry for a unique twist.
- Mix in blueberries, kiwi, or mango slices for added color and flavor.
- For a lighter option, consider using sugar-free jello and a dairy-free cream cheese alternative.
With these ingredients, you’re well on your way to creating a stunning Easter No Bake Jello Pie that will impress everyone at your gathering. Now, let’s move on to the step-by-step guide to bring this delicious dessert to life!
Step-by-Step Guide to Perfect Easter No Bake Jello Pie
Now that we have all our ingredients and tools ready, it’s time to dive into the fun part: making our Easter No Bake Jello Pie! Follow these simple steps, and you’ll have a stunning dessert that’s sure to impress.
- Preheat your oven to 350°F (175°C). This is the perfect temperature for baking our graham cracker crust to a golden perfection.
- Combine graham cracker crumbs, melted butter, and granulated sugar in a bowl. Mix until everything is well combined and resembles wet sand. The aroma of the buttery crumbs will make your mouth water!
- Press the mixture firmly into a 9-inch pie pan, making sure to cover the bottom and sides evenly. Bake for 8-10 minutes until lightly golden. Once done, remove it from the oven and let it cool completely. Trust me, the cooling step is crucial to prevent a melty filling!
- Beat heavy whipping cream in a large bowl until stiff peaks form. This will take about 3-5 minutes with an electric mixer. Set aside, and enjoy the fluffy clouds of cream you’ve just created!
- In another bowl, beat softened cream cheese, powdered sugar, and vanilla extract until smooth and creamy. The mixture should be velvety and free of lumps, with a delightful vanilla aroma wafting through your kitchen.
- Gently fold the whipped cream into the cream cheese mixture until fully combined. Use a rubber spatula to carefully incorporate the two, preserving that light, airy texture. This is where the magic happens!
- Spread the cream filling evenly over the cooled crust. Take your time to make it look beautiful; after all, we eat with our eyes first!
- Dissolve the strawberry jello in boiling water, stirring until fully dissolved. Then, stir in the cold water and let it cool slightly. The vibrant color of the jello is a feast for the eyes!
- Add sliced strawberries to the jello mixture, then carefully pour it over the cream filling. Watch as the jello settles on top, creating a stunning layered effect.
- Refrigerate for at least 4 hours or until set. This is the hardest part—waiting! But trust me, the anticipation will be worth it. Serve chilled and enjoy the delightful reactions from your family and friends!
And there you have it! A step-by-step guide to creating a beautiful Easter No Bake Jello Pie that’s as delicious as it is visually appealing. Now, let’s move on to some chef’s notes and pro tips to ensure your pie turns out flawless!
Chef’s Notes & Pro Tips for Flawless Results
As you embark on your journey to create the perfect Easter No Bake Jello Pie, here are some invaluable tips and tricks that I’ve gathered over the years. These insights will help you achieve a pie that not only looks stunning but tastes absolutely divine!
Make-Ahead Instructions
One of the best things about this pie is that it can be prepared a day in advance. In fact, I highly recommend it! Making the pie ahead of time allows the flavors to meld beautifully and ensures that the jello layer sets perfectly. Just cover it with plastic wrap and store it in the refrigerator overnight. You’ll be the star of your Easter gathering with minimal last-minute stress!
Storage Tips
If you happen to have leftovers (which is rare, but it happens!), keep them in an airtight container in the fridge for up to 3 days. Just be sure to enjoy it chilled, as the flavors are at their best when served cold. I often find myself sneaking a slice for breakfast—don’t judge, it’s fruit, right?
Equipment Recommendations
For ease and efficiency, I recommend using a stand mixer to whip the cream and beat the cream cheese mixture. It saves time and effort, allowing you to multitask while the mixer does the heavy lifting. If you don’t have one, a hand mixer will work just fine, but be prepared for a little workout!
Customization Options
Feel free to get creative with your Easter No Bake Jello Pie! Experiment with different jello flavors like raspberry, peach, or even tropical options like pineapple. You can also mix in various fruits such as blueberries or kiwi for added texture and flavor. The possibilities are endless, and it’s a fun way to make the pie your own!
With these tips in your back pocket, you’re well on your way to creating a flawless Easter No Bake Jello Pie that will leave everyone asking for the recipe. Now, let’s move on to some common mistakes to avoid, ensuring your pie turns out perfect every time!
Avoid These Common Cooking Mistakes
As you embark on your journey to create the perfect Easter No Bake Jello Pie, it’s essential to be aware of some common pitfalls that can turn your delightful creation into a less-than-stellar dessert. Trust me, I’ve learned these lessons the hard way, and I want to save you from the same fate!
- Not allowing the crust to cool completely: This is a crucial step! If you add the filling while the crust is still warm, it can cause the filling to melt and become runny. Always let it cool completely before proceeding to the next layer.
- Overmixing the whipped cream: While it’s tempting to keep mixing for that perfect texture, overmixing can lead to a grainy consistency. Stop mixing as soon as you see stiff peaks form—your cream will thank you!
- Using hot jello: Pouring hot jello over the cream filling can melt it, ruining the beautiful layers you’ve created. Allow the jello to cool slightly before adding it to the pie.
- Not refrigerating long enough: Patience is key! The pie needs adequate time to set properly. Aim for at least 4 hours in the fridge, but overnight is even better for optimal results.
- Using low-fat cream cheese: While it may seem like a healthier option, low-fat cream cheese can affect the creaminess of the filling. Stick to full-fat for the best flavor and texture.
- Skipping the fruit in the jello: The fruit adds not only flavor but also texture and visual appeal. Don’t miss out on this essential component—always include fruit for a balanced taste!
- Not measuring ingredients accurately: Baking is a science, and precise measurements are crucial for achieving the right balance of flavors. Use measuring tools for accuracy to avoid any unbalanced flavors in your pie.
By keeping these common mistakes in mind, you’ll be well on your way to creating a stunning Easter No Bake Jello Pie that will impress everyone at your gathering. Now, let’s explore some creative variations and customizations to make this pie truly your own!
Creative Variations & Customizations
One of the best things about our Easter No Bake Jello Pie is its versatility! You can easily customize it to suit your taste preferences or dietary needs. Here are some fun and creative variations to consider:
- Flavor Swaps: Want to switch things up? Try using raspberry or peach jello instead of strawberry for a different taste experience. Each flavor brings its own unique twist, making it a fun surprise for your guests!
- Fruit Combinations: Don’t stop at strawberries! Mix in some fresh blueberries or slices of kiwi for added color and flavor. The burst of juicy fruit will elevate your pie and make it even more delightful.
- Dairy-Free Option: If you’re looking for a dairy-free alternative, simply substitute the cream cheese with a dairy-free cream cheese option. You can also use coconut cream for the whipped topping, giving it a tropical flair!
- Sugar-Free Version: For those watching their sugar intake, consider using sugar-free jello and a sugar substitute in the filling. This way, you can enjoy the same delicious flavors without the extra calories.
- Seasonal Twists: Embrace the seasons by incorporating seasonal fruits. In the summer, try adding fresh peaches or berries, and in the fall, consider a pumpkin spice jello for a festive twist that’s perfect for autumn gatherings.
With these creative variations, you can make the Easter No Bake Jello Pie your own, ensuring it’s a hit at any occasion. So, don’t be afraid to experiment and have fun in the kitchen!
Perfect Pairings: What to Serve With Easter No Bake Jello Pie
As you prepare to serve your stunning Easter No Bake Jello Pie, consider these delightful pairings that will elevate your dessert experience and impress your guests. Each option complements the pie’s vibrant flavors and adds a unique twist to your spring gathering!
- Dollop of Whipped Cream: A classic choice! Adding a generous dollop of whipped cream not only enhances the richness of the pie but also adds a beautiful visual appeal. The creamy texture melds perfectly with the fruity jello and smooth filling.
- Fresh Fruit Salad: A refreshing contrast to the pie’s sweetness, a colorful fruit salad made with seasonal fruits like berries, melons, and citrus will brighten up your dessert table and provide a light, zesty balance.
- Vanilla Ice Cream: For those who crave a little extra indulgence, serving a scoop of vanilla ice cream alongside the pie elevates the dessert experience. The creamy, cold ice cream pairs beautifully with the fruity jello and creamy filling.
- Light, Fruity White Wine: If you’re looking to add a sophisticated touch, consider serving a light, fruity white wine. A crisp Sauvignon Blanc or a sweet Riesling will complement the pie’s flavors and make for a delightful pairing.
- Lemon Sorbet: This refreshing treat enhances the fruity notes of the pie while providing a palate-cleansing effect. The tartness of the lemon sorbet contrasts beautifully with the sweetness of the jello, making it a perfect match.
- Lemon Pound Cake: For a delightful dessert duo, serve slices of lemon pound cake alongside the pie. The buttery, citrusy cake adds a lovely texture and flavor that harmonizes with the jello pie.
- Herbal Tea: For a relaxing afternoon treat, consider serving a warm cup of herbal tea. Flavors like chamomile or mint will provide a soothing complement to the pie, making it a perfect end to a spring meal.
- Picnic Spread: If you’re taking your pie outdoors, it pairs wonderfully with a light picnic spread. Think finger sandwiches, cheese platters, and other light desserts that will create a festive atmosphere for your gathering.
With these perfect pairings, your Easter No Bake Jello Pie will shine even brighter, creating a memorable dessert experience for you and your loved ones. So, gather your favorite accompaniments and get ready to enjoy a delightful spring celebration!
Storage & Meal Prep Instructions
Once you’ve created your stunning Easter No Bake Jello Pie, you’ll want to ensure it stays fresh and delicious for as long as possible. Here are some essential storage and meal prep tips to help you enjoy this delightful dessert at its best!
Fridge Storage
To keep your pie fresh, store it in an airtight container in the refrigerator. This will help maintain its creamy texture and prevent any unwanted odors from seeping in. The pie can be kept in the fridge for up to 3 days. Just be sure to cover it well to preserve its vibrant colors and flavors!
Freezer Storage
If you want to make your Easter No Bake Jello Pie ahead of time or have leftovers that you can’t finish, freezing is a great option. Here’s how to do it:
- Wrap the pie tightly in plastic wrap, ensuring there are no air pockets. This will help prevent freezer burn.
- For added protection, place the wrapped pie in a freezer-safe container or a resealable freezer bag.
- The pie can be frozen for up to 2 months. Just remember to label it with the date so you can keep track!
When you’re ready to enjoy your frozen pie, simply transfer it to the refrigerator to thaw overnight. This gentle thawing method will help maintain the pie’s texture and flavor.
Reheating Methods
While this pie is best served chilled, if you prefer it at room temperature, here’s how to do it:
- Remove the pie from the refrigerator and let it sit at room temperature for about 30 minutes before serving. This will allow the flavors to bloom and the filling to soften slightly.
- Avoid reheating in the microwave or oven, as this can alter the texture of the jello and cream filling, leading to a less enjoyable experience.
With these storage and meal prep instructions, you can enjoy your Easter No Bake Jello Pie at its best, whether you’re savoring it fresh or saving it for later. Now, let’s dive into the nutrition facts and health insights to round out your dessert experience!
Nutrition Facts & Health Insights
As we indulge in our delightful Easter No Bake Jello Pie, it’s always good to know what we’re putting into our bodies. Here’s a detailed nutrition table that breaks down the key components per serving, so you can enjoy this dessert with a little more awareness:
| Nutrient | Amount per Serving (1 slice, 1/8 of pie) |
|---|---|
| Calories | 320 |
| Sugar | 22 grams |
| Sodium | 150 milligrams |
| Fat | 20 grams |
| Saturated Fat | 10 grams |
| Unsaturated Fat | 8 grams |
| Trans Fat | 0 grams |
| Carbohydrates | 30 grams |
| Fiber | 1 gram |
| Protein | 3 grams |
| Cholesterol | 40 milligrams |
Now, let’s talk about the health benefits of some key ingredients in our pie:
Strawberries
These vibrant berries are not just a pretty face! Strawberries are packed with vitamins, particularly vitamin C, which is essential for a healthy immune system. They are also rich in antioxidants, which help combat oxidative stress in the body. Plus, their natural sweetness means you can enjoy them guilt-free!
Cream Cheese
Cream cheese, while indulgent, does offer some nutritional benefits. It contains calcium, which is vital for strong bones and teeth. Additionally, it provides a source of protein and healthy fats, which can help keep you feeling satisfied. Just remember, moderation is key!
With this nutritional insight, you can enjoy your Easter No Bake Jello Pie knowing that it not only delights your taste buds but also offers some health benefits. So go ahead, indulge a little—after all, it’s all about balance!
Frequently Asked Questions
As you embark on your journey to create the perfect Easter No Bake Jello Pie, you may have some questions along the way. Here are some of the most common inquiries I’ve encountered, along with helpful answers to guide you through the process!
1. Can I use a different type of crust?
Absolutely! While the graham cracker crust is a classic choice, you can experiment with other options. Consider using a chocolate cookie crust for a richer flavor, or a shortbread crust for a buttery twist. Just make sure to adjust the baking time if necessary, depending on the crust you choose!
2. How long can I store leftovers?
If you happen to have any leftovers (which is rare with this delicious pie!), you can store them in an airtight container in the refrigerator for up to 3 days. Just be sure to keep it well-covered to maintain its freshness and flavor!
3. What if my jello doesn’t set properly?
If your jello doesn’t set as expected, it could be due to a few reasons. Make sure you’ve used the correct ratio of water to jello powder. If it’s still too runny, you can try adding a bit more jello powder dissolved in a small amount of hot water to help it firm up. Just be sure to let it cool slightly before pouring it over the cream filling!
4. Can I make this pie gluten-free?
Yes, you can easily make this pie gluten-free! Simply substitute the graham cracker crumbs with a gluten-free alternative, such as gluten-free cookie crumbs or a nut-based crust. Just ensure that all other ingredients, including the jello, are gluten-free as well!
5. How do I prevent the filling from melting?
To prevent the filling from melting, it’s crucial to let the crust cool completely before adding the cream filling. Additionally, ensure that the jello is cooled to room temperature before pouring it over the filling. Finally, refrigerate the pie for at least 4 hours to allow it to set properly!
6. Is it possible to use frozen fruit?
Yes, you can use frozen fruit in your Easter No Bake Jello Pie! Just be sure to thaw and drain any excess liquid from the fruit before adding it to the jello mixture. This will help maintain the texture and prevent the jello from becoming too watery.
7. Can I substitute the heavy cream?
If you’re looking for a lighter option, you can substitute heavy cream with whipped coconut cream for a dairy-free version. Alternatively, you can use half-and-half or light cream, but keep in mind that the texture may not be as fluffy as with heavy cream.
8. What’s the best way to cut the pie for serving?
To achieve clean slices of your Easter No Bake Jello Pie, use a sharp knife that has been dipped in warm water. Wipe the knife clean between cuts to prevent the layers from smudging together. This will help you serve beautiful, picture-perfect slices that are sure to impress!
With these FAQs answered, you’re well-equipped to tackle any challenges that may arise while making your Easter No Bake Jello Pie. Now, let’s dive into some final inspiration and kitchen confidence to wrap up your baking adventure!
Final Inspiration & Kitchen Confidence
As you stand in your kitchen, ready to create your very own Easter No Bake Jello Pie, I want to take a moment to encourage you. Remember, every great chef started somewhere, and the kitchen is a place of joy, creativity, and delicious discoveries. Don’t be afraid to embrace the process, make a few mistakes, and learn along the way. Each step you take brings you closer to a delightful dessert that will not only satisfy your sweet tooth but also create lasting memories with your loved ones.
Celebrating your achievements in the kitchen is just as important as the final dish itself. Whether it’s your first time whipping cream or your hundredth pie, each creation is a testament to your growth and passion for cooking. So, take a moment to appreciate the effort you’ve put in, the flavors you’ve combined, and the love you’ve infused into your pie. Trust me, your family and friends will taste that love in every bite!
Now, I invite you to share your creations with the world! Snap a photo of your stunning Easter No Bake Jello Pie and post it on social media. Tag your friends, family, and fellow food lovers, and let them join in on the festive spirit. Your pie might just inspire someone else to step into the kitchen and create their own masterpiece. So, go ahead, celebrate your culinary journey, and enjoy every delicious moment!
Print
Easter No Bake Jello Pie: Creamy, Juicy Bliss Awaits!
- Total Time: 4 hours 40 minutes
- Yield: 8 servings 1x
- Diet: Vegetarian
Description
Indulge in the vibrant layers of our Easter No Bake Jello Pie, where the creamy texture of the filling meets the refreshing burst of fruity jello. Each bite offers a delightful contrast between the smooth, rich cream and the light, airy jello, making it a perfect treat for spring celebrations.
Ingredients
- Crust:
- 1 ½ cups graham cracker crumbs
- ½ cup unsalted butter, melted
- ¼ cup granulated sugar
- Filling:
- 1 cup heavy whipping cream
- 8 oz cream cheese, softened
- 1 cup powdered sugar
- 1 tsp vanilla extract
- Jello Layer:
- 1 package (3 oz) strawberry jello
- 1 cup boiling water
- 1 cup cold water
- 1 cup sliced strawberries (fresh or frozen)
Instructions
- Preheat your oven to 350°F (175°C).
- In a medium bowl, combine graham cracker crumbs, melted butter, and granulated sugar. Mix until well combined.
- Press the mixture firmly into the bottom and up the sides of a 9-inch pie pan. Bake for 8-10 minutes until lightly golden. Remove and let cool completely.
- In a large mixing bowl, beat the heavy whipping cream until stiff peaks form. Set aside.
- In another bowl, beat the softened cream cheese, powdered sugar, and vanilla extract until smooth and creamy.
- Gently fold the whipped cream into the cream cheese mixture until fully combined.
- Spread the cream filling evenly over the cooled crust.
- In a separate bowl, dissolve the strawberry jello in boiling water, then stir in cold water. Allow to cool slightly.
- Add the sliced strawberries to the jello mixture, then carefully pour it over the cream filling.
- Refrigerate the pie for at least 4 hours or until set. Serve chilled.
Notes
- This pie can be made a day in advance and stored in the refrigerator.
- Store leftovers in an airtight container in the fridge for up to 3 days.
- For a different flavor, substitute the strawberry jello with raspberry or peach jello.
- Prep Time: 30 minutes
- Cook Time: 10 minutes
- Category: desserts
- Method: no-bake
- Cuisine: American
Nutrition
- Serving Size: 1 slice (1/8 of pie)
- Calories: 320
- Sugar: 22 grams
- Sodium: 150 milligrams
- Fat: 20 grams
- Saturated Fat: 10 grams
- Unsaturated Fat: 8 grams
- Trans Fat: 0 grams
- Carbohydrates: 30 grams
- Fiber: 1 gram
- Protein: 3 grams
- Cholesterol: 40 milligrams
Keywords: Easter No Bake Jello Pie, no bake dessert, jello pie, Easter dessert, creamy pie, strawberry jello, spring dessert, easy dessert recipe, festive pie, fruit dessert, no bake recipes, vegetarian dessert, holiday treats


