Sensory-Rich Introduction with Immediate Craving
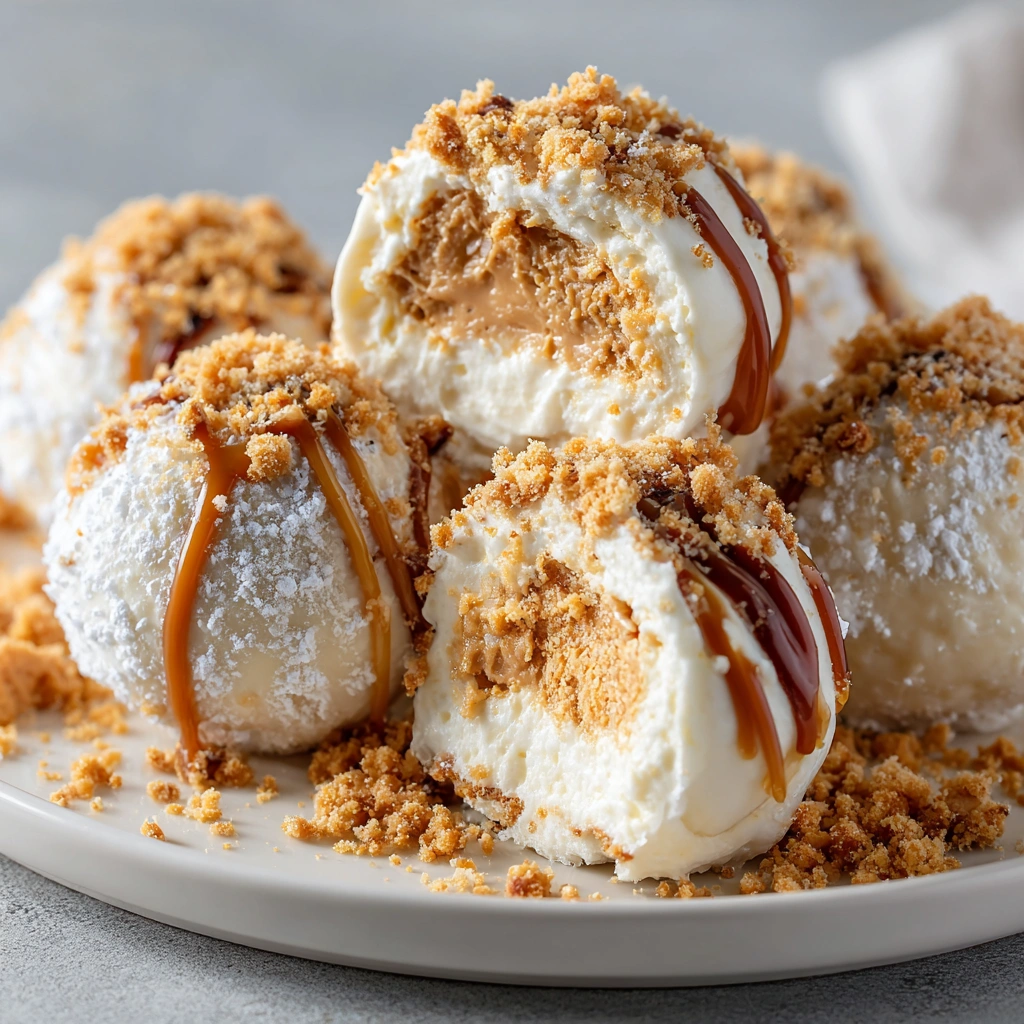
Imagine sinking your teeth into a No-Bake Peanut Butter Cheesecake Ball, where the creamy texture envelops your palate, and the rich, nutty flavor of peanut butter dances joyfully with the sweetness of chocolate. Each bite is a delightful contrast, with the smooth filling giving way to a crunchy graham cracker coating that adds a satisfying crunch. The aroma wafting from the kitchen as these treats chill is enough to make anyone’s mouth water!
I still remember the first time I made these little gems. It was a sunny afternoon, and I was preparing for a family gathering. As I mixed the ingredients, the familiar scent of peanut butter brought back memories of my grandmother’s kitchen, where she would whip up her famous peanut butter cookies. I decided to put a twist on her classic recipe, and the joy on my family’s faces when they took their first bites was priceless. It was a moment of pure happiness, and I knew I had created something special.
These No-Bake Peanut Butter Cheesecake Balls have since become a staple at our family celebrations. Whether it’s a birthday party, a holiday feast, or just a casual get-together, they never fail to impress. They’re the kind of treat that brings people together, sparking laughter and conversation as everyone reaches for just one more. Perfect for any occasion, they also make a sweet surprise for loved ones, showing them just how much you care.
Why You’ll Love This No-Bake Peanut Butter Cheesecake Balls
Let me tell you, these No-Bake Peanut Butter Cheesecake Balls are not just a treat; they are an experience! Here’s why you’ll fall head over heels for them:
- Texture Contrast: The moment you take a bite, you’ll be greeted by the smooth, creamy cheesecake filling that melts in your mouth, perfectly complemented by the crunchy graham cracker coating. It’s a delightful dance of textures that keeps you coming back for more!
- Flavor Balance: The rich nuttiness of peanut butter harmonizes beautifully with the sweetness of chocolate. Each bite is a perfect balance that satisfies your sweet tooth without being overly indulgent. It’s like a warm hug for your taste buds!
- Versatility: One of the best parts? These cheesecake balls are easily customizable! Want to switch things up? You can add a hint of cocoa powder for a chocolatey twist or swap peanut butter for almond butter for a different flavor profile. The possibilities are endless!
- Ease of Preparation: No baking required! This means you can whip them up in no time, making them a quick and simple dessert option for those busy days when you want something sweet without the fuss. Trust me, your kitchen will thank you for the minimal cleanup!
- Universal Appeal: These little bites of joy are loved by both kids and adults alike. They’re perfect for any gathering, whether it’s a birthday party, a holiday celebration, or just a cozy night in. Everyone will be reaching for seconds, and you’ll be the star of the show!
So, whether you’re looking to impress guests or simply treat yourself, these No-Bake Peanut Butter Cheesecake Balls are sure to become a favorite in your dessert repertoire!
Essential Tools & Preparation Strategy
Before we dive into the deliciousness of No-Bake Peanut Butter Cheesecake Balls, let’s talk about the essential tools you’ll need to make this process smooth and enjoyable. Having the right equipment not only makes your life easier but also ensures that your treats turn out perfectly every time!
- Mixing Bowl: A sturdy mixing bowl is essential for combining your ingredients smoothly. I recommend using a glass bowl, as it allows you to monitor the mixture’s consistency easily. Plus, it’s a breeze to clean!
- Cookie Scoop: This handy tool is a game-changer! It ensures uniformity in size for even cooking and presentation. No more guessing how much filling to use—just scoop and roll!
- Parchment Paper: Line your baking sheet with parchment paper to prevent sticking and simplify cleanup when chilling the balls. Trust me, your future self will thank you for this little step!
- Microwave-Safe Bowl: Melting chocolate can be tricky, but a microwave-safe bowl (glass or silicone) is essential for achieving that smooth, velvety texture without burning. Just remember to stir in between heating!
- Whisk or Electric Mixer: For achieving a creamy, well-blended filling, a whisk works fine, but an electric mixer saves time and effort. Plus, it gives you that perfectly smooth texture we all crave!
- Refrigerator: This is critical for chilling the balls to achieve the right texture before coating. Patience is key here; a little chill time goes a long way in ensuring your treats hold their shape.
- Measuring Cups and Spoons: Precision is vital in baking and dessert-making. Use measuring cups and spoons to ensure you maintain the perfect balance of flavors. A little too much or too little can change everything!
With these tools at your disposal, you’re well on your way to creating the most delightful No-Bake Peanut Butter Cheesecake Balls. Let’s get ready to whip up some magic in the kitchen!
Ingredients & Their Roles in This No-Bake Peanut Butter Cheesecake Balls
Understanding the ingredients in your No-Bake Peanut Butter Cheesecake Balls is key to mastering this delightful treat. Each component plays a vital role in creating that perfect balance of flavor and texture. Let’s break it down!
For the Cheesecake Filling:
- Cream Cheese: This is the star of the show! It provides the creamy base and richness that makes the filling so indulgent. Make sure it’s softened to room temperature for easy mixing—trust me, you don’t want lumps in your cheesecake!
- Creamy Peanut Butter: The heart and soul of this recipe! It adds a rich, nutty flavor and a smooth texture that pairs beautifully with the cream cheese. Whether you choose classic or natural peanut butter, it’s sure to be delicious!
- Powdered Sugar: This sweetener not only sweetens the filling but also helps achieve that silky smooth consistency we all crave. It dissolves easily, ensuring a lump-free mixture that’s a joy to eat.
- Vanilla Extract: A splash of vanilla enhances the overall flavor profile, adding depth and warmth to the filling. It’s like a secret ingredient that elevates the taste to a whole new level!
For the Coating:
- Graham Cracker Crumbs: These little crumbs add a delightful crunch and a classic cheesecake flavor that’s simply irresistible. They provide that familiar taste of a traditional cheesecake crust, making each bite feel like a nostalgic treat.
- Semi-Sweet Chocolate Chips: The rich chocolate coating is what takes these cheesecake balls over the top! It adds a layer of sweetness and a touch of decadence that perfectly complements the peanut butter filling.
- Coconut Oil: This ingredient is essential for melting the chocolate smoothly. It helps create a glossy finish and adds a subtle flavor that enhances the overall experience. Plus, it keeps the chocolate from hardening too quickly!
Substitutions:
If you’re looking to customize your No-Bake Peanut Butter Cheesecake Balls, here are a couple of great substitutions:
- Almond Butter: Swap out peanut butter for almond butter for a different flavor profile that’s equally delicious.
- Dairy-Free Cream Cheese: For a vegan option, use dairy-free cream cheese to keep the creamy texture while accommodating dietary preferences.
With these ingredients, you’re well on your way to creating a batch of No-Bake Peanut Butter Cheesecake Balls that will impress everyone. Let’s keep the momentum going and dive into the next steps!
Step-by-Step Guide to Perfect No-Bake Peanut Butter Cheesecake Balls
Now that you’re ready to dive into the delightful world of No-Bake Peanut Butter Cheesecake Balls, let’s break down the process step-by-step. Trust me, this is where the magic happens! Each step is designed to ensure that your cheesecake balls turn out perfectly creamy and delicious.
- Mix the Filling: In a mixing bowl, combine 8 oz of softened cream cheese, 1/2 cup of creamy peanut butter, 1/4 cup of powdered sugar, and 1 tsp of vanilla extract. Beat the mixture until it’s smooth and creamy, which should take about 2-3 minutes. The aroma of peanut butter will fill your kitchen, making it hard to resist tasting!
- Form the Balls: Using a cookie scoop, portion out the mixture and roll it into balls, about 1 inch in diameter. This is where you can get a little messy, but that’s part of the fun! Don’t worry if they aren’t perfect; they’ll still taste amazing.
- Chill the Balls: Place the balls on a parchment-lined baking sheet and refrigerate for at least 30 minutes to firm up. This step is crucial; it helps the balls hold their shape when you coat them in chocolate.
- Melt the Chocolate: While the balls are chilling, melt 1/2 cup of semi-sweet chocolate chips and 1 tbsp of coconut oil together in a microwave-safe bowl. Heat in 30-second intervals, stirring until smooth. The rich, sweet aroma of melting chocolate will have you dreaming of dessert!
- Coat the Balls: Once the cheesecake balls are firm, dip each one into the melted chocolate, allowing the excess to drip off. This is where they transform into decadent treats!
- Roll in Graham Cracker Crumbs: After coating in chocolate, roll the balls in 1 cup of graham cracker crumbs until fully coated. This adds a delightful crunch that contrasts beautifully with the creamy filling.
- Final Chill: Return the coated balls to the baking sheet and refrigerate for another 15-20 minutes to set the chocolate. The anticipation will build as you wait for these beauties to be ready!
- Serve and Enjoy: Once set, serve chilled and enjoy the delightful combination of flavors and textures. Each bite is a little piece of heaven!
And there you have it! A simple yet satisfying process that results in a treat everyone will love. Remember, the key to success is in the chilling and the chocolate coating, so don’t skip those steps!
Chef’s Notes & Pro Tips for Flawless Results
As you embark on your journey to create these delightful No-Bake Peanut Butter Cheesecake Balls, I want to share some of my favorite tips and tricks to ensure your treats turn out perfectly every time. Trust me, these little nuggets of wisdom can make all the difference!
- Make-Ahead Instructions: If you’re planning for a gathering or just want to save time, prepare and refrigerate the balls a day in advance. This not only enhances the flavors but also allows you to enjoy the process without the last-minute rush!
- Storage: These cheesecake balls are great for meal prep! Keep them in the refrigerator for up to 5 days for a quick sweet treat. If you want to store them longer, freeze them in an airtight container for up to 3 months. Just remember to let them thaw in the fridge before serving!
- Equipment Recommendations: While melting chocolate in the microwave is convenient, consider using a double boiler if you prefer a more controlled melting process. This method helps prevent the chocolate from seizing and gives you that silky smooth finish we all love.
- Customization Options: Don’t be afraid to get creative! Add crushed nuts or colorful sprinkles to the coating for added texture and visual appeal. You can even experiment with different flavored extracts, like almond or hazelnut, to give your cheesecake balls a unique twist!
With these tips in your back pocket, you’re well-equipped to create No-Bake Peanut Butter Cheesecake Balls that will impress everyone. Happy cooking!
Avoid These Common Cooking Mistakes
Even the most seasoned cooks can run into a few hiccups when making No-Bake Peanut Butter Cheesecake Balls. To help you navigate the kitchen with confidence, I’ve compiled a list of common mistakes to avoid. Trust me, steering clear of these pitfalls will ensure your treats turn out perfectly every time!
- Not Softening the Cream Cheese: This is a biggie! If you skip this step, you’ll end up with a lumpy filling that’s less than appealing. Always let your cream cheese sit at room temperature for at least 30 minutes before mixing. This simple step makes all the difference in achieving that smooth, creamy texture we all crave.
- Overmixing the Filling: While it’s tempting to whip that filling into a frenzy, overmixing can lead to a dense texture that’s not as enjoyable. Mix just until combined—think of it as a gentle embrace rather than a vigorous workout!
- Skipping the Chilling Step: Patience is key! If you skip chilling the balls, you might end up with a gooey mess when it’s time to coat them in chocolate. Refrigerate for at least 30 minutes to ensure they hold their shape beautifully.
- Using Too Much Chocolate: While chocolate is delicious, using too much can overpower the delightful peanut butter flavor. A light coating is all you need to enhance the experience without drowning out the star of the show!
- Not Allowing the Chocolate to Set: After coating, it’s crucial to refrigerate the balls again to let the chocolate set. Skipping this step can lead to a messy presentation, and nobody wants that! A quick chill of 15-20 minutes will do the trick.
- Using Stale Graham Crackers: Freshness matters! Stale graham crackers can affect both the flavor and texture of your coating. Always use fresh ingredients to ensure your cheesecake balls taste as delightful as they look.
- Not Measuring Ingredients Accurately: Precision is key in baking and dessert-making. Not measuring ingredients accurately can alter the balance of flavors, leading to disappointing results. Use measuring cups and spoons for the best outcome—your taste buds will thank you!
By keeping these common mistakes in mind, you’ll be well on your way to creating No-Bake Peanut Butter Cheesecake Balls that are not only delicious but also visually stunning. Happy baking!
Creative Variations & Customizations
One of the best things about No-Bake Peanut Butter Cheesecake Balls is their versatility! You can easily customize them to suit your taste preferences or dietary needs. Here are some creative variations to inspire your next batch:
- Chocolate Peanut Butter: For a rich chocolate twist, simply add 2 tablespoons of cocoa powder to the filling. This will give your cheesecake balls a decadent chocolate flavor that pairs beautifully with the peanut butter. Just imagine the delightful combination of chocolate and peanut butter melting in your mouth!
- Nut-Free Version: If you need a nut-free alternative, substitute sunflower seed butter for the peanut butter. This option is perfect for those with nut allergies and still delivers a creamy, delicious filling that everyone can enjoy.
- Seasonal Flavors: Embrace the flavors of the season by incorporating 1 teaspoon of pumpkin spice into the filling for a fall-inspired treat. This warm spice blend adds a cozy touch that’s perfect for autumn gatherings or holiday celebrations.
- Fruit-Infused: For a refreshing twist, add 1/2 cup of crushed berries</strong (like strawberries or raspberries) to the filling. This not only adds a burst of fruity flavor but also gives your cheesecake balls a beautiful pop of color. It’s a delightful way to enjoy a taste of summer all year round!
- Dairy-Free Option: If you’re looking for a vegan treat, simply use dairy-free cream cheese and dairy-free chocolate for the coating. This way, you can enjoy the same creamy texture and rich flavor while accommodating dietary preferences.
With these creative variations, you can make No-Bake Peanut Butter Cheesecake Balls that are uniquely yours. Don’t hesitate to experiment and find your favorite combination—after all, the kitchen is your playground!
Perfect Pairings: What to Serve With No-Bake Peanut Butter Cheesecake Balls
When it comes to enjoying your No-Bake Peanut Butter Cheesecake Balls, the right accompaniments can elevate the experience to new heights. Here are some delightful pairings that will complement the rich, creamy flavors of these treats:
- Fresh Strawberries: The natural acidity of fresh strawberries beautifully balances the richness of the cheesecake balls. Their vibrant color and juicy texture make for a refreshing contrast that’s simply irresistible!
- Cold Milk: You can’t go wrong with a classic! A glass of cold milk complements the sweetness of the dessert, making each bite even more enjoyable. It’s a nostalgic pairing that brings back childhood memories.
- Vanilla Ice Cream: For those looking to indulge, serving your cheesecake balls alongside a scoop of creamy vanilla ice cream adds an extra layer of decadence. The combination of warm and cold is a delightful treat for the senses!
- Crushed Peanuts: Sprinkle some crushed peanuts on top of your cheesecake balls for an added crunch and flavor boost. This simple garnish not only enhances the presentation but also ties in beautifully with the peanut butter flavor.
- Dessert Platter: Create a stunning dessert platter by including assorted fruits and chocolates alongside your cheesecake balls. This variety not only looks impressive but also allows guests to mix and match flavors for a fun tasting experience.
- Coffee or Espresso: For a delightful after-dinner pairing, serve your cheesecake balls with a cup of coffee or espresso. The rich, bold flavors of the coffee enhance the sweetness of the dessert, making for a sophisticated finish to any meal.
- Chocolate Sauce Drizzle: For those who crave a little extra indulgence, a drizzle of warm chocolate sauce over your cheesecake balls adds a touch of elegance and visual appeal. It’s a simple way to elevate your presentation and satisfy any chocolate lover’s cravings!
- Lunchbox Treats: These cheesecake balls make for a perfect addition to kids’ lunchboxes, providing a sweet surprise that’s sure to bring smiles. They’re easy to pack and a delightful treat for any midday snack!
With these perfect pairings, your No-Bake Peanut Butter Cheesecake Balls will shine even brighter. Whether you’re hosting a gathering or simply enjoying a quiet evening at home, these accompaniments will enhance your dessert experience and leave everyone wanting more!
Storage & Meal Prep Instructions
Now that you’ve created your delicious No-Bake Peanut Butter Cheesecake Balls, let’s talk about how to store them properly so you can enjoy these treats for days to come. With the right storage methods, you can keep them fresh and ready to satisfy your sweet cravings!
- Refrigeration: Store your cheesecake balls in an airtight container in the fridge for up to 5 days. This keeps them fresh and maintains their creamy texture. Just be sure to separate layers with parchment paper to prevent sticking!
- Freezing: If you want to enjoy these treats later, freeze them in a single layer on a baking sheet. Once they’re frozen solid, transfer them to an airtight container or freezer bag for up to 3 months. This way, you can have a sweet treat ready whenever the craving strikes!
- Reheating: There’s no need to reheat these cheesecake balls; they’re best served chilled. However, if you prefer them a bit softer, you can leave them at room temperature for a few minutes before serving. This will enhance the creamy texture and make them even more delightful!
With these simple storage and meal prep instructions, you can enjoy your No-Bake Peanut Butter Cheesecake Balls whenever the mood strikes. Whether you’re treating yourself or sharing with friends, these little bites of joy are sure to impress!
Nutrition Facts & Health Insights
When indulging in No-Bake Peanut Butter Cheesecake Balls, it’s always good to know what you’re treating yourself to! Here’s a detailed look at the nutrition facts and some health insights that make these delightful treats not just delicious but also a bit nutritious.
| Nutrient | Amount per Serving (1 cheesecake ball) |
|---|---|
| Calories | 120 |
| Sugar | 5 grams |
| Sodium | 50 milligrams |
| Fat | 8 grams |
| Saturated Fat | 3 grams |
| Unsaturated Fat | 4 grams |
| Trans Fat | 0 grams |
| Carbohydrates | 10 grams |
| Fiber | 1 gram |
| Protein | 3 grams |
| Cholesterol | 15 milligrams |
These No-Bake Peanut Butter Cheesecake Balls not only satisfy your sweet tooth but also offer some health benefits:
- Peanut Butter: A great source of protein and healthy fats, peanut butter helps keep you feeling full and satisfied. It’s also packed with vitamins and minerals, making it a nutritious addition to your diet.
- Cream Cheese: This creamy ingredient adds a dose of calcium, which is essential for strong bones and teeth. Plus, it contributes to the rich texture that makes these cheesecake balls so irresistible!
So, while you enjoy these delightful treats, you can feel good knowing they offer a bit of nutrition along with the indulgence. Just remember, moderation is key, and these little bites of joy are perfect for satisfying your cravings without overdoing it!
Frequently Asked Questions
As you embark on your journey to create the perfect No-Bake Peanut Butter Cheesecake Balls, you might have a few questions along the way. Don’t worry; I’ve got you covered! Here are some of the most frequently asked questions, along with helpful answers to guide you through the process.
- Can I use crunchy peanut butter?Absolutely! Using crunchy peanut butter will add a delightful texture to your cheesecake balls. Just keep in mind that the crunchiness may alter the smoothness of the filling slightly, but it will still be delicious!
- How long do these last in the fridge?Your No-Bake Peanut Butter Cheesecake Balls can last in the fridge for up to 5 days when stored in an airtight container. Just make sure to separate layers with parchment paper to prevent sticking!
- Can I make these vegan?Yes, you can! To make these cheesecake balls vegan, simply substitute the cream cheese with a dairy-free cream cheese alternative and use dairy-free chocolate for the coating. They’ll still be just as creamy and delicious!
- What can I substitute for graham cracker crumbs?If you don’t have graham cracker crumbs on hand, you can use crushed digestive biscuits, vanilla wafers, or even crushed pretzels for a salty-sweet twist. Each option will give a unique flavor and texture!
- How do I prevent the chocolate from seizing?To prevent chocolate from seizing, make sure to melt it slowly in a microwave-safe bowl, heating in 30-second intervals and stirring in between. Adding a little coconut oil, as the recipe suggests, also helps keep the chocolate smooth and glossy.
- Can I add protein powder to the filling?Yes, you can! Adding a scoop of protein powder to the filling is a great way to boost the nutritional value. Just be mindful of the flavor; vanilla or chocolate protein powder works best to complement the peanut butter.
- What if my mixture is too soft?If your mixture is too soft to form into balls, try chilling it in the refrigerator for an additional 15-20 minutes. If it’s still too soft, you can add a bit more powdered sugar or graham cracker crumbs to help firm it up.
- Can I use a different type of chocolate?Definitely! While semi-sweet chocolate is a classic choice, you can use dark chocolate for a richer flavor or milk chocolate for a sweeter treat. Just keep in mind that the flavor profile will change slightly with each type!
- How do I know when the chocolate is melted properly?The chocolate is melted properly when it’s smooth and glossy, with no lumps remaining. Stir it well after each heating interval to ensure even melting. If it looks shiny and flows easily, you’re good to go!
- Can I double the recipe?Absolutely! Doubling the recipe is a great idea if you’re preparing for a larger gathering. Just make sure to use a larger mixing bowl and baking sheet to accommodate the increased volume. Enjoy sharing these treats!
With these FAQs answered, you’re well-equipped to tackle any challenges that may arise while making your No-Bake Peanut Butter Cheesecake Balls. Happy cooking!
Final Inspiration & Kitchen Confidence
As you stand in your kitchen, ready to whip up a batch of No-Bake Peanut Butter Cheesecake Balls, I want to take a moment to celebrate the joy of creating something delicious. There’s a unique magic that happens when you combine simple ingredients and transform them into a delightful treat that brings smiles to faces. Trust me, the satisfaction of seeing your loved ones enjoy your creations is worth every minute spent in the kitchen!
Remember, you have the culinary skills to make these treats shine! Whether you’re a seasoned pro or just starting your cooking journey, these cheesecake balls are forgiving and fun to make. Embrace the process, and don’t be afraid to let your personality shine through in your creations. Your friends and family will be impressed not just by the taste but by the love and effort you put into making them!
So, go ahead and dive into this delicious adventure! Once you’ve made your No-Bake Peanut Butter Cheesecake Balls, I encourage you to share your creations on social media. Snap a picture, tag your friends, and inspire others to indulge in these delightful treats. Let’s spread the joy of cooking and create a community of dessert lovers together!
Print
No-Bake Peanut Butter Cheesecake Balls: Irresistibly Creamy Treats!
- Total Time: 50 minutes
- Yield: 24 balls 1x
- Diet: Vegetarian
Description
Indulge in these No-Bake Peanut Butter Cheesecake Balls, where the creamy texture of the cheesecake melds perfectly with the rich, nutty flavor of peanut butter. Each bite offers a delightful contrast between the smooth filling and the crunchy coating, making them an irresistible treat for any occasion.
Ingredients
- For the Cheesecake Filling:
- 8 oz cream cheese, softened
- 1/2 cup creamy peanut butter
- 1/4 cup powdered sugar
- 1 tsp vanilla extract
- For the Coating:
- 1 cup graham cracker crumbs
- 1/2 cup semi-sweet chocolate chips
- 1 tbsp coconut oil
Instructions
- In a mixing bowl, combine the softened cream cheese, peanut butter, powdered sugar, and vanilla extract. Beat until smooth and creamy, about 2-3 minutes.
- Using a cookie scoop, portion out the mixture and roll into balls, about 1 inch in diameter.
- Place the balls on a parchment-lined baking sheet and refrigerate for at least 30 minutes to firm up.
- While the balls are chilling, melt the chocolate chips and coconut oil together in a microwave-safe bowl in 30-second intervals, stirring until smooth.
- Once the cheesecake balls are firm, dip each one into the melted chocolate, allowing excess to drip off.
- Roll the chocolate-coated balls in graham cracker crumbs until fully coated.
- Return the coated balls to the baking sheet and refrigerate for another 15-20 minutes to set the chocolate.
- Serve chilled and enjoy!
Notes
- These cheesecake balls can be made ahead of time and stored in the refrigerator for up to 5 days.
- For longer storage, freeze the balls in an airtight container for up to 3 months.
- Substitute almond butter for peanut butter for a different flavor profile.
- Prep Time: 20 minutes
- Cook Time: 0 minutes
- Category: desserts
- Method: no-bake
- Cuisine: American
Nutrition
- Serving Size: 1 cheesecake ball
- Calories: 120
- Sugar: 5 grams
- Sodium: 50 milligrams
- Fat: 8 grams
- Saturated Fat: 3 grams
- Unsaturated Fat: 4 grams
- Trans Fat: 0 grams
- Carbohydrates: 10 grams
- Fiber: 1 gram
- Protein: 3 grams
- Cholesterol: 15 milligrams
Keywords: No-Bake Peanut Butter Cheesecake Balls, peanut butter dessert, no-bake treats, cheesecake balls, easy dessert recipes, creamy peanut butter snacks, chocolate-coated cheesecake, quick dessert ideas, vegetarian desserts, party treats, kid-friendly snacks, make-ahead desserts, no-bake cheesecake recipes


