Oreo Mousse Brownie Layer Dessert: Indulge in Creamy Bliss!
Sensory-Rich Introduction with Immediate Craving
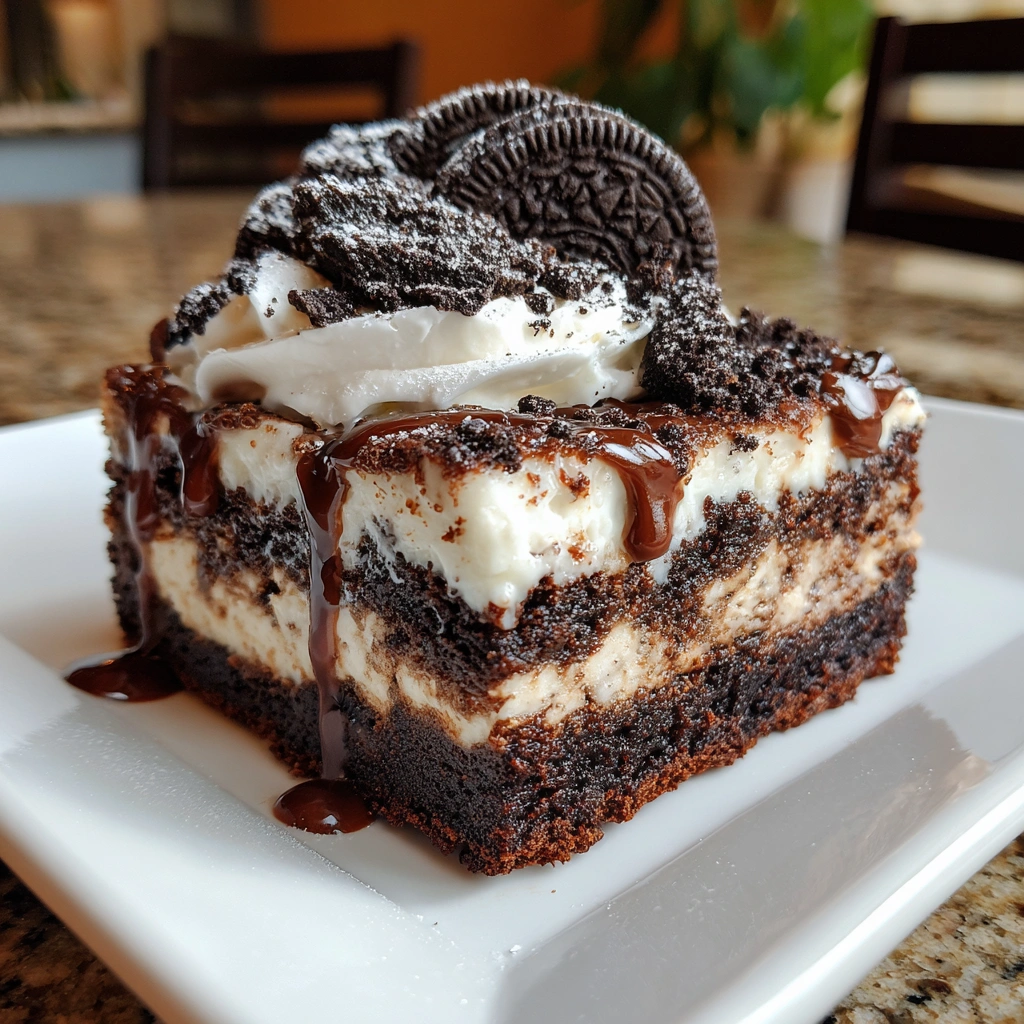
Imagine sinking your fork into a luscious layer of rich, fudgy brownie, only to be met with a cloud of airy Oreo mousse that melts in your mouth. The combination of textures—dense chocolate contrasted with creamy lightness—creates an irresistible dessert experience. This Oreo Mousse Brownie Layer Dessert is not just a treat; it’s a celebration of flavors and textures that brings back memories of childhood indulgences and family gatherings. Whether it’s a birthday party, a holiday feast, or simply a cozy night in, this dessert is perfect for any occasion that calls for a touch of sweetness and a lot of love.
Why You’ll Love This Oreo Mousse Brownie Layer Dessert
- Texture Contrast: The fudgy brownie base provides a rich, chewy foundation, while the Oreo mousse adds a light, fluffy layer that creates a delightful mouthfeel.
- Flavor Balance: The deep chocolate flavor of the brownies harmonizes beautifully with the sweet, creamy notes of the mousse, enhanced by the crunch of Oreo cookie pieces.
- Versatility: This dessert can be served at various occasions, from casual family dinners to elegant parties, making it a versatile addition to your dessert repertoire.
- Ease of Preparation: With straightforward steps and minimal equipment, this recipe is accessible for bakers of all skill levels, ensuring a stress-free baking experience.
- Universal Appeal: Chocolate lovers and Oreo fans alike will find it hard to resist this decadent dessert, making it a crowd-pleaser for all ages.
Essential Tools & Preparation Strategy
- Mixing Bowls: Essential for combining ingredients without spilling; opt for glass or stainless steel for durability.
- Whisk: Necessary for achieving a smooth brownie batter and whipped cream; a balloon whisk works best for aerating.
- Spatula: Ideal for gently folding ingredients to maintain airiness in the mousse; a silicone spatula is recommended for scraping bowls clean.
- 9×13 inch Baking Pan: Perfect size for baking the brownie layer evenly; consider using a non-stick version for easy release.
- Electric Mixer: Speeds up the process of whipping cream and mixing batter; a hand mixer is sufficient for this recipe.
- Measuring Cups and Spoons: Ensures accurate ingredient quantities for best results; use dry measuring cups for solids and liquid measuring cups for liquids.
- Parchment Paper: Optional, but lining the baking pan can help with easy removal of the brownies.
- Cooling Rack: Useful for allowing brownies to cool evenly and quickly, preventing sogginess.
Ingredients & Their Roles in This Oreo Mousse Brownie Layer Dessert
Brownie Layer
- Unsalted Butter: Provides richness and moisture to the brownies.
- Granulated Sugar: Sweetens the brownies and contributes to their fudgy texture.
- Eggs: Bind the ingredients together and add structure.
- Vanilla Extract: Enhances the overall flavor profile.
- All-Purpose Flour: Provides structure; can be substituted with gluten-free flour for a gluten-free version.
- Unsweetened Cocoa Powder: Delivers deep chocolate flavor; ensure it’s high-quality for best results.
- Salt: Balances sweetness and enhances flavor.
Oreo Mousse
- Heavy Whipping Cream: Creates a light and airy texture; must be whipped to stiff peaks.
- Powdered Sugar: Sweetens the mousse and helps stabilize the whipped cream.
- Vanilla Extract: Adds depth to the mousse flavor.
- Crushed Oreo Cookies: Provides flavor and texture; can be adjusted based on preference for crunch.
- Cream Cheese: Adds creaminess and richness; ensure it’s softened for easy mixing.
Step-by-Step Guide to Perfect Oreo Mousse Brownie Layer Dessert
- Preheat Oven: Set your oven to 350°F (175°C) to prepare for baking.
- Mix Wet Ingredients: In a large bowl, combine melted butter and granulated sugar until well blended.
- Incorporate Eggs: Add eggs one at a time, mixing thoroughly after each addition, then stir in vanilla extract.
- Combine Dry Ingredients: In a separate bowl, whisk together flour, cocoa powder, and salt.
- Combine Mixtures: Gradually add the dry ingredients to the wet mixture, stirring until just combined to avoid overmixing.
- Bake Brownies: Pour the brownie batter into a greased 9×13 inch baking pan, spreading evenly. Bake for 25-30 minutes, or until a toothpick inserted in the center comes out with a few moist crumbs.
- Cool Completely: Allow the brownies to cool completely in the pan before adding the mousse layer.
- Prepare Mousse: In a large mixing bowl, beat cream cheese until smooth, then add powdered sugar and vanilla extract, mixing until combined. In another bowl, whip heavy cream to stiff peaks and gently fold it into the cream cheese mixture. Finally, fold in crushed Oreo cookies.
- Assemble Dessert: Spread the Oreo mousse over the cooled brownie layer and refrigerate for at least 4 hours or until set.
Chef’s Notes & Pro Tips for Flawless Results
- Make-Ahead Instructions: This dessert can be prepared a day in advance, allowing flavors to meld beautifully.
- Storage: Store leftovers in an airtight container in the fridge for up to 3 days to maintain freshness.
- Equipment Recommendations: A stand mixer can make whipping cream easier, but a hand mixer works just as well.
- Customization Options: Feel free to add different flavors to the mousse, such as mint extract or peanut butter, for a unique twist.
Avoid These Common Cooking Mistakes
- Overmixing the Brownie Batter: Can lead to tough brownies; mix until just combined.
- Not Cooling Brownies Completely: Can cause the mousse to melt; patience is key.
- Using Cold Cream Cheese: Results in lumps; ensure it’s at room temperature before mixing.
- Not Whipping Cream to Stiff Peaks: Leads to a runny mousse; watch for peaks that hold their shape.
- Skipping Refrigeration: Results in a mousse that doesn’t set properly; allow adequate chilling time.
- Using Too Much Cocoa Powder: Can make brownies bitter; measure accurately.
- Not Crushing Oreos Finely Enough: Leads to uneven distribution in the mousse; aim for small, even pieces.
Creative Variations & Customizations
- Gluten-Free Version: Use gluten-free brownie mix and gluten-free Oreos for a gluten-free dessert.
- Mint Oreo Mousse: Substitute regular Oreos with mint-flavored Oreos for a refreshing twist.
- Peanut Butter Swirl: Add a layer of peanut butter mousse between the brownie and Oreo mousse layers.
- Seasonal Flavors: Incorporate pumpkin spice or peppermint extract during the holidays for a festive touch.
- Fruit Additions: Layer in fresh raspberries or strawberries for a fruity contrast to the rich chocolate.
Perfect Pairings: What to Serve With Oreo Mousse Brownie Layer Dessert
- Chocolate Sauce: A drizzle adds extra indulgence and enhances the chocolate flavor.
- Fresh Berries: Their tartness provides a refreshing contrast to the rich dessert.
- Whipped Cream: Topping with whipped cream adds lightness and extra creaminess.
- Vanilla Ice Cream: A classic pairing that complements the chocolate and Oreo flavors.
- Coffee or Espresso: Balances the sweetness and enhances the chocolate notes.
- Mint Leaves: Garnishing with mint adds a pop of color and freshness.
- Caramel Sauce: For those who enjoy a sweet twist, a side of caramel sauce is delightful.
- Glass of Milk: A nostalgic pairing that enhances the Oreo experience.
Storage & Meal Prep Instructions
- Refrigeration: Store the dessert in the fridge for up to 3 days in an airtight container.
- Freezing: For longer storage, freeze individual slices wrapped in plastic wrap and foil for up to 2 months. Thaw in the fridge before serving.
- Reheating: This dessert is best served chilled; avoid reheating to maintain texture.
Nutrition Facts & Health Insights
| Nutrient | Amount per Serving (1 slice) |
|---|---|
| Calories | 350 |
| Sugar | 25 grams |
| Sodium | 150 milligrams |
| Fat | 22 grams |
| Saturated Fat | 12 grams |
| Unsaturated Fat | 8 grams |
| Trans Fat | 0 grams |
| Carbohydrates | 40 grams |
| Fiber | 2 grams |
| Protein | 4 grams |
| Cholesterol | 60 milligrams |
Health Insights: While this dessert is indulgent, it contains ingredients like cream cheese and heavy cream that provide calcium and protein. Enjoy in moderation as part of a balanced diet.
Frequently Asked Questions
- Can I use a different type of cookie for the mousse?
Yes, feel free to experiment with different cookies like chocolate chip or peanut butter. - How long can I store the dessert?
It can be stored in the fridge for up to 3 days or frozen for up to 2 months. - Can I make this dessert vegan?
Substitute eggs with flax eggs, use vegan butter, and opt for dairy-free cream cheese and whipped cream alternatives. - What if my mousse doesn’t set?
Ensure you whipped the cream to stiff peaks and allowed adequate chilling time. - Can I add nuts to the brownie layer?
Absolutely! Chopped walnuts or pecans can add a delightful crunch. - Is it necessary to refrigerate the mousse?
Yes, refrigeration is crucial for the mousse to set properly. - Can I double the recipe?
Yes, simply use a larger baking pan and adjust baking time as needed. - What’s the best way to crush Oreos?
Use a food processor for fine crumbs or place them in a zip-top bag and crush with a rolling pin.
Final Inspiration & Kitchen Confidence
As you embark on creating this Oreo Mousse Brownie Layer Dessert, remember that baking is not just about following a recipe; it’s about expressing creativity and sharing joy with others. Celebrate your achievements in the kitchen, and don’t hesitate to make this dessert your own. Whether you’re impressing guests or treating yourself, this indulgent dessert is sure to bring smiles and satisfaction. So gather your ingredients, roll up your sleeves, and dive into the delicious world of baking—your sweet masterpiece awaits!
Print
Oreo Mousse Brownie Layer Dessert: Indulge in Creamy Bliss!
- Total Time: 4 hours 30 minutes
- Yield: 12 servings 1x
- Diet: Vegetarian
Description
This Oreo Mousse Brownie Layer Dessert is a decadent treat that combines rich, fudgy brownies with a light and airy Oreo mousse. Each bite offers a delightful contrast of textures, from the dense chocolate base to the creamy, dreamy mousse, all enhanced by the crunch of Oreo cookie pieces.
Ingredients
- Brownie Layer:
- 1 cup unsalted butter, melted
- 2 cups granulated sugar
- 4 large eggs
- 1 teaspoon vanilla extract
- 1 cup all-purpose flour
- 1 cup unsweetened cocoa powder
- 1/2 teaspoon salt
- Oreo Mousse:
- 2 cups heavy whipping cream
- 1 cup powdered sugar
- 1 teaspoon vanilla extract
- 1 cup crushed Oreo cookies
- 1 package (8 oz) cream cheese, softened
Instructions
- Preheat your oven to 350°F (175°C).
- In a large bowl, mix melted butter and sugar until well combined.
- Add eggs one at a time, mixing well after each addition, then stir in vanilla extract.
- In a separate bowl, whisk together flour, cocoa powder, and salt.
- Gradually add the dry ingredients to the wet mixture, stirring until just combined.
- Pour the brownie batter into a greased 9×13 inch baking pan and spread evenly.
- Bake for 25-30 minutes, or until a toothpick inserted in the center comes out with a few moist crumbs.
- Allow the brownies to cool completely in the pan.
- In a large mixing bowl, beat the cream cheese until smooth, then add powdered sugar and vanilla extract, mixing until combined.
- In another bowl, whip the heavy cream until stiff peaks form, then gently fold it into the cream cheese mixture.
- Fold in the crushed Oreo cookies until evenly distributed.
- Spread the Oreo mousse over the cooled brownie layer and refrigerate for at least 4 hours or until set.
Notes
- This dessert can be made a day in advance and stored in the refrigerator.
- Store leftovers in an airtight container in the fridge for up to 3 days.
- For a gluten-free version, use gluten-free brownie mix and gluten-free Oreos.
- Prep Time: 30 minutes
- Cook Time: 30 minutes
- Category: dessert
- Method: baking
- Cuisine: American
Nutrition
- Serving Size: 1 slice (1/12 of the dessert)
- Calories: 350
- Sugar: 25 grams
- Sodium: 150 milligrams
- Fat: 22 grams
- Saturated Fat: 12 grams
- Unsaturated Fat: 8 grams
- Trans Fat: 0 grams
- Carbohydrates: 40 grams
- Fiber: 2 grams
- Protein: 4 grams
- Cholesterol: 60 milligrams
Keywords: Oreo Mousse Brownie Layer Dessert, brownie dessert, Oreo dessert, mousse dessert, chocolate mousse, layered dessert, no-bake dessert, creamy dessert, easy dessert recipe, party dessert, indulgent dessert, American dessert, chocolate brownie, Oreo cookies, dessert for chocolate lovers


