Sensory-Rich Introduction with Immediate Craving
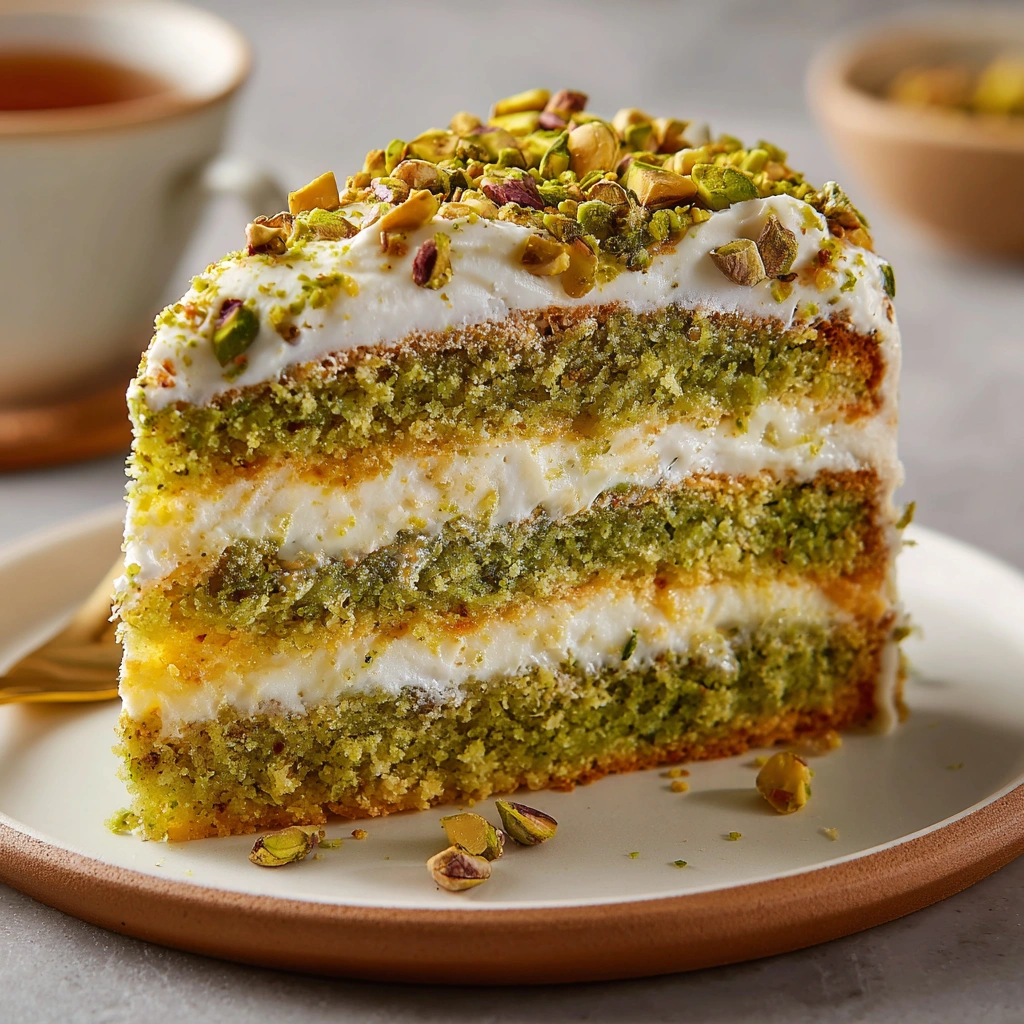
Imagine slicing into a Pistachio Ricotta Layer Cake and revealing its stunning layers—each one a delicate shade of pale green, speckled with crunchy bits of pistachio. The moment you lift a slice, the cake feels impossibly light yet moist, promising a delightful experience. As you bring it closer, the nutty aroma of roasted pistachios mingles with the creamy richness of ricotta, creating an irresistible invitation to indulge.
This cake holds a special place in my heart, as it was the star of my cousin’s wedding reception. I remember the laughter and joy that filled the air as we gathered around the dessert table, each of us eagerly anticipating a slice. The first bite transported me back to my grandmother’s kitchen, where she would whip up her famous ricotta desserts, filling the house with warmth and love. It was a moment of nostalgia, a reminder of how food can weave together the fabric of our memories.
What I love most about this cake is its ability to bring people together. Whether it’s a birthday celebration, an anniversary, or just a cozy afternoon with friends, the Pistachio Ricotta Layer Cake is the perfect centerpiece. Its vibrant colors and inviting aroma make it a showstopper, while its rich yet refreshing flavors create a sense of comfort and joy. It’s a cake that says, “Let’s celebrate life’s little moments together!”
Perfect for any occasion, this cake shines brightly at festive gatherings, holiday feasts, or even as a sweet surprise for a loved one. Its versatility means it can be dressed up with elegant decorations for a wedding or simply enjoyed with a cup of coffee on a quiet afternoon. No matter the setting, this cake is sure to leave a lasting impression and create sweet memories.
Why You’ll Love This Pistachio Ricotta Layer Cake
Let me tell you, the Pistachio Ricotta Layer Cake is a true delight for the senses! The first thing that strikes you is the texture contrast. Each slice reveals moist, tender cake layers that practically melt in your mouth, perfectly complemented by a creamy frosting that envelops the cake like a soft blanket. And let’s not forget the crunchy pistachios sprinkled throughout, adding a satisfying crunch that elevates every bite.
Now, let’s talk about flavor balance. The nutty essence of pistachios harmonizes beautifully with the sweet, creamy ricotta, creating a delightful symphony of tastes. It’s a dance of flavors that’s both indulgent and refreshing, making it hard to resist just one slice. I remember serving this cake at a family gathering, and the way everyone’s eyes lit up with the first bite was priceless. It’s a flavor experience that lingers long after the last crumb is gone.
One of the best things about this cake is its versatility. You can enjoy it as is, with its stunning layers and rich frosting, or you can dress it up for special occasions. Imagine adding fresh berries on top for a pop of color or drizzling a bit of chocolate sauce for those who crave a little extra sweetness. It’s a canvas for your creativity, and I love how it can adapt to any celebration.
Worried about the complexity of baking? Fear not! The Pistachio Ricotta Layer Cake is surprisingly easy to prepare. With straightforward steps and simple ingredients, even novice bakers can achieve impressive results. I’ve had friends who were intimidated by baking, but after trying this recipe, they felt like pros! It’s all about following the steps and enjoying the process.
Finally, this cake has universal appeal. The combination of nutty, sweet, and creamy flavors, along with its delightful textures, makes it a crowd-pleaser. Whether you’re serving it at a birthday party, a holiday feast, or just a casual get-together, you can be sure that everyone will be reaching for seconds. It’s a cake that brings smiles and satisfaction, and that’s what baking is all about!
Essential Tools & Preparation Strategy
Before diving into the delightful world of baking this Pistachio Ricotta Layer Cake, let’s gather our essential tools. Having the right equipment not only makes the process smoother but also enhances the final outcome. Trust me, I’ve learned this the hard way!
Mixing Bowls
You’ll need a couple of mixing bowls—one large for the batter and a smaller one for the frosting. I recommend using glass or stainless steel bowls, as they are durable and easy to clean. Avoid plastic bowls, as they can retain odors and stains. A set of nested bowls can save space and make storage a breeze!
Electric Mixer
An electric mixer is a game-changer for achieving that light and fluffy batter. If you don’t have one, a good old-fashioned whisk will do the trick, but be prepared for a bit of a workout! I remember my grandmother whisking by hand for what felt like an eternity, but the results were always worth it. If you opt for a whisk, just make sure to channel your inner arm strength!
Measuring Cups and Spoons
Accurate measurements are crucial for baking success. Invest in a set of dry and liquid measuring cups, along with a set of measuring spoons. I can’t stress enough how important it is to measure correctly—too much flour can lead to a dense cake, and nobody wants that! For best results, use a kitchen scale for precision, especially when it comes to flour.
Rubber Spatula
A rubber spatula is perfect for gently folding in ingredients without deflating your batter. I prefer silicone spatulas for their durability and flexibility. They make scraping down the sides of the bowl a breeze! Plus, they’re great for getting every last bit of frosting out of the bowl—no waste here!
9-inch Round Cake Pans
Two 9-inch round cake pans are essential for this recipe. Make sure to grease and flour them well to prevent sticking. If you don’t have round pans, you can use square ones, but adjust the baking time accordingly. I once used a rectangular pan and ended up with a cake that took forever to bake! So, stick to the recommended size for even baking.
Wire Rack
A wire rack is crucial for cooling your cakes evenly. It prevents sogginess by allowing air to circulate around the cake. If you don’t have one, you can use a baking sheet turned upside down as a makeshift cooling surface. Just remember, cooling is key to achieving that perfect frosting finish!
Preparation Strategy
Now that we have our tools ready, let’s talk about preparation. Here’s a quick checklist to streamline your baking process:
- Gather all ingredients and tools before starting.
- Preheat your oven to 350°F (175°C) to ensure it’s hot and ready.
- Measure out your ingredients accurately to avoid any mishaps.
- Prepare your cake pans by greasing and flouring them.
- Set up your mixing area to keep things organized and efficient.
With everything in place, you’re ready to embark on this baking adventure. Remember, the kitchen is a place of joy and creativity—don’t be afraid to make it your own!
Ingredients & Their Roles in This Pistachio Ricotta Layer Cake
Understanding the ingredients in your Pistachio Ricotta Layer Cake is key to mastering this delightful dessert. Each component plays a vital role in creating the perfect balance of flavor and texture. Let’s break it down!
Cake Ingredients
- All-Purpose Flour: This is the backbone of your cake, providing structure and stability. If you’re looking for a gluten-free option, a gluten-free flour blend works beautifully as a substitute.
- Granulated Sugar: Sweetens the cake and helps create that lovely golden crust. For a healthier twist, consider replacing it with coconut sugar, which adds a subtle caramel flavor.
- Unsalted Butter: Adds richness and moisture to the cake. If you’re aiming for a dairy-free version, vegan butter is a fantastic alternative that won’t compromise on taste.
- Ricotta Cheese: This creamy ingredient contributes to the cake’s moist texture and rich flavor. If you don’t have ricotta on hand, cottage cheese can be blended until smooth as a suitable substitute.
- Eggs: They bind the ingredients together and provide structure. For a vegan alternative, flax eggs (1 tablespoon of ground flaxseed mixed with 2.5 tablespoons of water per egg) work wonders!
- Vanilla Extract: Enhances the overall flavor profile of the cake. If you’re feeling adventurous, almond extract can add a delightful twist.
- Baking Powder & Baking Soda: These leavening agents are crucial for a light and fluffy cake. Always check that they are fresh for the best rise!
- Salt: A pinch of salt balances the sweetness and enhances the flavors. If you’re on a low-sodium diet, feel free to omit it.
- Chopped Pistachios: These not only add a wonderful nutty flavor but also provide a delightful crunch. For a nut-free version, sunflower seeds can be used instead.
Frosting Ingredients
- Unsalted Butter: The base for your frosting, creating a creamy and smooth texture. If you prefer, margarine can be used as a substitute.
- Powdered Sugar: This sweetens and thickens the frosting, giving it that perfect spreadable consistency. For a healthier option, consider using a sugar alternative like powdered erythritol.
- Heavy Cream: Adds richness and helps achieve a silky texture in the frosting. If you’re looking for a dairy-free option, coconut cream is a fantastic substitute.
- Vanilla Extract: Just like in the cake, it enhances the flavor of the frosting. Feel free to experiment with other extracts, such as hazelnut or maple, for a unique twist.
- Ground Pistachios: These add flavor and texture to the frosting, making it even more delightful. If you want to switch things up, try using ground almonds or walnuts for a different flavor profile.
With these ingredients in hand, you’re well on your way to creating a Pistachio Ricotta Layer Cake that will impress everyone at your next gathering. Remember, each ingredient contributes to the overall experience, so choose quality products for the best results!
Step-by-Step Guide to Perfect Pistachio Ricotta Layer Cake
Now that we have all our ingredients and tools ready, it’s time to dive into the fun part—baking! Follow these steps closely, and you’ll be well on your way to creating a stunning Pistachio Ricotta Layer Cake that will impress everyone.
- Preheat the Oven: Set your oven to 350°F (175°C). This ensures that your cake bakes evenly and rises beautifully. Trust me, a preheated oven is a baker’s best friend!
- Cream Butter and Sugar: In a large mixing bowl, beat together the softened unsalted butter and granulated sugar until the mixture is light and fluffy, about 3-4 minutes. This step is crucial as it incorporates air into the batter, giving your cake that lovely rise.
- Incorporate Ricotta: Add the ricotta cheese to the butter-sugar mixture and mix until well combined. The ricotta adds a creamy texture that makes the cake moist and delicious.
- Whisk Eggs and Vanilla: In a separate bowl, whisk together the eggs and vanilla extract. Once combined, add this mixture to the butter and ricotta mixture. This step adds richness and depth of flavor to your cake.
- Combine Dry Ingredients: In another bowl, whisk together the all-purpose flour, baking powder, baking soda, and salt. This ensures that your leavening agents are evenly distributed throughout the flour.
- Mix Wet and Dry Ingredients: Gradually add the dry ingredients to the wet mixture, mixing until just combined. Be careful not to overmix; you want to maintain that light texture!
- Fold in Pistachios: Gently fold in the finely chopped pistachios. This adds a delightful crunch and nutty flavor that complements the creamy cake perfectly.
- Divide and Bake: Pour the batter evenly into your greased 9-inch round cake pans. Bake in the preheated oven for 25-30 minutes, or until a toothpick inserted in the center comes out clean. Keep an eye on them—every oven is a little different!
- Cool Cakes: Once baked, allow the cakes to cool in the pans for about 10 minutes. Then, carefully transfer them to wire racks to cool completely. This step is essential to prevent sogginess and ensure a perfect frosting finish.
- Prepare Frosting: In a mixing bowl, beat the softened unsalted butter until creamy. Gradually add the powdered sugar and heavy cream, mixing until smooth. Stir in the vanilla extract and ground pistachios for that extra flavor kick.
- Assemble the Cake: Once the cakes are completely cool, place one layer on a serving plate. Spread a generous layer of frosting on top, then place the second layer on top. Frost the top and sides of the cake, making it as smooth or textured as you like. Don’t forget to add some extra chopped pistachios on top for a beautiful finish!
And there you have it! Your Pistachio Ricotta Layer Cake is ready to be enjoyed. Just remember, the key to a successful cake is patience and love—so take your time and savor the process!
Chef’s Notes & Pro Tips for Flawless Results
As you embark on your baking journey with the Pistachio Ricotta Layer Cake, I want to share some of my favorite tips and tricks that I’ve gathered over the years. These insights will help you achieve the best results and make the process even more enjoyable!
Make-Ahead Instructions
One of the best things about this cake is that it can be made a day in advance. In fact, I often find that the flavors deepen and improve overnight, making it even more delicious! Just bake the cake, let it cool completely, and then wrap it tightly in plastic wrap. Store it in the refrigerator until you’re ready to frost and serve. This way, you can enjoy a stress-free baking day and impress your guests with a cake that tastes like it was made just for them!
Storage Tips
To keep your Pistachio Ricotta Layer Cake fresh, store it in an airtight container in the refrigerator. It will stay delicious for up to 5 days. If you have any leftovers (which is rare, trust me!), you can also freeze individual slices. Just wrap them in plastic wrap and place them in a freezer-safe container. When you’re ready to enjoy a slice, let it thaw in the fridge overnight or at room temperature for a few hours. It’s like having a little piece of joy waiting for you!
Equipment Recommendations
Investing in high-quality kitchen tools can make a world of difference in your baking experience. I highly recommend using a stand mixer for the best results, as it saves time and effort while ensuring a perfectly mixed batter. Additionally, opt for sturdy, non-stick cake pans to prevent any sticking mishaps. Trust me, a good set of pans can be a game-changer when it comes to cake baking!
Customization Options
Don’t be afraid to get creative with your Pistachio Ricotta Layer Cake! Here are a few flavor variations to consider:
- Citrus Zest: Add the zest of an orange or lemon to the batter for a refreshing twist that complements the nutty flavors beautifully.
- Spices: A pinch of cinnamon or cardamom can add warmth and depth to the cake. Just be careful not to overpower the delicate pistachio flavor!
- Chocolate Drizzle: For a decadent touch, drizzle melted chocolate over the frosted cake. It adds a rich contrast that chocolate lovers will adore.
- Fruit Layers: Consider adding layers of fresh fruit, like raspberries or strawberries, between the cake layers for a burst of freshness and color.
With these tips and customization options, you’re well on your way to creating a Pistachio Ricotta Layer Cake that’s not only delicious but also uniquely yours. Happy baking!
Avoid These Common Cooking Mistakes
Baking can be a bit of a science, and even the most experienced bakers can run into hiccups along the way. To ensure your Pistachio Ricotta Layer Cake turns out perfectly every time, here are some common mistakes to avoid:
- Overmixing the Batter: This is a classic pitfall that can lead to a dense cake. When combining your wet and dry ingredients, mix until just combined. A few lumps are perfectly fine—trust me, your cake will thank you!
- Inaccurate Measurements: Baking is all about precision. Using improper measuring tools can affect the texture of your cake. Invest in a good set of measuring cups and spoons, and consider using a kitchen scale for the most accurate results.
- Skipping Cooling Step: Patience is key! If you frost your cake while it’s still warm, the frosting will melt and slide off. Allow your cakes to cool completely on a wire rack before frosting to achieve that beautiful finish.
- Using Cold Ingredients: Cold ingredients can lead to lumps in your batter. Make sure to bring your eggs, butter, and ricotta cheese to room temperature before mixing. This helps create a smooth, homogenous batter that bakes evenly.
- Not Greasing Pans: A sticky situation! Always grease and flour your cake pans to prevent your cake from sticking. Trust me, there’s nothing worse than a beautiful cake that won’t come out of the pan!
- Underbaking: A gooey center is not what we’re aiming for! Use a toothpick to check for doneness—insert it into the center of the cake, and if it comes out clean or with a few moist crumbs, you’re good to go.
- Not Cooling Layers: If you don’t let your cake layers cool completely, the frosting will slide right off. Allow them to cool on a wire rack for at least 10 minutes in the pans, then transfer them to cool completely before frosting.
By keeping these common mistakes in mind, you’ll be well on your way to creating a stunning and delicious Pistachio Ricotta Layer Cake that will impress everyone at your next gathering. Happy baking!
Creative Variations & Customizations
One of the joys of baking the Pistachio Ricotta Layer Cake is the opportunity to make it your own! Whether you have dietary restrictions or simply want to experiment with flavors, here are some creative variations and customizations to consider:
- Nut-Free Version: If you or your guests have nut allergies, fear not! You can easily substitute the pistachios with sunflower seeds or pumpkin seeds. These alternatives will still provide a delightful crunch and a hint of nuttiness without the allergens.
- Gluten-Free Option: For those following a gluten-free diet, simply swap out the all-purpose flour for a gluten-free flour blend. Many blends work well in baking, but make sure to choose one that includes xanthan gum for the best texture.
- Chocolate Lovers: If you’re a fan of chocolate, why not add a twist? Incorporate cocoa powder into the batter for a chocolate pistachio cake. Start with 1/4 cup of unsweetened cocoa powder and reduce the flour by the same amount. The combination of chocolate and pistachios is simply divine!
- Seasonal Flavors: Embrace the seasons by incorporating spices like cinnamon or nutmeg into the batter. A teaspoon of cinnamon can add warmth and depth, making it perfect for fall gatherings. You could even add a pinch of ginger for a little extra zing!
- Fruit Additions: Fresh fruits can elevate your cake to new heights! Consider layering with fresh raspberries or strawberries between the cake layers for a burst of color and flavor. The tartness of the fruit beautifully balances the sweetness of the cake.
With these creative variations, your Pistachio Ricotta Layer Cake can be tailored to suit any occasion or preference. Don’t hesitate to experiment and make it uniquely yours—after all, the kitchen is your canvas!
Perfect Pairings: What to Serve With Pistachio Ricotta Layer Cake
When it comes to enjoying your Pistachio Ricotta Layer Cake, the right accompaniments can elevate the experience to new heights. Here are some delightful pairings that complement the cake’s rich flavors and textures:
- Whipped Cream: A dollop of freshly whipped cream adds an extra layer of creaminess and lightness, making each bite even more indulgent. I love to sweeten mine with a touch of vanilla for an extra flavor boost!
- Earl Grey Tea: The fragrant notes of bergamot in Earl Grey tea beautifully complement the nutty flavors of the cake. It’s a match made in heaven, perfect for an afternoon tea party or a cozy gathering.
- Fresh Raspberries: These vibrant berries provide a tart contrast to the sweetness of the cake, creating a delightful balance. Plus, they add a pop of color that makes your dessert table look stunning!
- Vanilla Ice Cream: A scoop of creamy vanilla ice cream enhances the dessert experience, adding a cool and refreshing element that pairs perfectly with the warm flavors of the cake.
- Light Salad: For a balanced meal, serve the cake alongside a light salad. The freshness of greens and a citrus vinaigrette can cut through the richness of the cake, making for a satisfying combination.
- Dessert Wine: A glass of dessert wine adds a touch of sophistication to your cake experience. Opt for a sweet wine like Moscato or a rich Sauternes to enhance the flavors of the pistachios.
- Chocolate Sauce: For those who enjoy a chocolatey touch, a drizzle of chocolate sauce over the cake can add an extra layer of decadence. It’s a delightful contrast that chocolate lovers will adore!
- Chopped Pistachios: Don’t forget to garnish with additional chopped pistachios! They not only add a crunchy texture but also enhance the visual appeal of your cake, making it look even more inviting.
With these perfect pairings, your Pistachio Ricotta Layer Cake will shine at any gathering, leaving your guests raving about the delightful flavors and textures. Enjoy the experience, and don’t hesitate to mix and match these suggestions to find your favorite combinations!
Storage & Meal Prep Instructions
Once you’ve baked and frosted your Pistachio Ricotta Layer Cake, you’ll want to ensure it stays fresh and delicious for as long as possible. Here are my tried-and-true storage and meal prep tips to help you enjoy this delightful cake at its best!
Fridge Storage
To keep your cake fresh, store it in an airtight container in the refrigerator. This will help maintain its moisture and flavor. The cake can be enjoyed for up to 5 days, but I can assure you, it rarely lasts that long in my house! Just be sure to slice it as needed to minimize exposure to air.
Freezer Storage
If you want to save some slices for later, freezing is a great option. Wrap individual slices in plastic wrap and then place them in a freezer-safe container. This way, you can enjoy a piece of your Pistachio Ricotta Layer Cake whenever the craving strikes! It will stay fresh in the freezer for up to 3 months. Just remember to label the container with the date so you can keep track of its freshness.
Reheating Methods
When you’re ready to enjoy a slice from the fridge or freezer, there are a couple of reheating methods you can use:
- Room Temperature: For the best texture and flavor, allow the cake to come to room temperature before serving. Just take it out of the fridge about 30 minutes before you plan to enjoy it.
- Microwave: If you’re in a hurry, you can gently warm a slice in the microwave. Place it on a microwave-safe plate and heat for about 10-15 seconds. Be careful not to overheat, as this can cause the frosting to melt and the cake to become dry.
With these storage and meal prep instructions, you can savor your Pistachio Ricotta Layer Cake for days to come. Enjoy every delicious bite!
Nutrition Facts & Health Insights
Understanding the nutritional profile of your Pistachio Ricotta Layer Cake can help you enjoy it guilt-free. Here’s a detailed breakdown of the nutrition per serving, so you can indulge while being mindful of your health!
| Nutrient | Amount per Serving (1 slice, 1/12 of the cake) |
|---|---|
| Calories | 350 |
| Sugar | 25 grams |
| Sodium | 150 milligrams |
| Total Fat | 20 grams |
| Saturated Fat | 10 grams |
| Unsaturated Fat | 8 grams |
| Trans Fat | 0 grams |
| Carbohydrates | 35 grams |
| Fiber | 1 gram |
| Protein | 6 grams |
| Cholesterol | 50 milligrams |
Health Benefits
The Pistachio Ricotta Layer Cake not only satisfies your sweet tooth but also offers some nutritional advantages thanks to its key ingredients:
- Pistachios: These little green gems are packed with healthy fats, protein, and fiber. They are known to support heart health, help with weight management, and provide essential nutrients like vitamin B6 and potassium. Plus, their nutty flavor adds a delightful crunch to the cake!
- Ricotta Cheese: This creamy ingredient is a great source of calcium and protein, making it a nutritious addition to your dessert. Calcium is essential for strong bones and teeth, while protein helps with muscle repair and growth. Ricotta also contains less fat than many other cheeses, making it a lighter option for baking.
So, while you enjoy your slice of Pistachio Ricotta Layer Cake, you can feel good knowing that it contains ingredients that offer health benefits. Just remember, moderation is key—indulge in this delicious treat while keeping a balanced diet!
Frequently Asked Questions
Can I substitute ricotta cheese?
Absolutely! If you don’t have ricotta cheese on hand, you can use cottage cheese blended until smooth as a substitute. It will still provide that creamy texture you’re looking for. For a dairy-free option, try using silken tofu blended until creamy—it works surprisingly well!
What can I use instead of eggs?
If you’re looking for an egg substitute, flax eggs are a great option. To make one flax egg, mix 1 tablespoon of ground flaxseed with 2.5 tablespoons of water and let it sit for about 5 minutes until it thickens. You can also use unsweetened applesauce (1/4 cup per egg) or mashed bananas for a different flavor profile.
How do I make this cake gluten-free?
To make the Pistachio Ricotta Layer Cake gluten-free, simply substitute the all-purpose flour with a gluten-free flour blend. Make sure the blend contains xanthan gum for the best texture. You can also use almond flour for a nutty flavor, but keep in mind that it may alter the cake’s texture slightly.
Can I freeze the cake?
Yes, you can freeze the Pistachio Ricotta Layer Cake! Wrap individual slices tightly in plastic wrap and place them in a freezer-safe container. They can be stored in the freezer for up to 3 months. When you’re ready to enjoy a slice, just let it thaw in the fridge overnight or at room temperature for a few hours.
What if my cake is too dense?
If your cake turns out too dense, it’s likely due to overmixing the batter or using too much flour. Make sure to mix until just combined and use proper measuring techniques. If you find yourself with a dense cake, you can try serving it with whipped cream or ice cream to balance the texture!
How do I store leftover frosting?
Leftover frosting can be stored in an airtight container in the refrigerator for up to a week. Just make sure to bring it back to room temperature and give it a good stir before using it again. If you want to keep it longer, you can freeze it for up to 3 months—just thaw it in the fridge before using.
Can I add other flavors to the frosting?
Absolutely! The frosting is a blank canvas for your creativity. You can add different extracts like almond, hazelnut, or even citrus zest for a refreshing twist. For a chocolate version, simply mix in some cocoa powder or melted chocolate. Just remember to adjust the sugar accordingly to maintain the right consistency!
What’s the best way to decorate the cake?
When it comes to decorating your Pistachio Ricotta Layer Cake, the sky’s the limit! You can keep it simple with a smooth layer of frosting and a sprinkle of chopped pistachios on top. For a more elaborate look, consider adding fresh berries, edible flowers, or a drizzle of chocolate sauce. Get creative and have fun with it—your cake should reflect your personal style!
Final Inspiration & Kitchen Confidence
Baking is more than just a task; it’s a journey filled with creativity, learning, and a sprinkle of magic. Each time you step into the kitchen, you’re not just following a recipe—you’re crafting memories, honing your skills, and embracing the joy of creating something delicious. Remember, every attempt, whether it turns out perfectly or not, is a step towards mastery. So, don’t be discouraged by the occasional mishap; instead, celebrate the process and the lessons learned along the way!
As you slice into your beautiful Pistachio Ricotta Layer Cake, take a moment to appreciate your hard work. Share your creation with friends and family, and watch their faces light up with delight. There’s something truly special about bringing people together over a homemade dessert. It’s a way to spread joy, create connections, and make lasting memories. Plus, who doesn’t love a slice of cake?
Now, I invite you to dive into this recipe with enthusiasm! Try your hand at the Pistachio Ricotta Layer Cake, and don’t hesitate to experiment with your own variations. Whether it’s adding a hint of citrus zest or swapping out the nuts, let your creativity shine. And when you do, I’d love to hear about your experiences! Share your triumphs, your tweaks, and your favorite moments in the kitchen. Together, let’s celebrate the joy of baking and the delicious creations that come from our hearts!
Print
Pistachio Ricotta Layer Cake: Indulge in Creamy Bliss!
- Total Time: 1 hour
- Yield: 12 servings 1x
- Diet: Vegetarian
Description
The Pistachio Ricotta Layer Cake is a delightful dessert that combines the nutty flavor of pistachios with the creamy richness of ricotta cheese. Each slice reveals a moist, tender crumb, layered with a luscious pistachio frosting that melts in your mouth, creating a symphony of textures and flavors that is both indulgent and refreshing.
Ingredients
- Cake:
- 2 cups all-purpose flour
- 1 cup granulated sugar
- 1/2 cup unsalted butter, softened
- 1 cup ricotta cheese
- 4 large eggs
- 1 teaspoon vanilla extract
- 1 teaspoon baking powder
- 1/2 teaspoon baking soda
- 1/4 teaspoon salt
- 1 cup finely chopped pistachios
- Pistachio Frosting:
- 1 cup unsalted butter, softened
- 4 cups powdered sugar
- 1/4 cup heavy cream
- 1 teaspoon vanilla extract
- 1/2 cup finely ground pistachios
Instructions
- Preheat the oven to 350°F (175°C).
- In a large mixing bowl, cream together the softened butter and granulated sugar until light and fluffy, about 3-4 minutes.
- Add the ricotta cheese and mix until well combined.
- In a separate bowl, whisk together the eggs and vanilla extract, then add to the butter mixture.
- In another bowl, combine the flour, baking powder, baking soda, and salt.
- Gradually add the dry ingredients to the wet mixture, mixing until just combined.
- Fold in the chopped pistachios.
- Divide the batter evenly between two greased 9-inch round cake pans.
- Bake for 25-30 minutes, or until a toothpick inserted in the center comes out clean.
- Allow the cakes to cool in the pans for 10 minutes before transferring to wire racks to cool completely.
- For the frosting, beat the softened butter until creamy, then gradually add the powdered sugar and heavy cream, mixing until smooth.
- Stir in the vanilla extract and ground pistachios.
- Once the cakes are completely cool, spread a layer of frosting on top of one cake layer, place the second layer on top, and frost the top and sides of the cake.
Notes
- This cake can be made a day in advance; store it in an airtight container in the refrigerator.
- Leftover cake can be stored in the refrigerator for up to 5 days.
- For a nut-free version, substitute the pistachios with sunflower seeds.
- Prep Time: 30 minutes
- Cook Time: 30 minutes
- Category: desserts
- Method: baking
- Cuisine: American
Nutrition
- Serving Size: 1 slice (1/12 of the cake)
- Calories: 350
- Sugar: 25 grams
- Sodium: 150 milligrams
- Fat: 20 grams
- Saturated Fat: 10 grams
- Unsaturated Fat: 8 grams
- Trans Fat: 0 grams
- Carbohydrates: 35 grams
- Fiber: 1 gram
- Protein: 6 grams
- Cholesterol: 50 milligrams
Keywords: Pistachio Ricotta Layer Cake, pistachio cake, ricotta dessert, layer cake, nutty cake, creamy frosting, American desserts, homemade cake, festive cake, dessert recipes, baking, vegetarian desserts, indulgent cake, cake with nuts, ricotta cheese recipes


