
Introduction to Spider Nest Cake Pops
As the leaves turn and the air gets crisp, I find myself dreaming up spooky treats for Halloween. One of my favorites is Spider Nest Cake Pops. These delightful little bites are not only fun to make, but they also bring a touch of whimsy to any gathering. If you’re a busy mom or professional like me, you’ll appreciate how quick and easy these cake pops are to whip up. Plus, they’re sure to impress your loved ones, making them the perfect addition to your Halloween festivities!
Why You’ll Love This Spider Nest Cake Pops
These Spider Nest Cake Pops are a game-changer for busy days. They come together quickly, making them perfect for last-minute Halloween parties or school events. The rich chocolate flavor paired with the fun, spooky design is a hit with kids and adults alike. Plus, they’re a fantastic way to get your little ones involved in the kitchen, creating memories while whipping up these delightful treats!
Ingredients for Spider Nest Cake Pops
Gathering the right ingredients is the first step to creating these delightful Spider Nest Cake Pops. Here’s what you’ll need:
- Chocolate cake mix: This is the base of your cake pops. You can use a classic chocolate mix or opt for dark chocolate for a richer flavor.
- Frosting: A cup of frosting binds the crumbled cake together. Choose your favorite flavor, but chocolate or vanilla works best for this spooky treat.
- Chocolate candy melts: These are essential for coating your cake pops. They melt smoothly and create a delicious outer layer. You can find them in various colors, but classic chocolate is perfect for this recipe.
- Shredded coconut: This adds texture and helps create the “nest” look. You can use sweetened or unsweetened coconut, depending on your preference.
- Black food coloring: This is optional but adds a fun twist to your coconut, making it look even spookier!
- Edible eyes: These little decorations bring your spider nests to life! They’re easy to find at craft stores or online.
- Black licorice or chocolate sticks: These will serve as the spider legs. If you’re looking for a healthier option, pretzel sticks can work too!
For exact quantities, check the bottom of the article where you can find a printable version of the recipe. Now that you have your ingredients ready, let’s dive into the fun part—making these spooky treats!
How to Make Spider Nest Cake Pops
Now that you have your ingredients ready, let’s get started on making these delightful Spider Nest Cake Pops! Follow these simple steps, and you’ll have a spooky treat that’s sure to impress.
Step 1: Prepare the Cake Mix
First, preheat your oven according to the instructions on the cake mix box. Prepare the chocolate cake mix as directed. This is where the magic begins! The aroma of baking chocolate cake will fill your kitchen, making it feel like Halloween already.
Step 2: Crumble the Cake
Once the cake is baked and cooled, it’s time to crumble it. I like to use my hands for this part. It’s a bit messy, but it’s also fun! Crumble the cake into a large bowl until it resembles fine crumbs. This is the base for your cake pops.
Step 3: Mix with Frosting
Next, add the frosting to the crumbled cake. Mix it well until everything is combined. The mixture should be moist but not too sticky. If it feels too dry, add a bit more frosting. This step is crucial for forming the cake balls!
Step 4: Form Cake Balls
Now, it’s time to roll the mixture into small balls. Aim for about one inch in diameter. Place them on a baking sheet lined with parchment paper. This is where you can get creative! If you want larger pops, feel free to make them bigger.
Step 5: Chill the Cake Balls
Pop the baking sheet into the refrigerator for about 30 minutes. Chilling helps the cake balls firm up, making them easier to dip later. While you wait, you can clean up your workspace or prepare your decorations!
Step 6: Melt the Chocolate
In a microwave-safe bowl, melt the chocolate candy melts. Heat them in short bursts, stirring in between, until smooth. Be careful not to overheat! The melted chocolate should be glossy and perfect for dipping.
Step 7: Dip the Cake Balls
Once the cake balls are chilled, it’s time to dip! Using a fork, dip each ball into the melted chocolate, ensuring it’s fully coated. Let the excess chocolate drip off before placing it back on the baking sheet. This is where the fun begins!
Step 8: Create the Spider Nest
While the chocolate is still wet, sprinkle shredded coconut on top of each cake pop. This will create the “nest” effect. If you want to add a spooky twist, mix in some black food coloring with the coconut before sprinkling!
Step 9: Decorate with Edible Eyes and Legs
Now for the finishing touches! Attach edible eyes to each cake pop. Then, use black licorice or chocolate sticks to create spider legs. You can get creative here—make your spiders as big or small as you like!
Step 10: Let Set
Finally, let the cake pops set until the chocolate hardens. This usually takes about 30 minutes at room temperature. Once set, they’re ready to be enjoyed! You can even store them in the fridge until you’re ready to serve.
Tips for Success
- Use a cookie scoop for uniform cake balls; it makes rolling easier!
- Chill the cake balls longer if they’re too soft to dip.
- Experiment with different colors of candy melts for a fun twist.
- Don’t rush the melting process; stir often to avoid burning.
- Have fun with decorations—let your creativity shine!
Equipment Needed
- Baking sheet: A standard baking sheet works well. You can also use a large platter if you don’t have one.
- Parchment paper: This helps prevent sticking. If you’re out, a silicone mat is a great alternative.
- Microwave-safe bowl: For melting chocolate. Any heatproof bowl will do!
- Fork: Perfect for dipping cake balls. A skewer can work in a pinch.
- Cookie scoop: For uniform cake balls. If you don’t have one, just use your hands!
Variations
- Gluten-Free: Use a gluten-free chocolate cake mix to make these Spider Nest Cake Pops suitable for those with gluten sensitivities.
- Vegan: Substitute the frosting with a vegan option and use dairy-free chocolate candy melts for a plant-based treat.
- Flavor Twists: Experiment with different cake flavors like red velvet or vanilla for a unique spin on the classic chocolate.
- Nutty Addition: Add crushed nuts or nut butter to the cake mixture for an extra crunch and flavor boost.
- Colorful Nests: Use colored coconut or sprinkles instead of shredded coconut for a vibrant, festive look!
Serving Suggestions
- Pair these Spider Nest Cake Pops with a spooky punch or hot apple cider for a festive drink.
- Serve them on a decorative platter with Halloween-themed napkins for a fun presentation.
- For an extra treat, include some ghost-shaped cookies or mini pumpkin muffins on the side.
- Consider using a cake stand to elevate your display and make it more eye-catching!
FAQs about Spider Nest Cake Pops
As you embark on your journey to create these delightful Spider Nest Cake Pops, you might have a few questions. Here are some common queries I’ve encountered, along with helpful answers!
Can I make Spider Nest Cake Pops in advance?
Absolutely! These cake pops can be made a day in advance. Just store them in the refrigerator until you’re ready to serve. This makes them a perfect treat for busy moms like us!
What can I use instead of black licorice for spider legs?
If black licorice isn’t your thing, chocolate sticks or pretzel sticks work wonderfully as spider legs. They add a fun crunch and are easy to find!
How do I store leftover cake pops?
Store any leftover Spider Nest Cake Pops in an airtight container in the fridge. They’ll stay fresh for up to a week, making them a great treat for after Halloween!
Can I use different colors for the candy melts?
Of course! Feel free to experiment with different colors of candy melts. This can add a fun twist to your Spider Nest Cake Pops, making them even more festive!
What if my cake balls are too soft to dip?
If your cake balls are too soft, simply chill them for a bit longer. This will help them firm up, making the dipping process much easier!
Final Thoughts
Creating Spider Nest Cake Pops is more than just baking; it’s about making memories with your loved ones. The joy of seeing their faces light up as they enjoy these spooky treats is priceless. Whether you’re hosting a Halloween party or just looking for a fun activity with the kids, these cake pops are sure to bring smiles all around. Plus, the ease of preparation means you can focus on what truly matters—spending time with family and friends. So, roll up your sleeves, get creative, and let the Halloween fun begin!
Print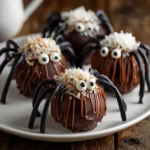
Spider Nest Cake Pops: A Spooky Treat for Your Halloween!
- Total Time: 1 hour
- Yield: 24 cake pops 1x
- Diet: Vegetarian
Description
Spider Nest Cake Pops are a fun and spooky treat perfect for Halloween celebrations. These cake pops are decorated to resemble spider nests, making them a hit for both kids and adults.
Ingredients
- 1 box of chocolate cake mix
- 1 cup of frosting
- 1 cup of chocolate candy melts
- 1 cup of shredded coconut
- Black food coloring
- Edible eyes
- Black licorice or chocolate sticks for spider legs
Instructions
- Prepare the chocolate cake mix according to package instructions and bake.
- Once cooled, crumble the cake into a large bowl.
- Add frosting to the crumbled cake and mix until well combined.
- Form the mixture into small balls and place them on a baking sheet.
- Chill the cake balls in the refrigerator for about 30 minutes.
- Melt the chocolate candy melts in a microwave-safe bowl.
- Dip the chilled cake balls into the melted chocolate and place them back on the baking sheet.
- While the chocolate is still wet, sprinkle shredded coconut on top to resemble a nest.
- Use black food coloring to color some of the coconut if desired.
- Attach edible eyes and use black licorice or chocolate sticks to create spider legs.
- Let the cake pops set until the chocolate hardens.
Notes
- For a more intense chocolate flavor, use dark chocolate cake mix.
- These cake pops can be made a day in advance and stored in the refrigerator.
- Feel free to get creative with decorations for different spooky effects.
- Prep Time: 30 minutes
- Cook Time: 30 minutes
- Category: Dessert
- Method: Baking and Decorating
- Cuisine: American
Nutrition
- Serving Size: 1 cake pop
- Calories: 150
- Sugar: 10g
- Sodium: 50mg
- Fat: 7g
- Saturated Fat: 4g
- Unsaturated Fat: 2g
- Trans Fat: 0g
- Carbohydrates: 20g
- Fiber: 1g
- Protein: 2g
- Cholesterol: 20mg
Keywords: Spider Nest Cake Pops, Halloween Treats, Cake Pops, Spooky Desserts


