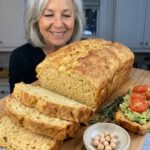
Ingredients
Here is everything you need for one loaf, which makes roughly 10 to 12 slices:
- 2 cans chickpeas (15 oz / 425 g each), drained and rinsed
- 4 large eggs
- 2 teaspoons baking powder
Optional add-ins: a pinch of salt, garlic powder, or dried herbs such as oregano or rosemary.
Equipment: a blender or food processor, a standard loaf pan (about 8 × 4 inches / 20 × 10 cm), parchment paper, a spatula, and a wire rack.
Tips for the Best Chickpea Bread
Simple recipes depend on technique, and these small details make a big difference in how your loaf turns out.
Drain the chickpeas well
Rinse the chickpeas thoroughly under cool running water, then let the excess water drain away. If they still look very wet, gently pat them dry with a clean kitchen towel. Extra moisture is the number one reason flourless chickpea loaves turn out too soft or gummy in the middle.
Blend until smooth
A smooth batter creates an even texture and helps the loaf hold together after baking. You want a thick, creamy mixture with no large pieces of chickpea left. Stop and scrape down the sides as needed, and blend in short bursts if your machine struggles with the thick mixture.
Use room-temperature eggs
Room-temperature eggs blend more easily with the chickpeas and create a more consistent batter. If you forget to take them out ahead of time, place the eggs in a bowl of warm water for a few minutes.
Add the baking powder last
Blend the chickpeas and eggs first, then add the baking powder and pulse just until combined. Over-blending at this stage is not necessary, so keep it brief.
Do not add extra water
Avoid adding water unless it is absolutely necessary. Excess moisture can make the bread too soft inside.
Line the pan
Parchment paper makes it much easier to lift out the finished loaf and prevents sticking. Leave a little overhang on the sides so you can use it as a handle.
Check the center
The top can look golden long before the middle is fully cooked. Always test the center with a toothpick or thin skewer before removing the loaf from the oven.
Let it cool completely
This is the step people are most tempted to skip. Flourless bread firms up as it cools, so slicing too early can lead to crumbling or a wet texture.
Instructions
Preheat your oven to 350°F (175°C). Drain the two cans of chickpeas and rinse them well under cool water. Let them drain thoroughly, removing as much liquid as you can. If they seem particularly wet, pat them dry with a clean towel.
Line an 8 × 4 inch (20 × 10 cm) loaf pan with parchment paper, leaving a little overhang on the long sides.
Add the drained chickpeas and the four large eggs to a blender or food processor. Blend until the mixture is as smooth as possible, pausing to scrape down the sides. The batter should look thick and creamy, with no big chunks of chickpea.
Add the 2 teaspoons of baking powder and pulse briefly until evenly distributed. The batter will be thick and either spoonable or pourable, depending on the moisture in your chickpeas and the size of your eggs. That is completely normal for a flourless loaf.
Pour or spoon the batter into the prepared pan. Use a spatula to spread it evenly into the corners and smooth the top. Tap the pan gently on the counter to release large air pockets. An even layer helps the loaf bake consistently from the edges to the center.
Bake for approximately 45 to 60 minutes. The top should be lightly golden, the edges set, and the center firm to the touch rather than wet. Insert a toothpick or skewer into the middle; it should come out without wet batter.
If the top is browning too quickly while the center is still soft, loosely cover the loaf with foil and keep baking in 5 to 10 minute increments. Baking time varies with your oven, your pan, and how much moisture is left in the chickpeas.
Let the loaf rest in the pan for 10 to 15 minutes. Then lift it out using the parchment paper and transfer it to a wire rack. Cool completely, ideally another 45 to 60 minutes, before slicing. The loaf continues to firm up as it cools, which helps the slices stay together.
Use a sharp serrated knife to cut even slices. Enjoy them as they are, or toast them lightly for a firmer exterior and a more pronounced nutty flavor.