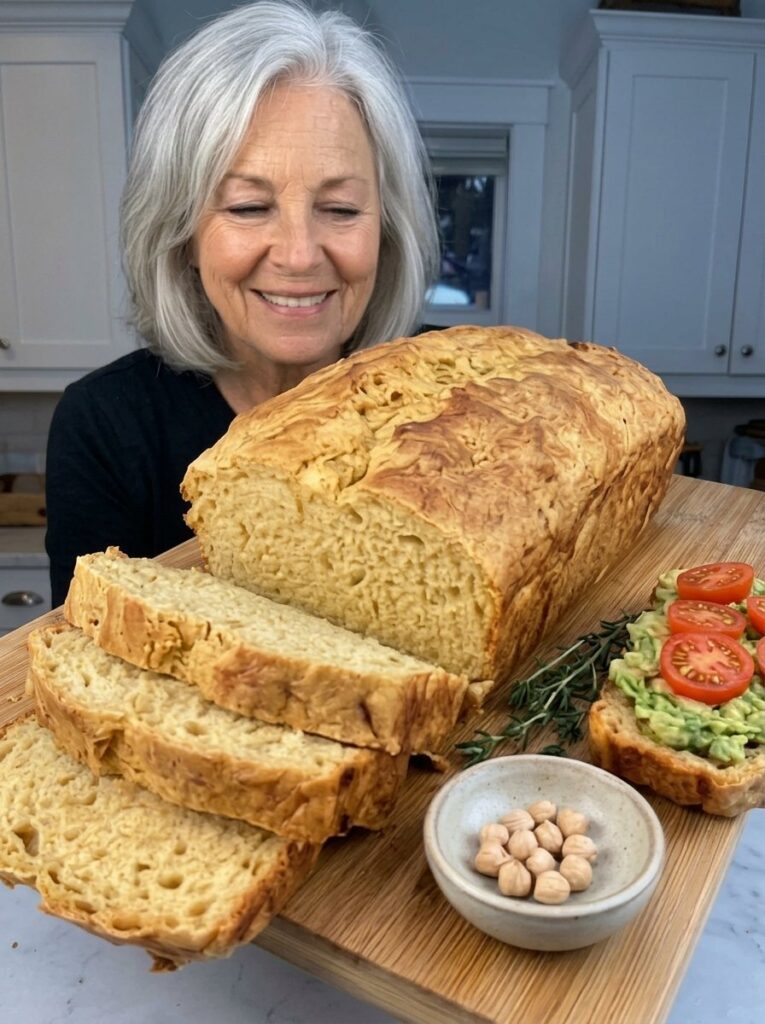
If you have ever wished you could make a homemade loaf without flour, yeast, kneading, or a long list of ingredients, this 3-ingredient high-protein chickpea bread is for you. It is hearty, tender, and savory, and everything comes together in a blender. All you need is canned chickpeas, eggs, and baking powder.
This chickpea bread recipe is a favorite for busy mornings, meal prep, and anyone looking for a simple, protein-rich alternative to traditional sandwich bread. In this guide you will find the full ingredient list, step-by-step instructions, troubleshooting tips, serving ideas, storage advice, and answers to the most common questions about flourless chickpea bread.
What Is 3-Ingredient Chickpea Bread?
Chickpea bread is a flourless loaf made by blending cooked chickpeas (garbanzo beans) with eggs and a little baking powder, then baking the batter in a loaf pan. The chickpeas provide the body and structure that flour normally would, the eggs bind everything together, and the baking powder gives the loaf a little lift.
Because it contains no wheat flour, the texture is different from a classic bakery loaf. It is denser, moister, and heartier, with a mild, nutty, savory chickpea flavor. Think of it as a cross between a savory quick bread and a firm, sliceable egg loaf. That makes it a wonderful base for toppings, which is exactly how most people enjoy it.
Why You Will Love This Recipe
There are plenty of reasons this simple loaf has become a go-to for home cooks:
- Only three ingredients. Chickpeas, eggs, and baking powder are the entire base recipe. There is no yeast, no flour, and no proofing time.
- High in protein. Both chickpeas and eggs are known protein sources, so the finished slices are satisfying and filling, which makes them great for breakfast or lunch.
- Made in a blender. No mixing bowls, no kneading, no special skills. Blend, pour, and bake.
- Flourless. The loaf contains no wheat flour, which makes it an appealing option for people who want to cut back on traditional bread. If you need a strictly gluten-free product, always check that your canned chickpeas and baking powder are labeled gluten-free.
- Budget-friendly. Canned chickpeas and eggs are inexpensive pantry and fridge staples.
- Meal-prep friendly. The loaf slices neatly, keeps in the refrigerator for days, and freezes well.
- Easy to customize. Keep it plain or add garlic powder, dried herbs, or a pinch of salt for extra flavor.
Ingredients
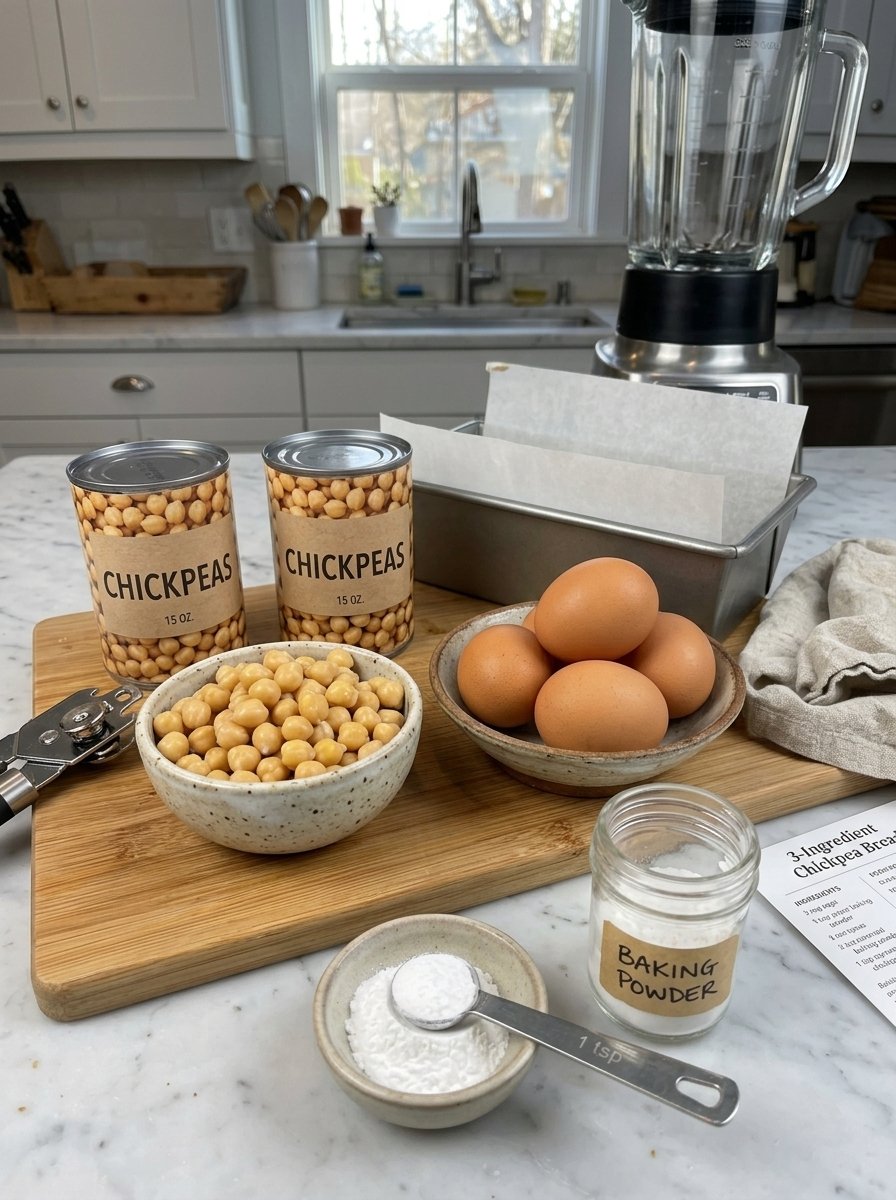
Here is everything you need for one loaf, which makes roughly 10 to 12 slices:
- 2 cans chickpeas (15 oz / 425 g each), drained and rinsed
- 4 large eggs
- 2 teaspoons baking powder
Optional add-ins: a pinch of salt, garlic powder, or dried herbs such as oregano or rosemary.
Equipment: a blender or food processor, a standard loaf pan (about 8 × 4 inches / 20 × 10 cm), parchment paper, a spatula, and a wire rack.
Tips for the Best Chickpea Bread
Simple recipes depend on technique, and these small details make a big difference in how your loaf turns out.
Drain the chickpeas well
Rinse the chickpeas thoroughly under cool running water, then let the excess water drain away. If they still look very wet, gently pat them dry with a clean kitchen towel. Extra moisture is the number one reason flourless chickpea loaves turn out too soft or gummy in the middle.
Blend until smooth
A smooth batter creates an even texture and helps the loaf hold together after baking. You want a thick, creamy mixture with no large pieces of chickpea left. Stop and scrape down the sides as needed, and blend in short bursts if your machine struggles with the thick mixture.
Use room-temperature eggs
Room-temperature eggs blend more easily with the chickpeas and create a more consistent batter. If you forget to take them out ahead of time, place the eggs in a bowl of warm water for a few minutes.
Add the baking powder last
Blend the chickpeas and eggs first, then add the baking powder and pulse just until combined. Over-blending at this stage is not necessary, so keep it brief.
Do not add extra water
Avoid adding water unless it is absolutely necessary. Excess moisture can make the bread too soft inside.
Line the pan
Parchment paper makes it much easier to lift out the finished loaf and prevents sticking. Leave a little overhang on the sides so you can use it as a handle.
Check the center
The top can look golden long before the middle is fully cooked. Always test the center with a toothpick or thin skewer before removing the loaf from the oven.
Let it cool completely
This is the step people are most tempted to skip. Flourless bread firms up as it cools, so slicing too early can lead to crumbling or a wet texture.
How to Make 3-Ingredient Chickpea Bread (Step by Step)
Step 1: Prepare the chickpeas
Preheat your oven to 350°F (175°C). Drain the two cans of chickpeas and rinse them well under cool water. Let them drain thoroughly, removing as much liquid as you can. If they seem particularly wet, pat them dry with a clean towel.
Line an 8 × 4 inch (20 × 10 cm) loaf pan with parchment paper, leaving a little overhang on the long sides.
Step 2: Blend the chickpeas and eggs
Add the drained chickpeas and the four large eggs to a blender or food processor. Blend until the mixture is as smooth as possible, pausing to scrape down the sides. The batter should look thick and creamy, with no big chunks of chickpea.
Step 3: Add the baking powder
Add the 2 teaspoons of baking powder and pulse briefly until evenly distributed. The batter will be thick and either spoonable or pourable, depending on the moisture in your chickpeas and the size of your eggs. That is completely normal for a flourless loaf.
Step 4: Transfer to the loaf pan
Pour or spoon the batter into the prepared pan. Use a spatula to spread it evenly into the corners and smooth the top. Tap the pan gently on the counter to release large air pockets. An even layer helps the loaf bake consistently from the edges to the center.
Step 5: Bake until set and golden
Bake for approximately 45 to 60 minutes. The top should be lightly golden, the edges set, and the center firm to the touch rather than wet. Insert a toothpick or skewer into the middle; it should come out without wet batter.
If the top is browning too quickly while the center is still soft, loosely cover the loaf with foil and keep baking in 5 to 10 minute increments. Baking time varies with your oven, your pan, and how much moisture is left in the chickpeas.
Step 6: Cool the bread
Let the loaf rest in the pan for 10 to 15 minutes. Then lift it out using the parchment paper and transfer it to a wire rack. Cool completely, ideally another 45 to 60 minutes, before slicing. The loaf continues to firm up as it cools, which helps the slices stay together.
Step 7: Slice and enjoy
Use a sharp serrated knife to cut even slices. Enjoy them as they are, or toast them lightly for a firmer exterior and a more pronounced nutty flavor.
Recipe Details
- Prep time: 10 to 15 minutes
- Bake time: 45 to 60 minutes
- Cooling time: 55 to 75 minutes
- Total time: about 1 hour 50 minutes to 2 hours 30 minutes
- Yield: 1 loaf, approximately 10 to 12 slices
- Difficulty: Easy
- Cooking method: Oven-baked
- Texture: Hearty, tender, moist, and slightly dense
What Does Chickpea Bread Taste Like?
Chickpea bread has a mild, savory, slightly nutty flavor. It does not taste like hummus, but you will notice a gentle earthiness from the chickpeas. The eggs give it a soft, tender crumb, somewhat like a firm frittata or a dense quick bread.
It is important to set expectations: this is not a fluffy wheat sandwich loaf. The texture is heartier and denser, and it works best when toasted and topped. If you approach it as its own thing rather than a perfect replica of white bread, you will probably love it.
Serving Ideas
This loaf is a blank canvas. Here are some of the best ways to eat it:
- Avocado toast: Spread mashed avocado over a toasted slice and finish with black pepper and a squeeze of lemon juice.
- Protein-rich breakfast: Serve with scrambled eggs or cottage cheese for a filling morning meal.
- Easy sandwiches: Layer grilled chicken, tuna, cheese, lettuce, tomato, or cucumber between two slices.
- Hummus toast: Spread hummus on a slice and top with fresh herbs or roasted vegetables.
- Savory snack: Toast a slice and enjoy it with olive oil or your favorite dip.
- Meal-prep lunches: Pair slices with a fresh salad, roasted vegetables, or a bowl of soup.
- Garlic herb variation: Add garlic powder, dried oregano, or rosemary to the batter before baking for extra flavor.
Easy Flavor Variations
The three-ingredient version is the foundation, but it is also easy to adapt once you are comfortable with the basic method. Add any of the following to the blender along with the baking powder, keeping the amounts modest so the batter does not become too wet:
- Savory herb loaf: a pinch of salt, dried oregano, and rosemary.
- Garlic loaf: garlic powder for a bolder flavor that pairs well with soups and pasta dishes.
- Simple seasoned loaf: a small pinch of salt on its own is enough to bring out the natural flavor of the chickpeas.
Change one thing at a time so you can tell what works in your oven and with your blender.
How to Store Chickpea Bread
Because this bread contains chickpeas and eggs and has a moist texture, it needs to be stored with care.
- At room temperature: Refrigerate the loaf within 2 hours of baking rather than leaving it out for extended periods.
- In the refrigerator: Once completely cooled, store the loaf or individual slices in an airtight container for up to 4 days.
- In the freezer: Slice the cooled bread and separate the slices with parchment paper. Place them in a freezer-safe bag or container and freeze for up to 2 to 3 months for the best quality.
- To reheat: Toast refrigerated slices until warmed through and lightly crisp. Frozen slices can go straight into the toaster if your appliance supports it; otherwise, thaw them in the refrigerator first.
Helpful tip: If the bread feels a little moist after refrigeration, toasting it before serving improves the texture and makes it sturdier for sandwiches.
Meal-Prep Strategy
This recipe fits neatly into a weekly meal-prep routine. Bake the loaf on a weekend, let it cool completely, and slice it right away. Keep four days’ worth of slices in the refrigerator and freeze the rest, separated with parchment paper. Each morning, pull out a slice, toast it, and top it with whatever you have on hand. Because it is sturdy once toasted, it holds up well to wet toppings like avocado, tomato, or hummus.
Troubleshooting: Common Problems and Fixes
My bread is too wet in the middle
This usually comes from chickpeas that were not drained well enough, or from cutting the loaf before it cooled. Next time, pat the chickpeas dry, skip any added water, and bake until a toothpick comes out clean from the center. If the top browns too fast, cover it loosely with foil and keep baking.
My bread crumbles when I slice it
Flourless bread needs time to set. Let the loaf cool completely on a wire rack, ideally 45 to 60 minutes after the initial rest in the pan. Use a sharp serrated knife and a gentle sawing motion.
The texture is gummy
Gumminess is a sign of too much moisture or underbaking. Drain the chickpeas more thoroughly and extend the baking time in 5 to 10 minute increments, checking the center each time.
The batter is too thick to blend
Blend in short bursts, scrape the sides often, and make sure the eggs are at room temperature. Avoid adding water unless you truly have no other option, and if you do, add only a very small amount.
The loaf did not rise much
This is expected. A flourless chickpea loaf rises only modestly, and the baking powder gives a gentle lift rather than a dramatic one. Make sure your baking powder is fresh, and pulse it in just until combined.
The bread sticks to the pan
Always line the pan with parchment paper, leaving overhang on the sides, so you can lift the loaf out easily.
Is Chickpea Bread Healthy?
Chickpea bread is a wholesome, minimally processed option. Chickpeas are a legume that contributes plant-based protein and fiber, and eggs add more protein along with a satisfying, filling quality. The recipe has no flour and only three simple ingredients, which makes it easy to know exactly what you are eating.
That said, “healthy” depends on your needs and what you pair it with. This article is not medical or dietary advice. If you manage a health condition, have allergies (eggs and legumes are common allergens), or follow a specific nutrition plan, check with a qualified professional. If you need nutrition numbers for tracking, calculate them with your own ingredients and a nutrition tool, since brands and egg sizes vary.
Chickpea Bread vs. Traditional Bread
| Chickpea bread | Traditional wheat bread | |
|---|---|---|
| Main base | Chickpeas and eggs | Wheat flour and yeast |
| Ingredients in base recipe | 3 | Typically 4 or more |
| Rising time | None | Often 1 to 2 hours or more |
| Texture | Dense, moist, hearty | Light, airy, chewy |
| Best served | Toasted and topped | Fresh, toasted, or as sandwiches |
| Equipment | Blender and loaf pan | Mixing bowl, often a stand mixer or kneading |
Neither is “better.” They serve different purposes. Chickpea bread shines when you want something quick, simple, and protein-forward, while traditional bread is the choice when you want that classic soft, airy crumb.
Frequently Asked Questions
Can I make chickpea bread without eggs?
In this recipe, the eggs are essential: they bind the chickpeas and help the loaf set. Egg replacements can change the texture significantly, so this particular recipe is written and tested with real eggs only.
Do I need a high-speed blender?
No. A standard blender or a food processor will work. You may need to blend in short bursts and scrape down the sides more often to get the batter smooth.
Can I use dried chickpeas instead of canned?
The recipe is written for canned chickpeas, which are already cooked and soft. If you use home-cooked dried chickpeas, make sure they are fully tender and well drained, so they do not add too much moisture.
Can I add seasonings?
Yes. The three main ingredients make the basic recipe, but a pinch of salt, garlic powder, or dried herbs can add extra flavor. Keep additions small so you do not disturb the texture.
How do I know when the bread is done?
The top should be lightly golden, the edges set, and the center firm. A toothpick or skewer inserted in the middle should come out without wet batter.
Why does it taste so different from regular bread?
Because it is made from chickpeas and eggs rather than wheat flour, it has a hearty, mildly nutty, savory flavor and a denser crumb. Toasting brings out its best qualities.
How long does it last?
In an airtight container in the refrigerator, it keeps for up to 4 days. In the freezer, sliced bread keeps for up to 2 to 3 months for the best quality.
Can I freeze it?
Yes. Slice the cooled loaf, separate the slices with parchment paper, and store them in a freezer-safe bag or container. Toast slices straight from the freezer if your toaster allows it, or thaw them in the refrigerator first.
Is this bread gluten-free?
The recipe contains no wheat flour. However, cross-contamination can occur in processed foods, so if you need to avoid gluten strictly, check the labels on your canned chickpeas and baking powder.
Can I double the recipe?
You can bake two loaves using two pans, but make sure your blender can handle the batter in batches. Blend each batch separately and bake both loaves in the same oven, checking the centers for doneness, since baking times can vary.
Final Thoughts
This 3-ingredient high-protein chickpea bread proves that homemade bread does not have to be complicated. With just chickpeas, eggs, and baking powder, a blender, and a single loaf pan, you can have a hearty, savory loaf ready for the week ahead. Remember the key points: drain the chickpeas well, blend until smooth, add the baking powder last, bake until the center is fully set, and let the bread cool completely before slicing.
Toast a slice, top it with avocado, hummus, or eggs, and enjoy a simple, satisfying bite any time of day. If you try this recipe, leave a comment below with your favorite toppings and any flavor variations you discovered.
Print
3-Ingredient High-Protein Chickpea Bread
Ingredients
Here is everything you need for one loaf, which makes roughly 10 to 12 slices:
- 2 cans chickpeas (15 oz / 425 g each), drained and rinsed
- 4 large eggs
- 2 teaspoons baking powder
Optional add-ins: a pinch of salt, garlic powder, or dried herbs such as oregano or rosemary.
Equipment: a blender or food processor, a standard loaf pan (about 8 × 4 inches / 20 × 10 cm), parchment paper, a spatula, and a wire rack.
Tips for the Best Chickpea Bread
Simple recipes depend on technique, and these small details make a big difference in how your loaf turns out.
Drain the chickpeas well
Rinse the chickpeas thoroughly under cool running water, then let the excess water drain away. If they still look very wet, gently pat them dry with a clean kitchen towel. Extra moisture is the number one reason flourless chickpea loaves turn out too soft or gummy in the middle.
Blend until smooth
A smooth batter creates an even texture and helps the loaf hold together after baking. You want a thick, creamy mixture with no large pieces of chickpea left. Stop and scrape down the sides as needed, and blend in short bursts if your machine struggles with the thick mixture.
Use room-temperature eggs
Room-temperature eggs blend more easily with the chickpeas and create a more consistent batter. If you forget to take them out ahead of time, place the eggs in a bowl of warm water for a few minutes.
Add the baking powder last
Blend the chickpeas and eggs first, then add the baking powder and pulse just until combined. Over-blending at this stage is not necessary, so keep it brief.
Do not add extra water
Avoid adding water unless it is absolutely necessary. Excess moisture can make the bread too soft inside.
Line the pan
Parchment paper makes it much easier to lift out the finished loaf and prevents sticking. Leave a little overhang on the sides so you can use it as a handle.
Check the center
The top can look golden long before the middle is fully cooked. Always test the center with a toothpick or thin skewer before removing the loaf from the oven.
Let it cool completely
This is the step people are most tempted to skip. Flourless bread firms up as it cools, so slicing too early can lead to crumbling or a wet texture.
Instructions
Preheat your oven to 350°F (175°C). Drain the two cans of chickpeas and rinse them well under cool water. Let them drain thoroughly, removing as much liquid as you can. If they seem particularly wet, pat them dry with a clean towel.
Line an 8 × 4 inch (20 × 10 cm) loaf pan with parchment paper, leaving a little overhang on the long sides.
Add the drained chickpeas and the four large eggs to a blender or food processor. Blend until the mixture is as smooth as possible, pausing to scrape down the sides. The batter should look thick and creamy, with no big chunks of chickpea.
Add the 2 teaspoons of baking powder and pulse briefly until evenly distributed. The batter will be thick and either spoonable or pourable, depending on the moisture in your chickpeas and the size of your eggs. That is completely normal for a flourless loaf.
Pour or spoon the batter into the prepared pan. Use a spatula to spread it evenly into the corners and smooth the top. Tap the pan gently on the counter to release large air pockets. An even layer helps the loaf bake consistently from the edges to the center.
Bake for approximately 45 to 60 minutes. The top should be lightly golden, the edges set, and the center firm to the touch rather than wet. Insert a toothpick or skewer into the middle; it should come out without wet batter.
If the top is browning too quickly while the center is still soft, loosely cover the loaf with foil and keep baking in 5 to 10 minute increments. Baking time varies with your oven, your pan, and how much moisture is left in the chickpeas.
Let the loaf rest in the pan for 10 to 15 minutes. Then lift it out using the parchment paper and transfer it to a wire rack. Cool completely, ideally another 45 to 60 minutes, before slicing. The loaf continues to firm up as it cools, which helps the slices stay together.
Use a sharp serrated knife to cut even slices. Enjoy them as they are, or toast them lightly for a firmer exterior and a more pronounced nutty flavor.