Soft & Fluffy Whole Wheat Pita Bread: An Easy Homemade Recipe for Perfect Pockets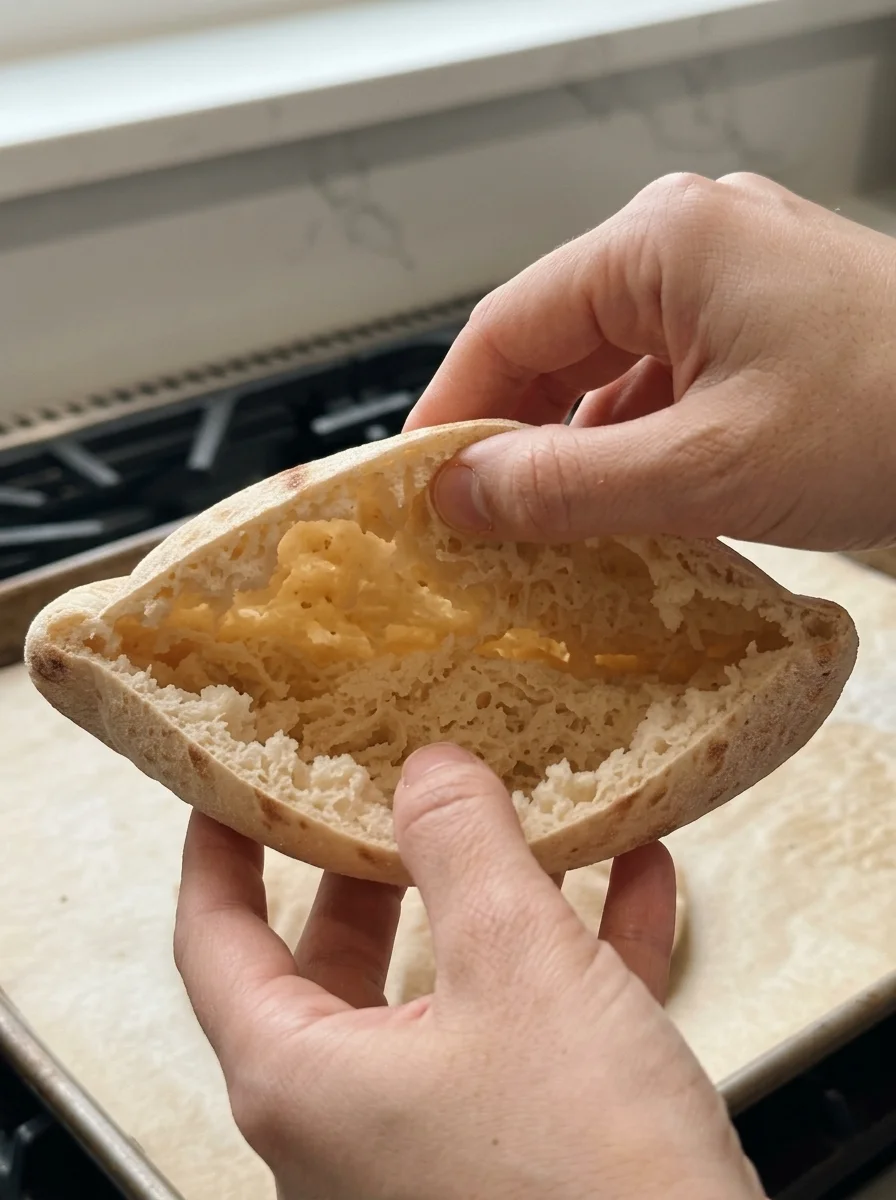
SEO title: Soft & Fluffy Whole Wheat Pita Bread Recipe (Easy Homemade Pockets)
Meta description: Learn how to make soft, fluffy whole wheat pita bread at home. This easy recipe puffs into perfect pockets in the oven or on the stovetop. Includes tips, variations, storage, and FAQ.
Focus keyword: whole wheat pita bread
Secondary keywords: homemade pita bread, whole wheat pita recipe, pita pockets, soft pita bread, easy pita recipe, how to make pita bread, pita bread without a stone, stovetop pita, healthy flatbread
Few breads are as satisfying to make at home as pita. You roll out a few simple rounds of dough, slide them onto a blazing hot surface, and watch through the oven window as they inflate like little balloons. A few minutes later you are holding a warm, tender, pillowy flatbread with a natural pocket, ready to be stuffed with hummus, falafel, grilled chicken, crisp vegetables, or whatever fillings you love.
This recipe for soft and fluffy whole wheat pita bread gives you all of that with a nutty, wholesome flavor. A combination of whole wheat and all-purpose flour keeps the texture tender rather than heavy, while a touch of olive oil and honey helps the pitas stay soft and flexible. You do not need a special oven, a bread machine, or any fancy equipment. A hot baking sheet or a heavy skillet is all it takes.
In this guide you will find the full recipe, a clear step-by-step method, an explanation of how pita gets its pocket, tips for getting every pita to puff, troubleshooting help, variations, serving ideas, storage and reheating instructions, and answers to the questions home bakers ask most often.
Why You’ll Love This Whole Wheat Pita Bread
Store-bought pita is convenient, but homemade pita has a freshness and softness that is hard to match. Here is why this recipe is worth making.
- Soft and tender. Olive oil, honey, and an optional spoonful of yogurt keep the pitas pillowy and flexible, so they fold without cracking.
- Wholesome flavor. Whole wheat flour adds a mild, nutty taste and extra fiber compared with white pita.
- Simple ingredients. You only need flour, yeast, honey, salt, olive oil, and warm water.
- Oven or stovetop. Bake the pitas on a hot baking sheet or stone, or cook them in a heavy skillet if you prefer.
- Great for meal prep. The pitas freeze well, so you can bake a batch and keep them on hand for quick lunches.
- Endlessly versatile. Use them as pockets, wraps, dippers, pizza bases, or crispy homemade pita chips.
Recipe Overview
- Prep time: 20 minutes
- Rise time: 1 hour 15 minutes
- Cook time: 12 to 18 minutes per batch
- Total time: About 1 hour 50 minutes
- Yield: 8 medium pitas
- Difficulty: Easy to moderate
Ingredients for Whole Wheat Pita Bread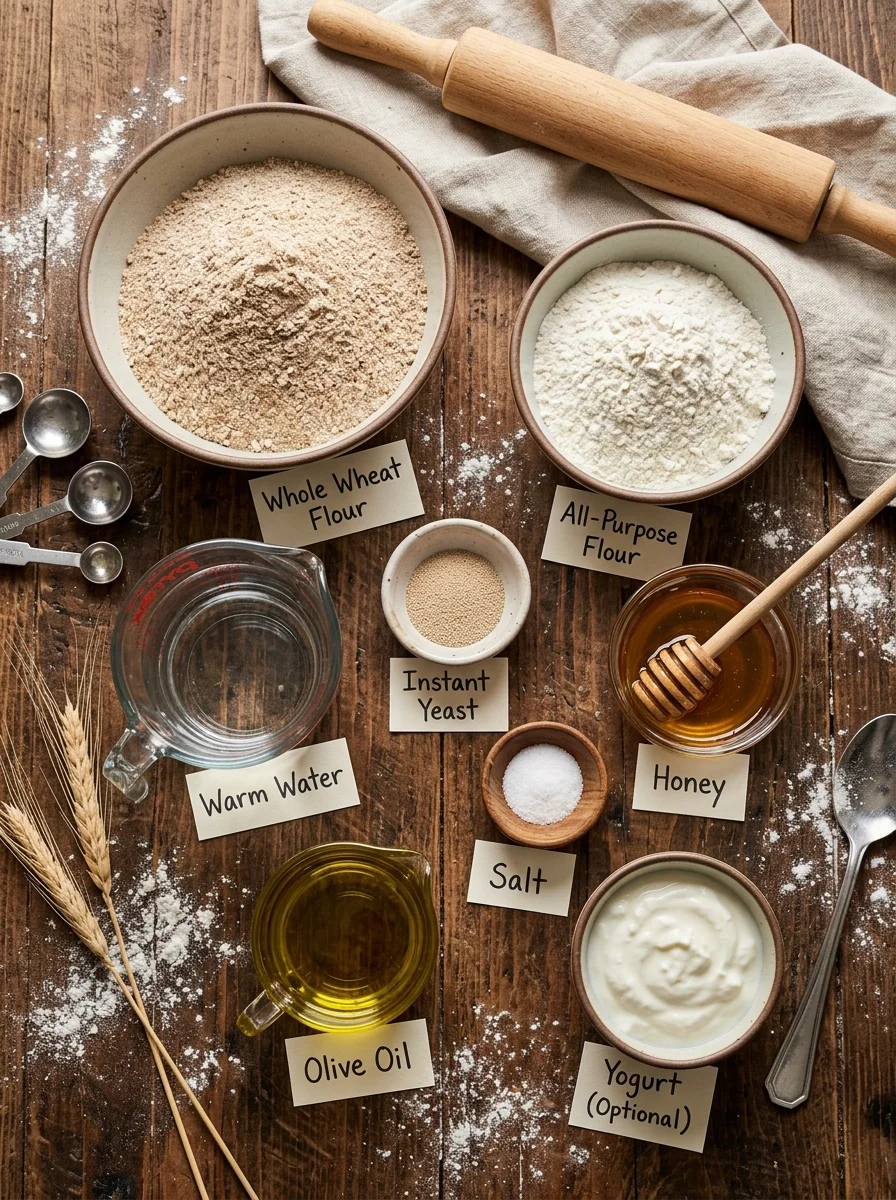
For the dough
- 2 cups (260 g) whole wheat flour
- 1 cup (125 g) all-purpose flour, plus extra for kneading
- 2¼ teaspoons (7 g) instant yeast
- 1 tablespoon honey or sugar
- 1 teaspoon salt
- 1 tablespoon olive oil
- 1 cup (240 ml) warm water, plus 1 to 3 tablespoons if needed
Optional for extra softness
- 2 tablespoons plain yogurt
- 1 teaspoon olive oil for brushing after baking
A Closer Look at the Key Ingredients
Whole wheat flour. Whole wheat flour contains the bran and germ of the wheat kernel, which gives the bread its nutty flavor and a more rustic texture. It also absorbs more water than white flour, which is why this dough should feel slightly tacky.
All-purpose flour. Blending in some all-purpose flour lightens the crumb and makes the dough easier to roll. It gives you a softer pita than a version made entirely with whole wheat.
Instant yeast. Instant yeast can be mixed directly with the dry ingredients. If you only have active dry yeast, dissolve it in the warm water with the honey first and let it stand for 5 to 10 minutes until foamy.
Honey or sugar. A small amount of sweetener feeds the yeast and adds a subtle hint of flavor. It also helps the crust brown lightly.
Olive oil. Olive oil keeps the dough supple and the finished pita tender. It also adds a pleasant, slightly fruity flavor that suits Mediterranean fillings.
Warm water. Water brings the dough together and activates the yeast. It should feel warm, not hot, at approximately 100 to 110°F (38 to 43°C). Water that is too hot can damage the yeast and keep the dough from rising.
Plain yogurt (optional). Yogurt adds tenderness and a very slight tang. It is a great option if you want pitas with an extra flexible crumb.
How to Make Whole Wheat Pita Bread: Step by Step
Step 1: Activate the Yeast
If using instant yeast, mix it directly with the flours. If using active dry yeast, stir it into the warm water with the honey or sugar and let it stand for 5 to 10 minutes, until foamy.
The water should feel warm, not hot, at approximately 100 to 110°F (38 to 43°C).
Step 2: Make the Dough
In a large bowl, combine the whole wheat flour, all-purpose flour, yeast, and salt.
Add the honey, olive oil, warm water, and yogurt if using. Mix until a rough dough forms. Add extra water a tablespoon at a time if the dough feels dry.
Whole wheat flour varies from brand to brand and absorbs moisture differently depending on how finely it is milled and how humid your kitchen is. Do not be alarmed if you need the extra water.
Step 3: Knead Until Smooth
Knead by hand for 8 to 10 minutes, or with a stand mixer fitted with a dough hook for 5 to 7 minutes.
The dough should be soft, smooth, and slightly tacky, but not excessively sticky. Avoid adding too much extra flour, as this can make the pitas dense.
A good test is to gently pinch off a small piece and stretch it. If it stretches thinly without tearing right away, the gluten is well developed.
Step 4: Let the Dough Rise
Lightly oil a bowl and place the dough inside. Cover and let it rise in a warm place for 60 to 75 minutes, or until approximately doubled in size.
A warm spot might be a turned-off oven with the light on, or a countertop away from drafts. Rising time varies with the temperature of your kitchen, so watch the dough rather than the clock.
Step 5: Divide and Shape
Gently press the dough to release excess air. Divide it into 8 equal pieces and roll each into a ball.
Cover the dough balls with a clean kitchen towel and let them rest for 10 to 15 minutes. This relaxes the gluten and makes rolling easier. If you skip the rest, the dough will keep springing back as you roll it.
Step 6: Roll the Pitas
On a lightly floured surface, roll each ball into a circle about 6 to 7 inches (15 to 18 cm) wide and roughly ⅛ inch (3 to 4 mm) thick.
Try to keep the thickness even throughout each circle. Cover the rolled pitas with a towel while you prepare the others so they do not dry out.
Even thickness is the secret to a good pocket. If the center is thicker than the edges, or the other way around, the steam will not distribute evenly and the pita may only puff partially.
Step 7: Bake Until Puffed
Preheat the oven to 475°F (245°C) with a heavy baking sheet, pizza stone, or baking steel inside. Allow it to heat thoroughly for at least 20 to 30 minutes.
Carefully place 1 or 2 pitas on the hot surface, leaving space between them. Bake for about 2 to 4 minutes, until they puff up and develop a few light golden spots. Turn only if needed, and avoid overbaking.
Repeat with the remaining dough.
Stovetop alternative: Heat a heavy skillet over medium-high heat. Cook one pita for about 1 to 2 minutes, until bubbles form. Flip and cook for another 1 to 2 minutes, then flip once more briefly if needed until it puffs. Adjust the heat so the bread cooks without burning.
Step 8: Keep Them Soft
As each pita comes out, place it under a clean kitchen towel. Stack the warm breads together to trap steam and keep the crusts soft.
For an extra tender finish, brush very lightly with olive oil while warm, if desired.
How Does Pita Bread Puff Up?
The signature pocket of pita is not magic, it is simple science. When a thin round of dough hits a very hot surface, the water inside the dough turns to steam almost immediately. The steam expands rapidly and pushes the top and bottom layers of dough apart, inflating the bread like a balloon. As the crust sets, the pocket stays in place even after the pita cools and deflates slightly.
Three things matter most for a good puff. First, the baking surface must be very hot so the steam forms quickly. Second, the dough must be rolled to an even thickness so the steam can lift the layers together. Third, the dough must not be dried out by too much flour or by sitting uncovered, because a dry surface can hold the layers together and keep the pocket from opening.
Tips for Perfect Pita Pockets
- Use a very hot baking surface. Intense heat creates the steam needed to separate the dough layers and form a pocket.
- Keep the dough soft. Whole wheat flour absorbs more water than white flour, so a slightly tacky dough is ideal.
- Roll evenly. Thick centers or thin edges can prevent a uniform puff.
- Do not skip the resting time. Resting makes the dough easier to roll without shrinking back.
- Avoid excess flour when rolling. Too much dry flour can interfere with puffing and leave the bread dry.
- Do not overbake. Remove the pitas as soon as they puff and develop light spots. Prolonged baking makes them crisp and brittle.
- Do not worry if every pita does not puff. They will still taste delicious and can be used as flatbreads.
- Work with a few pitas at a time. Keep the rolled rounds covered so they stay moist until they go into the oven.
Troubleshooting Common Pita Problems
My pitas did not puff. The most common causes are a baking surface that is not hot enough, dough rolled too thin or unevenly, or a surface that dried out. Preheat the oven and baking sheet for the full 20 to 30 minutes, roll to about ⅛ inch, and keep the rolled pitas covered.
My pitas are hard or crispy. They were probably overbaked. Pull them out as soon as they puff and show light golden spots, and stack them under a towel right away so steam can soften the crust.
The dough keeps shrinking when I roll it. The gluten is tight. Let the dough balls rest, covered, for another 10 minutes and try again.
The dough is too sticky. Whole wheat flour needs time to absorb water. Knead a few minutes longer before adding more flour, and add only a little at a time.
The dough is too dry. Add water 1 tablespoon at a time. The recipe allows 1 to 3 extra tablespoons depending on your flour and kitchen.
The pitas are dense. The dough may have too much added flour, or it may not have risen long enough. Keep the dough slightly tacky and let it approximately double in size.
Easy Variations
100% Whole Wheat Pitas. Replace the all-purpose flour with an equal weight of whole wheat flour. Add water gradually as needed, and expect a slightly heartier texture.
Extra-Soft Yogurt Pitas. Use the optional yogurt for a tender, flexible crumb.
Garlic Herb Pitas. Add ½ teaspoon of garlic powder and 1 teaspoon of dried oregano to the dry ingredients.
Seeded Whole Wheat Pitas. Mix 1 tablespoon of sesame seeds or flaxseeds into the dough.
Dairy-Free Version. Simply omit the yogurt. The recipe works beautifully without it.
Serving Ideas
Warm homemade pita is delicious on its own, but it truly shines with good fillings and dips. Try it with:
- Falafel, hummus, cucumber, tomato, and lettuce
- A grilled chicken or roasted vegetable pita sandwich
- Baba ganoush, tzatziki, or olive oil and za’atar
- Homemade pita chips: cut into wedges, brush lightly with olive oil, and bake until crisp
- Quick mini pizzas, using the pita as the base
For an easy mezze-style dinner, serve warm pita with a few dips, olives, sliced vegetables, and some grilled meat or roasted chickpeas. Everyone can build their own pockets at the table.
How to Store Whole Wheat Pita Bread
- Room temperature: Cool completely, then store in an airtight bag or container for up to 2 days.
- Refrigerator: Store airtight for up to 5 days, although refrigeration may make the bread firm faster.
- Freezer: Freeze completely cooled pitas with parchment between them in a freezer-safe bag for up to 3 months.
To reheat: Sprinkle lightly with water and warm in a covered skillet for 20 to 30 seconds per side, or wrap in foil and heat in a 300°F (150°C) oven for about 5 to 8 minutes. Thaw frozen pitas before reheating, or warm them gently for a little longer.
Cooling the pitas completely before bagging them is important. Sealing warm bread traps too much moisture and can make the surface gummy.
Frequently Asked Questions
Can I make pita bread without a pizza stone?
Yes. A heavy baking sheet preheated in the oven works well. You can also use the stovetop method with a heavy skillet.
Can I use 100% whole wheat flour?
Yes. Replace the all-purpose flour with an equal weight of whole wheat flour and add water gradually. The pitas will be a little heartier and slightly denser.
Can I use active dry yeast instead of instant yeast?
Yes. Stir the active dry yeast into the warm water with the honey or sugar and let it stand for 5 to 10 minutes until foamy before mixing the dough.
Why did my pita not form a pocket?
Usually the baking surface was not hot enough, the dough was uneven or too thin, or the surface dried out. Even pitas that do not puff are still delicious as flatbreads.
How thick should I roll the dough?
Roll each ball into a circle about 6 to 7 inches (15 to 18 cm) wide and roughly ⅛ inch (3 to 4 mm) thick, keeping the thickness even.
Is the yogurt necessary?
No. The yogurt is optional and adds extra tenderness. The recipe works well without it, which also makes it dairy-free.
How do I keep pita bread soft?
Wrap the warm pitas in a clean kitchen towel as they come out of the oven. The trapped steam softens the crust. A light brush of olive oil also helps.
Can I freeze homemade pita?
Yes. Cool the pitas completely, separate them with parchment, and freeze them in a freezer-safe bag for up to 3 months.
Can I make the dough ahead of time?
This recipe is written for same-day baking. If you want to plan ahead, it is best to bake the pitas and freeze them, then reheat them when needed.
What can I do with pitas that did not puff?
Use them as flatbreads, wraps, dippers, or pizza bases, or cut them into wedges for homemade pita chips.
Final Thoughts
Homemade whole wheat pita bread is soft, warm, and tender, with a lightly nutty flavor and a wonderfully flexible texture. When the dough is properly hydrated and the cooking surface is hot enough, many of the pitas will puff into beautiful pockets ready for all your favorite fillings. The ingredients are simple, the method is approachable, and the result is far fresher than anything from a bag.
Homemade, wholesome, and perfect for everyday meals. Bake a batch this week, fill them with your favorite ingredients, and keep a few in the freezer for easy lunches.
Print
Soft & Fluffy Whole Wheat Pita Bread
Ingredients
For the dough
- 2 cups (260 g) whole wheat flour
- 1 cup (125 g) all-purpose flour, plus extra for kneading
- 2¼ teaspoons (7 g) instant yeast
- 1 tablespoon honey or sugar
- 1 teaspoon salt
- 1 tablespoon olive oil
- 1 cup (240 ml) warm water, plus 1 to 3 tablespoons if needed
Optional for extra softness
- 2 tablespoons plain yogurt
- 1 teaspoon olive oil for brushing after baking
A Closer Look at the Key Ingredients
Whole wheat flour. Whole wheat flour contains the bran and germ of the wheat kernel, which gives the bread its nutty flavor and a more rustic texture. It also absorbs more water than white flour, which is why this dough should feel slightly tacky.
All-purpose flour. Blending in some all-purpose flour lightens the crumb and makes the dough easier to roll. It gives you a softer pita than a version made entirely with whole wheat.
Instant yeast. Instant yeast can be mixed directly with the dry ingredients. If you only have active dry yeast, dissolve it in the warm water with the honey first and let it stand for 5 to 10 minutes until foamy.
Honey or sugar. A small amount of sweetener feeds the yeast and adds a subtle hint of flavor. It also helps the crust brown lightly.
Olive oil. Olive oil keeps the dough supple and the finished pita tender. It also adds a pleasant, slightly fruity flavor that suits Mediterranean fillings.
Warm water. Water brings the dough together and activates the yeast. It should feel warm, not hot, at approximately 100 to 110°F (38 to 43°C). Water that is too hot can damage the yeast and keep the dough from rising.
Plain yogurt (optional). Yogurt adds tenderness and a very slight tang. It is a great option if you want pitas with an extra flexible crumb.
Instructions
If using instant yeast, mix it directly with the flours. If using active dry yeast, stir it into the warm water with the honey or sugar and let it stand for 5 to 10 minutes, until foamy.
The water should feel warm, not hot, at approximately 100 to 110°F (38 to 43°C).
In a large bowl, combine the whole wheat flour, all-purpose flour, yeast, and salt.
Add the honey, olive oil, warm water, and yogurt if using. Mix until a rough dough forms. Add extra water a tablespoon at a time if the dough feels dry.
Whole wheat flour varies from brand to brand and absorbs moisture differently depending on how finely it is milled and how humid your kitchen is. Do not be alarmed if you need the extra water.
Knead by hand for 8 to 10 minutes, or with a stand mixer fitted with a dough hook for 5 to 7 minutes.
The dough should be soft, smooth, and slightly tacky, but not excessively sticky. Avoid adding too much extra flour, as this can make the pitas dense.
A good test is to gently pinch off a small piece and stretch it. If it stretches thinly without tearing right away, the gluten is well developed.
Lightly oil a bowl and place the dough inside. Cover and let it rise in a warm place for 60 to 75 minutes, or until approximately doubled in size.
A warm spot might be a turned-off oven with the light on, or a countertop away from drafts. Rising time varies with the temperature of your kitchen, so watch the dough rather than the clock.
Gently press the dough to release excess air. Divide it into 8 equal pieces and roll each into a ball.
Cover the dough balls with a clean kitchen towel and let them rest for 10 to 15 minutes. This relaxes the gluten and makes rolling easier. If you skip the rest, the dough will keep springing back as you roll it.
On a lightly floured surface, roll each ball into a circle about 6 to 7 inches (15 to 18 cm) wide and roughly ⅛ inch (3 to 4 mm) thick.
Try to keep the thickness even throughout each circle. Cover the rolled pitas with a towel while you prepare the others so they do not dry out.
Even thickness is the secret to a good pocket. If the center is thicker than the edges, or the other way around, the steam will not distribute evenly and the pita may only puff partially.
Preheat the oven to 475°F (245°C) with a heavy baking sheet, pizza stone, or baking steel inside. Allow it to heat thoroughly for at least 20 to 30 minutes.
Carefully place 1 or 2 pitas on the hot surface, leaving space between them. Bake for about 2 to 4 minutes, until they puff up and develop a few light golden spots. Turn only if needed, and avoid overbaking.
Repeat with the remaining dough.
Stovetop alternative: Heat a heavy skillet over medium-high heat. Cook one pita for about 1 to 2 minutes, until bubbles form. Flip and cook for another 1 to 2 minutes, then flip once more briefly if needed until it puffs. Adjust the heat so the bread cooks without burning.
As each pita comes out, place it under a clean kitchen towel. Stack the warm breads together to trap steam and keep the crusts soft.
For an extra tender finish, brush very lightly with olive oil while warm, if desired.