Ingredients
Here is everything you need to make one large loaf, which yields approximately 10 to 12 slices.
- 4 cups (480 g) bread flour or all-purpose flour
- 1½ cups (360 ml) warm water
- 2¼ teaspoons (7 g) active dry yeast or instant yeast
- 1 teaspoon granulated sugar
- 1½ teaspoons salt
- 1 tablespoon olive oil
- 1 tablespoon flour, for dusting
- A little water for creating steam in the oven (optional)
Ingredient Notes and Substitutions
Flour. Bread flour has a higher protein content than all-purpose flour, which develops more gluten and gives the loaf a chewier texture and a better rise. All-purpose flour still works beautifully and produces a slightly softer crumb. Either option gives excellent results, so use whichever you have on hand.
Water. The water should feel comfortably warm, not hot. Water that is too hot can kill the yeast, while water that is too cool will slow down activation. If it feels pleasantly warm on your wrist, like a baby’s bottle, it is about right.
Yeast. Both active dry yeast and instant yeast work in this recipe. Active dry yeast should be dissolved in the warm water with the sugar and left until foamy. Instant yeast can be mixed directly into the flour, so you can skip the proofing step.
Sugar. Just one teaspoon is used here. It gives the yeast a little food to get started and helps with browning, but it will not make the bread taste sweet.
Salt. Salt controls the yeast and builds flavor. Do not skip it, or the bread will taste flat.
Olive oil. A single tablespoon softens the crumb and adds a hint of Italian character. Extra-virgin olive oil adds the most flavor.
Instructions
In a large mixing bowl, combine the warm water, sugar, and active dry yeast. Let the mixture stand for about 5 to 10 minutes, until it turns foamy. A foamy surface tells you the yeast is alive and ready to work. If you are using instant yeast, you can mix it directly with the flour instead.
Add the flour, salt, and olive oil to the yeast mixture. Stir with a wooden spoon until a rough dough forms and no large patches of dry flour remain. At this stage, the dough should feel soft and slightly sticky. Resist the urge to add lots of extra flour, because a slightly tacky dough is the secret to a light, airy interior.
Transfer the dough to a lightly floured surface and knead for about 8 to 10 minutes, until it is smooth and elastic. If you prefer to use a stand mixer fitted with a dough hook, knead for approximately 5 to 7 minutes.
If the dough is sticky, keep kneading before you add a little extra flour. Kneading often fixes stickiness on its own as the gluten develops. The dough is ready when it feels smooth, springs back when poked, and stretches without tearing easily.
Place the dough in a lightly greased bowl and turn it once to coat the surface. Cover with a clean kitchen towel or plastic wrap and let it rise in a warm place for about 1 to 1½ hours, or until it has doubled in size.
Pay attention to the dough rather than the clock. Kitchen temperature affects rising time, so a cool room may need longer and a warm room may need less.
Gently press the dough to release excess air. Transfer it to a lightly floured surface and shape it into a long oval loaf. Fold the edges inward if needed, then roll the dough gently to create an even shape. Pinch the seam closed and place the loaf seam-side down on a parchment-lined baking sheet.
Cover the shaped loaf loosely with a clean kitchen towel and let it rise for another 30 to 45 minutes, until slightly puffy. While it rests, preheat your oven to 425°F (220°C). If you are using a baking stone or heavy baking sheet, place it in the oven while it preheats so it gets very hot.
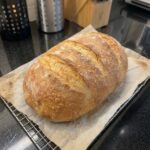
Dust the loaf lightly with flour if desired. Using a sharp bread knife or bread lame, make 2 to 3 shallow diagonal cuts across the top. Scoring gives the loaf room to expand in the oven and creates that traditional rustic bakery appearance.
Place the loaf in the preheated oven and bake for approximately 25 to 35 minutes, until the crust is a deep golden brown and the loaf sounds hollow when tapped on the bottom.
For an extra crispy crust: carefully place a heatproof pan on the lower oven rack while preheating. When the bread goes into the oven, add a small amount of hot water to the pan to create steam. Keep your face and hands away from the steam, and never pour water directly onto the oven floor.
Remove the loaf from the oven and transfer it to a wire rack. Let it cool for at least 30 minutes before slicing. This allows the interior to finish setting while the crust stays crisp. Cutting too early can make the center gummy and cause the crust to soften from trapped steam.
Cut the loaf into thick slices and serve it fresh. Enjoy it with butter, dip it in olive oil, or pair it with your favorite pasta, soup, or salad for a comforting homemade meal.