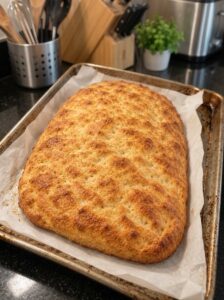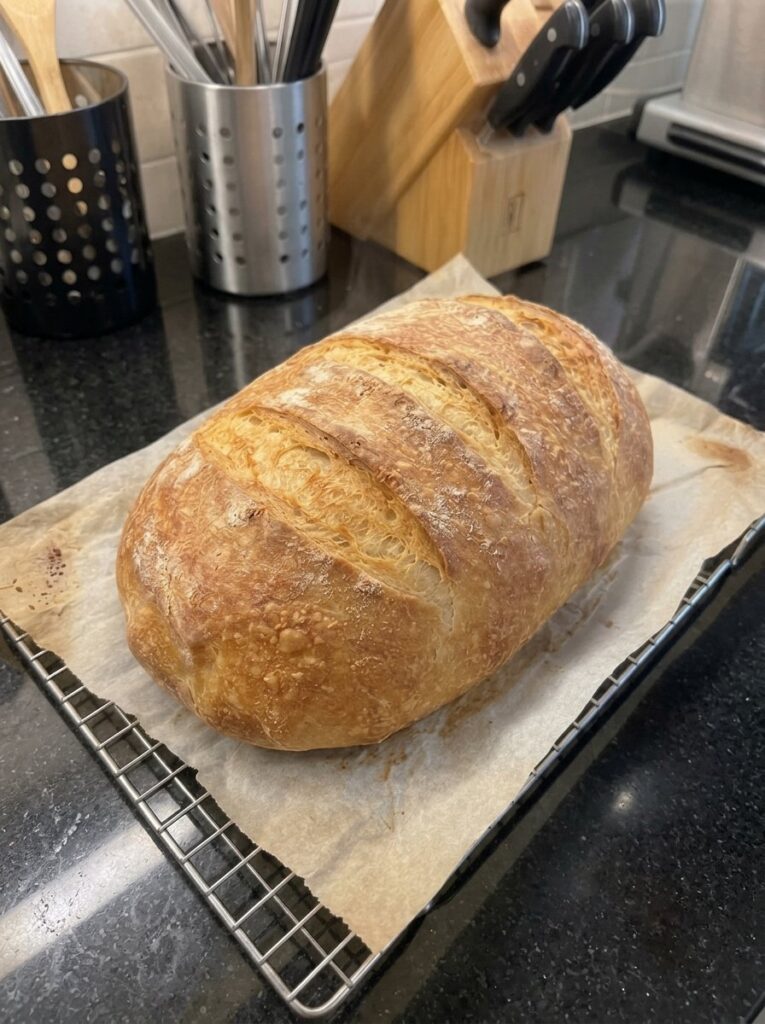
There is nothing quite like tearing into a freshly baked loaf of crusty Italian bread. You hear the crackle of the golden crust, you catch the warm, yeasty aroma, and then you discover the soft, airy center waiting inside. It is the kind of bread that turns a simple bowl of soup into a full meal and makes pasta night feel like dinner at a little trattoria.
The good news is that you do not need a professional bakery, a sourdough starter, or years of experience to make it. This homemade Italian bread recipe uses just a handful of pantry staples: flour, water, yeast, salt, a little sugar, and olive oil. With some patience and a few smart techniques, you can bake a loaf with a crunchy exterior and a tender, fluffy crumb right in your own oven.
In this complete guide, you will find the full ingredient list, detailed step-by-step instructions, expert tips for the crispiest crust, troubleshooting help, delicious serving ideas, storage advice, and answers to the most common questions about baking Italian bread at home.
What Is Crusty Italian Bread?
Crusty Italian bread is a rustic, oval-shaped loaf known for its thin, crisp, golden-brown crust and its light, soft interior. Unlike dense sandwich loaves or heavily enriched breads, Italian-style bread is made from a lean dough, which means it contains little fat and no eggs or milk. That simplicity is exactly what gives it a clean, mildly savory flavor and a satisfying chew.
This version includes a small amount of olive oil, which keeps the crumb tender and adds a subtle richness without making the loaf heavy. The result is a bread that is crunchy on the outside, soft and fluffy on the inside, and versatile enough to pair with almost any meal.
Why You Will Love This Recipe
There are plenty of bread recipes out there, but this one stands out for several reasons:
- Simple ingredients. You probably already have everything you need in your kitchen.
- Beginner-friendly. The dough is forgiving, and every step is explained clearly.
- Bakery-style results. A hot oven, a little steam, and shallow scoring create that classic rustic look and crackly crust.
- Soft, airy texture. A slightly tacky dough and a full rise give you a light, fluffy center.
- Incredibly versatile. Use it for dipping, garlic bread, bruschetta, sandwiches, or mopping up sauce.
- Freezer-friendly. Slice and freeze for fresh-tasting bread whenever you want it.
Crusty Italian Bread Ingredients
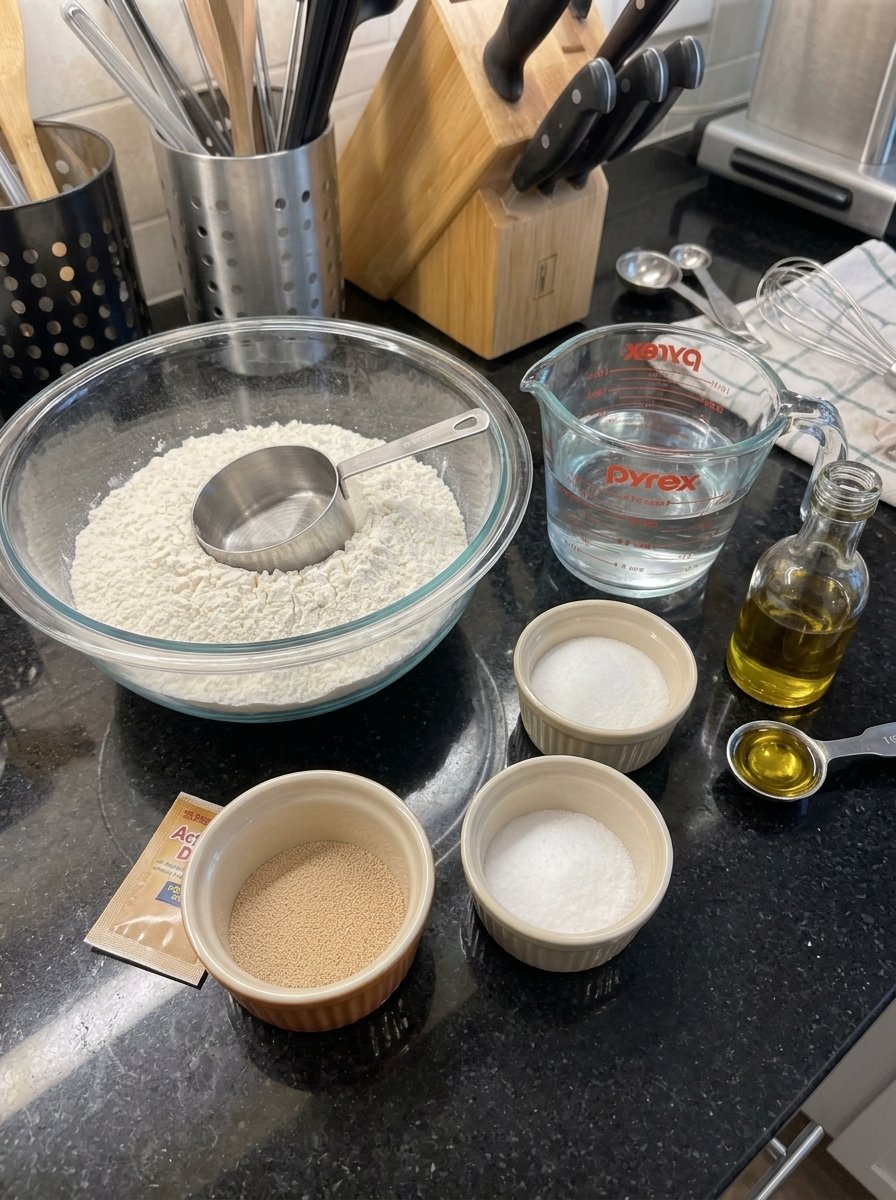
Here is everything you need to make one large loaf, which yields approximately 10 to 12 slices.
- 4 cups (480 g) bread flour or all-purpose flour
- 1½ cups (360 ml) warm water
- 2¼ teaspoons (7 g) active dry yeast or instant yeast
- 1 teaspoon granulated sugar
- 1½ teaspoons salt
- 1 tablespoon olive oil
- 1 tablespoon flour, for dusting
- A little water for creating steam in the oven (optional)
Ingredient Notes and Substitutions
Flour. Bread flour has a higher protein content than all-purpose flour, which develops more gluten and gives the loaf a chewier texture and a better rise. All-purpose flour still works beautifully and produces a slightly softer crumb. Either option gives excellent results, so use whichever you have on hand.
Water. The water should feel comfortably warm, not hot. Water that is too hot can kill the yeast, while water that is too cool will slow down activation. If it feels pleasantly warm on your wrist, like a baby’s bottle, it is about right.
Yeast. Both active dry yeast and instant yeast work in this recipe. Active dry yeast should be dissolved in the warm water with the sugar and left until foamy. Instant yeast can be mixed directly into the flour, so you can skip the proofing step.
Sugar. Just one teaspoon is used here. It gives the yeast a little food to get started and helps with browning, but it will not make the bread taste sweet.
Salt. Salt controls the yeast and builds flavor. Do not skip it, or the bread will taste flat.
Olive oil. A single tablespoon softens the crumb and adds a hint of Italian character. Extra-virgin olive oil adds the most flavor.
Equipment You Will Need
You do not need fancy tools to make great bread. Here is a simple checklist:
- A large mixing bowl
- A wooden spoon
- A lightly floured work surface (or a stand mixer with a dough hook)
- A clean kitchen towel or plastic wrap
- A baking sheet lined with parchment paper (a baking stone or heavy baking sheet is a bonus)
- A sharp bread knife or bread lame for scoring
- A heatproof pan for creating steam
- A wire cooling rack
How to Make Crusty Italian Bread: Step-by-Step
Step 1: Prepare the Yeast
In a large mixing bowl, combine the warm water, sugar, and active dry yeast. Let the mixture stand for about 5 to 10 minutes, until it turns foamy. A foamy surface tells you the yeast is alive and ready to work. If you are using instant yeast, you can mix it directly with the flour instead.
Step 2: Mix the Dough
Add the flour, salt, and olive oil to the yeast mixture. Stir with a wooden spoon until a rough dough forms and no large patches of dry flour remain. At this stage, the dough should feel soft and slightly sticky. Resist the urge to add lots of extra flour, because a slightly tacky dough is the secret to a light, airy interior.
Step 3: Knead Until Smooth
Transfer the dough to a lightly floured surface and knead for about 8 to 10 minutes, until it is smooth and elastic. If you prefer to use a stand mixer fitted with a dough hook, knead for approximately 5 to 7 minutes.
If the dough is sticky, keep kneading before you add a little extra flour. Kneading often fixes stickiness on its own as the gluten develops. The dough is ready when it feels smooth, springs back when poked, and stretches without tearing easily.
Step 4: Let the Dough Rise
Place the dough in a lightly greased bowl and turn it once to coat the surface. Cover with a clean kitchen towel or plastic wrap and let it rise in a warm place for about 1 to 1½ hours, or until it has doubled in size.
Pay attention to the dough rather than the clock. Kitchen temperature affects rising time, so a cool room may need longer and a warm room may need less.
Step 5: Shape the Loaf
Gently press the dough to release excess air. Transfer it to a lightly floured surface and shape it into a long oval loaf. Fold the edges inward if needed, then roll the dough gently to create an even shape. Pinch the seam closed and place the loaf seam-side down on a parchment-lined baking sheet.
Step 6: Allow the Second Rise
Cover the shaped loaf loosely with a clean kitchen towel and let it rise for another 30 to 45 minutes, until slightly puffy. While it rests, preheat your oven to 425°F (220°C). If you are using a baking stone or heavy baking sheet, place it in the oven while it preheats so it gets very hot.
Step 7: Score the Top
Dust the loaf lightly with flour if desired. Using a sharp bread knife or bread lame, make 2 to 3 shallow diagonal cuts across the top. Scoring gives the loaf room to expand in the oven and creates that traditional rustic bakery appearance.
Step 8: Bake Until Golden
Place the loaf in the preheated oven and bake for approximately 25 to 35 minutes, until the crust is a deep golden brown and the loaf sounds hollow when tapped on the bottom.
For an extra crispy crust: carefully place a heatproof pan on the lower oven rack while preheating. When the bread goes into the oven, add a small amount of hot water to the pan to create steam. Keep your face and hands away from the steam, and never pour water directly onto the oven floor.
Step 9: Cool on a Wire Rack
Remove the loaf from the oven and transfer it to a wire rack. Let it cool for at least 30 minutes before slicing. This allows the interior to finish setting while the crust stays crisp. Cutting too early can make the center gummy and cause the crust to soften from trapped steam.
Step 10: Slice and Enjoy
Cut the loaf into thick slices and serve it fresh. Enjoy it with butter, dip it in olive oil, or pair it with your favorite pasta, soup, or salad for a comforting homemade meal.
Tips for the Best Crusty Italian Bread
Small details make a big difference in bread baking. Keep these tips in mind every time you bake:
- Use warm water, not hot. Comfortably warm water activates yeast properly without harming it.
- Keep the dough slightly tacky. A soft dough creates a light, airy interior. Avoid adding too much extra flour while kneading and shaping.
- Allow enough rising time. Let the dough double in size rather than relying only on the clock. Under-risen dough bakes up dense.
- Create steam while baking. Steam during the early part of baking keeps the surface flexible so the loaf can expand fully, then helps develop a crisp, beautifully golden crust.
- Score the loaf before baking. Shallow cuts guide the expansion of the bread and give it a classic bakery look.
- Preheat thoroughly. A fully heated oven, and a hot baking stone or sheet if you have one, gives the loaf a strong burst of heat right away.
- Cool before slicing. Patience pays off. Cooling lets the crumb set and preserves that fluffy texture.
Troubleshooting: Common Bread Problems and Fixes
My dough did not rise. The yeast may have been old, or the water may have been too hot or too cold. Check the expiration date on your yeast, and make sure the water is only comfortably warm. Also try placing the dough in a warmer spot, such as inside the oven with just the light turned on.
My bread turned out dense. Dense bread usually means the dough was under-risen, under-kneaded, or had too much flour added. Let the dough fully double in size, knead until smooth and elastic, and keep the dough soft and slightly sticky.
The crust is too soft. Make sure your oven is fully preheated and add steam during baking. Also let the bread cool uncovered on a wire rack, and avoid storing it in a plastic bag until it has cooled completely.
The crust is too hard or too dark. Check your oven temperature with an oven thermometer, since many ovens run hot. If the crust browns too quickly, move the rack slightly lower or tent the loaf loosely with foil for the last part of baking.
The loaf spread flat instead of rising upward. The dough may have been over-proofed, or the shaping may not have created enough surface tension. Shape the loaf firmly, pinch the seam well, and bake it as soon as it looks slightly puffy.
The center is gummy. The loaf was probably sliced too soon, or it was underbaked. Bake until the crust is deep golden and the bottom sounds hollow, then allow at least 30 minutes of cooling.
Fun Variations to Try
Once you have mastered the basic loaf, it is easy to customize. Here are a few ideas:
- Garlic and herb loaf. Knead in a teaspoon of dried oregano or Italian seasoning, or brush the finished loaf with garlic-infused olive oil.
- Cheesy Italian bread. Fold shredded mozzarella or grated Parmesan into the dough during shaping.
- Rosemary and sea salt. Brush the loaf with olive oil before baking and sprinkle with chopped rosemary and flaky salt.
- Seeded crust. Brush the top with a little water and sprinkle sesame seeds, poppy seeds, or fennel seeds before baking.
- Mini loaves or rolls. Divide the dough into smaller pieces for sandwich rolls or dinner rolls, and shorten the baking time accordingly.
Serving Ideas for Italian Bread
This versatile loaf goes with almost everything. Here are some of the best ways to enjoy it:
- Italian olive oil dip. Serve warm slices with extra-virgin olive oil, dried oregano, and a pinch of salt.
- Homemade garlic bread. Brush slices with garlic butter and toast until fragrant and lightly golden.
- Pasta night. Serve alongside spaghetti, lasagna, baked ziti, or creamy Alfredo pasta.
- Soup companion. Pair with tomato soup, minestrone, or a hearty vegetable soup.
- Bruschetta. Toast slices and top with diced tomatoes, fresh basil, garlic, and olive oil.
- Rustic sandwiches. Fill thick slices with mozzarella, tomatoes, fresh basil, or your favorite sandwich fillings.
- Cheese board. Serve alongside Italian cheeses, olives, roasted peppers, and cured meats.
How to Store Crusty Italian Bread
Homemade bread has no preservatives, so proper storage matters.
- Room temperature. Let the bread cool completely, then store it in a paper bread bag or bread box for up to 2 days to help preserve its crust.
- Softer crust option. If you prefer a softer crust, store the cooled loaf in an airtight bag. Keep in mind that the crust will soften.
- Freezer. Slice the completely cooled loaf and freeze the slices in a freezer-safe bag for up to 3 months. Slicing first lets you take out just what you need.
- Reheating. Refresh the crust by warming the loaf in a 350°F (175°C) oven for about 5 to 10 minutes.
- Freshness tip. Avoid refrigerating homemade bread, because refrigeration can make it stale more quickly.
Make-Ahead and Time-Saving Tips
Bread is mostly waiting time, which makes it easy to fit into a busy schedule. The hands-on work is only about 20 minutes. Between the first rise (1 to 1½ hours), the second rise (30 to 45 minutes), baking (25 to 35 minutes), and cooling (30 minutes), the total time is approximately 2 hours 45 minutes to 3 hours 10 minutes.
You can use the rising periods to prepare a soup, sauce, or salad so the whole meal comes together at the same time as the bread. For a fresher, warmer result at dinner, bake the loaf in the afternoon and reheat it briefly in the oven just before serving.
Recipe Card: Crusty Italian Bread
- Prep time: 20 minutes
- First rise: 1 to 1½ hours
- Second rise: 30 to 45 minutes
- Bake time: 25 to 35 minutes
- Cooling time: 30 minutes
- Total time: Approximately 2 hours 45 minutes to 3 hours 10 minutes
- Yield: 1 large loaf, approximately 10 to 12 slices
- Difficulty: Beginner-friendly
- Texture: Crisp, golden crust with a soft, airy center
- Flavor: Mildly savory with a classic Italian-style bread flavor
Frequently Asked Questions
Can I use all-purpose flour instead of bread flour?
Yes. All-purpose flour works well in this recipe and produces a slightly softer crumb. Bread flour gives a chewier texture and a bit more structure, but both options make a delicious loaf.
Can I use instant yeast instead of active dry yeast?
Absolutely. Instant yeast can be mixed directly into the flour, so you do not need to wait for it to foam. Simply combine everything and continue with the recipe.
Do I really need to add steam?
Steam is optional, but it makes a noticeable difference. It keeps the outside of the loaf flexible during the early stage of baking, which helps the bread rise fully and develops a crispier, more golden crust. If you add steam, do it carefully with a heatproof pan and hot water, keeping your face and hands away, and never pour water directly onto the oven floor.
How do I know when the bread is done?
Look for a deep golden-brown crust and listen for a hollow sound when you tap the bottom of the loaf. This usually happens between 25 and 35 minutes in a 425°F (220°C) oven.
Why is my dough so sticky?
A soft, slightly sticky dough is normal and actually desirable for a fluffy center. Keep kneading, since the dough becomes smoother as gluten develops. Add only a small amount of flour if it remains unmanageable.
Can I make the dough in a stand mixer?
Yes. Use the dough hook and knead for approximately 5 to 7 minutes, until the dough is smooth and elastic.
Can I freeze Italian bread?
Yes. Let the loaf cool completely, slice it, and freeze the slices in a freezer-safe bag for up to 3 months. Warm it in a 350°F (175°C) oven for 5 to 10 minutes to refresh the crust.
Why shouldn’t I slice the bread right away?
The inside of a fresh loaf is still setting as it cools. Cutting too early can make the crumb gummy and release steam that softens the crust. Waiting at least 30 minutes gives the best texture.
Is this recipe good for beginners?
Yes. It uses simple ingredients, requires no special equipment, and the dough is forgiving. It is a great first yeast bread to try.
Final Thoughts
Freshly baked crusty Italian bread brings a little bakery magic into your home. With just flour, water, yeast, salt, sugar, and olive oil, you can create a loaf with a crackling golden crust and a soft, fluffy center that disappears fast at the table.
Remember the key points: use comfortably warm water, keep the dough soft and slightly tacky, let it rise until doubled, add steam for a crisper crust, score the loaf before baking, and let it cool before slicing. Follow those steps and you will be rewarded with a loaf you can be proud of.
Print
Crusty Italian Bread with a Soft, Fluffy Center
Ingredients
Here is everything you need to make one large loaf, which yields approximately 10 to 12 slices.
- 4 cups (480 g) bread flour or all-purpose flour
- 1½ cups (360 ml) warm water
- 2¼ teaspoons (7 g) active dry yeast or instant yeast
- 1 teaspoon granulated sugar
- 1½ teaspoons salt
- 1 tablespoon olive oil
- 1 tablespoon flour, for dusting
- A little water for creating steam in the oven (optional)
Ingredient Notes and Substitutions
Flour. Bread flour has a higher protein content than all-purpose flour, which develops more gluten and gives the loaf a chewier texture and a better rise. All-purpose flour still works beautifully and produces a slightly softer crumb. Either option gives excellent results, so use whichever you have on hand.
Water. The water should feel comfortably warm, not hot. Water that is too hot can kill the yeast, while water that is too cool will slow down activation. If it feels pleasantly warm on your wrist, like a baby’s bottle, it is about right.
Yeast. Both active dry yeast and instant yeast work in this recipe. Active dry yeast should be dissolved in the warm water with the sugar and left until foamy. Instant yeast can be mixed directly into the flour, so you can skip the proofing step.
Sugar. Just one teaspoon is used here. It gives the yeast a little food to get started and helps with browning, but it will not make the bread taste sweet.
Salt. Salt controls the yeast and builds flavor. Do not skip it, or the bread will taste flat.
Olive oil. A single tablespoon softens the crumb and adds a hint of Italian character. Extra-virgin olive oil adds the most flavor.
Instructions
In a large mixing bowl, combine the warm water, sugar, and active dry yeast. Let the mixture stand for about 5 to 10 minutes, until it turns foamy. A foamy surface tells you the yeast is alive and ready to work. If you are using instant yeast, you can mix it directly with the flour instead.
Add the flour, salt, and olive oil to the yeast mixture. Stir with a wooden spoon until a rough dough forms and no large patches of dry flour remain. At this stage, the dough should feel soft and slightly sticky. Resist the urge to add lots of extra flour, because a slightly tacky dough is the secret to a light, airy interior.
Transfer the dough to a lightly floured surface and knead for about 8 to 10 minutes, until it is smooth and elastic. If you prefer to use a stand mixer fitted with a dough hook, knead for approximately 5 to 7 minutes.
If the dough is sticky, keep kneading before you add a little extra flour. Kneading often fixes stickiness on its own as the gluten develops. The dough is ready when it feels smooth, springs back when poked, and stretches without tearing easily.
Place the dough in a lightly greased bowl and turn it once to coat the surface. Cover with a clean kitchen towel or plastic wrap and let it rise in a warm place for about 1 to 1½ hours, or until it has doubled in size.
Pay attention to the dough rather than the clock. Kitchen temperature affects rising time, so a cool room may need longer and a warm room may need less.
Gently press the dough to release excess air. Transfer it to a lightly floured surface and shape it into a long oval loaf. Fold the edges inward if needed, then roll the dough gently to create an even shape. Pinch the seam closed and place the loaf seam-side down on a parchment-lined baking sheet.
Cover the shaped loaf loosely with a clean kitchen towel and let it rise for another 30 to 45 minutes, until slightly puffy. While it rests, preheat your oven to 425°F (220°C). If you are using a baking stone or heavy baking sheet, place it in the oven while it preheats so it gets very hot.
Dust the loaf lightly with flour if desired. Using a sharp bread knife or bread lame, make 2 to 3 shallow diagonal cuts across the top. Scoring gives the loaf room to expand in the oven and creates that traditional rustic bakery appearance.
Place the loaf in the preheated oven and bake for approximately 25 to 35 minutes, until the crust is a deep golden brown and the loaf sounds hollow when tapped on the bottom.
For an extra crispy crust: carefully place a heatproof pan on the lower oven rack while preheating. When the bread goes into the oven, add a small amount of hot water to the pan to create steam. Keep your face and hands away from the steam, and never pour water directly onto the oven floor.
Remove the loaf from the oven and transfer it to a wire rack. Let it cool for at least 30 minutes before slicing. This allows the interior to finish setting while the crust stays crisp. Cutting too early can make the center gummy and cause the crust to soften from trapped steam.
Cut the loaf into thick slices and serve it fresh. Enjoy it with butter, dip it in olive oil, or pair it with your favorite pasta, soup, or salad for a comforting homemade meal.