The aroma of freshly baked bread hanging in the kitchen is like a warm embrace, inviting everyone to gather around. When you make bread at home, you tap into something ancient and deeply fulfilling. But before you can achieve that delightful loaf, you need a starter, the very heart of your sourdough adventure. Knowing when your starter is ready to rise takes the guesswork out of the equation. With a few simple methods at your disposal, you can embrace the joy of baking without uncertainty.
Imagine your kitchen filled with the subtle tang of fermented goodness, a scent that hints at complexity and warmth. You bring a piece of bread to your lips, and the first bite reveals a crisp crust that shatters with each chew, giving way to an open crumb structure that feels light yet satisfying. The nuanced flavors dance on your palate—slightly sour, earthy, with a hint of sweetness that balances everything exquisitely. This experience transforms baking bread into an art form, where every loaf tells a story of patience and love.
In this article, we will explore the easiest way to know your starter is ready—no guessing, no stress. Let’s unwrap the mystery behind this critical component of bread-making, so you can bake confidently and enjoy that luscious, homemade loaf you’ve been dreaming of.
Why You’ll Love This Starter Readiness Guide
When it comes to sourdough, timing and consistency are everything. This guide equips you with the knowledge you need to understand your starter’s behavior, ensuring you achieve that perfect rise every single time. Imagine catching the rich scent of fermentation in the air as your starter bubbles away, coating your kitchen with anticipation.
Understanding your starter means you’ll save time and eliminate frustration. No more second-guessing whether it’s hungry for feeding or primed for baking. You’ll recognize when it’s at its peak—a time when it beckons you to measure, mix, and create. The flavors of your bread will be at their height, the aromatic allure will be irresistible, and the texture will hold the right amount of chewiness that every artisan loaf boasts.
This simple knowledge opens the door to various occasions where you can showcase your culinary talent, be it a cozy family dinner, a festive gathering, or even gifting a loaf to a friend. Each occasion will be transformed into a cherished memory, anchored by the love you placed into each rise and fold of your dough.
Preparation Phase & Tools to Use
Before diving into the delightful world of sourdough baking, equip yourself with a few essential tools that can enhance your experience and ensure success:
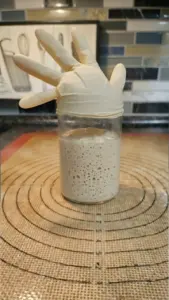
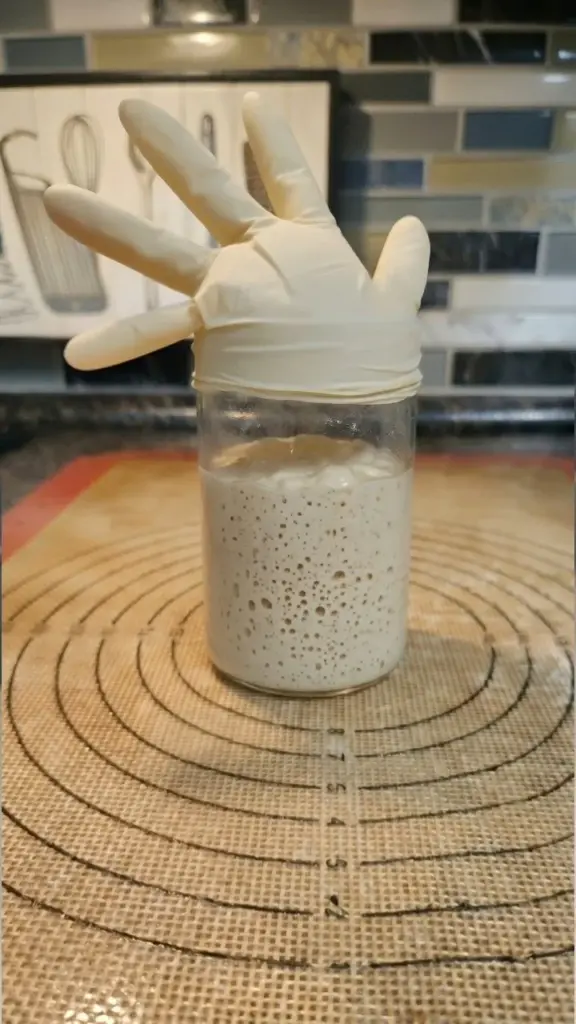
- Glass Jar: A clear glass jar allows you to observe your starter as it develops. Look for bubbles and swelling!
- Kitchen Scale: Precision matters in baking. Weighing your ingredients ensures consistency and quality in your bread.
- Wooden Spoon or Silicone Spatula: These tools make mixing your starter easy while being gentle enough not to damage the bubbles.
- Parchment Paper: Use this when baking to avoid sticking; it also makes cleanup a breeze.
- Towel or Cheese Cloth: Covering your starter while it ferments allows it to breathe while protecting it from any unwanted debris.
Practical Preparation Tips
- Keep your kitchen warm. Starters thrive in warmer temperatures, so aim for a cozy corner.
- Ensure your tools are clean. Sanitization reduces the risk of unwanted bacteria.
- Document your observations! Note the times your starter peaks so you can replicate success each time.
Ingredients for Your Sourdough Starter
Creating a robust starter only requires a handful of ingredients, most of which you likely already have in your kitchen:
- Flour: Choose all-purpose or whole wheat flour. Whole wheat flour offers more nutrients for your yeast.
- Water: Use filtered or bottled water, as chlorine in tap water can hinder yeast growth.
- Time and Patience: Although not physical ingredients, these elements are vital for achieving success.
Possible Substitutions
If you find yourself without specific ingredients, consider these substitutions:
- Swap whole wheat flour for rye flour for a different flavor and stronger microbial content.
- Use bottled spring water instead of filtered if that’s more accessible.
How to Make Your Starter Ready for Baking
Knowing how to assess your starter’s readiness opens the door to countless delicious loaves. Follow these clear steps to feel confident about your sourdough journey:
-
Feed Your Starter: Begin with equal weights of flour and water. This keeps your starter fed and allows it to thrive.
- Tip: A common ratio is 1:1:1 (starter:flour:water).
-
Let It Ferment: Cover your jar loosely with a lid or cloth, place it in a warm spot, and let it sit for about 4-8 hours.
-
Observe the Bubbles: After several hours, look for bubbles forming on the surface and sides of the jar. This is a sign of active fermentation.
-
Check the Rise: Your starter should have doubled in size—this indicates it’s filled with carbon dioxide, essential for your bread.
-
The Float Test: Take a small spoonful of the starter and drop it in a glass of water. If it floats, it’s ready to bake. If it sinks, give it more time and a feeding.
-
Smell and Taste: A properly fermented starter gives off a fragrant, slightly sour aroma. When you taste it, it should be pleasantly tangy.
Chef’s Notes & Helpful Tips
- Make-Ahead Tips: If you plan on baking later, feed your starter several hours in advance. For optimal flavor, a “cold retard” method can enhance sourness.
- Cooking Alternatives: You can create your bread in a bread machine if you prefer a hands-off approach. Many machines allow for sourdough settings.
- Customization Ideas: Enhance your loaf with mix-ins like herbs, cheese, or nuts, which will add unique flavors and textures to your bread.
Common Mistakes to Avoid
Creating a successful sourdough starter can be tricky; here are common pitfalls to steer clear of:
- Neglecting Regular Feeding: Failing to feed your starter can lead to a weak culture. Stay committed to a regular feeding schedule.
- Using Inadequate Flour: Avoid using bleached flour as it lacks the microorganisms needed for a thriving starter.
- Temperature Fluctuations: Keep your starter in a consistently warm environment away from drafts.
- Ignoring Signs of Activity: If your starter fails to bubble or rise, reassess your feeding ratio and find a warmer location.
What to Serve With Sourdough Bread
Now that you’ve mastered the art of sourdough, it’s time to think about delicious pairings that elevate your meal:
- Creamy Butter: Nothing beats fresh bread slathered with rich, creamy butter.
- Homemade Jam: Spread a bright, fruity jam to enhance the rustic flavor of your loaf.
- Cheese Platter: Pair with a selection of cheeses like goat cheese, sharp cheddar, or brie for an exciting charcuterie.
- Soup: Serve slices alongside a hearty soup—think classic tomato, roasted butternut squash, or creamy chowder.
- Avocado Toast: Top with smashed avocado, lemon juice, and a sprinkle of sea salt for a trendy brunch option.
- Salads: Crispy salads complement the dense nature of sourdough, especially those with robust vinaigrettes.
- Olive Oil or Balsamic Vinegar: A dipping station with high-quality oils and vinegars invites the flavors of Mediterranean cuisine to the table.
Storage & Reheating Instructions
For optimal freshness and longevity, keep your bread in the best condition:
- Storing in the Fridge: Wrap your sourdough in a bread bag or cloth and store in the fridge for up to a week.
- Freezing: Slice your bread and wrap it tightly in plastic wrap and then foil. It lasts up to three months. To enjoy, toast it straight from the freezer!
- Reheating Methods: Reheat slices in the toaster or for a whole loaf, wrap in foil and heat in a preheated oven at 350°F until warm and crusty.
Estimated Nutrition Information
1 slice of sourdough bread (approximately 50g) generally contains:
- Calories: 150
- Protein: 4g
- Carbohydrates: 30g
- Fiber: 1g
- Total Fat: 1g
Nutrition may vary based on specific recipe ingredients and portion sizes.
FAQs
-
How long does it take for a sourdough starter to be ready?
Most starters take about 5 to 7 days to fully develop, with daily feedings to cultivate the right balance of yeast and bacteria. -
Why does my starter smell bad?
An unpleasant smell often indicates an imbalance or lack of feeding. Be sure to feed it regularly and check for any signs of mold. -
Can I use tap water for my starter?
Tap water may contain chlorine, which can affect yeast development. Opting for filtered or bottled water provides the healthiest environment for your starter. -
What should I do if my starter isn’t rising?
Ensure that your starter is warm enough and that you are using fresh ingredients. If the problem persists, consider adjusting your feeding ratio to spark activity. -
How often should I feed my sourdough starter?
During active use, feed your starter every 12 hours. If you are storing it longer, feed it weekly, keeping it in the refrigerator.
Conclusion
With this guide, the journey into the world of sourdough baking is within your grasp. Knowing when your starter is ready to rise frees you from uncertainty, allowing you to express your creativity and passion for baking without fear. As you craft each loaf, let the aromas envelop you, the flavors capture your heart, and the process bring joy to your kitchen. Embrace this process, invite loved ones to share in the experience, and know that each loaf carries the warmth of home and heart. Happy baking!
Print
Sourdough Starter Readiness Guide
- Total Time: N/A
- Yield: N/A
- Diet: Vegetarian
Description
A comprehensive guide to knowing when your sourdough starter is ready for baking, ensuring perfect loaves every time.
Ingredients
- Flour (all-purpose or whole wheat)
- Water (filtered or bottled)
- Time and Patience
Instructions
- Feed your starter: Begin with equal weights of flour and water.
- Let it ferment: Cover loosely and place it in a warm spot for about 4-8 hours.
- Observe the bubbles: Look for bubbles forming on the surface.
- Check the rise: Ensure it has doubled in size.
- Perform the float test: Spoon some starter into water; if it floats, it’s ready.
- Smell and taste: It should have a fragrant, slightly sour aroma.
Notes
Keep your kitchen warm for optimal starter growth and ensure all tools are sanitized before use.
- Prep Time: 10 minutes
- Cook Time: N/A
- Category: Baking
- Method: Fermentation
- Cuisine: Global
Nutrition
- Serving Size: N/A
- Calories: 150 per slice (50g)
- Sugar: 0g
- Sodium: 0mg
- Fat: 1g
- Saturated Fat: 0g
- Unsaturated Fat: 0g
- Trans Fat: 0g
- Carbohydrates: 30g
- Fiber: 1g
- Protein: 4g
- Cholesterol: 0mg
Keywords: sourdough, starter, baking, fermentation, homemade bread