Ingredients
Ingredients You Need
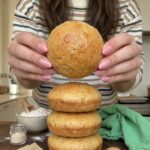
This recipe makes 6 to 8 small dinner rolls.
-
Canned white beans (cannellini or great northern), drained and rinsed: 1 cup (240 g)
-
Large eggs: 2
-
Self-rising flour: 1 cup (125–130 g)
You will also need a little oil, butter, or non-stick spray to grease the muffin pan, unless you are using silicone muffin cups.
About the White Beans
Cannellini beans and great northern beans both work well. They have a mild flavor and a creamy texture that blends into a smooth puree. Because the beans are blended with eggs and flour, their taste becomes very subtle in the finished rolls. Most people notice a soft, slightly savory, bread-like flavor rather than anything that tastes distinctly like beans.
Drain the beans in a colander and rinse them under cool running water. Rinsing removes the canning liquid, which can taste salty or starchy. Then shake off as much water as you can. This step matters more than it might seem, and we will come back to it in the tips below.
About the Eggs
Use large eggs, ideally at room temperature. Room-temperature eggs blend more easily into the bean puree and help create a uniform batter. If you forget to take them out ahead of time, place the eggs in a bowl of warm tap water for a few minutes before using them.
About the Self-Rising Flour
Self-rising flour is all-purpose flour that already contains baking powder and salt. That is what allows these rolls to rise without yeast. Make sure your self-rising flour is fresh, because the leavening loses strength over time. If your flour has been sitting in the pantry for a long while, you may get flatter, denser rolls.
Instructions
Preheat your oven to 375°F (190°C). Lightly grease a muffin pan, or line it with silicone muffin cups.
Drain and rinse the canned white beans thoroughly under cool running water. Shake off the excess water, then transfer the beans to a blender or food processor.
Blend until the beans form a smooth, thick puree. Stop and scrape down the sides as needed so that no large pieces remain. Smoothness is the secret to a good texture here. If you leave bean pieces in the puree, you will notice them in the finished rolls.
Add the eggs to the blended beans and blend again until the mixture is creamy and completely combined. It should look smooth and slightly thick, with no visible pieces of egg or bean.
Transfer the bean and egg mixture to a medium mixing bowl. Add the self-rising flour and gently stir with a spatula until no dry patches remain.
Avoid vigorous mixing. Stir just until combined to keep the rolls tender. The batter should be thick, soft, and scoopable. If it seems unusually thin, let it stand for 2 to 3 minutes so the flour can absorb some of the moisture.
Divide the batter evenly among 6 to 8 muffin cups, filling each about two-thirds to three-quarters full. Smooth the tops gently with the back of a spoon if you like a neater look. For a more rustic appearance, leave the tops slightly rounded.
Place the muffin pan in the preheated oven and bake for approximately 20 to 25 minutes. The rolls should rise, develop lightly golden tops, and feel set when gently touched.
Insert a toothpick into the center of one roll. It should come out clean or with a few moist crumbs, but no wet batter. If the centers still look underbaked, continue baking for another 3 to 5 minutes, checking frequently.
Remove the pan from the oven and let the rolls cool for about 5 to 10 minutes. Carefully loosen the edges with a small spatula and transfer the rolls to a wire rack. Their texture will become firmer as they rest, and they will be easier to remove from the pan once they have had a few minutes to set.
Serve the rolls warm alongside your favorite meal. Break one open to reveal the tender interior, then enjoy it plain or with a little butter, olive oil, or your favorite spread. These rolls are especially delicious when served fresh on the day they are baked.