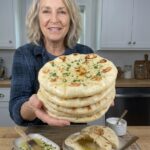
Ingredients
This recipe makes 8 pita breads.
For the Pita Dough
- 3 cups (375 g) all-purpose flour, plus extra for rolling
- 1 cup (240 ml) warm water
- 2¼ teaspoons (7 g) active dry yeast
- 1 tablespoon olive oil
- 1 teaspoon sugar
- 1 teaspoon salt
For the Garlic Butter
- 3 tablespoons (42 g) unsalted butter, melted
- 2–3 garlic cloves, finely minced
- 1 tablespoon chopped fresh parsley
- Pinch of salt, to taste
A Quick Note on the Ingredients
Flour. All-purpose flour works beautifully and is easy to find. It gives you enough gluten for a soft, stretchy dough. If you like a slightly chewier texture, you can swap in bread flour. If you want a more rustic flavor, replace up to one cup of the all-purpose flour with whole wheat flour, and add a splash more water if the dough feels dry.
Yeast. This recipe uses active dry yeast, which needs to be activated in warm water first. Always check the expiration date. Old yeast is the number one reason dough fails to rise.
Water. Aim for comfortably warm water, similar to a pleasant bath. Water that is too hot can kill the yeast, while cool water slows the rise significantly.
Butter. Unsalted butter lets you control the saltiness. If you only have salted butter, simply skip the pinch of salt in the garlic butter.
Garlic. Fresh garlic gives the best flavor. Mince it as finely as you can so it blends evenly into the butter and does not leave harsh, raw chunks on the bread.
Instructions
In a large mixing bowl, combine the warm water, sugar, and active dry yeast. Stir gently and let the mixture stand for about 5 to 10 minutes, until it becomes foamy on the surface.
This foam tells you the yeast is alive and ready to work. If nothing happens, your yeast may be old or the water may have been too hot or too cold. It is best to start over with fresh yeast rather than continue with a dough that will not rise.
Add the flour, salt, and olive oil to the yeast mixture. Stir with a wooden spoon until a rough dough forms and the ingredients begin to come together.
If the dough seems dry, add a little water, one teaspoon at a time. If it feels very sticky, sprinkle in a small amount of flour, but resist the urge to add too much. The finished dough should be soft and slightly tacky.
Transfer the dough to a lightly floured work surface and knead for approximately 8 to 10 minutes. Stretch, fold, and push the dough until it turns smooth, elastic, and springy.
If you prefer, use a stand mixer fitted with a dough hook and knead on low speed for 5 to 7 minutes. Proper kneading develops the gluten that keeps the pitas tender and flexible after cooking. A good test is to press the dough gently with your finger. If it slowly springs back, it is ready.
Place the dough in a lightly oiled bowl and turn it once so the surface is coated. Cover with a clean kitchen towel or plastic wrap.
Let it rise in a warm, draft-free spot for about 1 hour, or until it has roughly doubled in size. Rising time depends on the temperature of your kitchen, so watch the dough rather than the clock. A good spot is inside a turned-off oven with the light on, or near a warm (not hot) appliance.
Once the dough has risen, gently press it down to release excess air. Transfer it to a lightly floured surface and divide it into 8 equal portions. A kitchen scale makes this easy and keeps your pitas consistent in size.
Roll each portion into a smooth ball, then cover the balls with a kitchen towel and let them rest for 10 to 15 minutes. This rest relaxes the gluten, which makes the dough far easier to roll out without it shrinking back.
Take one dough ball and roll it into a round about 6 to 7 inches (15 to 18 cm) wide and roughly ¼ inch (6 mm) thick.
Keep the thickness even across the entire round. Dough that is too thick may not cook through properly, while very thin spots can tear or prevent the pita from puffing. Place each rolled pita on a lightly floured surface and cover it with a towel while you roll the rest, so the surface does not dry out.
Heat a heavy skillet or cast-iron pan over medium-high heat until it is properly hot. You generally will not need any oil.
Place one pita in the dry skillet and cook for about 30 to 60 seconds, until bubbles begin to appear and the underside develops light golden spots. Flip it and cook the other side for another 30 to 60 seconds.
Flip once more if needed, which encourages the pita to puff. Some pitas will form a large, dramatic pocket, while others will puff only partially. Both are soft and delicious. If the bread browns too quickly before it has time to puff, lower the heat slightly.
While the pitas cook, melt the butter in a small bowl or saucepan. Add the finely minced garlic, chopped parsley, and a pinch of salt, then stir well.
For a milder garlic flavor, let the mixture sit for a minute before brushing it onto the bread. If you prefer a deeper, more mellow flavor, gently warm the garlic in the melted butter for about 30 seconds, taking care not to let it brown. Burnt garlic turns bitter, so keep the heat low.
As each pita comes out of the skillet, brush the warm surface generously with the garlic butter. The warmth helps the butter melt into the bread so the garlic and parsley flavors really shine.
Sprinkle with a little extra parsley if you like. Stack the finished pitas on a plate and cover them with a clean kitchen towel to preserve their softness while you cook the remaining bread.
Serve the garlic butter pita bread while it is still warm and fragrant. Tear it into pieces for dipping, slice it into wedges, or use it to wrap grilled vegetables, chicken, falafel, or your favorite sandwich fillings.