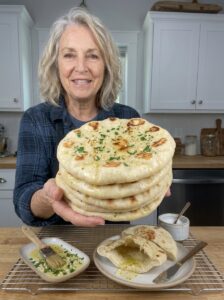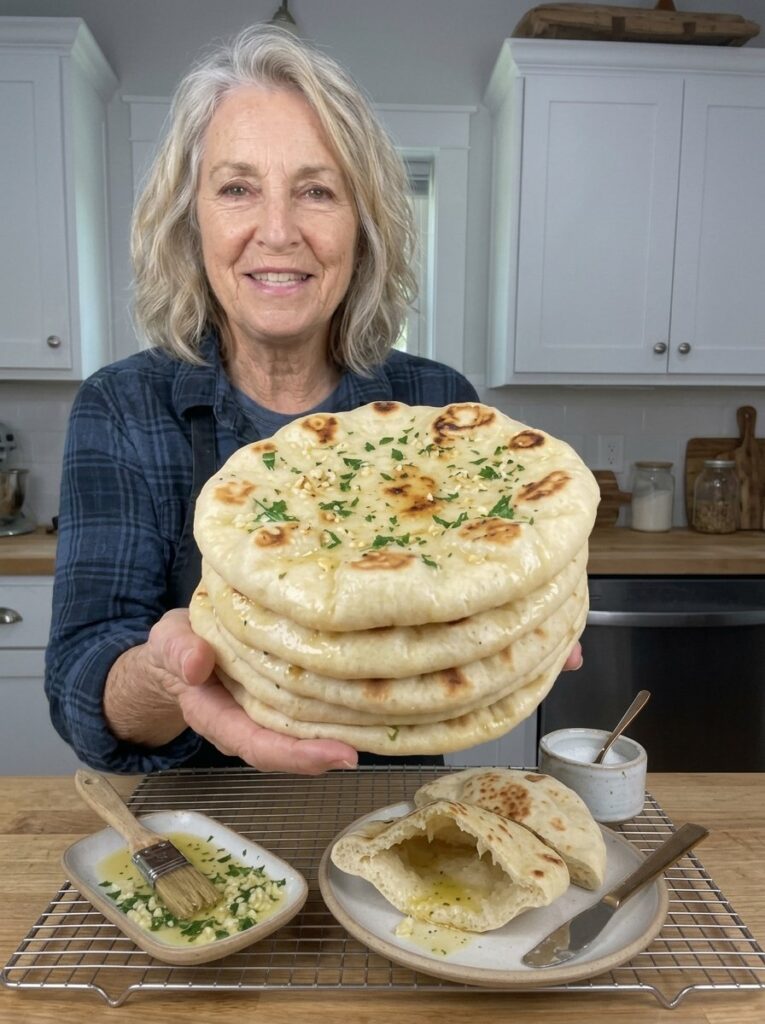
There are few things in the kitchen as satisfying as pulling a warm, puffy pita from a hot skillet and brushing it with fragrant garlic butter. The aroma alone is enough to bring everyone to the table. If you have only ever bought pita from the grocery store, this homemade garlic butter pita bread is about to change your mind for good.
These pitas have a tender, pillowy center and beautifully golden spots from the pan. They are flexible enough to fold, sturdy enough to scoop, and so flavorful that they hardly need anything else. Best of all, you only need a handful of pantry staples, one skillet, and a little patience while the dough rises. No oven, no pizza stone, and no special equipment are required.
In this guide you will find the complete recipe, a detailed step-by-step walkthrough, troubleshooting advice for common pita problems, creative variations, serving ideas, and everything you need to know about storing and reheating your bread. Whether you are a first-time baker or an experienced home cook, this easy pita bread recipe will quickly become a staple in your kitchen.
Why You Will Love This Garlic Butter Pita Bread Recipe
Before we get into the details, here is why this recipe deserves a permanent place in your rotation:
- Simple ingredients. Flour, water, yeast, olive oil, sugar, and salt make the dough. Butter, garlic, and parsley make the topping. You probably have almost everything at home already.
- No oven needed. The pitas cook on the stovetop in a dry skillet, which means less heat in your kitchen and faster cooking.
- Soft and flexible. Properly kneaded and rested dough creates pitas that bend without cracking, perfect for wraps and sandwiches.
- Big flavor. Garlic, butter, and fresh parsley turn plain flatbread into something you will want to eat straight off the plate.
- Versatile. Serve it with hummus, soup, salads, grilled meats, or turn leftovers into crunchy pita chips.
- Freezer friendly. Make a batch, freeze what you do not need, and enjoy fresh-tasting bread whenever you like.
- Budget friendly. Eight pitas cost a fraction of what you would pay for artisan bread, and the taste is far better.
What Is Pita Bread?
Pita is a round, slightly leavened flatbread that originated in the Middle East and the Mediterranean region and has been enjoyed for thousands of years. It is made from a simple yeasted dough that is rolled thin and baked or cooked at high heat. The intense heat causes the water in the dough to turn to steam, which pushes the layers apart and creates the signature pocket inside.
Traditionally, pita is baked in very hot ovens. At home, a heavy skillet or cast-iron pan does a remarkable job of imitating that high, direct heat. The result is a soft, chewy bread with those distinctive golden-brown blisters.
Adding garlic butter is a modern twist that makes the bread feel indulgent. The melted butter soaks into the warm surface, the garlic adds a savory bite, and the parsley brings freshness and color.
Ingredients for Homemade Garlic Butter Pita Bread
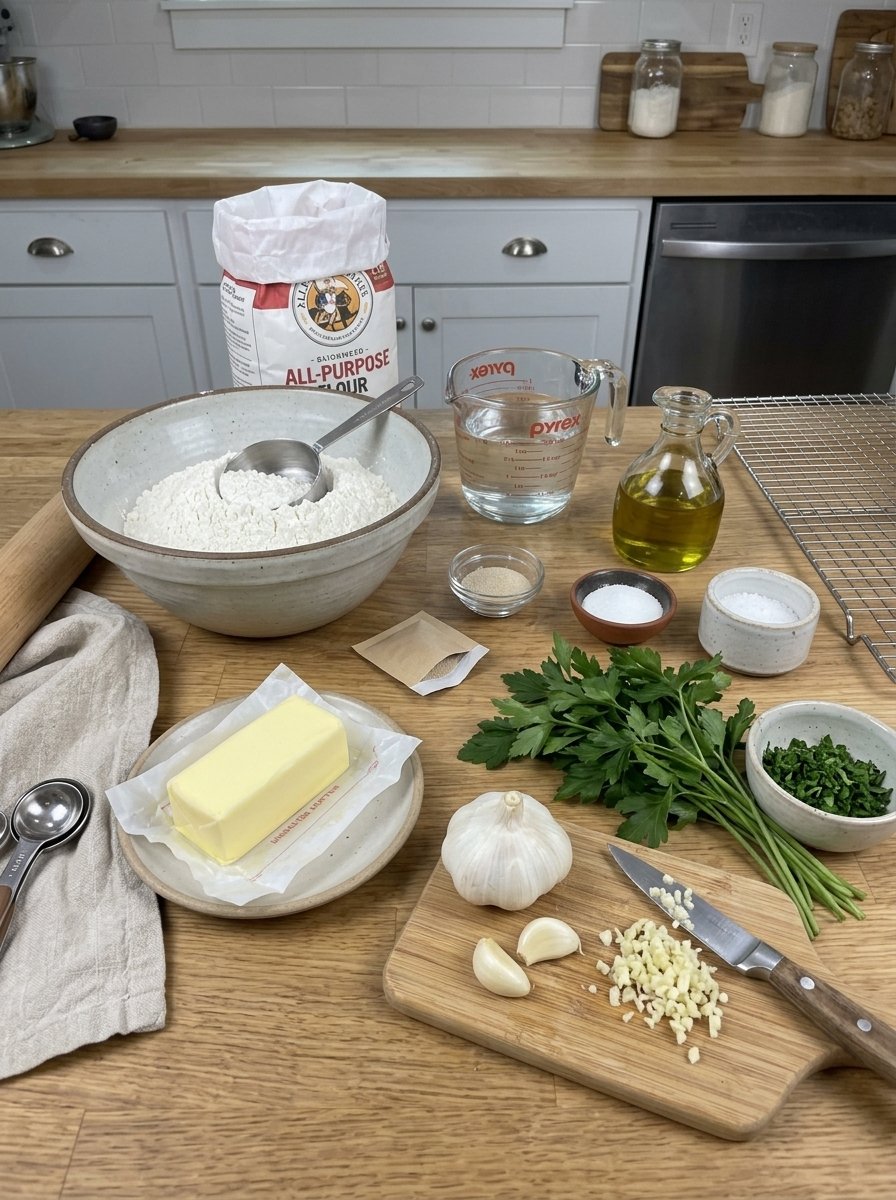
This recipe makes 8 pita breads.
For the Pita Dough
- 3 cups (375 g) all-purpose flour, plus extra for rolling
- 1 cup (240 ml) warm water
- 2¼ teaspoons (7 g) active dry yeast
- 1 tablespoon olive oil
- 1 teaspoon sugar
- 1 teaspoon salt
For the Garlic Butter
- 3 tablespoons (42 g) unsalted butter, melted
- 2–3 garlic cloves, finely minced
- 1 tablespoon chopped fresh parsley
- Pinch of salt, to taste
A Quick Note on the Ingredients
Flour. All-purpose flour works beautifully and is easy to find. It gives you enough gluten for a soft, stretchy dough. If you like a slightly chewier texture, you can swap in bread flour. If you want a more rustic flavor, replace up to one cup of the all-purpose flour with whole wheat flour, and add a splash more water if the dough feels dry.
Yeast. This recipe uses active dry yeast, which needs to be activated in warm water first. Always check the expiration date. Old yeast is the number one reason dough fails to rise.
Water. Aim for comfortably warm water, similar to a pleasant bath. Water that is too hot can kill the yeast, while cool water slows the rise significantly.
Butter. Unsalted butter lets you control the saltiness. If you only have salted butter, simply skip the pinch of salt in the garlic butter.
Garlic. Fresh garlic gives the best flavor. Mince it as finely as you can so it blends evenly into the butter and does not leave harsh, raw chunks on the bread.
Equipment You Will Need
- A large mixing bowl
- A wooden spoon (or a stand mixer with a dough hook)
- A clean kitchen towel
- A rolling pin
- A heavy skillet or cast-iron pan
- A small bowl or saucepan for the garlic butter
- A pastry brush
How to Make Garlic Butter Pita Bread: Step-by-Step Instructions
Step 1: Activate the Yeast
In a large mixing bowl, combine the warm water, sugar, and active dry yeast. Stir gently and let the mixture stand for about 5 to 10 minutes, until it becomes foamy on the surface.
This foam tells you the yeast is alive and ready to work. If nothing happens, your yeast may be old or the water may have been too hot or too cold. It is best to start over with fresh yeast rather than continue with a dough that will not rise.
Step 2: Mix the Pita Dough
Add the flour, salt, and olive oil to the yeast mixture. Stir with a wooden spoon until a rough dough forms and the ingredients begin to come together.
If the dough seems dry, add a little water, one teaspoon at a time. If it feels very sticky, sprinkle in a small amount of flour, but resist the urge to add too much. The finished dough should be soft and slightly tacky.
Step 3: Knead Until Smooth
Transfer the dough to a lightly floured work surface and knead for approximately 8 to 10 minutes. Stretch, fold, and push the dough until it turns smooth, elastic, and springy.
If you prefer, use a stand mixer fitted with a dough hook and knead on low speed for 5 to 7 minutes. Proper kneading develops the gluten that keeps the pitas tender and flexible after cooking. A good test is to press the dough gently with your finger. If it slowly springs back, it is ready.
Step 4: Let the Dough Rise
Place the dough in a lightly oiled bowl and turn it once so the surface is coated. Cover with a clean kitchen towel or plastic wrap.
Let it rise in a warm, draft-free spot for about 1 hour, or until it has roughly doubled in size. Rising time depends on the temperature of your kitchen, so watch the dough rather than the clock. A good spot is inside a turned-off oven with the light on, or near a warm (not hot) appliance.
Step 5: Divide the Dough
Once the dough has risen, gently press it down to release excess air. Transfer it to a lightly floured surface and divide it into 8 equal portions. A kitchen scale makes this easy and keeps your pitas consistent in size.
Roll each portion into a smooth ball, then cover the balls with a kitchen towel and let them rest for 10 to 15 minutes. This rest relaxes the gluten, which makes the dough far easier to roll out without it shrinking back.
Step 6: Roll Into Pita Rounds
Take one dough ball and roll it into a round about 6 to 7 inches (15 to 18 cm) wide and roughly ¼ inch (6 mm) thick.
Keep the thickness even across the entire round. Dough that is too thick may not cook through properly, while very thin spots can tear or prevent the pita from puffing. Place each rolled pita on a lightly floured surface and cover it with a towel while you roll the rest, so the surface does not dry out.
Step 7: Cook the Pitas in a Hot Skillet
Heat a heavy skillet or cast-iron pan over medium-high heat until it is properly hot. You generally will not need any oil.
Place one pita in the dry skillet and cook for about 30 to 60 seconds, until bubbles begin to appear and the underside develops light golden spots. Flip it and cook the other side for another 30 to 60 seconds.
Flip once more if needed, which encourages the pita to puff. Some pitas will form a large, dramatic pocket, while others will puff only partially. Both are soft and delicious. If the bread browns too quickly before it has time to puff, lower the heat slightly.
Step 8: Prepare the Garlic Butter
While the pitas cook, melt the butter in a small bowl or saucepan. Add the finely minced garlic, chopped parsley, and a pinch of salt, then stir well.
For a milder garlic flavor, let the mixture sit for a minute before brushing it onto the bread. If you prefer a deeper, more mellow flavor, gently warm the garlic in the melted butter for about 30 seconds, taking care not to let it brown. Burnt garlic turns bitter, so keep the heat low.
Step 9: Brush With Garlic Butter
As each pita comes out of the skillet, brush the warm surface generously with the garlic butter. The warmth helps the butter melt into the bread so the garlic and parsley flavors really shine.
Sprinkle with a little extra parsley if you like. Stack the finished pitas on a plate and cover them with a clean kitchen towel to preserve their softness while you cook the remaining bread.
Step 10: Serve Warm and Enjoy
Serve the garlic butter pita bread while it is still warm and fragrant. Tear it into pieces for dipping, slice it into wedges, or use it to wrap grilled vegetables, chicken, falafel, or your favorite sandwich fillings.
Recipe Details at a Glance
- Prep time: 25 minutes
- First rise: 1 hour
- Dough resting time: 10–15 minutes
- Cook time: 15–20 minutes
- Total time: Approximately 1 hour 50 minutes to 2 hours
- Yield: 8 pita breads
- Difficulty: Easy
- Cooking method: Stovetop skillet
- Texture: Soft, tender, and flexible with golden skillet spots
- Flavor: Savory garlic butter with fresh parsley and a hint of olive oil
Tips for the Best Homemade Garlic Butter Pita Bread
A few small habits make a big difference between average pitas and exceptional ones.
- Use comfortably warm water. Too hot damages the yeast, and too cool slows the rise.
- Knead until elastic. A smooth, stretchy dough produces soft, flexible bread.
- Let the dough rise fully. Wait until it is puffy and nearly doubled in size.
- Roll evenly. Pita rounds of similar thickness cook at the same rate and puff more reliably.
- Avoid excessive flour. Too much flour makes pitas dry and stiff. Use just enough to prevent sticking.
- Cook in a hot skillet. A properly heated pan creates golden spots and encourages puffing.
- Cover after cooking. Stacking warm pitas under a clean towel traps steam and keeps them soft.
- Brush with garlic butter while warm. The residual heat helps the butter absorb into the bread.
Troubleshooting: Why Didn’t My Pita Puff Up?
Even experienced bakers occasionally end up with flat pitas. Here are the most common causes and how to fix them.
The skillet was not hot enough. Pita puffs because moisture inside turns to steam quickly. If the pan is lukewarm, the bread cooks slowly and dries out instead. Make sure the skillet is properly preheated over medium-high heat.
The dough was rolled too thin or too thick. Very thin dough dries out before it can puff, and very thick dough is too heavy for the steam to lift. Aim for about ¼ inch.
The dough was uneven. Thin spots and tears let steam escape. Roll with even pressure and try to avoid creating holes.
The dough dried out. Cover rolled rounds with a towel while they wait. A dry skin on the surface prevents the pita from expanding.
The dough did not rise enough. If the yeast was weak or the kitchen was cold, the dough may lack the structure to puff. Give it more time in a warm place.
Not to worry. Pitas that puff only partially are still soft, tasty, and perfect for dipping. Not every pita needs a perfect pocket.
Delicious Variations to Try
Once you master the basic recipe, it is easy to customize.
- Whole wheat garlic butter pita. Replace up to one cup of all-purpose flour with whole wheat flour for a nuttier flavor and a bit more fiber.
- Herb-infused pita. Knead a tablespoon of dried oregano, thyme, or za’atar into the dough for a fragrant twist.
- Spicy garlic butter. Stir a pinch of red pepper flakes or smoked paprika into the melted butter for gentle heat.
- Lemon garlic butter. Add a little lemon zest to the butter for a bright, fresh finish.
- Cheesy garlic pita. Sprinkle mozzarella or feta over the warm bread and heat briefly in the oven until melted.
- Dairy-free version. Swap the butter for olive oil or a plant-based butter alternative.
- Sesame or nigella seeds. Press a few seeds onto the rolled dough before cooking for extra texture and visual appeal.
What to Serve With Garlic Butter Pita Bread
This versatile bread pairs with nearly everything. Here are some of the best ways to enjoy it:
- Creamy hummus. Tear the warm pitas into pieces and serve with classic hummus, roasted garlic hummus, or red pepper hummus.
- Mediterranean platter. Pair with olives, feta cheese, cucumber, tomatoes, and your favorite dips for an effortless appetizer board.
- Hearty soups. Serve alongside lentil soup, tomato soup, or a comforting vegetable stew.
- Fresh salads. Enjoy with Greek salad, tabbouleh, or a crisp cucumber and tomato salad.
- Falafel wraps. Fill the pitas with falafel, lettuce, tomatoes, and creamy tahini sauce.
- Grilled chicken pockets. Add grilled chicken, fresh vegetables, and garlic yogurt sauce for a satisfying meal.
- Cheesy pita. Sprinkle with mozzarella or feta and briefly warm in the oven until the cheese melts.
- Garlic pita chips. Cut leftover pitas into wedges, brush lightly with olive oil, and bake until crisp for a crunchy snack.
How to Store Homemade Pita Bread
Because homemade bread contains no preservatives, proper storage matters.
- Room temperature. Let the pitas cool completely, then store them in an airtight bag or container for up to 2 days. Since these are brushed with garlic butter, refrigerate them if your kitchen is particularly warm or if you plan to keep them longer.
- Refrigerator. Store in an airtight container for up to 4 days.
- Freezer. Place completely cooled pitas in a freezer-safe bag, separating them with parchment paper if needed. Freeze for up to 2 months for the best quality.
How to Reheat Pita Bread
- Skillet. Warm in a dry skillet over medium-low heat for about 20 to 30 seconds per side.
- Oven. Wrap in foil and heat in a 300°F (150°C) oven for several minutes.
- From frozen. Thaw at room temperature, or gently reheat from frozen in a covered skillet until soft and warm.
- Refresh the flavor. Add a light brush of freshly melted garlic butter after reheating for a fragrant, just-made finish.
Make-Ahead and Meal Prep Tips
Pita is a great candidate for planning ahead. You can prepare the dough through the first rise, then refrigerate it in a lightly oiled, covered bowl overnight. The slow, cool fermentation can even deepen the flavor. Let the dough come back to room temperature for 30 minutes before dividing and rolling.
Alternatively, cook all eight pitas, cool them completely, and freeze them. When guests arrive, reheat a few in a skillet, brush with fresh garlic butter, and serve. It feels like you baked from scratch moments before dinner.
Frequently Asked Questions
Can I make garlic butter pita bread without yeast?
Yeast gives pita its characteristic flavor and puffed pocket. Without it, you would be making a different type of flatbread. If you are short on time, a yeast-free flatbread using baking powder and yogurt is a quick alternative, but it will not puff or taste quite like traditional pita.
Do I need a cast-iron skillet?
No, but a heavy skillet or cast-iron pan holds and distributes heat extremely well, which helps the pitas puff and develop golden spots. A nonstick or stainless steel pan can work if you preheat it thoroughly.
Why is my pita dough sticky?
The dough should be soft and slightly tacky. If it sticks heavily to your hands, add a small amount of flour, a tablespoon at a time. Avoid adding too much, since excess flour leads to dry, stiff pitas.
Can I use instant yeast instead of active dry yeast?
Yes. Instant yeast can be mixed directly into the flour and does not need a separate activation step, though many bakers still enjoy proofing the yeast for peace of mind. Use the same amount.
How do I keep pita bread soft?
Stack the pitas under a clean kitchen towel immediately after cooking. The trapped steam keeps them tender. Brushing with butter also helps lock in softness.
Can I make the garlic butter ahead of time?
Yes. Prepare it a day in advance and store it in the refrigerator, then gently melt it before brushing. Fresh garlic butter tastes brightest, though, so a quick mix right before serving is ideal.
How many pitas does this recipe make?
This recipe makes 8 pita breads, each about 6 to 7 inches wide. You can easily double it for a crowd.
Is garlic butter pita bread vegetarian?
Yes. The recipe contains no meat, and it is vegetarian-friendly as written. For a vegan version, use olive oil or a plant-based butter.
Final Thoughts
Homemade garlic butter pita bread proves that a few humble ingredients can create something truly special. With a tender center, golden skillet spots, and a glossy coat of garlic, butter, and parsley, these pitas turn an ordinary meal into an occasion. They are easy enough for a weeknight, impressive enough for entertaining, and flexible enough to match almost any dish on your table.
Once you have tried making pita from scratch, you may never want to reach for the store-bought version again. Gather your ingredients, warm up your skillet, and enjoy the satisfying aroma of fresh bread filling your kitchen. Tear it, dip it, wrap it, and share it with the people you love.
Print
Easy Homemade Garlic Butter Pita Bread
Ingredients
This recipe makes 8 pita breads.
For the Pita Dough
- 3 cups (375 g) all-purpose flour, plus extra for rolling
- 1 cup (240 ml) warm water
- 2¼ teaspoons (7 g) active dry yeast
- 1 tablespoon olive oil
- 1 teaspoon sugar
- 1 teaspoon salt
For the Garlic Butter
- 3 tablespoons (42 g) unsalted butter, melted
- 2–3 garlic cloves, finely minced
- 1 tablespoon chopped fresh parsley
- Pinch of salt, to taste
A Quick Note on the Ingredients
Flour. All-purpose flour works beautifully and is easy to find. It gives you enough gluten for a soft, stretchy dough. If you like a slightly chewier texture, you can swap in bread flour. If you want a more rustic flavor, replace up to one cup of the all-purpose flour with whole wheat flour, and add a splash more water if the dough feels dry.
Yeast. This recipe uses active dry yeast, which needs to be activated in warm water first. Always check the expiration date. Old yeast is the number one reason dough fails to rise.
Water. Aim for comfortably warm water, similar to a pleasant bath. Water that is too hot can kill the yeast, while cool water slows the rise significantly.
Butter. Unsalted butter lets you control the saltiness. If you only have salted butter, simply skip the pinch of salt in the garlic butter.
Garlic. Fresh garlic gives the best flavor. Mince it as finely as you can so it blends evenly into the butter and does not leave harsh, raw chunks on the bread.
Instructions
In a large mixing bowl, combine the warm water, sugar, and active dry yeast. Stir gently and let the mixture stand for about 5 to 10 minutes, until it becomes foamy on the surface.
This foam tells you the yeast is alive and ready to work. If nothing happens, your yeast may be old or the water may have been too hot or too cold. It is best to start over with fresh yeast rather than continue with a dough that will not rise.
Add the flour, salt, and olive oil to the yeast mixture. Stir with a wooden spoon until a rough dough forms and the ingredients begin to come together.
If the dough seems dry, add a little water, one teaspoon at a time. If it feels very sticky, sprinkle in a small amount of flour, but resist the urge to add too much. The finished dough should be soft and slightly tacky.
Transfer the dough to a lightly floured work surface and knead for approximately 8 to 10 minutes. Stretch, fold, and push the dough until it turns smooth, elastic, and springy.
If you prefer, use a stand mixer fitted with a dough hook and knead on low speed for 5 to 7 minutes. Proper kneading develops the gluten that keeps the pitas tender and flexible after cooking. A good test is to press the dough gently with your finger. If it slowly springs back, it is ready.
Place the dough in a lightly oiled bowl and turn it once so the surface is coated. Cover with a clean kitchen towel or plastic wrap.
Let it rise in a warm, draft-free spot for about 1 hour, or until it has roughly doubled in size. Rising time depends on the temperature of your kitchen, so watch the dough rather than the clock. A good spot is inside a turned-off oven with the light on, or near a warm (not hot) appliance.
Once the dough has risen, gently press it down to release excess air. Transfer it to a lightly floured surface and divide it into 8 equal portions. A kitchen scale makes this easy and keeps your pitas consistent in size.
Roll each portion into a smooth ball, then cover the balls with a kitchen towel and let them rest for 10 to 15 minutes. This rest relaxes the gluten, which makes the dough far easier to roll out without it shrinking back.
Take one dough ball and roll it into a round about 6 to 7 inches (15 to 18 cm) wide and roughly ¼ inch (6 mm) thick.
Keep the thickness even across the entire round. Dough that is too thick may not cook through properly, while very thin spots can tear or prevent the pita from puffing. Place each rolled pita on a lightly floured surface and cover it with a towel while you roll the rest, so the surface does not dry out.
Heat a heavy skillet or cast-iron pan over medium-high heat until it is properly hot. You generally will not need any oil.
Place one pita in the dry skillet and cook for about 30 to 60 seconds, until bubbles begin to appear and the underside develops light golden spots. Flip it and cook the other side for another 30 to 60 seconds.
Flip once more if needed, which encourages the pita to puff. Some pitas will form a large, dramatic pocket, while others will puff only partially. Both are soft and delicious. If the bread browns too quickly before it has time to puff, lower the heat slightly.
While the pitas cook, melt the butter in a small bowl or saucepan. Add the finely minced garlic, chopped parsley, and a pinch of salt, then stir well.
For a milder garlic flavor, let the mixture sit for a minute before brushing it onto the bread. If you prefer a deeper, more mellow flavor, gently warm the garlic in the melted butter for about 30 seconds, taking care not to let it brown. Burnt garlic turns bitter, so keep the heat low.
As each pita comes out of the skillet, brush the warm surface generously with the garlic butter. The warmth helps the butter melt into the bread so the garlic and parsley flavors really shine.
Sprinkle with a little extra parsley if you like. Stack the finished pitas on a plate and cover them with a clean kitchen towel to preserve their softness while you cook the remaining bread.
Serve the garlic butter pita bread while it is still warm and fragrant. Tear it into pieces for dipping, slice it into wedges, or use it to wrap grilled vegetables, chicken, falafel, or your favorite sandwich fillings.