There is something deeply satisfying about tearing into a warm pita you made yourself. This easy homemade Greek pita bread is soft, fluffy and wonderfully chewy, with a tender center and a lightly golden, blistered exterior. It comes together with simple pantry ingredients and cooks in a regular skillet in minutes.
Store-bought pita can be dry, stiff or cracker-like by the time it reaches your kitchen. Fresh pita is a different thing. It’s warm, flexible and ready to wrap around grilled meats, scoop up creamy dips or serve beside a Mediterranean spread. If you’ve never baked bread before, this recipe is a friendly place to start.
In this guide you’ll find the full recipe, tips for getting soft and pillowy results every time, serving ideas, storage and reheating instructions, and answers to common questions.
Why You’ll Love This Greek Pita Bread Recipe
Several things make this recipe worth bookmarking:
- Simple pantry ingredients. All-purpose flour, water, yeast, sugar, salt and olive oil. There’s nothing specialty to hunt down.
- No oven required. The pitas cook in a hot skillet or cast-iron pan, so there’s no preheating an oven or hunting for a baking stone.
- Soft and flexible. The dough stays slightly tacky and the cooked pitas are steamed under a towel, so they stay tender and bend without cracking.
- Beautiful golden spots. A hot, heavy pan gives you the blistered, toasty look that makes homemade pita so appealing.
- Versatile. Use these for gyros, souvlaki, wraps, sandwiches, hummus, tzatziki or Mediterranean platters.
- Freezer friendly. Make a batch, freeze what you don’t need and reheat straight from frozen.
What Is Greek Pita Bread?
Pita is a round, soft flatbread made from a yeasted dough. In Greece, pita is a staple of everyday eating. It’s the bread behind gyros and souvlaki, wrapped around juicy grilled meat, fresh tomatoes, onions, creamy tzatziki and often a handful of fries.
Greek-style pita tends to be soft, thick and pillowy rather than thin and crisp. It’s meant to be folded, wrapped or used for scooping. As it cooks, steam forms inside the dough and can cause the pita to puff up, creating the soft pocket-like center that pita is known for. Don’t worry if some of yours puff dramatically and others only partially. Both taste wonderful.
Ingredients for Homemade Greek Pita Bread
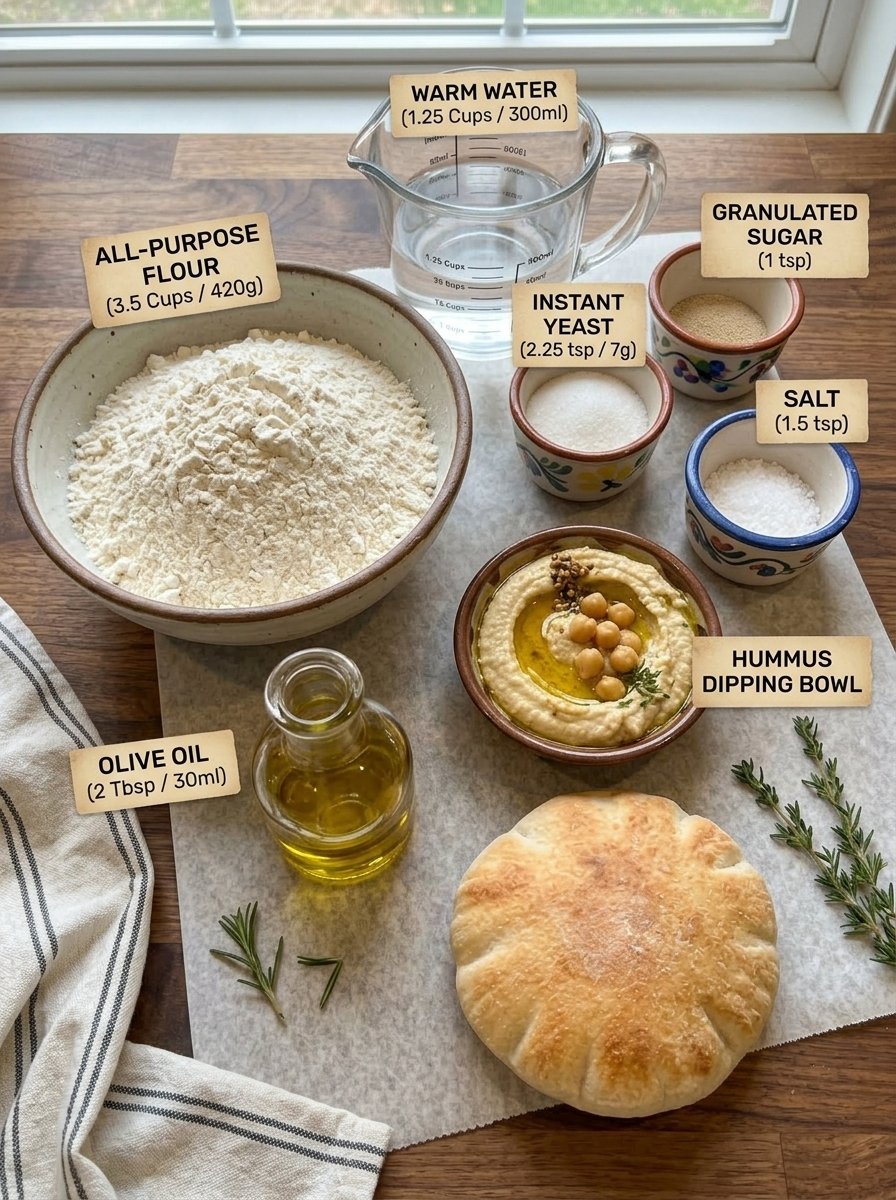
This recipe makes 8 pitas.
- 3½ cups (420 g) all-purpose flour
- 1¼ cups (300 ml) warm water
- 2¼ tsp (7 g) instant yeast
- 1 tsp granulated sugar
- 1½ tsp salt
- 2 tbsp (30 ml) olive oil
A Quick Look at Each Ingredient
All-purpose flour is all you need. It has enough protein to develop a smooth, elastic dough while keeping the finished bread tender.
Warm water wakes up the yeast. Aim for comfortably warm, like a pleasant bath, not hot. Water that is too hot can damage the yeast and keep your dough from rising properly.
Instant yeast gives the pitas their lift and soft, airy texture.
Sugar gives the yeast a little food to help it get going, and it adds a very subtle touch of flavor.
Salt seasons the bread and helps strengthen the dough.
Olive oil adds softness, flavor and a slightly richer crumb, which fits the Greek style well.
Tips for the Best Greek Pita Bread
A few small habits make a big difference in how your pitas turn out:
- Use warm water, not hot. Warm water activates the yeast properly. Hot water can work against you.
- Watch the dough, not just the clock. Rising times are a guide. Let the dough rise until it’s visibly puffy and roughly doubled in size, since kitchen temperature changes how fast it moves.
- Don’t add too much flour. While kneading and shaping, resist adding a lot of extra flour. A soft, slightly tacky dough produces tender, flexible pitas. Too much flour leads to dense, dry bread.
- Roll evenly. An evenly rolled pita puffs and cooks consistently. Thin spots can dry out or turn crisp while thicker spots stay doughy.
- Keep the dough covered. Cover shaped dough balls with a clean towel while you work so they don’t form a dry skin.
- Cover the cooked pitas. Stack finished pitas under a clean kitchen towel. The trapped steam keeps them soft, warm and bendable.
How to Make Homemade Greek Pita Bread: Step by Step
Step 1: Activate the Yeast
Add the warm water, sugar and instant yeast to a large mixing bowl. Stir gently and let the mixture sit for about 5 minutes. It should become slightly foamy, which tells you the yeast is active and ready to work.
Step 2: Make the Dough
Add the flour and salt to the bowl, then pour in the olive oil. Stir with a wooden spoon until a shaggy dough begins to form. Once it comes together, transfer it to a lightly floured surface.
Step 3: Knead the Dough
Knead gently for about 5 to 7 minutes, until the dough is smooth, elastic and soft. If it feels excessively sticky, add a small amount of flour at a time, but avoid adding too much. Shape the dough into a smooth ball.
Step 4: Let the Dough Rise
Lightly grease a clean bowl with a little olive oil and place the dough inside. Cover with plastic wrap or a clean kitchen towel. Let it rise in a warm, draft-free place for about 1 to 1½ hours, or until roughly doubled in size.
Step 5: Divide the Dough
Gently press down the risen dough to release excess air. Transfer it to a lightly floured work surface and divide it into 8 equal pieces. Shape each into a smooth ball by folding the edges toward the center and gently rolling it under your palm. Cover the balls with a clean towel and rest them for 10 to 15 minutes. This short rest relaxes the gluten and makes the dough much easier to roll.
Step 6: Roll the Pitas
Lightly flour your work surface. Roll one dough ball into a round about 6 to 7 inches (15 to 18 cm) across and about ¼ inch (6 mm) thick. Keep the thickness as even as you can. Cover the remaining dough balls while you work.
Step 7: Heat the Skillet
Heat a large, heavy-bottomed skillet or cast-iron pan over medium-high heat. The pan should be hot before the first pita goes in. You don’t need any oil.
Step 8: Cook the Pitas
Place one rolled pita onto the hot skillet. Cook for about 1 to 2 minutes, until bubbles begin to appear and golden-brown spots develop underneath. Flip and cook another 1 to 2 minutes. As it cooks, the pita may puff up with steam, creating that soft pocket-like center. Flip once more if needed and cook briefly until both sides have beautiful golden spots.
Step 9: Keep the Pitas Soft
Move each cooked pita to a clean kitchen towel and cover it right away. Continue with the rest, stacking them under the towel as they finish. The trapped steam is what keeps them soft, warm and flexible.
Step 10: Serve Warm
Serve while they’re still warm and soft. Use them right away for wraps, gyros, dipping, sandwiches or a Mediterranean-style meal.
Time and Yield
- Prep time: about 25 minutes
- Rising time: about 1 to 1½ hours
- Cooking time: about 15 to 20 minutes
- Total time: about 2 to 2½ hours
- Yield: 8 homemade Greek pita breads
Troubleshooting Your Homemade Pita
Even simple bread can misbehave now and then. Here’s how to sort out common problems.
My pitas didn’t puff up
Puffing depends on a few things: a properly hot pan, even rolling and a well-risen dough. If your skillet isn’t hot enough, the pita cooks slowly and dries out before steam can build. If one side of the dough is thinner than the other, steam escapes instead of inflating the bread. Roll evenly and make sure the pan is hot before cooking. Keep in mind that a pita that doesn’t puff fully is still soft, tasty and perfectly usable for wraps and dipping.
My pitas turned out dry or stiff
This usually comes from too much flour in the dough, rolling too thin, overcooking or leaving the finished pitas uncovered. Keep the dough soft and slightly tacky, cook just until golden spots appear, and cover the cooked pitas with a towel right away.
My dough isn’t rising
Check that the yeast foamed in Step 1. If it didn’t, the yeast may be old, or the water may have been too hot or too cold. Also make sure the dough is resting in a warm, draft-free spot. If your kitchen is cool, give it more time and judge by the dough’s size and puffiness.
My dough is too sticky to handle
A slightly tacky dough is what you want, but if it’s unmanageable, add a small amount of flour at a time during kneading. Lightly floured hands and a lightly floured surface help a lot.
The pitas are browning too fast
Lower the heat slightly. Every stove and pan behaves differently, and a heavy cast-iron pan can hold a lot of heat.
Serving Ideas for Greek Pita Bread
Fresh pita is the starting point for a whole range of meals:
- Homemade gyros and wraps. Fill with seasoned grilled chicken, beef, lamb or pork.
- Hummus and tzatziki. Serve warm with creamy hummus and tzatziki for a simple, satisfying appetizer.
- Veggie wraps. Wrap grilled vegetables, lettuce, tomatoes, cucumber and feta.
- Mediterranean dip platter. Cut into wedges and arrange with dips and salads.
- Chicken souvlaki. Use the pita for souvlaki or grilled meat sandwiches.
- Alongside soups and stews. Warm lightly and serve with soups, stews or roasted vegetables.
Build a Mediterranean Platter
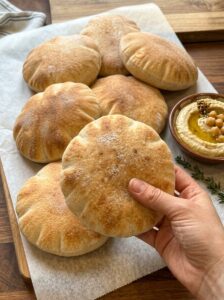
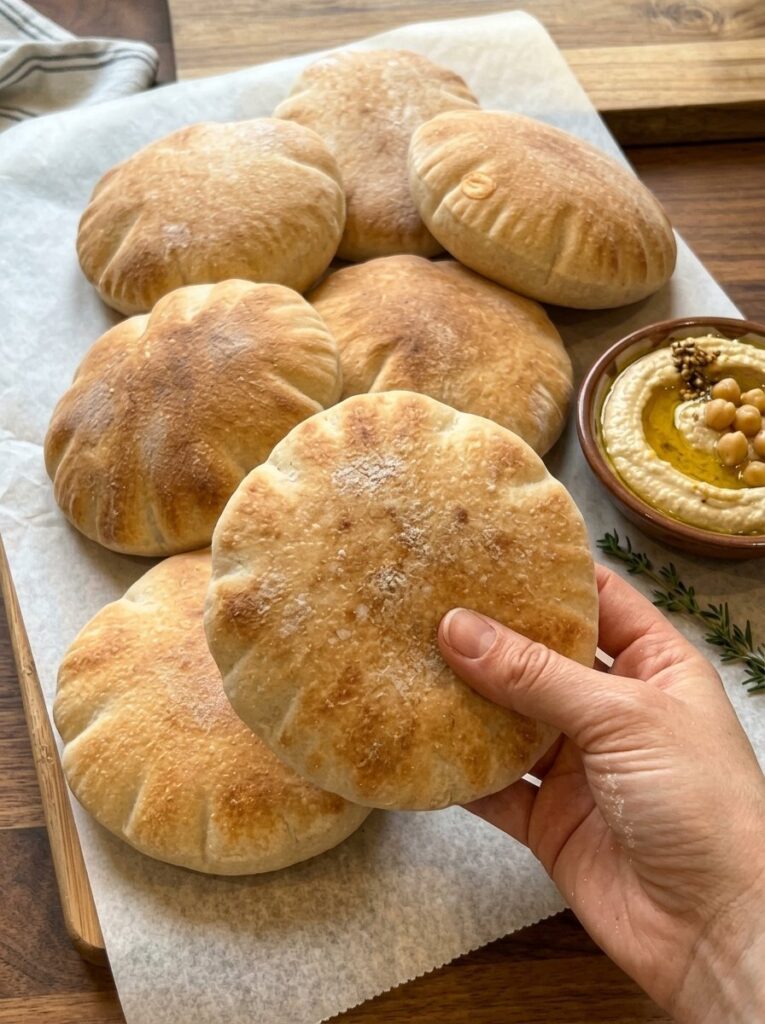
For an easy entertaining spread, stack the warm pitas on a board lined with parchment paper, as in the photo above, and add a bowl of hummus drizzled with olive oil. Surround it with fresh herbs, olives, cucumber, tomatoes and feta. Guests tear off pieces and build their own bites. It’s casual, colorful and almost entirely make-ahead.
Storage and Reheating
Room Temperature
Let the pitas cool completely, then store them in an airtight container or reusable bread bag at room temperature for up to 3 days.
Freezing
For longer storage, place parchment paper between the pitas and freeze them in a freezer-safe bag for up to 2 to 3 months. The parchment keeps them from sticking together, so you can pull out just what you need.
Reheating
- Skillet: Warm in a dry skillet for a few seconds per side.
- Microwave: Heat briefly under a slightly damp kitchen towel.
- From frozen: Frozen pitas can be reheated directly from frozen and will become soft and flexible again.
Make-Ahead Tips
Pita is easy to fit into a busy schedule. You can make a full batch, cool the pitas completely, then freeze them flat with parchment between each one. On a busy evening you only need to warm a few in a skillet and dinner is half done. If you’re hosting, cook the pitas in the afternoon, keep them wrapped in a clean towel and give them a quick warm-up right before serving.
Frequently Asked Questions
Can I make Greek pita bread without an oven?
Yes. This recipe is cooked entirely in a hot skillet or cast-iron pan, so no oven is needed.
Do I need oil in the pan?
No. The pan should be hot and dry. The olive oil in the dough keeps the bread soft.
What kind of flour works best?
All-purpose flour, which is what this recipe uses, gives a soft and chewy result.
Why is warm water important?
Warm water helps the yeast activate. Water that is too hot can interfere with the yeast, so aim for warm rather than hot.
How do I know the dough has risen enough?
Look for visibly puffy dough that has roughly doubled in size. Rely on how the dough looks rather than only the clock.
Why do I need to rest the dough balls?
The 10 to 15 minute rest relaxes the gluten, which makes the dough much easier to roll without snapping back.
How thick should I roll the pitas?
About ¼ inch (6 mm) thick and 6 to 7 inches (15 to 18 cm) across. Try to keep the thickness even so the pitas cook consistently.
Why cover the cooked pitas with a towel?
The trapped steam keeps them soft, warm and flexible instead of drying out.
How long do homemade pitas keep?
Up to 3 days at room temperature in an airtight container or bread bag, or 2 to 3 months in the freezer.
Can I use these pitas for gyros and souvlaki?
Absolutely. They’re soft and flexible, which makes them ideal for wrapping grilled meats and fresh toppings.
Can I serve them with dips?
Yes. Warm pita with hummus or tzatziki is one of the best ways to enjoy it.
Final Thoughts
Homemade pita is one of the most rewarding breads you can make. The ingredient list is short, the technique is simple and the payoff is huge: warm, soft, golden-spotted bread that is far better than anything from a package. With a hot skillet, a little patience for the dough to rise and a towel to keep the finished pitas steamy and tender, you can have a stack of fresh Greek pitas on the table in a couple of hours.
Make a batch for your next gyro night, serve them beside a bowl of hummus or freeze a few for busy weeks. Once you’ve tried this easy homemade Greek pita bread, you may never go back to store-bought.
If you make this recipe, leave a comment and a rating below, and share your photos. Happy baking!
Print
Easy Homemade Greek Pita Bread
Ingredients
This recipe makes 8 pitas.
- 3½ cups (420 g) all-purpose flour
- 1¼ cups (300 ml) warm water
- 2¼ tsp (7 g) instant yeast
- 1 tsp granulated sugar
- 1½ tsp salt
- 2 tbsp (30 ml) olive oil
A Quick Look at Each Ingredient
All-purpose flour is all you need. It has enough protein to develop a smooth, elastic dough while keeping the finished bread tender.
Warm water wakes up the yeast. Aim for comfortably warm, like a pleasant bath, not hot. Water that is too hot can damage the yeast and keep your dough from rising properly.
Instant yeast gives the pitas their lift and soft, airy texture.
Sugar gives the yeast a little food to help it get going, and it adds a very subtle touch of flavor.
Salt seasons the bread and helps strengthen the dough.
Olive oil adds softness, flavor and a slightly richer crumb, which fits the Greek style well.
Instructions
Add the warm water, sugar and instant yeast to a large mixing bowl. Stir gently and let the mixture sit for about 5 minutes. It should become slightly foamy, which tells you the yeast is active and ready to work.
Add the flour and salt to the bowl, then pour in the olive oil. Stir with a wooden spoon until a shaggy dough begins to form. Once it comes together, transfer it to a lightly floured surface.
Knead gently for about 5 to 7 minutes, until the dough is smooth, elastic and soft. If it feels excessively sticky, add a small amount of flour at a time, but avoid adding too much. Shape the dough into a smooth ball.
Lightly grease a clean bowl with a little olive oil and place the dough inside. Cover with plastic wrap or a clean kitchen towel. Let it rise in a warm, draft-free place for about 1 to 1½ hours, or until roughly doubled in size.
Gently press down the risen dough to release excess air. Transfer it to a lightly floured work surface and divide it into 8 equal pieces. Shape each into a smooth ball by folding the edges toward the center and gently rolling it under your palm. Cover the balls with a clean towel and rest them for 10 to 15 minutes. This short rest relaxes the gluten and makes the dough much easier to roll.
Lightly flour your work surface. Roll one dough ball into a round about 6 to 7 inches (15 to 18 cm) across and about ¼ inch (6 mm) thick. Keep the thickness as even as you can. Cover the remaining dough balls while you work.
Heat a large, heavy-bottomed skillet or cast-iron pan over medium-high heat. The pan should be hot before the first pita goes in. You don’t need any oil.
Place one rolled pita onto the hot skillet. Cook for about 1 to 2 minutes, until bubbles begin to appear and golden-brown spots develop underneath. Flip and cook another 1 to 2 minutes. As it cooks, the pita may puff up with steam, creating that soft pocket-like center. Flip once more if needed and cook briefly until both sides have beautiful golden spots.
Move each cooked pita to a clean kitchen towel and cover it right away. Continue with the rest, stacking them under the towel as they finish. The trapped steam is what keeps them soft, warm and flexible.
Serve while they’re still warm and soft. Use them right away for wraps, gyros, dipping, sandwiches or a Mediterranean-style meal.