Ingredients
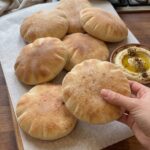
This recipe makes 8 soft homemade pita breads.
- 3 cups (375 g) all-purpose flour, plus extra for rolling
- 1 cup (240 ml) warm water, around 100–110°F (38–43°C)
- 2¼ teaspoons (7 g) instant yeast, or one standard packet
- 1 tablespoon (12 g) sugar or honey
- 1 teaspoon (6 g) salt
- 1 tablespoon (15 ml) olive oil
A Quick Note on the Ingredients
All-purpose flour is all you need. It gives the pitas a soft, tender crumb with just enough chew. Measure by weight if you can. A kitchen scale is the most reliable way to get a dough that’s soft and slightly tacky rather than dry or sticky.
Warm water activates the yeast. Aim for the temperature of a comfortable warm bath, roughly 100–110°F (38–43°C). Water that’s too cool slows the yeast down, and water that’s too hot can damage it.
Instant yeast is mixed directly into the water, so you don’t need a separate proofing step. One standard packet works just as well.
Sugar or honey gives the yeast a little food and adds a very subtle touch of flavor.
Olive oil adds tenderness to the dough and a hint of richness.
Instructions
In a large mixing bowl, combine the warm water, instant yeast, and sugar. Stir briefly to help distribute the ingredients.
Add the flour, salt, and olive oil. Mix with a wooden spoon or a sturdy spatula until everything comes together into a rough, shaggy dough. It may look uneven at first, and that’s perfectly fine.
There is no need to knead. Simply mix until no large patches of dry flour remain. If the dough seems unusually dry, add water a teaspoon at a time. If it’s very wet, sprinkle in a little extra flour.
Cover the bowl with a clean kitchen towel, plastic wrap, or a lid. Leave it in a warm, draft-free place for about 60 to 90 minutes, or until the dough has noticeably risen and looks airy.
The exact rising time depends on your room temperature and the activity of your yeast. The dough doesn’t need to double perfectly, but it should look softer, fuller, and slightly bubbly.
This resting period develops the dough’s structure without any kneading, and it’s what gives you tender pita breads.
Lightly dust your work surface with flour and gently transfer the risen dough onto it.
Divide the dough into 8 equal portions. Shape each portion into a loose ball by tucking the edges underneath. Avoid pressing out all the air, since that trapped air helps your pitas puff later.
Cover the dough balls with a clean towel and let them rest for 10 to 15 minutes. This short rest relaxes the gluten, which makes the dough easier to roll without springing back.
Place one dough ball on a lightly floured surface and roll it into a round about 6 to 7 inches (15–18 cm) across and roughly ⅛ inch (3–4 mm) thick.
Try to keep the thickness even from the center to the edges. Very thick areas may not puff properly, while extremely thin areas can turn crisp.
Repeat with the remaining dough balls, keeping the rolled rounds covered with a towel while you work so they don’t dry out.
Place a heavy skillet, cast-iron pan, or nonstick frying pan over medium-high heat. Let it get thoroughly hot before you cook the first pita.
You don’t need to add oil. Cooking the dough in a dry pan helps the bread develop its characteristic soft surface with light golden-brown spots.
If the skillet smokes heavily or the pita darkens almost immediately, reduce the heat slightly.
Place one rolled dough round into the hot skillet. Cook for about 30 to 60 seconds, until bubbles begin to appear across the surface.
Flip the pita and cook the second side for another 30 to 60 seconds. Flip it once more if needed and let it cook until it puffs into a pocket and develops light golden-brown spots.
Depending on your skillet and heat level, each pita may take around 1 to 2 minutes in total, sometimes a little longer.
If a pita doesn’t puff completely, don’t worry. It will still be soft and delicious, and you can use it as a wrap or flatbread. Consistent thickness and a properly heated skillet give you the best chance of a full pocket.
Transfer each cooked pita to a clean kitchen towel and cover it immediately. Stack the pitas as they finish cooking.
The trapped warmth keeps the bread soft, flexible, and easy to fold. Continue cooking the remaining rounds, adjusting the heat as necessary.
Avoid leaving cooked pitas uncovered for too long, as they can lose moisture and become firm around the edges.
Serve the pita breads while they’re warm and tender. Gently open the pocket with a knife once the bread has cooled slightly, then fill it with grilled chicken, falafel, lettuce, tomatoes, cucumber, or your favorite sauces.