No-Knead Homemade Pita Bread: Soft, Puffy, and Made in a Skillet
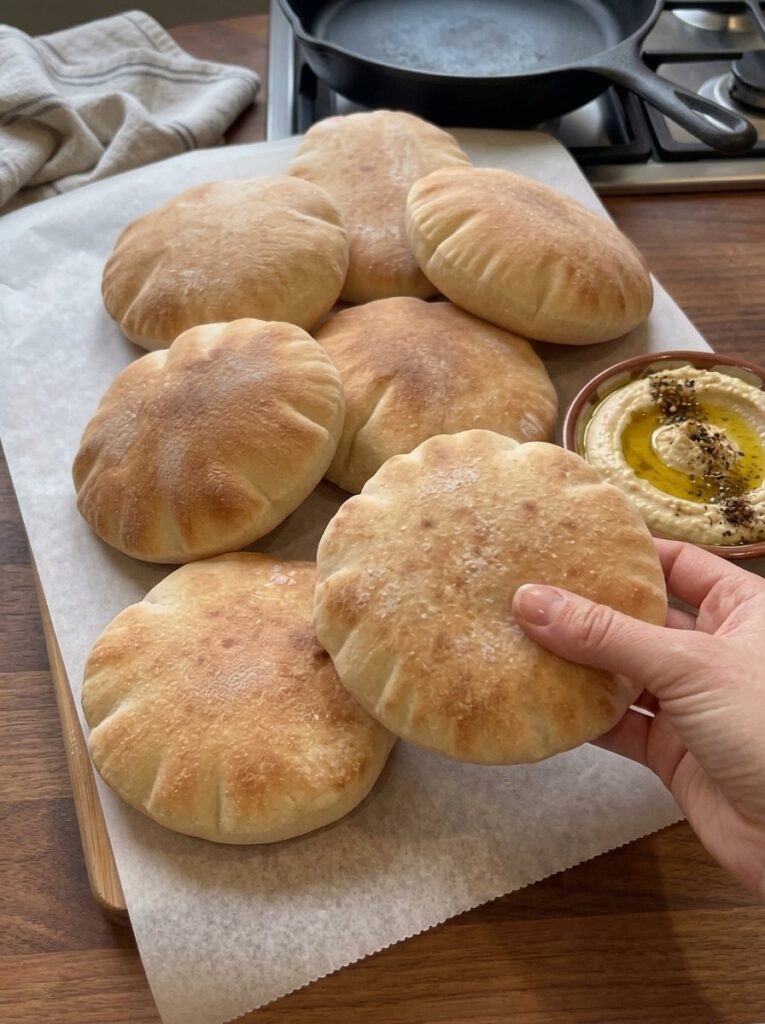
There’s a reason homemade pita bread is such a favorite. It’s soft, wonderfully flexible, and perfect for turning simple ingredients into a satisfying meal. This no-knead homemade pita bread recipe brings fresh, skillet-cooked flatbread to your kitchen with a lightly chewy bite and a tender center. When the pitas puff during cooking, they form pockets you can fill with grilled chicken, crisp vegetables, falafel, or whatever sandwich combination you like.
The best part is that you don’t need to knead the dough or turn on the oven. You mix the ingredients, let the dough rise, roll it into thin rounds, and cook each one in a hot skillet until it’s soft and lightly spotted with golden brown. No special equipment or advanced baking skills are required.
If you’ve only ever bought pita from the store, this recipe may change how you think about flatbread. Freshly cooked pita is warm, pillowy, and far more tender than the packaged kind, and it takes about two hours from start to finish, most of which is hands-off rising time.
In this guide you’ll find the full ingredient list, step-by-step instructions, troubleshooting tips for getting a perfect puff, serving ideas, storage and freezing advice, and answers to common questions.
Why You’ll Love This Easy Homemade Pita Bread
No kneading required. Traditional bread recipes often ask for ten minutes or more of kneading. This dough comes together with a wooden spoon in a few minutes. You stir until no large patches of dry flour remain, then let time do the work.
No oven needed. Many pita recipes call for a blazing hot oven or a baking stone. This version uses a regular skillet on the stovetop, which keeps your kitchen cooler and makes the recipe accessible even if you don’t have a full-size oven.
Simple pantry ingredients. You need flour, water, yeast, sugar or honey, salt, and olive oil. There’s nothing to hunt down and nothing expensive.
Soft, flexible texture. These pitas stay tender and bendable, so they fold around fillings without cracking. That makes them ideal for sandwiches, wraps, and dipping.
Versatile and freezer-friendly. One batch makes 8 pitas. Serve some fresh, store the rest, and you have flatbread ready for the week ahead.
Ingredients for No-Knead Homemade Pita Bread
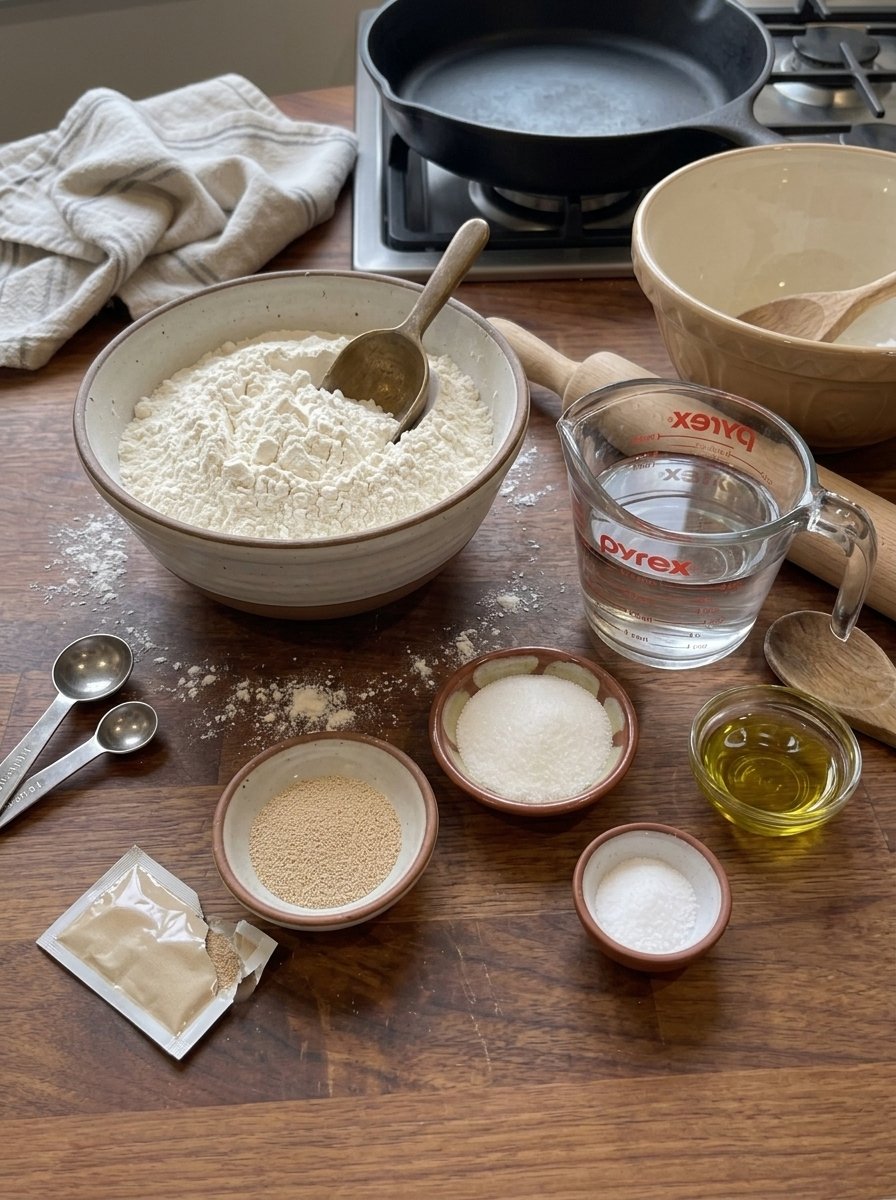
This recipe makes 8 soft homemade pita breads.
- 3 cups (375 g) all-purpose flour, plus extra for rolling
- 1 cup (240 ml) warm water, around 100–110°F (38–43°C)
- 2¼ teaspoons (7 g) instant yeast, or one standard packet
- 1 tablespoon (12 g) sugar or honey
- 1 teaspoon (6 g) salt
- 1 tablespoon (15 ml) olive oil
A Quick Note on the Ingredients
All-purpose flour is all you need. It gives the pitas a soft, tender crumb with just enough chew. Measure by weight if you can. A kitchen scale is the most reliable way to get a dough that’s soft and slightly tacky rather than dry or sticky.
Warm water activates the yeast. Aim for the temperature of a comfortable warm bath, roughly 100–110°F (38–43°C). Water that’s too cool slows the yeast down, and water that’s too hot can damage it.
Instant yeast is mixed directly into the water, so you don’t need a separate proofing step. One standard packet works just as well.
Sugar or honey gives the yeast a little food and adds a very subtle touch of flavor.
Olive oil adds tenderness to the dough and a hint of richness.
How to Make Homemade Pita Bread Step by Step
Step 1: Mix the Dough
In a large mixing bowl, combine the warm water, instant yeast, and sugar. Stir briefly to help distribute the ingredients.
Add the flour, salt, and olive oil. Mix with a wooden spoon or a sturdy spatula until everything comes together into a rough, shaggy dough. It may look uneven at first, and that’s perfectly fine.
There is no need to knead. Simply mix until no large patches of dry flour remain. If the dough seems unusually dry, add water a teaspoon at a time. If it’s very wet, sprinkle in a little extra flour.
Step 2: Let the Dough Rise
Cover the bowl with a clean kitchen towel, plastic wrap, or a lid. Leave it in a warm, draft-free place for about 60 to 90 minutes, or until the dough has noticeably risen and looks airy.
The exact rising time depends on your room temperature and the activity of your yeast. The dough doesn’t need to double perfectly, but it should look softer, fuller, and slightly bubbly.
This resting period develops the dough’s structure without any kneading, and it’s what gives you tender pita breads.
Step 3: Divide the Dough into Portions
Lightly dust your work surface with flour and gently transfer the risen dough onto it.
Divide the dough into 8 equal portions. Shape each portion into a loose ball by tucking the edges underneath. Avoid pressing out all the air, since that trapped air helps your pitas puff later.
Cover the dough balls with a clean towel and let them rest for 10 to 15 minutes. This short rest relaxes the gluten, which makes the dough easier to roll without springing back.
Step 4: Roll Out the Pita Breads
Place one dough ball on a lightly floured surface and roll it into a round about 6 to 7 inches (15–18 cm) across and roughly ⅛ inch (3–4 mm) thick.
Try to keep the thickness even from the center to the edges. Very thick areas may not puff properly, while extremely thin areas can turn crisp.
Repeat with the remaining dough balls, keeping the rolled rounds covered with a towel while you work so they don’t dry out.
Step 5: Heat the Skillet
Place a heavy skillet, cast-iron pan, or nonstick frying pan over medium-high heat. Let it get thoroughly hot before you cook the first pita.
You don’t need to add oil. Cooking the dough in a dry pan helps the bread develop its characteristic soft surface with light golden-brown spots.
If the skillet smokes heavily or the pita darkens almost immediately, reduce the heat slightly.
Step 6: Cook Until the Pita Puffs
Place one rolled dough round into the hot skillet. Cook for about 30 to 60 seconds, until bubbles begin to appear across the surface.
Flip the pita and cook the second side for another 30 to 60 seconds. Flip it once more if needed and let it cook until it puffs into a pocket and develops light golden-brown spots.
Depending on your skillet and heat level, each pita may take around 1 to 2 minutes in total, sometimes a little longer.
If a pita doesn’t puff completely, don’t worry. It will still be soft and delicious, and you can use it as a wrap or flatbread. Consistent thickness and a properly heated skillet give you the best chance of a full pocket.
Step 7: Keep the Pitas Soft and Warm
Transfer each cooked pita to a clean kitchen towel and cover it immediately. Stack the pitas as they finish cooking.
The trapped warmth keeps the bread soft, flexible, and easy to fold. Continue cooking the remaining rounds, adjusting the heat as necessary.
Avoid leaving cooked pitas uncovered for too long, as they can lose moisture and become firm around the edges.
Step 8: Serve and Enjoy
Serve the pita breads while they’re warm and tender. Gently open the pocket with a knife once the bread has cooled slightly, then fill it with grilled chicken, falafel, lettuce, tomatoes, cucumber, or your favorite sauces.
You can also tear the pita into pieces and serve it alongside hummus, tzatziki, roasted vegetables, soups, or Mediterranean-inspired meals.
Tips for the Best No-Knead Homemade Pita Bread
A few small details make the difference between flat, dry rounds and soft, puffy pockets.
Use warm, not hot, water. Warm water activates the yeast, while water that’s too hot can damage it.
Let the dough rise until puffy. Give it enough time to become soft and airy. A cool kitchen may need a little extra rising time, so judge by how the dough looks rather than by the clock alone.
Avoid adding too much extra flour. The dough should feel soft and slightly tacky. Too much flour, either in the dough or on the work surface while rolling, can make your pita breads dry or stiff.
Roll the dough evenly. Aim for rounds about ⅛ inch (3–4 mm) thick so they cook evenly and have a better chance of puffing.
Preheat the skillet thoroughly. A hot, dry skillet helps create the steam needed to form the signature pita pocket. Steam trapped inside the dough is what inflates it.
Don’t press the pitas while cooking. Let the heat do its work so the bread can inflate naturally. Pressing with a spatula can seal the layers together and prevent a pocket from forming.
Keep cooked pitas covered. Place them inside a clean kitchen towel as they come off the skillet to help them retain moisture and flexibility.
Be patient with the first pita. Use it to test the skillet temperature. If it browns too quickly before puffing, lower the heat slightly.
Troubleshooting: Why Didn’t My Pita Puff?
Even experienced cooks have the occasional flat pita. Here are the most common causes and what to adjust.
The pita is too thick or too thin. Rounds that are too thick may not puff properly, and rounds that are too thin can turn crisp before steam builds up. Aim for about ⅛ inch (3–4 mm) and keep the thickness even.
The skillet wasn’t hot enough. The steam that forms the pocket needs strong, steady heat. Give the pan plenty of time to preheat, and test with the first pita.
The skillet was too hot. If the pita browns before it puffs, the surface sets too early. Lower the heat slightly and try again.
The dough dried out. Dough balls and rolled rounds that sit uncovered can form a dry skin. Keep everything covered with a towel while you work.
The dough was too dry or had too much flour. A stiff dough is less likely to puff. Remember that the dough should feel soft and slightly tacky.
The dough didn’t rise enough. If the dough hasn’t become soft, fuller, and slightly bubbly, give it more time, especially in a cool kitchen.
And if a pita doesn’t puff completely, it’s still perfectly good as a wrap, a flatbread for dipping, or a base for a quick pizza.
What to Serve With Homemade Pita Bread
One of the joys of making pita at home is how many ways you can use it. Here are some ideas.
Chicken pita pockets. Fill with grilled chicken, lettuce, tomatoes, cucumber, and a garlic yogurt sauce for an easy lunch or dinner.
Falafel wraps. Add falafel, shredded vegetables, hummus, and a squeeze of lemon.
Hummus and dips. Serve warm pita with hummus, baba ganoush, tzatziki, or creamy feta dip. Tear it into pieces for easy scooping.
A Mediterranean lunch plate. Pair pita with olives, chopped salad, roasted vegetables, and your favorite protein.
Breakfast pita. Fill with scrambled eggs, cheese, spinach, and sliced tomatoes for a quick, portable breakfast.
Quick homemade pizza. Spread a little tomato sauce over a pita, add cheese and toppings, then heat until the cheese melts.
Crispy pita chips. Cut leftover pita into triangles, brush lightly with olive oil, season, and bake until crisp. They’re a great way to use up pitas that have gone a little firm.
How to Store Homemade Pita Bread
At room temperature. Let the pita breads cool completely, then store them in an airtight bag or container for up to 2 days. Keep them away from direct sunlight and excess moisture.
In the refrigerator. Store in an airtight container for up to 4 to 5 days. Refrigeration can make pita bread firmer, so warming it before serving helps restore its softness.
In the freezer. Separate completely cooled pitas with small pieces of parchment paper if you like, then place them in a freezer-safe bag. Freeze for up to 3 months for the best quality.
To reheat. Warm a pita in a dry skillet for about 20 to 30 seconds per side, or wrap it in a slightly damp paper towel and microwave for 10 to 20 seconds. Adjust the time as needed to avoid drying it out.
Helpful tip: If frozen, thaw the pita at room temperature or warm it gently from frozen in a covered skillet. Keep it covered with a clean towel after reheating to help it stay soft.
Make-Ahead and Meal Prep Ideas
Because these pitas store and freeze so well, they fit easily into meal prep. Cook the whole batch on a weekend afternoon, cool the pitas completely, and freeze them in a bag with parchment between each one. On busy weeknights you can warm a pita in a skillet in under a minute and have a wrap, a dipping bread, or a pizza base ready almost instantly.
You can also use the cooking time as a rhythm. Roll the next round while the current one is in the pan, and you’ll move through a full batch quickly. A handy routine is to roll two or three rounds ahead, keeping them covered, so you’re never waiting on the skillet.
Recipe Details
- Prep time: 15 minutes
- Rise time: 60–90 minutes
- Resting time: 10–15 minutes
- Cook time: 15–20 minutes
- Total time: approximately 1 hour 40 minutes to 2 hours 20 minutes
- Yield: 8 pita breads
- Difficulty: Easy
- Cooking method: Stovetop skillet
- Texture: Soft, flexible, lightly chewy, with a tender center
Frequently Asked Questions
Do I really not need to knead this pita dough?
Correct. You mix the ingredients until no large patches of dry flour remain, then let the dough rise. The resting period develops the structure for you, so no kneading is needed.
Can I make pita bread without an oven?
Yes. This recipe is cooked entirely in a hot skillet on the stovetop, so it works well when you don’t want to heat the oven or don’t have one available.
What kind of skillet works best?
A heavy skillet, cast-iron pan, or nonstick frying pan over medium-high heat all work. What matters most is that the pan is thoroughly hot before the first pita goes in.
Do I need to oil the pan?
No. Cooking in a dry pan helps the bread develop its soft surface with light golden-brown spots.
Why is my pita not forming a pocket?
The most common reasons are uneven or overly thick or thin rolling, a skillet that isn’t hot enough, pressing the bread while it cooks, or dough that dried out. Check the troubleshooting section above for fixes.
Can I use honey instead of sugar?
Yes. The recipe works with either sugar or honey. Both feed the yeast and add a subtle hint of flavor.
How long does the dough need to rise?
About 60 to 90 minutes in a warm, draft-free place, or until the dough looks noticeably risen, soft, and slightly bubbly. It may take longer in a cool kitchen.
How do I keep pita bread soft?
Wrap each pita in a clean kitchen towel as soon as it comes off the skillet, and stack them while covered. Store cooled pitas in an airtight bag or container, and warm them gently before serving.
Can I freeze homemade pita bread?
Yes. Cool the pitas completely, separate them with parchment if desired, and freeze them in a freezer-safe bag for up to 3 months for the best quality.
What can I do with pitas that didn’t puff?
Use them as wraps, flatbread for dipping, or quick pizza bases. They’ll still be soft and tasty.
Final Thoughts
Homemade pita bread is one of those recipes that feels special but asks very little of you. With no kneading, no oven, and a short list of everyday ingredients, you can have warm, soft, puffy pitas on the table in about two hours. Roll them evenly, preheat your skillet well, keep the cooked pitas wrapped in a towel, and you’ll be rewarded with tender pockets ready for every kind of filling.
Once you’ve made a batch, you’ll likely find yourself reaching for this recipe again and again, whether for weeknight wraps, a Mediterranean-inspired spread, or a simple plate of pita and hummus. Save it, share it, and enjoy the fresh homemade flavor.
Print
No-Knead Homemade Pita Bread
Ingredients
This recipe makes 8 soft homemade pita breads.
- 3 cups (375 g) all-purpose flour, plus extra for rolling
- 1 cup (240 ml) warm water, around 100–110°F (38–43°C)
- 2¼ teaspoons (7 g) instant yeast, or one standard packet
- 1 tablespoon (12 g) sugar or honey
- 1 teaspoon (6 g) salt
- 1 tablespoon (15 ml) olive oil
A Quick Note on the Ingredients
All-purpose flour is all you need. It gives the pitas a soft, tender crumb with just enough chew. Measure by weight if you can. A kitchen scale is the most reliable way to get a dough that’s soft and slightly tacky rather than dry or sticky.
Warm water activates the yeast. Aim for the temperature of a comfortable warm bath, roughly 100–110°F (38–43°C). Water that’s too cool slows the yeast down, and water that’s too hot can damage it.
Instant yeast is mixed directly into the water, so you don’t need a separate proofing step. One standard packet works just as well.
Sugar or honey gives the yeast a little food and adds a very subtle touch of flavor.
Olive oil adds tenderness to the dough and a hint of richness.
Instructions
In a large mixing bowl, combine the warm water, instant yeast, and sugar. Stir briefly to help distribute the ingredients.
Add the flour, salt, and olive oil. Mix with a wooden spoon or a sturdy spatula until everything comes together into a rough, shaggy dough. It may look uneven at first, and that’s perfectly fine.
There is no need to knead. Simply mix until no large patches of dry flour remain. If the dough seems unusually dry, add water a teaspoon at a time. If it’s very wet, sprinkle in a little extra flour.
Cover the bowl with a clean kitchen towel, plastic wrap, or a lid. Leave it in a warm, draft-free place for about 60 to 90 minutes, or until the dough has noticeably risen and looks airy.
The exact rising time depends on your room temperature and the activity of your yeast. The dough doesn’t need to double perfectly, but it should look softer, fuller, and slightly bubbly.
This resting period develops the dough’s structure without any kneading, and it’s what gives you tender pita breads.
Lightly dust your work surface with flour and gently transfer the risen dough onto it.
Divide the dough into 8 equal portions. Shape each portion into a loose ball by tucking the edges underneath. Avoid pressing out all the air, since that trapped air helps your pitas puff later.
Cover the dough balls with a clean towel and let them rest for 10 to 15 minutes. This short rest relaxes the gluten, which makes the dough easier to roll without springing back.
Place one dough ball on a lightly floured surface and roll it into a round about 6 to 7 inches (15–18 cm) across and roughly ⅛ inch (3–4 mm) thick.
Try to keep the thickness even from the center to the edges. Very thick areas may not puff properly, while extremely thin areas can turn crisp.
Repeat with the remaining dough balls, keeping the rolled rounds covered with a towel while you work so they don’t dry out.
Place a heavy skillet, cast-iron pan, or nonstick frying pan over medium-high heat. Let it get thoroughly hot before you cook the first pita.
You don’t need to add oil. Cooking the dough in a dry pan helps the bread develop its characteristic soft surface with light golden-brown spots.
If the skillet smokes heavily or the pita darkens almost immediately, reduce the heat slightly.
Place one rolled dough round into the hot skillet. Cook for about 30 to 60 seconds, until bubbles begin to appear across the surface.
Flip the pita and cook the second side for another 30 to 60 seconds. Flip it once more if needed and let it cook until it puffs into a pocket and develops light golden-brown spots.
Depending on your skillet and heat level, each pita may take around 1 to 2 minutes in total, sometimes a little longer.
If a pita doesn’t puff completely, don’t worry. It will still be soft and delicious, and you can use it as a wrap or flatbread. Consistent thickness and a properly heated skillet give you the best chance of a full pocket.
Transfer each cooked pita to a clean kitchen towel and cover it immediately. Stack the pitas as they finish cooking.
The trapped warmth keeps the bread soft, flexible, and easy to fold. Continue cooking the remaining rounds, adjusting the heat as necessary.
Avoid leaving cooked pitas uncovered for too long, as they can lose moisture and become firm around the edges.
Serve the pita breads while they’re warm and tender. Gently open the pocket with a knife once the bread has cooled slightly, then fill it with grilled chicken, falafel, lettuce, tomatoes, cucumber, or your favorite sauces.