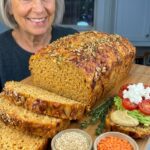
Ingredients
This recipe keeps things refreshingly simple. Here’s what goes into the batter:
- 1 cup (190 g) dry red lentils — the protein-rich base of the bread
- 1 cup (170 g) uncooked quinoa — adds structure, nuttiness, and additional protein
- 1½ cups (360 ml) water — helps blend the mixture into a smooth, thick batter (plus more for soaking)
- 2 tablespoons olive oil — adds moisture and richness to the crumb
- 1 teaspoon baking powder — helps the loaf rise slightly and stay light
- ½ teaspoon salt — balances and enhances the overall flavor
That’s it — six ingredients, no flour, no eggs, no yeast, and no gluten-free flour blend required.
Instructions
This bread comes together in five straightforward steps. The most important thing to remember is that soaking time is essential — it’s what allows the lentils and quinoa to blend into a smooth, bread-like batter.
Start by placing the red lentils and quinoa in separate bowls. Rinse each thoroughly under cool running water — this removes excess starch and helps eliminate any natural bitterness, especially from the quinoa, which has a natural coating called saponin.
Cover both bowls generously with water and let them soak for 4 to 6 hours, or until the lentils and quinoa have visibly softened. If you’re short on time, a shorter soak may still work, but a full soak yields the smoothest batter and the best final texture. Once softened, drain both thoroughly.
Tip: Soaking overnight in the refrigerator is a convenient option if you want to prep the batter fresh in the morning.
Preheat your oven to 350°F (175°C).
Add the soaked and drained red lentils, soaked and drained quinoa, 1½ cups of water, olive oil, baking powder, and salt to a high-speed blender. Blend until the mixture is completely smooth and creamy, pausing occasionally to scrape down the sides so nothing gets left behind.
The finished batter should be thick, uniform, and free of any visible lentil or quinoa fragments — this is key to achieving a tender, even crumb throughout the loaf rather than a gritty or uneven texture.
Lightly grease an 8 × 4-inch loaf pan, or line it with parchment paper for easy removal later. Pour the blended batter into the prepared pan and use a spatula to gently smooth the top, which helps the loaf bake evenly from edge to edge.
Place the loaf pan in your preheated oven and bake for 50 to 60 minutes. You’ll know it’s ready when the top turns a light golden color and the center feels firm to the touch.
To check for doneness, insert a toothpick into the center of the loaf — it should come out mostly clean, without wet batter clinging to it. If the top starts browning too quickly before the center is fully baked, loosely tent the loaf with aluminum foil for the remainder of the baking time.
Once baked, remove the bread from the oven and let it cool in the pan for 10 to 15 minutes. This resting period allows the structure to firm up slightly before handling.
Carefully transfer the loaf to a wire rack and let it cool completely before slicing — this step is more important than it sounds. Slicing too early can result in a gummy or crumbly texture, since the crumb needs time to fully set. Once cooled, use a sharp serrated knife to cut clean, even slices.