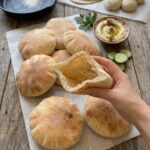
Ingredients
This recipe makes 8 soft pocket pitas.
- 3 cups (375 g) all-purpose flour
- 1 cup (240 ml) warm water, about 105–110°F (40–43°C)
- 2¼ tsp (7 g) instant yeast
- 1 tsp sugar or honey
- 1½ tsp salt
- 1 tbsp olive oil
Ingredient Notes
All-purpose flour: All-purpose flour has enough protein to create a stretchy dough that traps steam, while still producing a soft, tender bite. Measuring by weight (375 g) is the most accurate method. If you use cups, spoon the flour into the measuring cup and level it off rather than scooping directly from the bag, which packs in too much flour and makes the dough dry.
Warm water: Temperature matters. Water that is too cold slows the yeast, and water that is too hot can kill it. Aim for the comfortable warmth of a baby bottle, about 105–110°F (40–43°C).
Instant yeast: Instant yeast is reliable and easy to use. The foamy mixture you see in Step 1 confirms that your yeast is alive before you commit the rest of your ingredients.
Sugar or honey: Just one teaspoon gives the yeast a little food to wake up quickly. It is not there to make the bread sweet.
Salt: Salt adds flavor and strengthens the dough structure. Do not skip it, or the pitas will taste flat.
Olive oil: A tablespoon of olive oil makes the dough softer and more flexible, and it adds subtle richness.
Instructions
Add the warm water, sugar or honey, and instant yeast to a large mixing bowl. Stir gently and let the mixture sit for about 5 minutes. It should turn slightly foamy, which tells you the yeast is active. If nothing happens after 10 minutes, your yeast may be old or your water may have been the wrong temperature. It is best to start over with fresh yeast.
Add the flour, salt, and olive oil to the yeast mixture. Stir with a wooden spoon until a shaggy dough forms and no large patches of dry flour remain. At this stage the dough will look rough and uneven. That is completely normal, since kneading will smooth it out.
Transfer the dough to a lightly floured work surface and knead for about 5–7 minutes. Push the dough away from you with the heel of your hand, fold it back over itself, give it a quarter turn, and repeat. The dough is ready when it feels smooth, soft, and elastic.
The finished dough should be soft and slightly tacky. If it feels excessively sticky, add a very small amount of flour at a time. Resist the urge to add too much, because extra flour leads to dry, tough pitas.
Tip: To check your kneading, press a finger into the dough. If it springs back slowly and the surface looks smooth, you are ready for the next step.
Place the dough in a lightly oiled bowl and turn it once so the surface is lightly coated. Cover the bowl with a clean kitchen towel or plastic wrap. Let the dough rise in a warm, draft-free place for about 1–1½ hours, or until it has roughly doubled in size.
A turned-off oven with the light on, or a spot near (but not on) a warm appliance, works well if your kitchen is cool. Rise time varies with room temperature, so judge by the dough rather than the clock.
Gently press down the risen dough to release excess air. Divide it into 8 equal pieces. For even pitas, you can weigh the pieces on a kitchen scale. Shape each piece into a smooth ball by pulling the edges underneath and pinching them together at the bottom.
Cover the dough balls and let them rest for 10–15 minutes. This resting time allows the gluten to relax, which makes rolling much easier and prevents the dough from springing back.
Lightly flour your work surface. Roll each dough ball into a round approximately 6–7 inches (15–18 cm) wide and about ¼ inch (6 mm) thick. Keep the dough as evenly thick as possible from the center to the edges. This helps the pita puff evenly and form a proper pocket.
Use only a light dusting of flour. Too much flour on the surface can scorch in the hot skillet and leave a bitter taste. Keep the rolled pitas covered with a towel while you work through the rest so they do not dry out.
Place a large cast-iron or heavy-bottomed skillet over high heat. Allow it to become thoroughly hot before cooking. The high heat is essential for creating steam inside the pita. Do not add oil to the skillet, since pitas cook best on a dry surface.
A good test is to flick a few drops of water onto the pan. If they sizzle and evaporate immediately, the skillet is ready.
Place one rolled pita onto the hot, dry skillet. Cook for about 30–45 seconds, until bubbles begin appearing across the surface. Flip and cook for another 30–45 seconds. As the pita heats, it should begin inflating as steam forms inside the dough.
Flip once more if needed and cook for another 15–30 seconds, until the pita is fully puffed and lightly golden in spots. Remember: do not press down on the pita while it cooks. Let the steam do its work.
Immediately transfer the cooked pita to a plate and cover it with a clean kitchen towel. Continue cooking the remaining pitas, stacking them under the towel as they finish. The trapped steam softens the crust, so by the time you are done cooking, the whole stack will be tender and pliable. Once slightly cooled, each pita will have a soft, hollow center ready to fill.