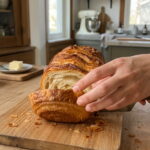
Ingredients
For the sourdough dough
- 400 g bread flour
- 100 g active sourdough starter, at 100% hydration
- 180 g cold whole milk
- 1 large egg, about 50 g
- 40 g granulated sugar
- 8 g salt
- 40 g unsalted butter, softened
For the butter layers
- 180 g unsalted butter, cold but pliable
For finishing
- 1 egg
- 1 tablespoon milk
Instructions
In a large bowl, combine the bread flour, active sourdough starter, cold milk, egg, sugar and salt. Mix until a rough dough forms. Add the softened butter and knead until it is fully incorporated and the dough becomes smooth and elastic. You can knead by hand on a lightly floured surface for about 8 to 10 minutes, or use a stand mixer with the dough hook for about 5 to 8 minutes.
The dough should feel smooth, slightly tacky and stretchy. If it seems too dry, add a teaspoon of milk. If too sticky, add a very small sprinkle of flour.
Cover the dough and let it ferment at room temperature for about 4 to 6 hours. The exact time depends on the strength of your starter and the temperature of your kitchen. In a warm kitchen it may be faster, and in a cool one it may take longer. The dough should become noticeably puffy and airy, though it may not fully double. Look for bubbles and a softer, more relaxed feel rather than relying only on the clock.
Cover and refrigerate the dough for 30 to 60 minutes. Chilling firms up the dough and makes it easier to roll and laminate. The goal is to have dough and butter at similar cool temperatures, which helps keep the layers separate.
Place the cold butter between two sheets of parchment paper. Use a rolling pin to pound and roll it into a rectangle about 5 mm thick. Keep it cool but flexible, not hard and not melted. If it cracks, let it sit for a few minutes. If it becomes soft or greasy, return it to the fridge for 10 minutes.
Once shaped, keep the butter in the fridge until you are ready for it. A tidy rectangle, roughly 15 by 20 cm (6 by 8 inches), is a good target, but exact dimensions matter less than uniform thickness.
On a lightly floured surface, roll the chilled dough into a rectangle large enough to enclose the butter. The dough rectangle should be about twice the width of the butter and slightly longer. Place the butter in the center and fold the dough over it, like closing an envelope. Pinch the edges firmly to seal the butter inside. No butter should be exposed.
Gently roll the dough into a long rectangle, about three times as long as it is wide. Use even pressure and work from the center outward. Brush off excess flour. Fold the dough into thirds, like folding a letter: fold one third over the middle, then the other third over the top. Wrap the dough and refrigerate for 30 to 45 minutes.
Turn the dough 90 degrees so the open edge is facing you like a book. Roll it out again into a long rectangle and fold it into thirds. Wrap and chill for 30 to 45 minutes. Repeat once more for a total of three single folds. Throughout the process, keep the dough and butter cool. If the butter softens or begins to leak, stop and chill the dough for 15 to 20 minutes.
A single fold, also called a letter fold, creates three layers each time. After three folds, the dough has many layers of butter and dough, which creates that flaky texture.
After the final chilling period, roll the dough into a rectangle. Fold or roll it into a loaf shape, trying to keep the layers neat and the edges tidy. A common method is to roll the rectangle up tightly like a jelly roll from the short side, then place it seam-side down in a greased loaf pan. Alternatively, fold it into thirds and tuck it into the pan.
Do not worry about perfection. The layers will show through no matter how you shape it, and every loaf looks a little different.
Cover the pan and refrigerate for 8 to 12 hours. This slow, cold proof develops deeper flavor, relaxes the dough and keeps the butter firm until baking.
Remove the loaf from the refrigerator and let it rise at room temperature until visibly puffy and close to the top of the pan. This may take 2 to 5 hours, depending on dough temperature and starter activity. The dough should look airy and jiggle slightly when the pan is nudged. Avoid hot spots, because butter that melts out of the dough can ruin the layers.
Heat the oven to 190°C (375°F). Place a rack in the lower-middle position so the top does not brown too fast.
Whisk the egg with the tablespoon of milk. Gently brush the top of the loaf without pressing down on the dough, which could deflate it.
Bake for 35 to 45 minutes, until the loaf is deeply golden and cooked through. If the top browns too quickly, cover it loosely with foil. The center should reach approximately 93°C to 96°C (200°F to 205°F). Some butter may leak onto the pan, which is normal, and placing a baking sheet underneath the loaf pan will catch drips.
Let the loaf rest in the pan for 10 minutes, then transfer it to a wire rack. Allow it to cool fully before slicing so the buttery layers can set. Slicing too soon can compress the layers and make the crumb seem gummy.