Sourdough Croissant Bread: Buttery, Flaky & Golden
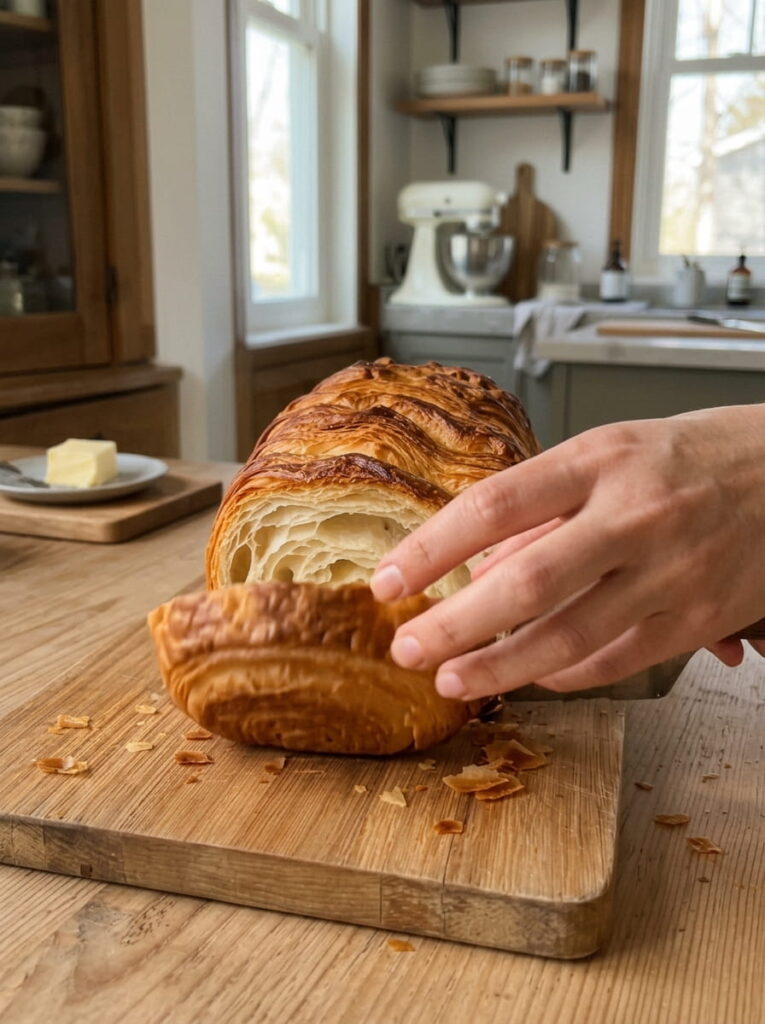
Imagine the rich, buttery layers of a French croissant combined with the tangy flavor of homemade sourdough bread. This sourdough croissant bread is a beautiful loaf with a golden, crisp crust, delicate buttery layers and a soft, tender interior. It is made with an active sourdough starter and real butter, and it uses a simple lamination technique to create irresistible layers without shaping individual croissants.
Whether you are an experienced sourdough baker looking for a new challenge or a curious home baker who loves croissants, this loaf offers the best of both worlds. It is perfect for breakfast, afternoon coffee or a slice toasted with your favorite jam.
This recipe takes time, mostly hands-off waiting, but the process is straightforward and the result is spectacular. Below you will find the full recipe, ingredient notes, detailed instructions, a timeline, troubleshooting tips, variations, storage advice, serving ideas and answers to common questions.
What Is Sourdough Croissant Bread?
Sourdough croissant bread combines two baking traditions. From sourdough, it takes a naturally leavened dough fermented with a wild yeast starter, which adds subtle tang, depth of flavor and a tender crumb. From croissants, it borrows lamination: the technique of folding a sheet of cold butter into dough again and again to create dozens of thin alternating layers of dough and butter.
When the laminated dough bakes, the water in the butter turns to steam and pushes the dough layers apart, creating flaky, airy, buttery pockets. Instead of cutting and rolling individual croissants, this recipe shapes the laminated dough into a loaf that bakes in a standard loaf pan. The result is a sliceable loaf with visible layers, a golden crust and a soft, rich interior.
Why You’ll Love This Recipe
It has real croissant flavor with sourdough character. The buttery richness and slight tang make every bite complex and satisfying.
No individual croissant shaping. You skip cutting triangles and rolling, which makes the process more approachable.
It uses a simple lamination technique. Three single folds create beautiful layers without the full complexity of traditional croissants.
It develops incredible flavor. The long, cold fermentation brings out sweet, buttery, slightly tangy notes.
It is versatile. Enjoy it as toast, with jam, in sandwiches, as French toast or simply plain with coffee.
It makes a showstopping homemade gift. A loaf with visible, flaky layers impresses everyone.
It is mostly hands-off. Although the timeline is long, most of it is resting time in the fridge or on the counter.
Ingredients You’ll Need
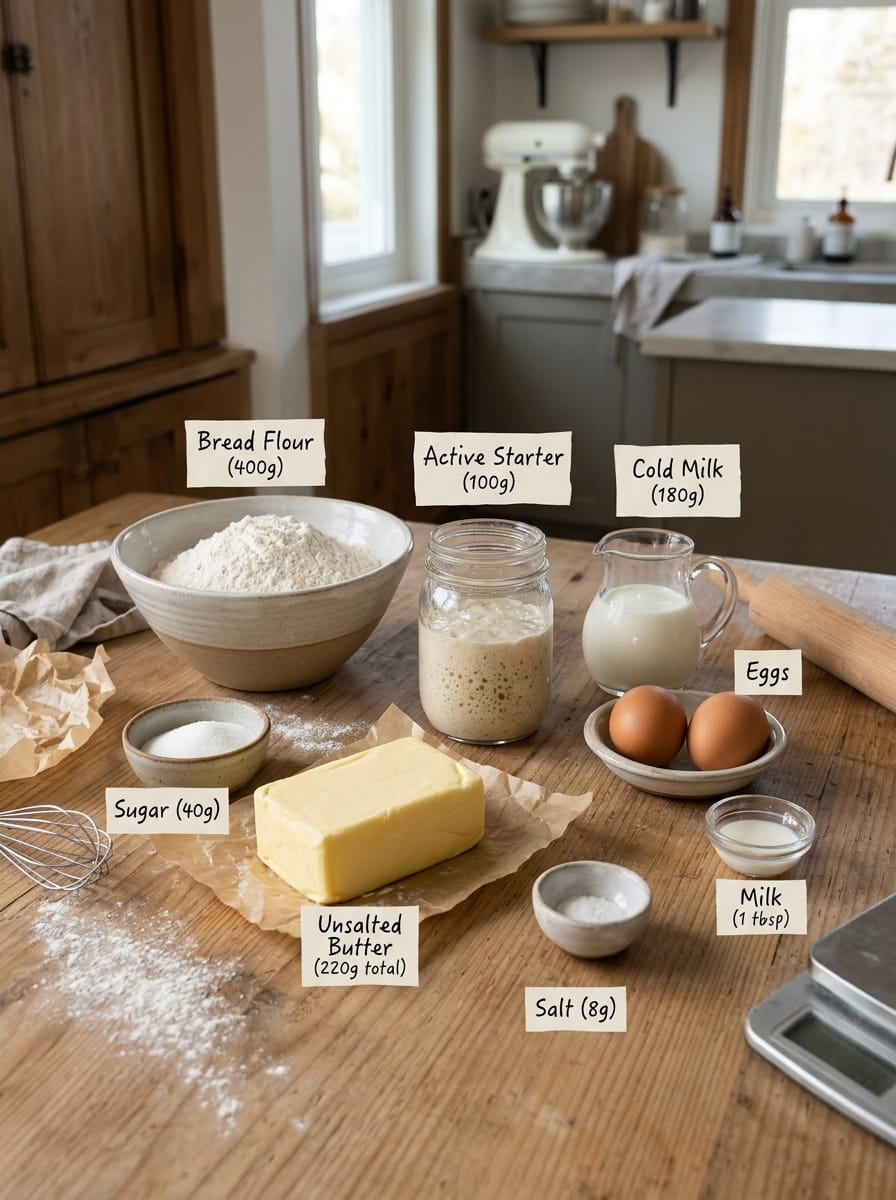
For the sourdough dough
- 400 g bread flour
- 100 g active sourdough starter, at 100% hydration
- 180 g cold whole milk
- 1 large egg, about 50 g
- 40 g granulated sugar
- 8 g salt
- 40 g unsalted butter, softened
For the butter layers
- 180 g unsalted butter, cold but pliable
For finishing
- 1 egg
- 1 tablespoon milk
Ingredient Notes
Bread flour. Bread flour has more protein than all-purpose flour, which gives the dough strength to hold the butter layers and rise well. It creates a chewier, more structured crumb that suits a laminated loaf. Weigh the flour with a scale for accuracy.
Active sourdough starter (100% hydration). Your starter should be bubbly, airy and at its peak, usually 4 to 8 hours after feeding, depending on your kitchen and feeding ratio. A 100% hydration starter is made with equal weights of flour and water. A weak or sluggish starter will make the fermentation slow and the loaf dense. A simple test is to see whether a small spoonful floats in water, though this is not always reliable. A doubled volume and lots of bubbles are better signs.
Cold whole milk. Cold milk keeps the dough cool, which is important when working with butter. Whole milk adds richness and tenderness.
Egg. One egg enriches the dough, adds color and gives a softer crumb.
Granulated sugar. Sugar adds mild sweetness, helps browning and balances the tang of the sourdough.
Salt. Salt strengthens gluten and brings out flavor. Do not skip it.
Softened unsalted butter. The 40 g of softened butter goes into the dough for tenderness. It should be soft enough to knead in easily but not melted.
Cold unsalted butter for lamination. This 180 g of butter forms the flaky layers. It should be cold but pliable, which means it bends without cracking and does not feel greasy or soft. European-style butter with a higher fat content, usually 82% or more, is easier to laminate and gives better flavor and flakiness, though regular unsalted butter will work.
Egg wash. A mix of egg and milk gives the crust a glossy, golden finish.
Timeline Overview
This is a multi-stage recipe, so it helps to plan ahead. Here is a rough timeline:
- Day 1 morning: Mix the dough and begin the first fermentation (4 to 6 hours).
- Day 1 afternoon: Chill the dough, prepare the butter, laminate with three folds (about 2 to 3 hours including chilling), shape the loaf.
- Day 1 evening to Day 2 morning: Cold proof in the fridge for 8 to 12 hours.
- Day 2 morning: Final rise at room temperature (2 to 5 hours), then bake (35 to 45 minutes).
Total elapsed time is around 24 hours, but active work is only about an hour or so. Adjust the schedule to fit your day.
How to Make Sourdough Croissant Bread
Step 1: Mix the Dough
In a large bowl, combine the bread flour, active sourdough starter, cold milk, egg, sugar and salt. Mix until a rough dough forms. Add the softened butter and knead until it is fully incorporated and the dough becomes smooth and elastic. You can knead by hand on a lightly floured surface for about 8 to 10 minutes, or use a stand mixer with the dough hook for about 5 to 8 minutes.
The dough should feel smooth, slightly tacky and stretchy. If it seems too dry, add a teaspoon of milk. If too sticky, add a very small sprinkle of flour.
Step 2: First Fermentation
Cover the dough and let it ferment at room temperature for about 4 to 6 hours. The exact time depends on the strength of your starter and the temperature of your kitchen. In a warm kitchen it may be faster, and in a cool one it may take longer. The dough should become noticeably puffy and airy, though it may not fully double. Look for bubbles and a softer, more relaxed feel rather than relying only on the clock.
Step 3: Chill the Dough
Cover and refrigerate the dough for 30 to 60 minutes. Chilling firms up the dough and makes it easier to roll and laminate. The goal is to have dough and butter at similar cool temperatures, which helps keep the layers separate.
Step 4: Prepare the Butter
Place the cold butter between two sheets of parchment paper. Use a rolling pin to pound and roll it into a rectangle about 5 mm thick. Keep it cool but flexible, not hard and not melted. If it cracks, let it sit for a few minutes. If it becomes soft or greasy, return it to the fridge for 10 minutes.
Once shaped, keep the butter in the fridge until you are ready for it. A tidy rectangle, roughly 15 by 20 cm (6 by 8 inches), is a good target, but exact dimensions matter less than uniform thickness.
Step 5: Enclose the Butter
On a lightly floured surface, roll the chilled dough into a rectangle large enough to enclose the butter. The dough rectangle should be about twice the width of the butter and slightly longer. Place the butter in the center and fold the dough over it, like closing an envelope. Pinch the edges firmly to seal the butter inside. No butter should be exposed.
Step 6: First Fold
Gently roll the dough into a long rectangle, about three times as long as it is wide. Use even pressure and work from the center outward. Brush off excess flour. Fold the dough into thirds, like folding a letter: fold one third over the middle, then the other third over the top. Wrap the dough and refrigerate for 30 to 45 minutes.
Step 7: Repeat the Folds
Turn the dough 90 degrees so the open edge is facing you like a book. Roll it out again into a long rectangle and fold it into thirds. Wrap and chill for 30 to 45 minutes. Repeat once more for a total of three single folds. Throughout the process, keep the dough and butter cool. If the butter softens or begins to leak, stop and chill the dough for 15 to 20 minutes.
A single fold, also called a letter fold, creates three layers each time. After three folds, the dough has many layers of butter and dough, which creates that flaky texture.
Step 8: Shape the Loaf
After the final chilling period, roll the dough into a rectangle. Fold or roll it into a loaf shape, trying to keep the layers neat and the edges tidy. A common method is to roll the rectangle up tightly like a jelly roll from the short side, then place it seam-side down in a greased loaf pan. Alternatively, fold it into thirds and tuck it into the pan.
Do not worry about perfection. The layers will show through no matter how you shape it, and every loaf looks a little different.
Step 9: Cold Proof
Cover the pan and refrigerate for 8 to 12 hours. This slow, cold proof develops deeper flavor, relaxes the dough and keeps the butter firm until baking.
Step 10: Final Rise
Remove the loaf from the refrigerator and let it rise at room temperature until visibly puffy and close to the top of the pan. This may take 2 to 5 hours, depending on dough temperature and starter activity. The dough should look airy and jiggle slightly when the pan is nudged. Avoid hot spots, because butter that melts out of the dough can ruin the layers.
Step 11: Preheat the Oven
Heat the oven to 190°C (375°F). Place a rack in the lower-middle position so the top does not brown too fast.
Step 12: Apply the Egg Wash
Whisk the egg with the tablespoon of milk. Gently brush the top of the loaf without pressing down on the dough, which could deflate it.
Step 13: Bake
Bake for 35 to 45 minutes, until the loaf is deeply golden and cooked through. If the top browns too quickly, cover it loosely with foil. The center should reach approximately 93°C to 96°C (200°F to 205°F). Some butter may leak onto the pan, which is normal, and placing a baking sheet underneath the loaf pan will catch drips.
Step 14: Cool Completely
Let the loaf rest in the pan for 10 minutes, then transfer it to a wire rack. Allow it to cool fully before slicing so the buttery layers can set. Slicing too soon can compress the layers and make the crumb seem gummy.
Tips for the Best Sourdough Croissant Bread
Use a strong, active starter. A starter that is at its peak makes a big difference in rise and flavor.
Keep everything cool. Cold dough and pliable butter are the key to lamination. If you see butter melting or smearing, chill the dough.
Do not add too much flour while rolling. Use only enough to prevent sticking, and brush off the excess before folding.
Roll gently and evenly. Rolling too hard can push the butter out or break the layers.
Seal the butter completely. Any gaps allow butter to leak out and reduce flakiness.
Do not rush the proof. Under-proofed dough leaks butter and bakes dense. Look for visible puffiness and a jiggly texture.
Bake with a tray underneath. This catches any leaking butter and prevents smoke in the oven.
Use a thermometer. An internal temperature of about 93°C to 96°C (200°F to 205°F) is the surest sign of doneness.
Let it cool. The structure sets as it cools, giving cleaner slices and better layers.
Common Mistakes to Avoid
Butter leaks out during baking. This often means the dough was under-proofed, the butter was too warm during lamination or the seal was incomplete. Keep things cold and make sure the dough is properly proofed before baking.
Dense loaf with no layers. The butter may have melted into the dough or the dough was overworked. Chill between folds and roll gently.
Loaf did not rise. A weak starter or cold kitchen can slow fermentation. Extend the rising time and use a bubbly, active starter.
Dough tears while rolling. The dough may be too cold or too tight. Let it rest at room temperature for a few minutes, and let gluten relax.
Top browns too quickly. Tent with foil and make sure the rack is not too high.
Greasy texture. Too much butter melting out, an underbaked center or slicing while still warm can cause this. Bake until fully cooked and let it cool.
Sour flavor is too strong. The starter may have been too ripe or the fermentation too long. Next time, use the starter slightly earlier, near its peak.
Delicious Variations
Chocolate sourdough croissant loaf. Scatter dark chocolate chips or chopped chocolate over the dough before rolling it up.
Cinnamon sugar swirl. Sprinkle cinnamon sugar over the final rolled rectangle before shaping the loaf.
Almond croissant loaf. Spread a thin layer of almond paste or frangipane over the dough and top the loaf with sliced almonds before baking.
Orange and cardamom. Add finely grated orange zest and a pinch of ground cardamom to the dough.
Savory version. Reduce the sugar and add shredded cheese, herbs or cooked bacon pieces between the layers.
Pearl sugar topping. Sprinkle pearl sugar or coarse sugar on the egg-washed loaf for a sweet, crunchy crust.
Jam-filled loaf. Spread a thin layer of jam over the dough before rolling it up.
Serving Ideas
Breakfast:
- Sliced and toasted with butter and jam
- Drizzled with honey and served with fresh fruit
- Turned into French toast, where the buttery layers create a luxurious texture
- Served with eggs and coffee
Afternoon treats:
- With a cup of tea or coffee
- Topped with whipped cream and berries
- Spread with Nutella or almond butter
Savory meals:
- Used for sandwiches with ham and cheese
- Layered with smoked salmon and cream cheese
- Served with soup or a salad
Desserts:
- Bread pudding made with day-old slices
- Toasted slices topped with ice cream and caramel
How to Store Sourdough Croissant Bread
At room temperature: Once completely cooled, store in an airtight container, bread bag or wrapped in a clean towel for 2 to 3 days. Because of the butter, the bread is best fresh.
In the refrigerator: Not usually recommended, as it can dry the crumb, but if your kitchen is hot or humid, refrigeration can help prevent spoilage. Reheat before serving.
In the freezer: Slice the cooled loaf, wrap tightly or place in a freezer-safe bag and freeze for up to 3 months. Toast slices straight from the freezer or warm them in the oven.
Reheating: Warm slices in a toaster oven or oven at 160°C (325°F) for a few minutes to refresh the crispness and flaky layers.
Nutrition Notes
This loaf is rich in butter, so it is more indulgent than a basic sandwich bread. It provides carbohydrates from the flour, fat from the butter and milk, and protein from the flour, milk and egg. The long fermentation of sourdough may make it easier to digest for some people, but it still contains gluten and dairy. Exact nutritional values depend on your ingredients and portion size. If you have dietary restrictions or a health condition, check with your doctor or registered dietitian.
Frequently Asked Questions
Do I need a sourdough starter for this recipe?
Yes. This recipe relies on active sourdough starter for leavening and flavor. There is no added commercial yeast.
What does active sourdough starter mean?
It is a starter that has been fed and has risen, with lots of bubbles and a domed or peaking top. Using it at its peak gives the strongest leavening power.
Can I add commercial yeast to speed things up?
You can add a small pinch of instant yeast to help the rise, but this changes the recipe and flavor. For a purely sourdough loaf, be patient with the fermentation.
Can I use all-purpose flour?
Yes, but bread flour gives better structure and chew. The loaf may be slightly less tall with all-purpose flour.
Why did butter leak out of my loaf?
This usually happens when the dough is under-proofed, the lamination was not sealed or the butter became too warm. Make sure the dough is puffy before baking and bake on a tray to catch any drips.
Can I make this dough ahead of time?
Yes. The cold proof of 8 to 12 hours is already part of the recipe. You can sometimes extend it slightly, but watch the dough, as it can overproof.
How many folds should I do?
This recipe uses three single folds. More folds create more layers but also increase the risk of the butter breaking through.
Can I use margarine?
Real butter gives the best flavor and flakiness. Margarine has a different fat and water content and will change the texture and taste.
Can I shape it into rolls or croissants instead?
Yes. After the final fold, you can cut and shape the dough into croissants or rolls, though proofing and baking times will differ.
How do I know when the loaf is fully proofed?
It should look puffy, rise close to the top of the pan and jiggle slightly when you gently shake the pan. If you poke it lightly, the dent should spring back slowly.
Can I freeze the unbaked dough?
Freezing laminated dough is possible but can affect rise and layer structure. For the most reliable results, bake first and freeze the slices.
Why is my loaf not very tangy?
Sourdough tang depends on the starter and fermentation. The rich butter and milk make this loaf milder than a rustic sourdough. A longer cold proof can build more tang.
Final Thoughts
Sourdough croissant bread is a project loaf that rewards patience. The tangy depth of sourdough meets the buttery, flaky layers of a croissant to create something truly special: a golden, crisp-crusted loaf with soft, tender, laminated layers inside.
You do not need fancy equipment, and the shaping is far simpler than traditional croissants. Keep the dough cool, trust the process and let time do the work. The first slice, still faintly warm and pulling apart in buttery layers, makes every step worthwhile.
Give it a try this weekend, pour a cup of coffee and enjoy a homemade bake that looks and tastes like it came from a French bakery.
Print
Sourdough Croissant Bread
Ingredients
For the sourdough dough
- 400 g bread flour
- 100 g active sourdough starter, at 100% hydration
- 180 g cold whole milk
- 1 large egg, about 50 g
- 40 g granulated sugar
- 8 g salt
- 40 g unsalted butter, softened
For the butter layers
- 180 g unsalted butter, cold but pliable
For finishing
- 1 egg
- 1 tablespoon milk
Instructions
In a large bowl, combine the bread flour, active sourdough starter, cold milk, egg, sugar and salt. Mix until a rough dough forms. Add the softened butter and knead until it is fully incorporated and the dough becomes smooth and elastic. You can knead by hand on a lightly floured surface for about 8 to 10 minutes, or use a stand mixer with the dough hook for about 5 to 8 minutes.
The dough should feel smooth, slightly tacky and stretchy. If it seems too dry, add a teaspoon of milk. If too sticky, add a very small sprinkle of flour.
Cover the dough and let it ferment at room temperature for about 4 to 6 hours. The exact time depends on the strength of your starter and the temperature of your kitchen. In a warm kitchen it may be faster, and in a cool one it may take longer. The dough should become noticeably puffy and airy, though it may not fully double. Look for bubbles and a softer, more relaxed feel rather than relying only on the clock.
Cover and refrigerate the dough for 30 to 60 minutes. Chilling firms up the dough and makes it easier to roll and laminate. The goal is to have dough and butter at similar cool temperatures, which helps keep the layers separate.
Place the cold butter between two sheets of parchment paper. Use a rolling pin to pound and roll it into a rectangle about 5 mm thick. Keep it cool but flexible, not hard and not melted. If it cracks, let it sit for a few minutes. If it becomes soft or greasy, return it to the fridge for 10 minutes.
Once shaped, keep the butter in the fridge until you are ready for it. A tidy rectangle, roughly 15 by 20 cm (6 by 8 inches), is a good target, but exact dimensions matter less than uniform thickness.
On a lightly floured surface, roll the chilled dough into a rectangle large enough to enclose the butter. The dough rectangle should be about twice the width of the butter and slightly longer. Place the butter in the center and fold the dough over it, like closing an envelope. Pinch the edges firmly to seal the butter inside. No butter should be exposed.
Gently roll the dough into a long rectangle, about three times as long as it is wide. Use even pressure and work from the center outward. Brush off excess flour. Fold the dough into thirds, like folding a letter: fold one third over the middle, then the other third over the top. Wrap the dough and refrigerate for 30 to 45 minutes.
Turn the dough 90 degrees so the open edge is facing you like a book. Roll it out again into a long rectangle and fold it into thirds. Wrap and chill for 30 to 45 minutes. Repeat once more for a total of three single folds. Throughout the process, keep the dough and butter cool. If the butter softens or begins to leak, stop and chill the dough for 15 to 20 minutes.
A single fold, also called a letter fold, creates three layers each time. After three folds, the dough has many layers of butter and dough, which creates that flaky texture.
After the final chilling period, roll the dough into a rectangle. Fold or roll it into a loaf shape, trying to keep the layers neat and the edges tidy. A common method is to roll the rectangle up tightly like a jelly roll from the short side, then place it seam-side down in a greased loaf pan. Alternatively, fold it into thirds and tuck it into the pan.
Do not worry about perfection. The layers will show through no matter how you shape it, and every loaf looks a little different.
Cover the pan and refrigerate for 8 to 12 hours. This slow, cold proof develops deeper flavor, relaxes the dough and keeps the butter firm until baking.
Remove the loaf from the refrigerator and let it rise at room temperature until visibly puffy and close to the top of the pan. This may take 2 to 5 hours, depending on dough temperature and starter activity. The dough should look airy and jiggle slightly when the pan is nudged. Avoid hot spots, because butter that melts out of the dough can ruin the layers.
Heat the oven to 190°C (375°F). Place a rack in the lower-middle position so the top does not brown too fast.
Whisk the egg with the tablespoon of milk. Gently brush the top of the loaf without pressing down on the dough, which could deflate it.
Bake for 35 to 45 minutes, until the loaf is deeply golden and cooked through. If the top browns too quickly, cover it loosely with foil. The center should reach approximately 93°C to 96°C (200°F to 205°F). Some butter may leak onto the pan, which is normal, and placing a baking sheet underneath the loaf pan will catch drips.
Let the loaf rest in the pan for 10 minutes, then transfer it to a wire rack. Allow it to cool fully before slicing so the buttery layers can set. Slicing too soon can compress the layers and make the crumb seem gummy.