
There is something deeply satisfying about a warm, chewy English muffin with a crisp, golden surface and a soft, nooks-and-crannies center. Now imagine making that at home with only four ingredients, no yeast, no kneading, and no hours of waiting for dough to rise. That is exactly what these 4-ingredient high-protein Greek yogurt English muffins deliver.
Made with thick plain Greek yogurt, eggs, all-purpose flour, and baking powder, this simple homemade English muffin recipe bakes up tender on the inside and lightly golden on the outside, with a surface that toasts beautifully. They cook in a skillet on the stovetop, so you do not even need to turn on the oven unless you want to. Whether you are a busy parent, a student, a meal prepper, or just someone who wants a better breakfast sandwich base, this recipe is about to become a staple in your kitchen.
In this guide, you will find the full ingredient list, a detailed step-by-step method, troubleshooting advice, serving ideas, storage and freezer instructions, creative variations, and answers to the most common questions about making English muffins with Greek yogurt.
Why You Will Love These Greek Yogurt English Muffins
Traditional English muffins are made with yeast dough that needs time to proof, then gets cooked slowly on a griddle. They are delicious, but they are not exactly a quick weekday project. This Greek yogurt version keeps everything you love about the classic and strips away the fuss.
- Only 4 ingredients. Greek yogurt, eggs, flour, and baking powder are all you need. Most kitchens already have them.
- No yeast and no rising time. Baking powder does the leavening, so you can go from mixing bowl to skillet in minutes.
- No kneading. You stir the dough together with a spoon, then gently pat and cut it.
- A protein boost. Thick Greek yogurt and eggs make these muffins more filling than a typical plain bread, which helps them keep you satisfied through the morning.
- Perfect for meal prep. They store well in the refrigerator and freezer, and they toast straight from frozen if your toaster allows it.
- Endlessly versatile. Sweet or savory, they work with everything from scrambled eggs and cheese to peanut butter and banana.
- Beginner friendly. If you can stir, pat, and flip, you can make these.
What Makes These English Muffins Different?
A classic English muffin gets its signature texture from a wet, yeasted dough and slow griddle cooking. These muffins take a different route. The yogurt adds moisture and a gentle tang, the eggs add structure and richness, and the baking powder gives lift. The result is a tender, slightly dense-but-soft crumb that is closer to a cross between a biscuit and an English muffin than a bakery-style yeast muffin.
That is not a flaw. It is the reason they come together so quickly. When you split them with a serrated knife and toast the cut sides, you get crisp edges and a soft center that holds up well to butter, jam, eggs, avocado, and just about any filling you can imagine.
Ingredients You Will Need
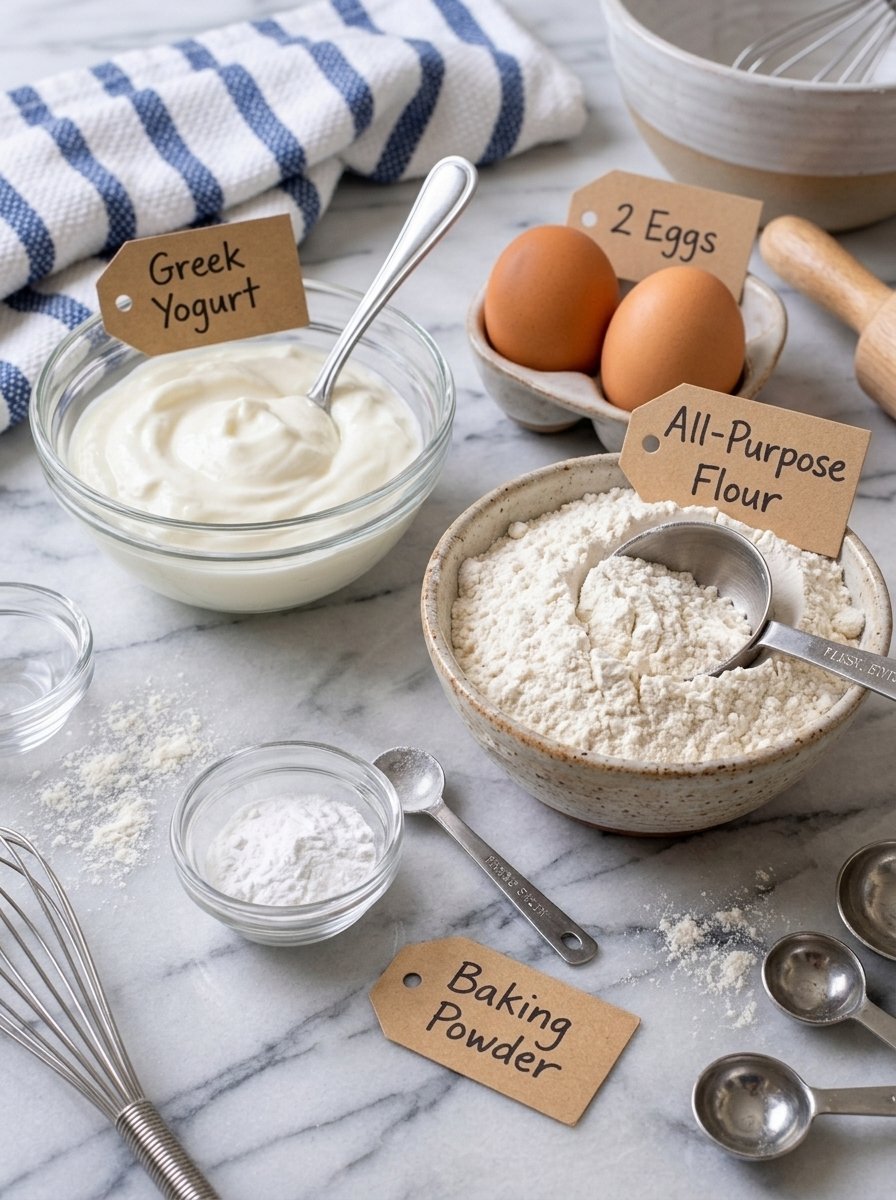
The ingredient list is short, which means the quality and handling of each item matters.
- 1 cup (225 g) plain Greek yogurt
- 2 large eggs
- 1½ cups (180 g) all-purpose flour
- 2 teaspoons baking powder
Optional extras for the skillet and the work surface include a little flour for dusting and a small amount of oil or butter to lightly grease the pan if needed. For a classic English muffin look like the ones pictured in the photos, some bakers like to dust the tray or the tops with a little cornmeal or semolina, though this is entirely optional.
Ingredient Notes and Substitutions
Greek yogurt. Plain Greek yogurt is the star of the recipe. Both full-fat and low-fat versions work well. What matters most is thickness. A thick yogurt creates a dough that is easier to shape and cut. If your yogurt has a layer of watery liquid on top, stir it well and drain off any obvious excess before measuring. Avoid flavored or sweetened yogurts, since they can change both the taste and the texture of the dough.
Eggs. Two large eggs bind the dough and help it set into a sturdy, sliceable muffin. Because the muffins contain eggs, make sure the centers are fully cooked before serving. More on that in the steps below.
All-purpose flour. Measuring flour correctly is one of the biggest factors in how these muffins turn out. If you have a kitchen scale, weigh out 180 grams. If you are using measuring cups, spoon the flour into the cup and level it off instead of scooping straight from the bag, which packs in extra flour and can make the muffins dense and dry.
Baking powder. Check that your baking powder is fresh. Old baking powder loses its lifting power, and your muffins may turn out flat. If you are unsure, test a small amount in hot water. It should fizz right away.
Equipment
You do not need anything fancy for this recipe.
- A large mixing bowl
- A whisk and a wooden spoon or spatula
- A round biscuit cutter or the rim of a drinking glass
- A nonstick skillet or heavy-bottomed frying pan with a lid
- A spatula for flipping
- A wire cooling rack
- A serrated knife for slicing
- An instant-read thermometer (highly recommended for checking the centers)
How to Make Greek Yogurt English Muffins: Step by Step
Step 1: Prepare the Greek yogurt
Measure the Greek yogurt into a large mixing bowl. If it contains excess liquid, stir it well and drain off any obvious watery liquid before measuring. Thick, creamy yogurt helps the dough hold its shape while adding moisture and a mild tangy flavor.
Step 2: Mix the wet ingredients
Add the eggs to the bowl with the yogurt. Whisk until the mixture is smooth and the eggs are fully incorporated. Scrape down the sides of the bowl as needed so the yogurt and eggs combine evenly. This creates a consistent base for the dough.
Step 3: Add the flour and baking powder
Add the flour and baking powder to the yogurt mixture. Stir with a wooden spoon or spatula until a soft dough forms and no large patches of dry flour remain. The dough should be moist and slightly sticky but firm enough to shape. If it is difficult to handle, lightly flour your hands and your work surface. Resist the urge to add lots of extra flour, because too much will make the muffins heavy.
Step 4: Shape the English muffins
Lightly flour a clean work surface and transfer the dough onto it. Gently bring the dough together, then pat it into a disc about ¾ inch (2 cm) thick. Use a round biscuit cutter or the rim of a glass to cut out 6 to 8 muffins, depending on the size of your cutter. Gather any scraps gently and reshape them to make additional muffins. Place the shaped muffins on a lightly floured tray or a piece of parchment paper while you heat the skillet.
Step 5: Preheat the skillet
Place a nonstick skillet or heavy-bottomed frying pan over medium-low heat and let it warm for a few minutes. Lightly grease the pan if necessary. The skillet should be hot enough to cook the muffins steadily without browning the outsides too quickly. Patience with the heat is the secret to success here.
Step 6: Cook until golden
Place the muffins in the skillet, leaving space between them. Cover with a lid and cook for approximately 5 to 7 minutes on the first side. Carefully flip each muffin and cook for another 5 to 7 minutes on the second side. Adjust the heat if the muffins begin to brown too quickly. The outsides should become lightly golden while the centers cook through. Depending on the thickness of your muffins and the heat of your skillet, they may need additional time.
Step 7: Make sure the centers are cooked
Because these muffins contain eggs and yogurt, it is important to check that the centers are fully cooked. If the outsides are golden but the insides still look doughy, reduce the heat and continue cooking with the lid on. For the most reliable check, use an instant-read thermometer and make sure the center reaches 160°F (71°C). If needed, transfer the muffins to a preheated 350°F (175°C) oven for several additional minutes to finish cooking.
Step 8: Cool, slice, and toast
Transfer the cooked muffins to a wire rack and let them cool for at least 10 minutes. Once they have cooled slightly, slice each muffin horizontally with a serrated knife. Toast the cut halves in a toaster or dry skillet until the edges are crisp and lightly golden. Add your favorite toppings and enjoy a warm, homemade breakfast.
Tips for the Best Greek Yogurt English Muffins
A few small habits make a big difference with a recipe this simple.
- Choose thick Greek yogurt. Full-fat or low-fat plain Greek yogurt both work, but thicker yogurt gives you a dough that is easier to shape.
- Measure the flour carefully. Too much flour makes the muffins dense and dry. Weighing is the most accurate approach.
- Avoid overmixing. Stir just until the dough comes together. Overworking it can make the muffins tough.
- Use lightly floured hands. The dough may feel slightly sticky, so dust your hands and work surface with a little flour rather than adding too much to the dough itself.
- Shape evenly. Keep the muffins similar in thickness so they cook through at the same rate.
- Cook over medium-low heat. A lower temperature lets the centers cook before the outsides get too dark.
- Check the centers. These muffins are thicker than traditional English muffins, so confirm they are cooked through before serving.
- Toast before eating. Toasting the cut sides creates a crisp exterior and makes them ideal for butter, jam, eggs, or avocado.
Troubleshooting: Common Problems and Easy Fixes
My muffins are golden outside but doughy inside. This usually means the heat was too high. Lower the heat to medium-low, keep the lid on, and give the muffins more time. You can also finish them in a 350°F (175°C) oven for several minutes until the centers reach 160°F (71°C).
My dough is too sticky to cut. Lightly flour your hands, the work surface, and the cutter. If the yogurt was thin or watery, the dough may be wetter than intended, so a small sprinkle of flour can help. Just avoid adding too much.
My muffins turned out dense. The most common causes are too much flour, overmixing, or old baking powder. Weigh your flour, mix only until combined, and check that your baking powder is fresh.
My muffins are dry. Dryness often comes from overcooking or from packing too much flour into the measuring cup. Next time, level the flour carefully and watch the cooking time.
The muffins browned too fast. Reduce the heat, make sure you are using a heavy-bottomed pan, and keep the lid on so the steam helps the centers cook.
They stuck to the pan. Use a nonstick skillet or lightly grease the pan. Also let the first side set before attempting to flip.
Serving Ideas: Sweet and Savory Ways to Enjoy Them
These muffins are a blank canvas. Here are some of the best ways to use them.
- Egg and cheese sandwich. Fill a toasted muffin with scrambled eggs and melted cheddar for a satisfying breakfast sandwich.
- Avocado toast. Spread mashed avocado over the toasted halves and finish with black pepper and a squeeze of lemon.
- Turkey breakfast muffin. Add turkey slices, cheese, and fresh spinach for an easy savory sandwich.
- Cream cheese and herbs. Spread with cream cheese and sprinkle with fresh chives or parsley.
- Sweet breakfast. Top with Greek yogurt, fresh berries, or a drizzle of honey for a simple sweet option.
- Peanut butter and banana. Spread with peanut butter and add banana slices for a filling snack.
- Mini pizza muffins. Add tomato sauce and mozzarella, then warm until the cheese melts.
- Classic buttered muffins. Serve hot toasted halves with butter, jam, or your favorite spread.
How to Store English Muffins Made with Greek Yogurt
These muffins are ideal for making ahead. A little care with cooling and storage keeps them fresh and prevents sogginess.
Refrigerator. Allow the muffins to cool completely, then store them in an airtight container for up to 4 days.
Freezer. Slice the cooled muffins in half and place parchment paper between them if stacking. Freeze in a freezer-safe bag for up to 2 months.
Reheating. Toast refrigerated muffin halves until warmed through and lightly crisp.
From frozen. Toast directly from frozen if your toaster allows it, or thaw in the refrigerator before reheating.
Best texture. Cool the muffins completely before storing so excess moisture does not collect inside the container.
Meal Prep Strategy
If you want grab-and-go breakfasts all week, make a batch on the weekend and freeze individual halves. On busy mornings, toast one or two, add a slice of cheese and a cooked egg, and you have a homemade breakfast sandwich in minutes without a drive-through line. You can also prepare a few sandwich-ready fillings in advance, such as scrambled eggs or sliced turkey, to make assembly even faster.
Creative Variations to Try
Once you have mastered the base recipe, there are plenty of ways to experiment. Keep changes small so the dough stays balanced.
- Everything-style muffins. Dust the tops with an everything seasoning blend before cooking, or sprinkle it on after toasting.
- Cheesy herb muffins. Fold a small amount of shredded cheese and chopped fresh herbs into the dough for a savory twist.
- Cinnamon-style breakfast muffins. Add a little cinnamon to the dry ingredients and serve with butter or nut butter.
- Mini muffins. Use a smaller cutter for bite-sized muffins that are great for sliders or kids’ lunches. Reduce the cooking time slightly and check the centers.
- Whole grain blend. Replace a portion of the flour with whole wheat flour for a heartier flavor. The dough may need slightly more care with moisture, so add changes gradually.
If you try a variation, remember to confirm that the centers are cooked through, since add-ins and size changes can affect cooking time.
Recipe at a Glance
- Prep time: 15 minutes
- Cook time: 15 to 25 minutes, depending on size and thickness
- Cooling time: 10 minutes
- Total time: Approximately 40 to 50 minutes
- Yield: 6 to 8 English muffins
- Difficulty: Easy
- Cooking method: Stovetop skillet, with an optional oven finish
- Texture: Tender and soft inside with a lightly golden exterior
- Flavor: Mild, slightly tangy, and pleasantly savory
- Best enjoyed: Sliced and toasted with sweet or savory toppings
Frequently Asked Questions
Do I need yeast to make these English muffins?
No. This recipe uses baking powder as the leavening agent, so there is no yeast, no proofing, and no long rise. That makes it a true quick English muffin recipe.
Can I use regular yogurt instead of Greek yogurt?
Regular yogurt is thinner and more watery, which can make the dough too sticky to shape. Thick Greek yogurt is strongly recommended. If you only have regular yogurt, strain it first to remove excess liquid.
Can I use low-fat or non-fat Greek yogurt?
Yes. Both full-fat and low-fat plain Greek yogurt work well. Choose a thick one for the best results, and avoid flavored varieties.
How do I know when the muffins are done?
The outsides should be lightly golden and the centers should look and feel fully cooked, not doughy. For the most reliable result, use an instant-read thermometer and check that the center reaches 160°F (71°C).
Can I bake these in the oven instead?
The main method is a covered skillet on medium-low heat. If the centers need extra time, you can finish the muffins in a preheated 350°F (175°C) oven for several more minutes. Always confirm doneness before serving.
Why are my muffins thicker than store-bought English muffins?
This dough is patted to about ¾ inch (2 cm) thick, and the leavening comes from baking powder, so the muffins are thicker and a bit more tender than traditional yeast-raised ones. Make sure they are fully cooked in the middle, then slice and toast them.
Can I make the dough ahead of time?
Because the dough relies on baking powder for lift, it is best to shape and cook it soon after mixing. For make-ahead convenience, cook a full batch and freeze the muffins instead.
How long do they last?
Stored in an airtight container in the refrigerator, they keep for up to 4 days. In the freezer, they keep for up to 2 months when sliced, separated with parchment, and stored in a freezer-safe bag.
Are these English muffins high in protein?
Greek yogurt and eggs both contribute protein, which is why this recipe is often described as high-protein. The exact amount depends on the brands and sizes you use, so check your product labels if you need precise numbers.
What is the best way to cut the muffins open?
Let them cool for at least 10 minutes, then slice horizontally with a serrated knife. A gentle sawing motion keeps the crumb intact. Toasting the cut sides afterward adds crunch.
Final Thoughts
Homemade English muffins do not have to be an all-morning project. With just Greek yogurt, eggs, flour, and baking powder, you can have warm, golden, toast-ready muffins on the table in under an hour, with no yeast, no kneading, and very little cleanup. They are quick enough for a weekend brunch, sturdy enough for a loaded breakfast sandwich, and freezer-friendly enough to make your weekday mornings easier.
Start with thick yogurt, measure your flour carefully, keep the heat gentle, and always check that the centers are cooked. Do that, and you will be rewarded with tender, lightly tangy muffins that are even better after a trip to the toaster.
Print
4-Ingredient High-Protein Greek Yogurt English Muffins
Ingredients
The ingredient list is short, which means the quality and handling of each item matters.
- 1 cup (225 g) plain Greek yogurt
- 2 large eggs
- 1½ cups (180 g) all-purpose flour
- 2 teaspoons baking powder
Optional extras for the skillet and the work surface include a little flour for dusting and a small amount of oil or butter to lightly grease the pan if needed. For a classic English muffin look like the ones pictured in the photos, some bakers like to dust the tray or the tops with a little cornmeal or semolina, though this is entirely optional.
Ingredient Notes and Substitutions
Greek yogurt. Plain Greek yogurt is the star of the recipe. Both full-fat and low-fat versions work well. What matters most is thickness. A thick yogurt creates a dough that is easier to shape and cut. If your yogurt has a layer of watery liquid on top, stir it well and drain off any obvious excess before measuring. Avoid flavored or sweetened yogurts, since they can change both the taste and the texture of the dough.
Eggs. Two large eggs bind the dough and help it set into a sturdy, sliceable muffin. Because the muffins contain eggs, make sure the centers are fully cooked before serving. More on that in the steps below.
All-purpose flour. Measuring flour correctly is one of the biggest factors in how these muffins turn out. If you have a kitchen scale, weigh out 180 grams. If you are using measuring cups, spoon the flour into the cup and level it off instead of scooping straight from the bag, which packs in extra flour and can make the muffins dense and dry.
Baking powder. Check that your baking powder is fresh. Old baking powder loses its lifting power, and your muffins may turn out flat. If you are unsure, test a small amount in hot water. It should fizz right away.
Instructions
Measure the Greek yogurt into a large mixing bowl. If it contains excess liquid, stir it well and drain off any obvious watery liquid before measuring. Thick, creamy yogurt helps the dough hold its shape while adding moisture and a mild tangy flavor.
Add the eggs to the bowl with the yogurt. Whisk until the mixture is smooth and the eggs are fully incorporated. Scrape down the sides of the bowl as needed so the yogurt and eggs combine evenly. This creates a consistent base for the dough.
Add the flour and baking powder to the yogurt mixture. Stir with a wooden spoon or spatula until a soft dough forms and no large patches of dry flour remain. The dough should be moist and slightly sticky but firm enough to shape. If it is difficult to handle, lightly flour your hands and your work surface. Resist the urge to add lots of extra flour, because too much will make the muffins heavy.
Lightly flour a clean work surface and transfer the dough onto it. Gently bring the dough together, then pat it into a disc about ¾ inch (2 cm) thick. Use a round biscuit cutter or the rim of a glass to cut out 6 to 8 muffins, depending on the size of your cutter. Gather any scraps gently and reshape them to make additional muffins. Place the shaped muffins on a lightly floured tray or a piece of parchment paper while you heat the skillet.
Place a nonstick skillet or heavy-bottomed frying pan over medium-low heat and let it warm for a few minutes. Lightly grease the pan if necessary. The skillet should be hot enough to cook the muffins steadily without browning the outsides too quickly. Patience with the heat is the secret to success here.
Place the muffins in the skillet, leaving space between them. Cover with a lid and cook for approximately 5 to 7 minutes on the first side. Carefully flip each muffin and cook for another 5 to 7 minutes on the second side. Adjust the heat if the muffins begin to brown too quickly. The outsides should become lightly golden while the centers cook through. Depending on the thickness of your muffins and the heat of your skillet, they may need additional time.
Because these muffins contain eggs and yogurt, it is important to check that the centers are fully cooked. If the outsides are golden but the insides still look doughy, reduce the heat and continue cooking with the lid on. For the most reliable check, use an instant-read thermometer and make sure the center reaches 160°F (71°C). If needed, transfer the muffins to a preheated 350°F (175°C) oven for several additional minutes to finish cooking.
Transfer the cooked muffins to a wire rack and let them cool for at least 10 minutes. Once they have cooled slightly, slice each muffin horizontally with a serrated knife. Toast the cut halves in a toaster or dry skillet until the edges are crisp and lightly golden. Add your favorite toppings and enjoy a warm, homemade breakfast.