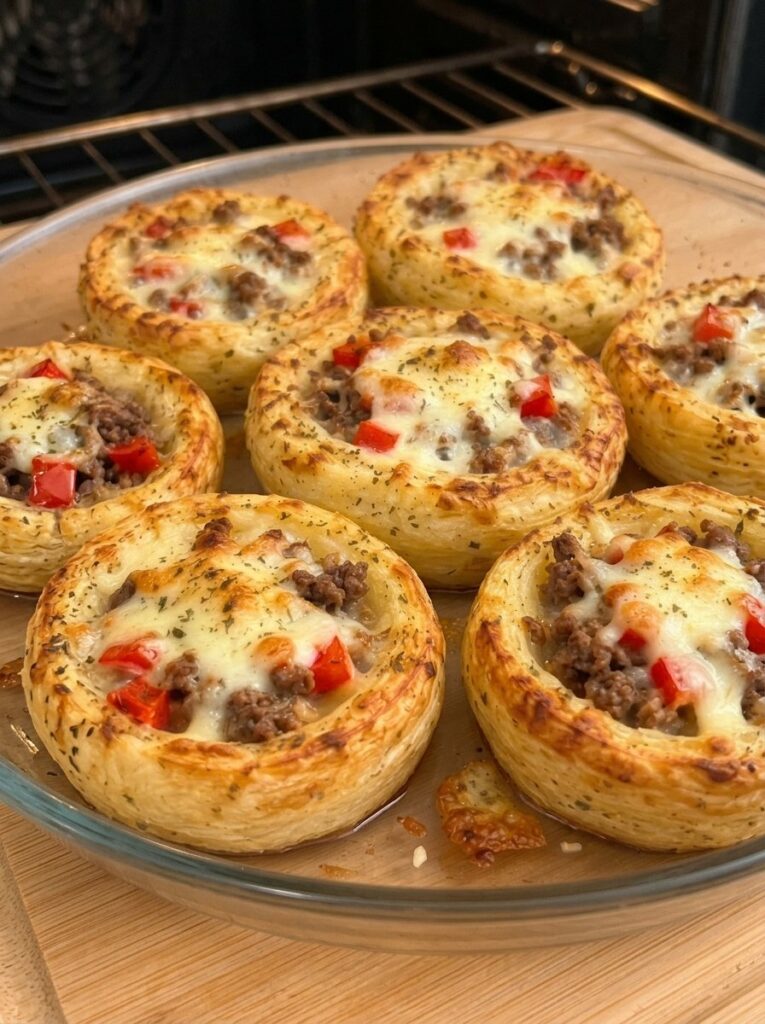
If you love the classic pairing of meat and potatoes, Cheesy Mashed Potato Beef Nests will become one of your favorite dinners. Creamy mashed potatoes are piped into little nests, baked until the edges turn golden and crisp, then filled with savory seasoned ground beef, sweet red bell pepper, and a blanket of gooey melted cheese.
Each bite has fluffy potato in the center, crunchy browned ridges around the rim, and rich, cheesy beef on top. The result looks impressive but is surprisingly easy to make, which is why this potato nests recipe works for weeknight dinners, potlucks, game-day gatherings, and holiday tables.
In this guide you’ll find the full recipe, step-by-step instructions, expert tips for crispy edges, ingredient swaps, make-ahead and storage advice, serving ideas, and answers to common questions.
Why You’ll Love This Cheesy Mashed Potato Beef Nests Recipe
There are plenty of ground beef and potato dishes out there, but these nests stand out for several reasons:
- They’re portion-controlled and fun to eat. Each nest is an individual serving, so there’s no scooping from a casserole dish. Kids love them, and they’re great for parties.
- They combine two textures. The outside is crisp and golden while the inside stays creamy and soft.
- They use simple, affordable ingredients. Potatoes, ground beef, an onion, a bell pepper, and some cheese are all you need.
- They’re a smart way to use leftover mashed potatoes. If you have extra mash from a holiday meal, this is a delicious way to reinvent it.
- They’re customizable. Swap the protein, change the cheese, or add vegetables to suit your family’s taste.
- They look beautiful. Piped potato swirls with bubbly cheese make a stunning presentation with very little effort.
What Are Mashed Potato Beef Nests?
Mashed potato nests are mashed potatoes enriched with butter, milk, Parmesan, and egg, which gives them enough structure to hold their shape. The mixture is piped or spooned into rings with a hollow center, then baked until golden. The hollow is filled with a savory topping, here a seasoned ground beef mixture, and finished with melted cheese.
Think of them as a cross between twice-baked potatoes, shepherd’s pie, and a loaded potato skin, only more elegant and easier to serve. The egg is the key ingredient. It binds the potatoes so the nests keep their shape and develop crisp, lightly browned edges in the oven.
Ingredients for Cheesy Mashed Potato Beef Nests
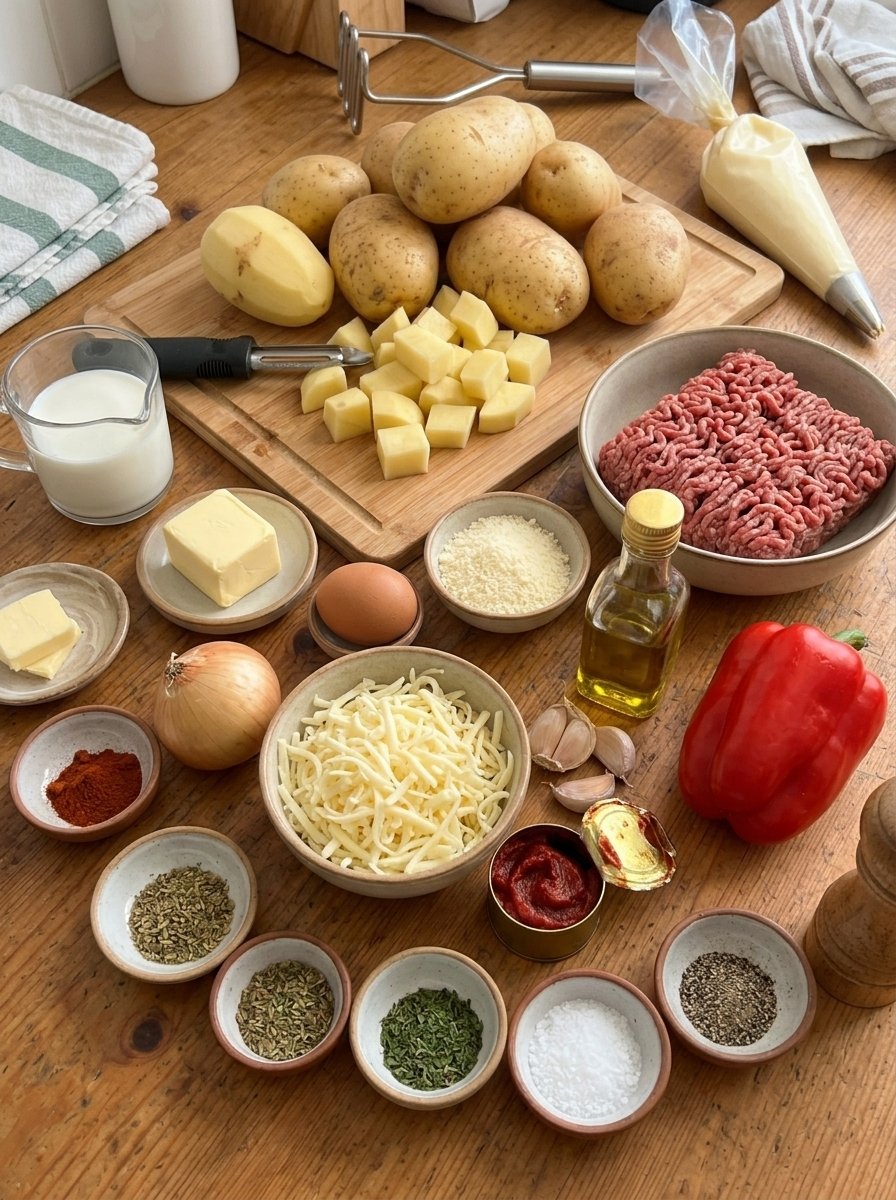
For the Potato Nests
- 2 lbs (900 g) potatoes, peeled and cubed
- 3 tablespoons (45 g) unsalted butter
- ¼ cup (60 ml) milk, warmed
- ½ cup (50 g) grated Parmesan cheese
- 1 large egg
- ½ teaspoon salt
- ¼ teaspoon black pepper
For the Beef Filling
- 1 lb (450 g) ground beef
- 1 tablespoon olive oil
- 1 small onion, finely chopped
- 2 garlic cloves, minced
- 1 small red bell pepper, diced
- 1 tablespoon tomato paste
- ½ teaspoon paprika
- ½ teaspoon dried oregano
- ½ teaspoon salt
- ¼ teaspoon black pepper
For the Topping
- 1 cup (100 g) shredded mozzarella cheese
- 2 tablespoons grated Parmesan cheese
- 1 teaspoon dried parsley or Italian seasoning
Yield: 8 nests
Prep time: 25 minutes
Cook time: About 50 minutes
Total time: About 1 hour 15 minutes
How to Make Cheesy Mashed Potato Beef Nests (Step by Step)
Step 1: Preheat the Oven
Preheat your oven to 400°F (200°C). Line a large baking sheet with parchment paper or lightly grease it with cooking spray. Parchment makes cleanup easy and helps the bottoms brown evenly without sticking.
Step 2: Cook the Potatoes
Place the peeled and cubed potatoes in a large pot of salted water. Bring to a boil and cook for 15–20 minutes, until a fork slides in easily. Cut the potatoes into evenly sized cubes so they cook at the same rate.
Step 3: Prepare the Mashed Potatoes
Drain the potatoes thoroughly and return them to the hot pot. Let them steam for a minute or two to release extra moisture. Add the butter, warm milk, ½ cup Parmesan, salt, and pepper, and mash until smooth and creamy.
Let the mixture cool for about 10 minutes, then stir in the egg until fully incorporated. Cooling first matters. Adding the egg to piping-hot potatoes can cause it to scramble.
Step 4: Shape the Potato Nests
Transfer the mashed potatoes to a piping bag fitted with a large star tip. Pipe 8 thick circular nests onto the prepared baking sheet, building up the sides and leaving a hollow center in each one. If you don’t have a piping bag, shape the nests with a spoon, pressing a well into the middle of each mound. The star tip’s ridges create more surface area to brown and crisp.
Step 5: Pre-Bake the Nests
Bake the nests for 15–20 minutes, until the edges begin to turn golden and slightly crispy. Remove from the oven and set aside. This pre-bake sets the structure so the nests don’t collapse under the filling.
Step 6: Cook the Beef Filling
While the nests bake, heat the olive oil in a large skillet over medium heat. Add the chopped onion and cook for 3–4 minutes until softened.
Step 7: Brown the Ground Beef
Add the ground beef and cook for 6–8 minutes, breaking it apart with a spoon, until browned and cooked through. Drain excess grease if needed so the filling doesn’t make the nests soggy.
Step 8: Season the Filling
Stir in the garlic, diced red bell pepper, tomato paste, paprika, oregano, salt, and black pepper. Cook for another 3–4 minutes, until the garlic is fragrant and the pepper begins to soften. The tomato paste adds a deep, slightly sweet savoriness.
Step 9: Fill the Potato Nests
Remove the nests from the oven and spoon the beef mixture into the hollow centers, filling each generously without overflowing.
Step 10: Add the Cheese Topping
Sprinkle the shredded mozzarella and the remaining 2 tablespoons of Parmesan over the beef. Finish with dried parsley or Italian seasoning.
Step 11: Bake Until Golden and Bubbly
Return the nests to the oven for another 8–12 minutes, until the cheese is melted and lightly golden and the potato edges are crisp.
Step 12: Rest and Serve
Let the nests rest for about 5 minutes so they hold their shape. Carefully transfer them to a serving plate and enjoy warm.
Pro Tips for Perfect Potato Nests
Choose the right potatoes. Starchy potatoes like Russets give the fluffiest, driest mash, which holds its shape best. Yukon Golds are creamier and more buttery, and they work well too. Avoid waxy potatoes like red or new potatoes, which can turn gluey.
Keep the mash thick. The mixture should be thick enough to hold a peak when piped. If it seems loose, reduce the milk slightly or let the potatoes steam dry a bit longer after draining. Too much liquid is the most common reason nests spread out and go flat.
Don’t skip the egg. It acts as a binder and creates the golden, crisp edges. Make sure the potatoes have cooled enough before adding it.
Use a large star tip. A wide star tip such as Wilton 1M or 2D gives a rope-like texture with plenty of ridges that crisp up beautifully. A spoon works if you don’t have one, but the nests will have a more rustic look.
Drain the beef well. Excess fat can pool in the nests and soften the potato. For leaner beef (90/10), you may not need to drain at all.
Pre-bake before filling. Baking the empty nests first sets the shape and develops the crisp exterior. Filling raw nests would make them collapse.
Broil for color. For extra-bubbly, spotted cheese, switch the oven to broil for the last 1–2 minutes. Watch closely, because cheese goes from golden to burnt quickly.
Make the well deep enough. Press or pipe the center down so there’s room for a generous scoop of filling. Build the walls up about 1½ inches high.
Variations and Substitutions
One of the best things about this mashed potato nests recipe is how easily it adapts.
Protein Swaps
- Ground turkey or chicken: A lighter option. Add a little extra olive oil, since poultry is leaner.
- Italian sausage: Gives the filling bold, spicy flavor.
- Ground lamb: Pairs well with a pinch of cumin and mint for a shepherd’s pie feel.
- Plant-based crumbles: A good vegetarian option. Add a splash of soy sauce for depth.
Cheese Swaps
- Cheddar: Sharper and more classic, like a cheeseburger.
- Provolone or Monterey Jack: Mild and very melty.
- Gouda or Gruyère: Nutty and rich for a more upscale version.
- Pepper Jack: Adds a gentle kick.
Vegetable Add-Ins
- Diced tomatoes for a juicy, fresh bite
- Sautéed mushrooms
- Frozen peas and carrots for a shepherd’s pie-style filling
- Spinach, wilted into the beef
- Corn kernels for sweetness
Flavor Twists
- Cheeseburger nests: Add mustard and diced pickles to the beef, top with cheddar, and finish with sesame seeds.
- Taco nests: Season the beef with taco spices, top with pepper jack, and serve with salsa and sour cream.
- Italian nests: Stir in marinara sauce and top with mozzarella and fresh basil.
- BBQ nests: Mix barbecue sauce into the beef and top with smoked cheddar and green onions.
Using Leftover Mashed Potatoes
You can use about 4 cups of leftover mashed potatoes. Warm them slightly, mix in the egg and Parmesan, and make sure the mixture is thick enough to pipe. If it’s too soft, add a spoonful of flour or breadcrumbs.
What to Serve with Cheesy Mashed Potato Beef Nests
Because the nests combine starch, protein, and cheese, they’re already filling. Light, fresh sides balance them nicely:
- A crisp green salad with lemon vinaigrette cuts through the richness.
- Roasted green beans or asparagus add color and crunch.
- Steamed broccoli with a little garlic butter is a quick side.
- Coleslaw gives a tangy, crunchy contrast.
- Roasted carrots bring natural sweetness.
- A tomato and cucumber salad is refreshing for summer.
For a party, serve the nests on a platter with small bowls of sour cream, ketchup, hot sauce, or ranch for dipping.
Make-Ahead, Storage, and Reheating
Make-Ahead Instructions
These nests are easy to prep in advance:
- Mashed potatoes: Prepare up to 2 days ahead and refrigerate in an airtight container. Bring to room temperature before adding the egg and piping.
- Beef filling: Cook up to 3 days ahead and refrigerate. Reheat gently before filling.
- Assembled nests: Pipe and pre-bake the nests, cool completely, then refrigerate for up to 24 hours. Fill, top, and bake just before serving, adding a few extra minutes if they’re cold.
Storing Leftovers
Let the nests cool completely, then store in an airtight container in the refrigerator for up to 3–4 days. Place parchment between layers to prevent sticking.
Freezing
Freeze baked nests on a tray until solid, then transfer to a freezer bag. They keep for up to 2 months. You can also freeze the unbaked, piped nests and the filling separately for easy assembly.
Reheating
The best way to reheat is in the oven at 375°F (190°C) for 12–15 minutes, which restores the crisp edges. An air fryer at 350°F (175°C) for 6–8 minutes also works well. The microwave is fastest but will soften the potato, so use it only when you’re in a hurry.
Nutrition Overview
Exact numbers vary by brand and ingredients, but one nest (when making 8) is roughly 350–420 calories. Each serving provides protein from the beef, Parmesan, and mozzarella, along with carbohydrates and potassium from the potatoes. To lighten it up, use lean ground beef or turkey, reduce the butter, use part-skim mozzarella, and add extra vegetables to the filling.
Common Mistakes to Avoid
- Watery potatoes. Drain thoroughly and let them steam dry. Wet mash won’t hold its shape.
- Adding the egg while the potatoes are hot. It can scramble and ruin the texture.
- Skipping the pre-bake. Unbaked nests can slump when filled.
- Overfilling. A mounded filling spills over and makes the nests messy. Keep it generous but contained.
- Using greasy beef. Drain it to protect the crisp texture.
- Overmixing the potatoes. Too much mashing, especially with a blender or food processor, makes them gummy. Mash by hand or use a ricer.
- Crowding the baking sheet. Leave space between nests so heat circulates and the edges crisp up.
Frequently Asked Questions
Can I make potato nests without a piping bag?
Yes. Scoop the mash onto the baking sheet with a large spoon or ice cream scoop, then use the back of a spoon to press a well into the center. You can also use a zip-top bag with a corner snipped off.
Why did my potato nests spread out?
The mixture was likely too wet or too warm. Use less milk, dry the potatoes well after draining, and let the mash cool slightly before piping.
Can I make this recipe gluten-free?
Yes, the recipe is naturally gluten-free as written. Check that your tomato paste, spices, and Parmesan are labeled gluten-free if you have celiac disease.
Can I use instant mashed potatoes?
You can, but fresh potatoes give better flavor and texture. If using instant, prepare them on the thicker side and add the egg and Parmesan for structure.
Can I make them in an air fryer?
Yes. Cook the shaped nests on parchment in the air fryer at 375°F (190°C) for about 10–12 minutes, fill, top with cheese, and cook 3–5 minutes more. Work in batches so they aren’t crowded.
What kind of ground beef is best?
An 85/15 or 90/10 blend balances flavor and richness. Fattier beef is juicier but needs draining. Leaner beef is lighter but benefits from the olive oil.
Are these nests good for meal prep?
Absolutely. They reheat well and freeze nicely, so they make a great grab-and-go lunch or dinner for busy weeks.
Can I make a vegetarian version?
Yes. Replace the beef with sautéed mushrooms and lentils, or use plant-based crumbles, and keep the cheese topping.
Can I add other herbs and spices?
Definitely. Thyme, rosemary, chives, smoked paprika, or a pinch of cayenne all work well in the beef or potato mixture.
Perfect for Any Occasion
These Cheesy Mashed Potato Beef Nests suit many occasions:
- Weeknight family dinners: Familiar flavors that kids and adults enjoy.
- Potlucks and parties: Handheld, easy to serve, and visually striking.
- Holiday gatherings: A creative way to serve potatoes and meat together.
- Game day: Hearty, cheesy, and easy to eat while cheering.
- Meal prep: Make a batch and enjoy it throughout the week.
- Using leftovers: Turn extra mashed potatoes and cooked ground beef into something new.
Final Thoughts
Cheesy Mashed Potato Beef Nests turn everyday ingredients into a dish that feels special. The crisp, golden potato edges, savory beef seasoned with garlic, paprika, and oregano, and the bubbling mozzarella and Parmesan make every bite satisfying. They’re simple enough for beginners yet impressive enough for guests.
Try the recipe once and you’ll likely keep it in your regular rotation. Customize it with your favorite cheeses and vegetables, make it ahead for busy nights, and enjoy the comfort of a homemade meal.
Ready to cook? Gather your ingredients, preheat the oven, and make a batch tonight. Share your results, and save this recipe for your next family dinner.
Print
Cheesy Mashed Potato Beef Nests
Ingredients
For the Potato Nests
- 2 lbs (900 g) potatoes, peeled and cubed
- 3 tablespoons (45 g) unsalted butter
- ¼ cup (60 ml) milk, warmed
- ½ cup (50 g) grated Parmesan cheese
- 1 large egg
- ½ teaspoon salt
- ¼ teaspoon black pepper
For the Beef Filling
- 1 lb (450 g) ground beef
- 1 tablespoon olive oil
- 1 small onion, finely chopped
- 2 garlic cloves, minced
- 1 small red bell pepper, diced
- 1 tablespoon tomato paste
- ½ teaspoon paprika
- ½ teaspoon dried oregano
- ½ teaspoon salt
- ¼ teaspoon black pepper
For the Topping
- 1 cup (100 g) shredded mozzarella cheese
- 2 tablespoons grated Parmesan cheese
- 1 teaspoon dried parsley or Italian seasoning
Instructions
Preheat your oven to 400°F (200°C). Line a large baking sheet with parchment paper or lightly grease it with cooking spray. Parchment makes cleanup easy and helps the bottoms brown evenly without sticking.
Place the peeled and cubed potatoes in a large pot of salted water. Bring to a boil and cook for 15–20 minutes, until a fork slides in easily. Cut the potatoes into evenly sized cubes so they cook at the same rate.
Drain the potatoes thoroughly and return them to the hot pot. Let them steam for a minute or two to release extra moisture. Add the butter, warm milk, ½ cup Parmesan, salt, and pepper, and mash until smooth and creamy.
Let the mixture cool for about 10 minutes, then stir in the egg until fully incorporated. Cooling first matters. Adding the egg to piping-hot potatoes can cause it to scramble.
Transfer the mashed potatoes to a piping bag fitted with a large star tip. Pipe 8 thick circular nests onto the prepared baking sheet, building up the sides and leaving a hollow center in each one. If you don’t have a piping bag, shape the nests with a spoon, pressing a well into the middle of each mound. The star tip’s ridges create more surface area to brown and crisp.
Bake the nests for 15–20 minutes, until the edges begin to turn golden and slightly crispy. Remove from the oven and set aside. This pre-bake sets the structure so the nests don’t collapse under the filling.
While the nests bake, heat the olive oil in a large skillet over medium heat. Add the chopped onion and cook for 3–4 minutes until softened.
Add the ground beef and cook for 6–8 minutes, breaking it apart with a spoon, until browned and cooked through. Drain excess grease if needed so the filling doesn’t make the nests soggy.
Stir in the garlic, diced red bell pepper, tomato paste, paprika, oregano, salt, and black pepper. Cook for another 3–4 minutes, until the garlic is fragrant and the pepper begins to soften. The tomato paste adds a deep, slightly sweet savoriness.
Remove the nests from the oven and spoon the beef mixture into the hollow centers, filling each generously without overflowing.
Sprinkle the shredded mozzarella and the remaining 2 tablespoons of Parmesan over the beef. Finish with dried parsley or Italian seasoning.
Return the nests to the oven for another 8–12 minutes, until the cheese is melted and lightly golden and the potato edges are crisp.
Let the nests rest for about 5 minutes so they hold their shape. Carefully transfer them to a serving plate and enjoy warm.