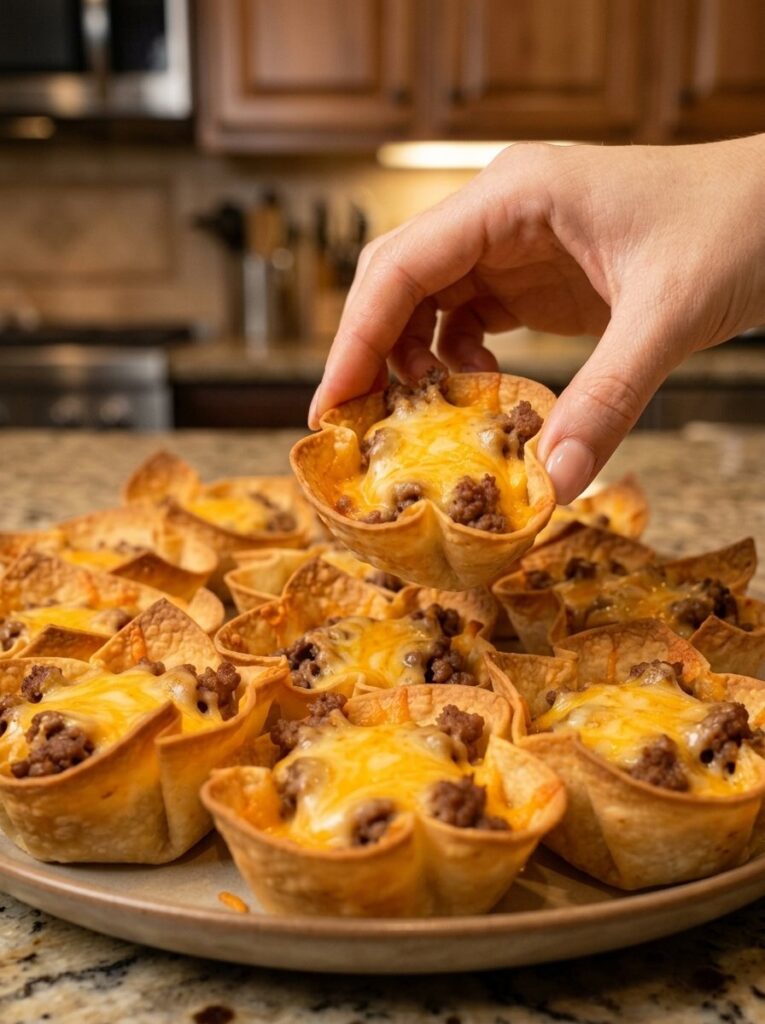
If you have ever wished you could hold an entire cheeseburger in one hand without it falling apart, these crispy cheeseburger taco cups are about to become your new favorite recipe. They take only three ingredients, one skillet, and one muffin tin, yet they deliver everything people love about a classic cheeseburger: juicy seasoned beef, gooey melted cheese, and a golden, crunchy shell that shatters with every bite.
This recipe sits right at the intersection of two comfort food legends. You get the savory, beefy satisfaction of a diner-style cheeseburger and the fun, handheld crunch of a taco. The result is a quick appetizer, a family-friendly dinner, and a game-day crowd pleaser all in one. Best of all, the whole thing comes together in about 30 minutes, with very little cleanup.
In this complete guide, you will learn exactly how to make cheeseburger taco cups, which ingredients work best, how to guarantee crispy edges every single time, and how to customize the recipe with creative toppings and dipping sauces. You will also find storage tips, reheating instructions, troubleshooting advice, and answers to the most common questions.
Why You Will Love These Cheeseburger Taco Cups
Before we get into the details, here is why this recipe deserves a permanent spot in your rotation.
Only three ingredients. Ground beef, small tortillas, and shredded cheese are all you truly need. There is no complicated shopping list, no special equipment, and no hard-to-find items. If you can make a hamburger patty, you can make these.
Fast and beginner friendly. From start to finish, you are looking at roughly 30 minutes. The steps are simple: brown the beef, shape the tortillas, fill, top, and bake. Even new cooks can nail this recipe on the first try.
Perfect portion control and mess-free eating. Each cup is a self-contained bite or two. There are no soggy buns, no dripping sauce down your wrist, and no need for a fork and knife.
Endlessly customizable. Once you master the base recipe, you can turn these into bacon cheeseburger cups, pizza burger cups, or spicy jalapeño cups. The plain version is a blank canvas for your favorite burger toppings.
Great for any occasion. Serve them at tailgates, birthday parties, school events, movie nights, or casual weeknight dinners. They disappear fast, so consider doubling the batch.
Kid approved. Kids love food they can pick up with their hands, and the familiar flavor of a cheeseburger makes these an easy win with picky eaters.
Ingredients You Need
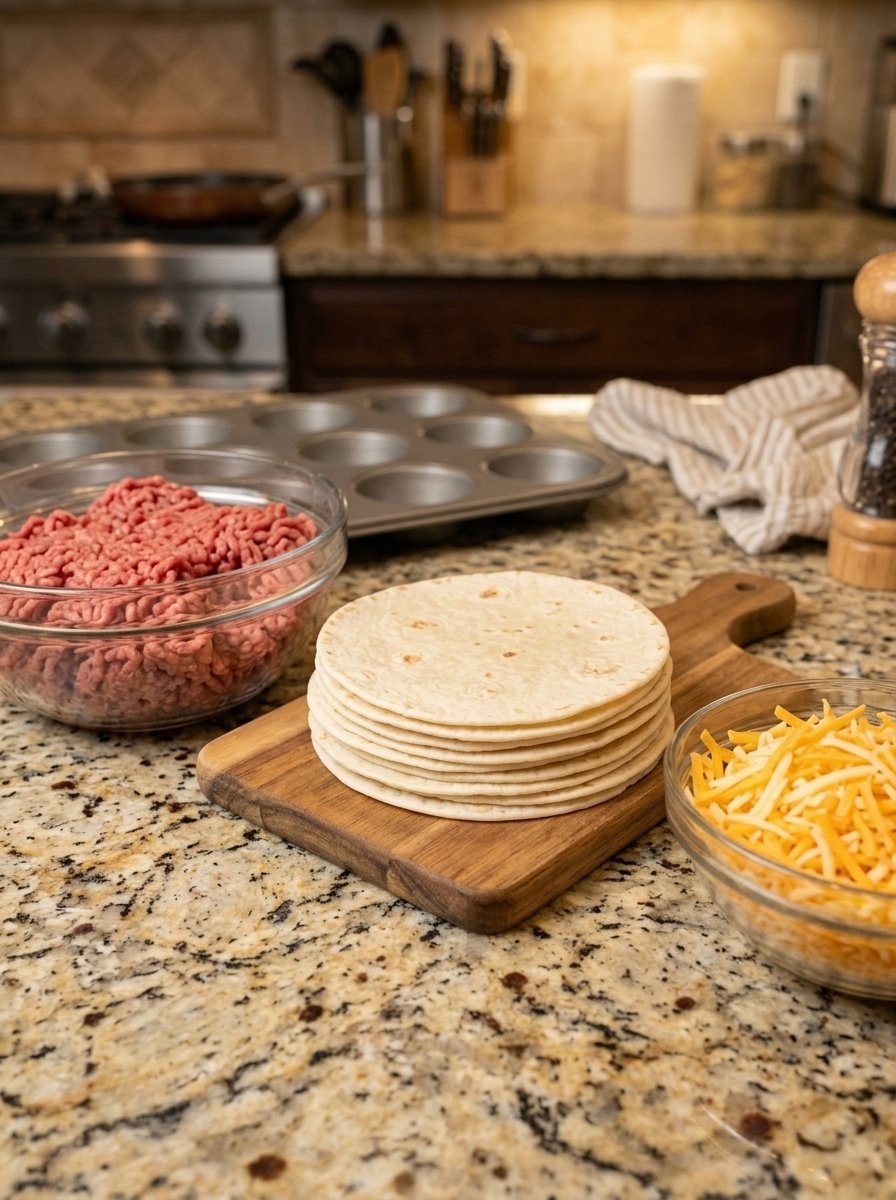
The beauty of this recipe is its simplicity. Here is what to gather.
- Ground beef: about 1 pound (450 g)
- Small flour or corn tortillas: 12 street-taco-sized tortillas (roughly 5 to 6 inches across)
- Shredded cheese: about 1.5 to 2 cups, depending on how cheesy you like things
Optional seasonings and extras, if you want to go beyond the three core ingredients, include salt, black pepper, garlic powder, onion powder, and a splash of Worcestershire sauce. We will cover these in the variations section.
Choosing the Best Ground Beef
The beef is the heart of the cheeseburger flavor, so it is worth choosing well. Ground beef is sold by lean-to-fat ratio, and the ratio affects both taste and texture.
- 80/20 ground beef has the richest, most burger-like flavor. The extra fat keeps the filling juicy, but you will want to drain the skillet well so the tortillas do not turn greasy.
- 85/15 ground beef is a great middle ground. It still tastes like a real cheeseburger, with less grease to manage.
- 90/10 or leaner works if you are watching fat, but the filling can taste a little dry. If you go lean, add a teaspoon of oil or a splash of broth while cooking.
You can also use ground turkey, ground chicken, or a plant-based crumble. Beef simply delivers the most authentic cheeseburger taste.
Flour Tortillas vs. Corn Tortillas
Both tortillas work, but they behave differently.
Flour tortillas are more pliable and easier to shape into cups. They bake up golden, slightly bubbly, and crisp with a tender bite. If you are making this recipe for the first time, start with flour. Look for the small “taco size” or “fajita size” packages.
Corn tortillas have a more rustic, toasty corn flavor and bake up extra crunchy. However, they crack easily when folded, so they need to be warmed thoroughly until soft and flexible. If you love a sturdier, crunchier shell, corn is a fantastic choice.
If your tortillas are larger than your muffin cups can handle, you can trim them with a round cutter or simply let the edges ruffle up. The ruffled edges actually become the crispiest, most appealing part of the cup.
The Best Cheese for Taco Cups
Since the cheese is the finishing touch that makes these taste like cheeseburgers, choose a cheese that melts beautifully.
- Sharp or medium cheddar is the classic cheeseburger choice and gives you that familiar flavor and orange color.
- Colby Jack or Monterey Jack melts ultra smooth and creamy.
- A Mexican blend keeps things taco-friendly.
- American cheese (torn into small pieces) delivers true drive-through burger vibes.
For best results, shred your own cheese from a block. Pre-shredded cheese is coated with anti-caking agents that can slightly hinder melting, while freshly grated cheese melts into a glossy, bubbly layer.
Equipment You Will Need
- A standard 12-cup muffin tin
- A large skillet
- A wooden spoon or spatula (a meat chopper is great for breaking up the beef)
- Nonstick cooking spray (optional)
- A baking sheet (optional, to catch drips)
- A spoon or small scoop for filling
How to Make Crispy Cheeseburger Taco Cups: Step by Step
Step 1: Preheat the Oven
Preheat your oven to 375°F (190°C). Lightly spray the muffin tin with nonstick spray if you want extra insurance against sticking, although the tortillas usually release easily on their own.
Step 2: Cook the Ground Beef
Heat a skillet over medium-high heat. Add the ground beef and cook, breaking it apart with a spoon or spatula as it browns. You want small, even crumbles, because smaller pieces fit more neatly into the cups and make each bite more balanced.
Cook until the beef is fully browned and no pink remains, usually 6 to 8 minutes. Season with salt, pepper, and garlic powder if desired. Then drain any excess grease. This step is important: too much grease will make the bottoms of your tortilla cups soft instead of crisp. Press the cooked beef gently between paper towels if it still looks oily.
Step 3: Warm and Shape the Tortillas
A cold tortilla will crack and tear when you bend it, so warm them first. You can stack the tortillas, wrap them in a damp paper towel, and microwave for 15 to 20 seconds, or warm each one for a few seconds in a dry skillet. They should feel soft and flexible, like fabric.
Press each tortilla gently into a muffin cup, pleating the sides as needed. Let the edges stand slightly above the rim of the tin. Those peaks are what turn into the crunchy, golden ruffles that make taco cups so irresistible.
Step 4: Fill with Beef
Spoon the cooked beef evenly into the tortilla cups. Aim for about 2 to 3 tablespoons per cup. Resist overfilling, as an overstuffed cup can bulge, spill, and make the tortilla harder to lift out later.
Step 5: Top with Cheese
Generously top each cup with shredded cheese, covering the beef completely. The cheese acts like a blanket that traps juices and creates that irresistible bubbling top. Do not be shy here; this is a cheeseburger, after all.
Step 6: Bake Until Golden and Bubbly
Bake for 10 to 15 minutes, until the tortilla edges are golden brown and crispy and the cheese is completely melted and bubbling. Corn tortillas may need a minute or two longer. If your cheese is melted but the edges are still pale, turn on the broiler for 30 to 60 seconds, watching closely so nothing burns.
Step 7: Cool Briefly and Serve
Let the cups rest in the tin for 2 to 3 minutes. This short pause helps the cheese set and the shells firm up. Then carefully lift each cup out with a spoon or small offset spatula. Serve immediately while they are hot, crispy, and loaded with juicy cheeseburger flavor.
Pro Tips for Extra Crispy Taco Cups
Crispiness is what separates a great taco cup from a forgettable one. Keep these tips in mind.
- Drain the beef well. Excess moisture and grease are the biggest enemies of a crunchy shell.
- Do not overfill. Too much filling steams the tortilla from the inside. A moderate scoop keeps the base crisp.
- Pre-bake the shells. For maximum crunch, bake the empty tortilla cups for 5 minutes before adding the filling. This lightly toasts the base and makes it more resistant to moisture.
- Brush with oil. A light brush of olive oil or a quick spritz of cooking spray on the tortillas helps them brown and crisp evenly.
- Use the middle rack. This ensures even heat circulation around the entire tin.
- Let them rest. A couple of minutes out of the oven allows steam to escape so the shells stay crunchy.
- Use a metal muffin tin. Metal conducts heat better than silicone and gives you deeper browning.
Delicious Variations to Try
The three-ingredient base is fantastic on its own, but here are some ways to customize your cheeseburger taco cups.
Bacon Cheeseburger Taco Cups
Stir 4 to 6 slices of crumbled, crispy bacon into the beef before filling the cups. The smoky, salty crunch is a natural partner for cheddar.
Classic Burger Seasoning Cups
Season the beef with garlic powder, onion powder, a dash of paprika, salt, pepper, and a teaspoon of Worcestershire sauce. This gives the filling a true backyard-grill flavor.
Big Mac Style Taco Cups
Mix a spoonful of burger sauce (mayonnaise, ketchup, mustard, relish, and a pinch of paprika) into the beef. After baking, top with shredded lettuce, diced pickles, and a sprinkle of sesame seeds.
Pizza Burger Cups
Replace the cheddar with mozzarella, add a teaspoon of pizza sauce to the beef, and top with a few mini pepperoni slices.
Spicy Jalapeño Cups
Fold diced jalapeños or a spoonful of green chiles into the beef, and swap in pepper jack cheese for a spicy kick.
Breakfast Burger Cups
Crack a small quail egg or spoon a bit of scrambled egg on top of the beef before the cheese goes on for a handheld breakfast option.
Veggie-Loaded Cups
Sauté finely diced onions, mushrooms, or bell peppers with the beef for extra flavor and a sneaky serving of vegetables.
Toppings to Add After Baking
Once your cups come out of the oven, you can dress them up like a cheeseburger with fresh toppings. Try any of the following:
- Shredded lettuce
- Diced tomatoes
- Pickle slices or chopped dill pickles
- Thinly sliced or diced raw onions
- Crispy fried onions
- A drizzle of ketchup, mustard, or burger sauce
- Sliced green onions or chives
- A sprinkle of sesame seeds
Add the fresh toppings right before serving so the cups stay crisp and the vegetables stay crunchy.
Best Dipping Sauces
Dipping sauces turn these taco cups into a party platter. Offer a few options and let everyone customize.
- Ketchup and mustard for the traditional route
- Special burger sauce (mayo, ketchup, relish, and mustard)
- Ranch dressing for a cool, creamy contrast
- Chipotle mayo for smoky heat
- Salsa or pico de gallo for a taco-night twist
- Queso for the ultimate cheese-on-cheese experience
What to Serve with Cheeseburger Taco Cups
These cups can be a stand-alone appetizer or part of a complete meal. For dinner, pair them with:
- Crispy oven fries or sweet potato fries
- A crunchy coleslaw or a simple green salad
- Corn on the cob or a corn salad
- Fresh fruit for a lighter side
- Baked beans or a pot of chili for a hearty game-day spread
For a party, arrange the cups on a large platter with small bowls of dipping sauces and toppings, and let guests build their own.
Make-Ahead, Storage, and Reheating
Make Ahead
You can cook the ground beef up to 2 days in advance and store it in an airtight container in the refrigerator. When you are ready to serve, assemble the cups and bake as directed. This makes party prep much easier.
Storing Leftovers
Place cooled taco cups in an airtight container, with parchment paper between layers, and refrigerate for up to 3 days. The shells will soften in the fridge, but they crisp up again when reheated properly.
Freezing
Freeze baked and fully cooled cups on a baking sheet until solid, then transfer them to a freezer-safe bag or container for up to 2 months. You can also freeze the cooked beef separately.
Reheating for Maximum Crunch
The oven or air fryer is the best way to revive crispiness.
- Oven: Reheat at 350°F (175°C) for 8 to 10 minutes.
- Air fryer: Reheat at 350°F (175°C) for 3 to 5 minutes.
- Frozen cups: Bake straight from frozen at 350°F for 12 to 15 minutes.
Avoid the microwave if you can, because it softens the tortilla and makes the cheese rubbery.
Can You Make Cheeseburger Taco Cups in an Air Fryer?
Yes. If your air fryer has a basket large enough, you can use silicone or foil muffin liners to shape the cups. Air fry at 350°F (175°C) for 6 to 8 minutes, checking at the halfway point. Because air fryers circulate hot air quickly, the edges crisp up fast, so keep an eye on them.
Troubleshooting Common Problems
My tortillas cracked when I shaped them. They were not warm enough. Heat them a little longer until they are fully soft and pliable, and work quickly while they are still warm.
The bottoms are soggy. The beef was probably too greasy or the cups were overfilled. Drain the beef thoroughly, use less filling, and try the pre-bake method described above.
The edges burned before the cheese melted. Your oven may run hot, or the cups were too close to the top heating element. Move the rack lower, reduce the temperature by 25°F, and cover the edges lightly with foil if needed.
The cups stick to the pan. Spray the muffin tin with nonstick spray before shaping, and allow the cups to rest for a few minutes after baking so the cheese firms up and releases.
The cheese is not browning. For those beautiful golden spots, broil for the final 30 to 60 seconds. Stay by the oven and watch carefully.
Nutrition Notes
The exact nutrition depends on the type of beef, tortillas, and cheese you choose, but here are a few general points. Using leaner beef and reduced-fat cheese lowers the fat content. Corn tortillas are typically lighter and naturally gluten free (check the packaging for certification). Smaller portions make these a satisfying treat without overindulging. For a lighter meal, pair two or three cups with a fresh salad rather than fries. If you need precise numbers for dietary reasons, run your specific ingredients through a nutrition calculator.
Frequently Asked Questions
How many ingredients do cheeseburger taco cups need?
The base recipe needs only three: ground beef, small tortillas, and shredded cheese. Seasonings and toppings are optional extras.
What size tortillas should I use?
Small street-taco-size tortillas, around 5 to 6 inches, fit a standard muffin tin best. Larger tortillas can be used if you let the edges ruffle up.
Can I use a mini muffin tin?
Absolutely. Cut tortillas into 3-inch rounds, press them into the mini tin, and bake for 8 to 10 minutes. They make perfect bite-sized party snacks.
Can I make these gluten free?
Yes. Use certified gluten-free corn tortillas and make sure your seasonings and cheese are gluten free.
Can I use ground turkey or chicken instead of beef?
Yes. Ground turkey and chicken work well. Add a little extra seasoning since they are milder in flavor.
How do I keep taco cups crispy for a party?
Bake them just before guests arrive, or keep finished cups on a wire rack in a warm oven at 200°F (95°C) for up to 30 minutes. Serve toppings and sauces on the side.
Can I prepare them completely ahead of time?
You can assemble the unbaked cups, cover the tin, and refrigerate for a few hours, then bake right before serving. Baking from fresh keeps the shells crunchiest, though.
Why are my taco cups greasy?
Greasy cups usually mean the beef was not drained well enough or the beef had a high fat content. Drain thoroughly and blot with paper towels.
What is the best cheese for cheeseburger taco cups?
Sharp cheddar is the classic cheeseburger choice, while Colby Jack, Monterey Jack, and American cheese all melt wonderfully.
Final Thoughts
These crispy 3-ingredient cheeseburger taco cups prove that great food does not need to be complicated. With just ground beef, tortillas, and cheese, you get a golden, crunchy, melty, juicy bite that tastes like your favorite cheeseburger in a fun handheld form. They are quick enough for a weeknight, impressive enough for a party, and flexible enough to match any craving.
Start with the basic recipe, then experiment with bacon, burger sauce, pickles, or spicy peppers to make it your own. Keep a muffin tin, a pack of tortillas, and a bag of cheese on hand, and you will always be 30 minutes away from a crowd-pleasing meal.
If you try this recipe, share it with friends and family, and do not forget to bookmark it for your next game day, movie night, or hungry-kids dinner emergency. Happy cooking!
Print
Crispy 3-Ingredient Cheeseburger Taco Cups
Ingredients
The beauty of this recipe is its simplicity. Here is what to gather.
- Ground beef: about 1 pound (450 g)
- Small flour or corn tortillas: 12 street-taco-sized tortillas (roughly 5 to 6 inches across)
- Shredded cheese: about 1.5 to 2 cups, depending on how cheesy you like things
Optional seasonings and extras, if you want to go beyond the three core ingredients, include salt, black pepper, garlic powder, onion powder, and a splash of Worcestershire sauce. We will cover these in the variations section.
Choosing the Best Ground Beef
The beef is the heart of the cheeseburger flavor, so it is worth choosing well. Ground beef is sold by lean-to-fat ratio, and the ratio affects both taste and texture.
- 80/20 ground beef has the richest, most burger-like flavor. The extra fat keeps the filling juicy, but you will want to drain the skillet well so the tortillas do not turn greasy.
- 85/15 ground beef is a great middle ground. It still tastes like a real cheeseburger, with less grease to manage.
- 90/10 or leaner works if you are watching fat, but the filling can taste a little dry. If you go lean, add a teaspoon of oil or a splash of broth while cooking.
You can also use ground turkey, ground chicken, or a plant-based crumble. Beef simply delivers the most authentic cheeseburger taste.
Instructions
Preheat your oven to 375°F (190°C). Lightly spray the muffin tin with nonstick spray if you want extra insurance against sticking, although the tortillas usually release easily on their own.
Heat a skillet over medium-high heat. Add the ground beef and cook, breaking it apart with a spoon or spatula as it browns. You want small, even crumbles, because smaller pieces fit more neatly into the cups and make each bite more balanced.
Cook until the beef is fully browned and no pink remains, usually 6 to 8 minutes. Season with salt, pepper, and garlic powder if desired. Then drain any excess grease. This step is important: too much grease will make the bottoms of your tortilla cups soft instead of crisp. Press the cooked beef gently between paper towels if it still looks oily.
A cold tortilla will crack and tear when you bend it, so warm them first. You can stack the tortillas, wrap them in a damp paper towel, and microwave for 15 to 20 seconds, or warm each one for a few seconds in a dry skillet. They should feel soft and flexible, like fabric.
Press each tortilla gently into a muffin cup, pleating the sides as needed. Let the edges stand slightly above the rim of the tin. Those peaks are what turn into the crunchy, golden ruffles that make taco cups so irresistible.
Spoon the cooked beef evenly into the tortilla cups. Aim for about 2 to 3 tablespoons per cup. Resist overfilling, as an overstuffed cup can bulge, spill, and make the tortilla harder to lift out later.
Generously top each cup with shredded cheese, covering the beef completely. The cheese acts like a blanket that traps juices and creates that irresistible bubbling top. Do not be shy here; this is a cheeseburger, after all.
Bake for 10 to 15 minutes, until the tortilla edges are golden brown and crispy and the cheese is completely melted and bubbling. Corn tortillas may need a minute or two longer. If your cheese is melted but the edges are still pale, turn on the broiler for 30 to 60 seconds, watching closely so nothing burns.
Let the cups rest in the tin for 2 to 3 minutes. This short pause helps the cheese set and the shells firm up. Then carefully lift each cup out with a spoon or small offset spatula. Serve immediately while they are hot, crispy, and loaded with juicy cheeseburger flavor.