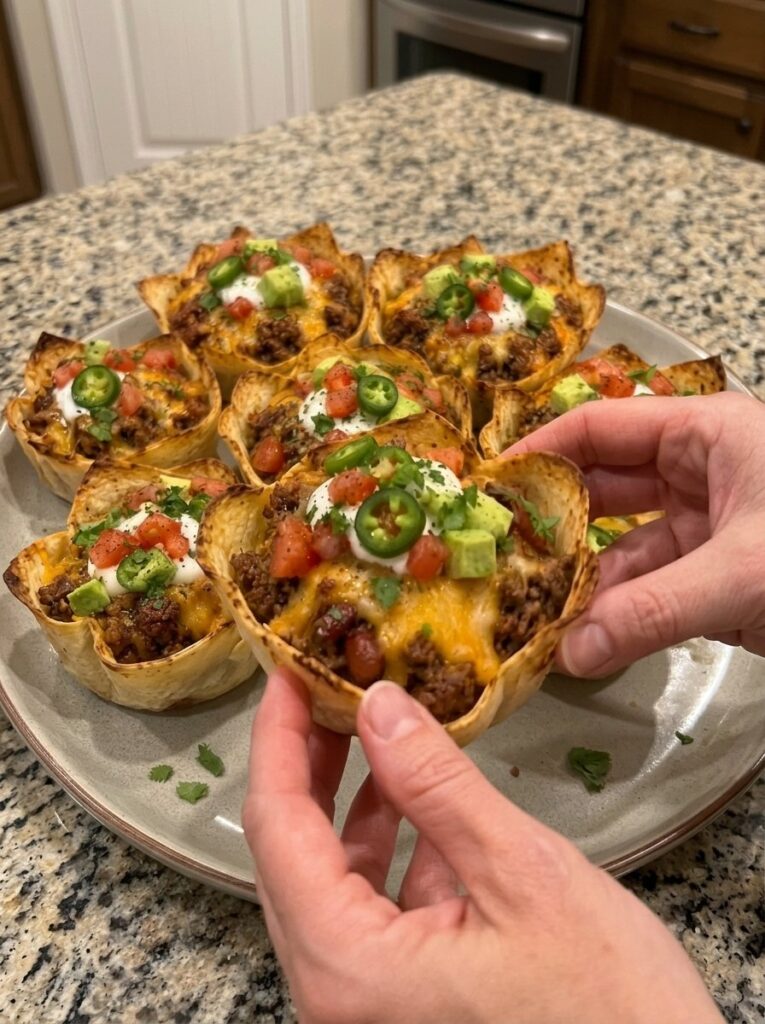
If you are looking for an appetizer that disappears from the platter within minutes, these Crispy Loaded Cheesy Beef & Bean Chili Tortilla Crunch Cups are exactly what you need. They are crunchy, cheesy, hearty, and packed with bold Tex-Mex flavor. Golden baked tortilla shells hold a generous scoop of juicy seasoned ground beef, tender kidney and black beans, zesty tomatoes, and melted cheddar and Monterey Jack cheese. Then comes the best part: a dollop of cool sour cream, creamy diced avocado, fresh tomatoes, sliced jalapeños, cilantro, and a squeeze of lime.
Every bite gives you a satisfying crunch from the tortilla, a savory and slightly smoky chili filling, gooey melted cheese, and fresh, bright toppings. They are hand-held, easy to serve, and ridiculously fun to eat. Whether you are hosting a game day party, planning a family taco night, or need a crowd-pleasing appetizer for a get-together, these tortilla cups deliver.
In this guide, you will find the full recipe, step-by-step instructions, ingredient notes, smart substitutions, make-ahead and storage tips, serving ideas, and answers to the most common questions. Let’s get cooking.
Why You Will Love These Tortilla Crunch Cups
There are plenty of reasons these cups earn a permanent spot in your recipe rotation:
- Incredibly crispy texture. Pre-baking the tortilla shells before filling them keeps the edges crunchy instead of soggy.
- Hearty and satisfying. Between the lean ground beef and two kinds of beans, the filling is protein-rich and filling enough to serve as a main course.
- Perfect portion size. Each cup is a built-in serving, so there are no plates, forks, or messy nachos to dig through.
- Customizable. Swap the protein, adjust the heat, or change up the toppings to suit your crowd.
- Great for parties. You can prepare the components ahead and assemble just before serving.
- Budget-friendly. Most ingredients are pantry staples, and a single batch feeds a crowd.
- Kid-friendly and adult-approved. Keep the cayenne and jalapeños optional and everyone can build a cup to their taste.
What Are Tortilla Cups?
Tortilla cups are small bowls made by pressing soft flour tortillas into a muffin pan and baking them until golden and crisp. Think of them as an edible, oven-baked taco bowl in appetizer size. Because the shape holds fillings so well, they work for countless recipes, from taco cups and breakfast cups to dessert versions with fruit and whipped cream.
In this recipe, the tortilla cup becomes the base for a thick, saucy beef and bean chili. The chili is cooked down until it is thick enough to scoop without turning the shell soggy, which is the secret to getting a perfect crunch in every bite.
Ingredients You Will Need
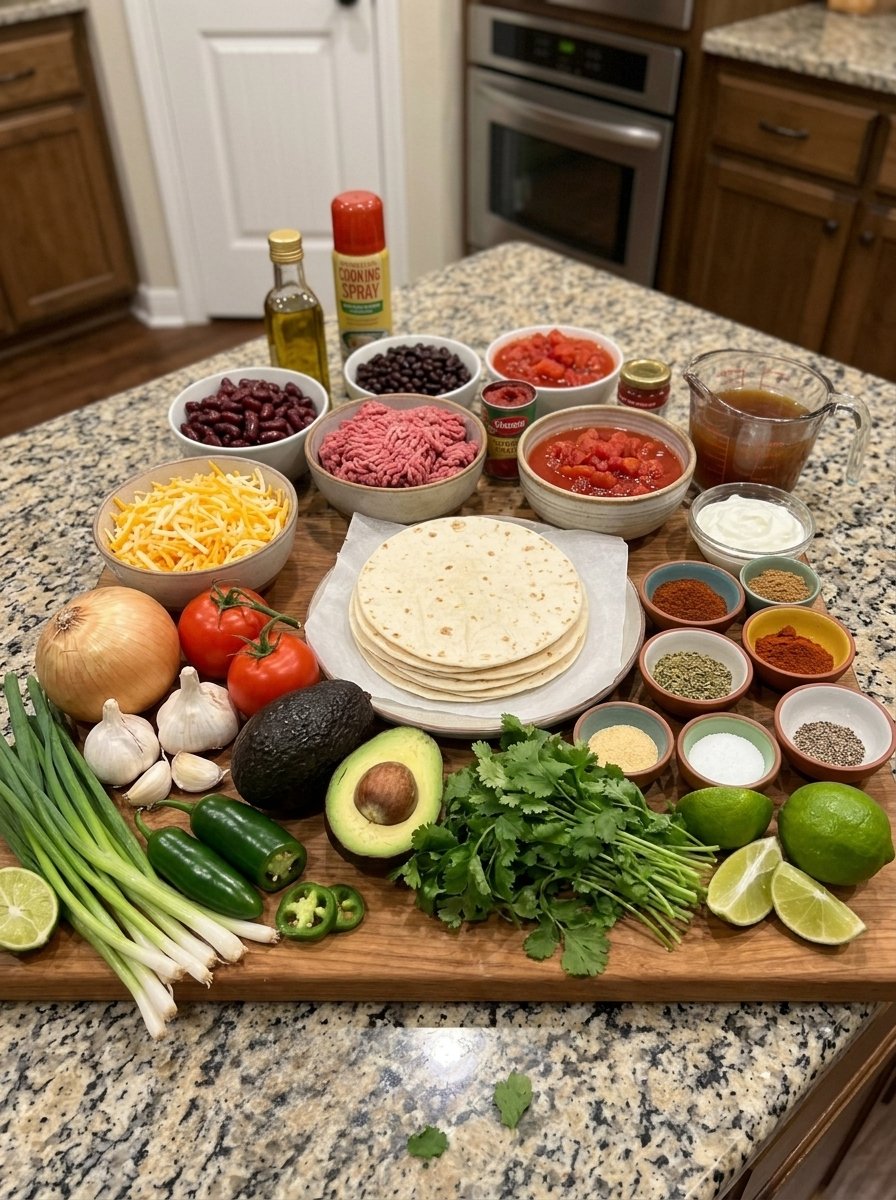
This recipe makes 12 tortilla cups. Here is everything you need, divided by component.
For the Tortilla Cups
- 12 small flour tortillas (6-inch / 15 cm)
- 1 tablespoon olive oil
- Nonstick cooking spray
For the Beef and Bean Chili Filling
- 1 lb (450 g) lean ground beef
- 1 small yellow onion, finely diced
- 3 garlic cloves, minced
- 1 can (15 oz / 425 g) kidney beans, drained and rinsed
- 1 can (15 oz / 425 g) black beans, drained and rinsed
- 1 can (14.5 oz / 411 g) diced tomatoes, drained
- 2 tablespoons tomato paste
- ½ cup (120 ml) beef broth
- 1 tablespoon olive oil (for the skillet)
For the Seasoning
- 2 teaspoons chili powder
- 1 teaspoon ground cumin
- 1 teaspoon smoked paprika
- ½ teaspoon dried oregano
- ½ teaspoon garlic powder
- ½ teaspoon salt, or to taste
- ¼ teaspoon black pepper
- ¼ teaspoon cayenne pepper (optional)
For the Cheese
- 2 cups (200 g) shredded cheddar cheese
- ½ cup (50 g) shredded Monterey Jack cheese
For the Toppings
- ½ cup (120 g) sour cream
- 1 ripe avocado, diced
- 2 medium tomatoes, diced
- 1 fresh jalapeño, sliced
- 2 tablespoons fresh cilantro, chopped
- 2 tablespoons sliced green onions
- Lime wedges, for serving
Ingredient Notes and Smart Substitutions
Flour tortillas. Small 6-inch tortillas fit a standard muffin pan best. If you only have larger tortillas, cut them into 5- to 6-inch circles with a bowl or round cutter. Fajita-size tortillas are ideal. Brushing both sides with a little olive oil helps them brown evenly and crisp up.
Ground beef. Lean ground beef (90 percent lean or leaner) keeps the filling from becoming greasy. You can use ground turkey, ground chicken, or ground pork instead. For a vegetarian version, replace the meat with extra beans, diced bell pepper, and corn.
Beans. Kidney beans and black beans give the filling variety in color, texture, and flavor. Pinto beans, cannellini beans, or chili beans are all great alternatives. Always drain and rinse canned beans to remove excess sodium and the starchy liquid that can make the filling watery.
Diced tomatoes. Draining the tomatoes is important. Too much liquid will make the shells soft. If you like more heat, use diced tomatoes with green chiles.
Tomato paste. This concentrated ingredient adds depth, a rich savory flavor, and helps thicken the chili. Do not skip it.
Spices. Chili powder, cumin, and smoked paprika create the classic Tex-Mex flavor profile. The smoked paprika adds a subtle campfire note that makes the filling taste slow-simmered even though it is ready in about 20 minutes. If you are sensitive to heat, leave out the cayenne.
Cheese. Sharp cheddar delivers bold flavor, while Monterey Jack melts beautifully and adds creaminess. For the best melt, shred your own cheese from a block. Pre-shredded cheese contains anti-caking agents that can prevent a smooth, gooey melt. A Mexican blend or pepper jack also works well.
Toppings. Sour cream can be swapped for plain Greek yogurt or Mexican crema. Add pickled red onions, sliced black olives, corn, or a drizzle of hot sauce for extra personality.
Step-by-Step Instructions
Step 1: Prepare the Tortilla Cups
Preheat your oven to 375°F (190°C). Lightly brush both sides of each tortilla with olive oil. Warm the tortillas in the microwave for 15 to 20 seconds so they become soft and flexible. This simple step prevents cracking when you press them into the pan. Spray a 12-cup muffin pan with nonstick cooking spray, then gently press one tortilla into each cup, pleating the sides to form a small bowl.
Step 2: Bake Until Crispy
Place the muffin pan in the preheated oven and bake for 8 to 10 minutes, until the edges are lightly golden and just beginning to crisp. Remove the pan and set it aside. Leave the oven on, because you will use it again shortly.
Step 3: Cook the Onion and Garlic
Heat 1 tablespoon of olive oil in a large skillet over medium heat. Add the diced onion and cook for 3 to 4 minutes, until softened and translucent. Stir in the minced garlic and cook for another 30 seconds, just until fragrant. Be careful not to burn the garlic, which can turn bitter.
Step 4: Brown the Ground Beef
Add the ground beef to the skillet and cook for 6 to 8 minutes, breaking it into small crumbles with a wooden spoon, until browned and fully cooked through. Drain any excess grease if needed. Small crumbles are important because they fit neatly into the tortilla cups and make each bite easier to eat.
Step 5: Season the Beef Filling
Stir in the tomato paste, chili powder, cumin, smoked paprika, oregano, garlic powder, salt, black pepper, and cayenne pepper, if using. Mix well until the beef is evenly coated. Toasting the spices in the pan for a minute or so wakes up their flavor.
Step 6: Add the Beans and Tomatoes
Stir in the kidney beans, black beans, drained diced tomatoes, and beef broth. Bring the mixture to a gentle simmer and cook for 8 to 12 minutes, stirring occasionally, until the filling thickens and most of the excess liquid evaporates. You want a thick, scoopable chili, not a soupy one. Taste and adjust the seasoning, adding a pinch more salt or chili powder if needed.
Step 7: Fill the Tortilla Cups
Spoon the beef and bean chili evenly into the pre-baked tortilla cups, filling each about three-quarters full. Leaving a little room prevents overflow and leaves space for the cheese. In a small bowl, combine the shredded cheddar and Monterey Jack, then sprinkle the cheese generously over each cup.
Step 8: Bake Until Golden and Cheesy
Return the filled cups to the oven and bake for 8 to 12 minutes, until the cheese is completely melted and bubbly and the tortilla edges are deep golden brown and crispy. Remove from the oven and let the cups rest in the pan for 3 to 5 minutes. This short rest helps them set so they lift out cleanly without falling apart.
Step 9: Add the Fresh Toppings
Add a small spoonful of sour cream to each cup. Top with diced avocado, fresh tomatoes, sliced jalapeños, chopped cilantro, and green onions. Finish with a squeeze of fresh lime juice, which brightens all the rich, savory flavors.
Step 10: Serve and Enjoy
Arrange the tortilla cups on a serving platter and serve immediately, while the shells are crunchy, the chili filling is warm, and the cheese is wonderfully melted.
Pro Tips for the Crispiest Tortilla Cups
Getting the texture right is what separates good tortilla cups from great ones. Keep these tips in mind:
- Always pre-bake the shells. Baking the empty tortillas first sets their shape and creates a crisp barrier between the shell and the moist filling.
- Thicken the filling. If the chili is too wet, the cups will soften. Simmer until the liquid has mostly cooked off.
- Do not overfill. Three-quarters full is the sweet spot. Overstuffed cups are harder to remove and tend to spill.
- Let them rest. The 3 to 5 minute rest firms up the cheese and helps the cups hold together.
- Add fresh toppings last. Avocado, tomatoes, and sour cream go on after baking so they stay fresh, cool, and vibrant.
- Use a metal muffin pan. Metal conducts heat well and browns the tortillas evenly. Silicone pans do not crisp as nicely.
- Run a knife around the edge if needed. If any cheese has stuck to the pan, a thin knife or small offset spatula helps release the cups without tearing.
Common Mistakes to Avoid
- Skipping the microwave step. Cold tortillas crack when pressed into the pan. A few seconds of warmth makes them pliable.
- Using too much oil. A light brush is plenty. Too much oil makes the shells greasy instead of crisp.
- Leaving the beans wet. Rinse and drain the beans thoroughly, and drain the tomatoes as well.
- Under-baking the second round. The cheese should bubble and the edges should look deeply golden. Pale edges mean softer shells.
- Adding sour cream before baking. Dairy toppings belong on after the oven, not before.
Variations and Flavor Ideas
Once you have mastered the base recipe, it is easy to make it your own.
Spicy Queso Cups. Add a spoonful of pickled jalapeños to the filling and swap the Monterey Jack for pepper jack. Drizzle with warm queso at the end.
Chicken Tortilla Cups. Replace the ground beef with shredded rotisserie chicken tossed in taco seasoning and a little salsa.
Turkey Chili Cups. Use lean ground turkey for a lighter option. Add a splash of extra broth since turkey is leaner than beef.
Vegetarian Black Bean Cups. Skip the meat, double the beans, and add sautéed bell peppers, corn, and zucchini for a colorful veggie-packed filling.
Breakfast Chili Cups. Crack a small egg into each cup on top of the filling before the second bake for a hearty brunch idea.
BBQ Beef Cups. Swap the chili seasonings for barbecue sauce and top with pickled red onions and a drizzle of ranch.
Mini Appetizer Version. Use a mini muffin pan and cut the tortillas into small circles to make bite-size cups for large parties.
What to Serve With Tortilla Crunch Cups
These cups are filling on their own, but a few simple sides turn them into a complete spread:
- Mexican street corn salad or classic grilled corn
- Cilantro lime rice for a heartier dinner
- Chips with fresh guacamole and salsa
- A crisp green salad with lime vinaigrette
- Queso dip for extra indulgence
- Refreshing drinks like margaritas, agua fresca, lemonade, or ice-cold lagers
For a party, set up a topping bar with small bowls of sour cream, guacamole, diced tomatoes, jalapeños, cilantro, green onions, pickled onions, hot sauce, and lime wedges. Guests can load up their cups however they like, which makes the evening interactive and fun.
Perfect Occasions for This Recipe
- Game day and watch parties: Hand-held, tidy, and big on flavor, these cups are made for the sofa and the big screen.
- Taco Tuesday: A fun twist that feels like a treat without extra effort.
- Family dinners: Serve three cups per person with rice and salad for a satisfying meal.
- Birthday parties and potlucks: They travel well and are easy to share.
- Cinco de Mayo celebrations: Colorful, festive, and full of classic Mexican-inspired flavor.
- Holiday gatherings: A savory appetizer that stands out from the usual cheese board.
Make-Ahead, Storage, and Reheating
Make-Ahead Tips
These cups are ideal for busy hosts because nearly every part can be prepared in advance.
- Chili filling: Cook the beef and bean mixture up to 3 days ahead and store it in an airtight container in the refrigerator. Reheat gently before filling.
- Tortilla shells: Bake the empty shells up to 2 days ahead. Let them cool completely, then store them in an airtight container at room temperature.
- Toppings: Dice the tomatoes, slice the jalapeños, and chop the herbs a few hours ahead. Dice the avocado right before serving so it stays green. A little lime juice helps prevent browning.
When guests arrive, simply fill the shells, add cheese, and bake as directed.
Storing Leftovers
Let any leftover baked cups cool completely. Store them, without the fresh toppings, in an airtight container in the refrigerator for up to 3 days. Keep the extra fresh toppings in separate containers.
Reheating
For the best texture, reheat leftovers in a 350°F (175°C) oven or air fryer for 5 to 8 minutes, until warmed through and the edges are crisp again. Avoid the microwave if you want to keep the shells crunchy.
Freezing
Freeze the unbaked, filled cups (before adding the cheese) on a lined baking sheet until solid, then transfer them to a freezer bag for up to 2 months. Thaw overnight in the refrigerator, add cheese, and bake until hot and bubbly. You can also freeze the chili filling by itself for up to 3 months.
Nutrition and Healthier Swaps
Beans add fiber and plant-based protein, while lean beef provides iron and high-quality protein. To lighten the recipe, you can:
- Use ground turkey or chicken in place of beef
- Choose reduced-fat cheese
- Swap sour cream for plain Greek yogurt
- Use whole wheat or low-carb tortillas
- Increase the beans and vegetables and decrease the meat
- Go easy on the oil by using cooking spray on the tortillas
Because nutrition varies by brand and portion size, use an online calculator with your exact ingredients if you need precise numbers.
Equipment You Will Need
- 12-cup standard muffin pan (metal recommended)
- Large skillet
- Wooden spoon or spatula
- Pastry brush for oiling the tortillas
- Microwave-safe plate
- Cutting board and sharp knife
- Box grater, if shredding your own cheese
Frequently Asked Questions
Can I make tortilla cups without a muffin pan?
Yes. You can drape tortillas over the backs of an upside-down muffin pan to form a taco bowl shape, or press them into oven-safe ramekins. Muffin pans are the easiest way to get uniform cups, though.
How do I keep tortilla cups from getting soggy?
Pre-bake the shells, thicken the filling by simmering off most of the liquid, drain the beans and tomatoes, and serve right after baking. Adding the sour cream and fresh toppings after baking also protects the crunch.
Can I use corn tortillas instead of flour?
Corn tortillas are more brittle and tend to crack, but you can use them if you warm them well and soften them with a little oil. Flour tortillas are more forgiving and produce a better cup shape.
Can I make these in an air fryer?
Yes. Use silicone or foil cups designed for air fryers, or shape the tortillas in small oven-safe molds. Cook at 350°F (175°C) for several minutes, checking often until crisp and golden.
How many tortilla cups should I plan per person?
As an appetizer, plan on 2 to 3 per guest. As a main dish, 3 to 4 cups per person with a side is usually plenty.
Can I make the recipe spicier?
Absolutely. Add more cayenne, use hot chili powder, stir in diced green chiles or chipotle in adobo, or top with extra fresh or pickled jalapeños.
Are these gluten-free?
Not as written, because flour tortillas contain gluten. Use gluten-free tortillas that are pliable enough to fold, and check that your broth and spices are gluten-free as well.
Can I double the recipe?
Yes. Use two muffin pans and a larger pot or skillet for the filling. The baking time stays the same.
What is the best cheese for tortilla cups?
A blend of sharp cheddar and Monterey Jack gives the best combination of flavor and melt. Pepper jack, Colby Jack, and Mexican blends are also excellent.
Can I prepare the filling in a slow cooker?
Yes. Brown the beef with the onion and garlic first, then simmer everything with the beans, tomatoes, broth, and spices in a slow cooker on low for 3 to 4 hours. Remove the lid near the end to let the chili thicken before filling the cups.
Final Thoughts
These Crispy Loaded Cheesy Beef & Bean Chili Tortilla Crunch Cups are everything you want in a party food: crunchy on the outside, hearty and flavorful on the inside, and finished with fresh, colorful toppings. The golden tortilla shells, savory beef and bean chili, bubbling cheddar and Monterey Jack, creamy avocado, and spicy jalapeños combine to create a snack that feels both comfort-food cozy and festive.
They are simple enough for a weeknight, impressive enough for entertaining, and flexible enough to match whatever ingredients and flavors you love. Make a batch for your next game day, family dinner, or gathering, and watch them vanish from the platter.
If you try the recipe, leave a rating and a comment, and share your favorite topping combination. Happy cooking!
Print
Crispy Loaded Cheesy Beef & Bean Chili Tortilla Crunch Cups
Ingredients
This recipe makes 12 tortilla cups. Here is everything you need, divided by component.
For the Tortilla Cups
- 12 small flour tortillas (6-inch / 15 cm)
- 1 tablespoon olive oil
- Nonstick cooking spray
For the Beef and Bean Chili Filling
- 1 lb (450 g) lean ground beef
- 1 small yellow onion, finely diced
- 3 garlic cloves, minced
- 1 can (15 oz / 425 g) kidney beans, drained and rinsed
- 1 can (15 oz / 425 g) black beans, drained and rinsed
- 1 can (14.5 oz / 411 g) diced tomatoes, drained
- 2 tablespoons tomato paste
- ½ cup (120 ml) beef broth
- 1 tablespoon olive oil (for the skillet)
For the Seasoning
- 2 teaspoons chili powder
- 1 teaspoon ground cumin
- 1 teaspoon smoked paprika
- ½ teaspoon dried oregano
- ½ teaspoon garlic powder
- ½ teaspoon salt, or to taste
- ¼ teaspoon black pepper
- ¼ teaspoon cayenne pepper (optional)
For the Cheese
- 2 cups (200 g) shredded cheddar cheese
- ½ cup (50 g) shredded Monterey Jack cheese
For the Toppings
- ½ cup (120 g) sour cream
- 1 ripe avocado, diced
- 2 medium tomatoes, diced
- 1 fresh jalapeño, sliced
- 2 tablespoons fresh cilantro, chopped
- 2 tablespoons sliced green onions
- Lime wedges, for serving
Instructions
Step 1: Prepare the Tortilla Cups
Preheat your oven to 375°F (190°C). Lightly brush both sides of each tortilla with olive oil. Warm the tortillas in the microwave for 15 to 20 seconds so they become soft and flexible. This simple step prevents cracking when you press them into the pan. Spray a 12-cup muffin pan with nonstick cooking spray, then gently press one tortilla into each cup, pleating the sides to form a small bowl.
Step 2: Bake Until Crispy
Place the muffin pan in the preheated oven and bake for 8 to 10 minutes, until the edges are lightly golden and just beginning to crisp. Remove the pan and set it aside. Leave the oven on, because you will use it again shortly.
Step 3: Cook the Onion and Garlic
Heat 1 tablespoon of olive oil in a large skillet over medium heat. Add the diced onion and cook for 3 to 4 minutes, until softened and translucent. Stir in the minced garlic and cook for another 30 seconds, just until fragrant. Be careful not to burn the garlic, which can turn bitter.
Step 4: Brown the Ground Beef
Add the ground beef to the skillet and cook for 6 to 8 minutes, breaking it into small crumbles with a wooden spoon, until browned and fully cooked through. Drain any excess grease if needed. Small crumbles are important because they fit neatly into the tortilla cups and make each bite easier to eat.
Step 5: Season the Beef Filling
Stir in the tomato paste, chili powder, cumin, smoked paprika, oregano, garlic powder, salt, black pepper, and cayenne pepper, if using. Mix well until the beef is evenly coated. Toasting the spices in the pan for a minute or so wakes up their flavor.
Step 6: Add the Beans and Tomatoes
Stir in the kidney beans, black beans, drained diced tomatoes, and beef broth. Bring the mixture to a gentle simmer and cook for 8 to 12 minutes, stirring occasionally, until the filling thickens and most of the excess liquid evaporates. You want a thick, scoopable chili, not a soupy one. Taste and adjust the seasoning, adding a pinch more salt or chili powder if needed.
Step 7: Fill the Tortilla Cups
Spoon the beef and bean chili evenly into the pre-baked tortilla cups, filling each about three-quarters full. Leaving a little room prevents overflow and leaves space for the cheese. In a small bowl, combine the shredded cheddar and Monterey Jack, then sprinkle the cheese generously over each cup.
Step 8: Bake Until Golden and Cheesy
Return the filled cups to the oven and bake for 8 to 12 minutes, until the cheese is completely melted and bubbly and the tortilla edges are deep golden brown and crispy. Remove from the oven and let the cups rest in the pan for 3 to 5 minutes. This short rest helps them set so they lift out cleanly without falling apart.
Step 9: Add the Fresh Toppings
Add a small spoonful of sour cream to each cup. Top with diced avocado, fresh tomatoes, sliced jalapeños, chopped cilantro, and green onions. Finish with a squeeze of fresh lime juice, which brightens all the rich, savory flavors.
Step 10: Serve and Enjoy
Arrange the tortilla cups on a serving platter and serve immediately, while the shells are crunchy, the chili filling is warm, and the cheese is wonderfully melted.
Pro Tips for the Crispiest Tortilla Cups
Getting the texture right is what separates good tortilla cups from great ones. Keep these tips in mind:
- Always pre-bake the shells. Baking the empty tortillas first sets their shape and creates a crisp barrier between the shell and the moist filling.
- Thicken the filling. If the chili is too wet, the cups will soften. Simmer until the liquid has mostly cooked off.
- Do not overfill. Three-quarters full is the sweet spot. Overstuffed cups are harder to remove and tend to spill.
- Let them rest. The 3 to 5 minute rest firms up the cheese and helps the cups hold together.
- Add fresh toppings last. Avocado, tomatoes, and sour cream go on after baking so they stay fresh, cool, and vibrant.
- Use a metal muffin pan. Metal conducts heat well and browns the tortillas evenly. Silicone pans do not crisp as nicely.
- Run a knife around the edge if needed. If any cheese has stuck to the pan, a thin knife or small offset spatula helps release the cups without tearing.