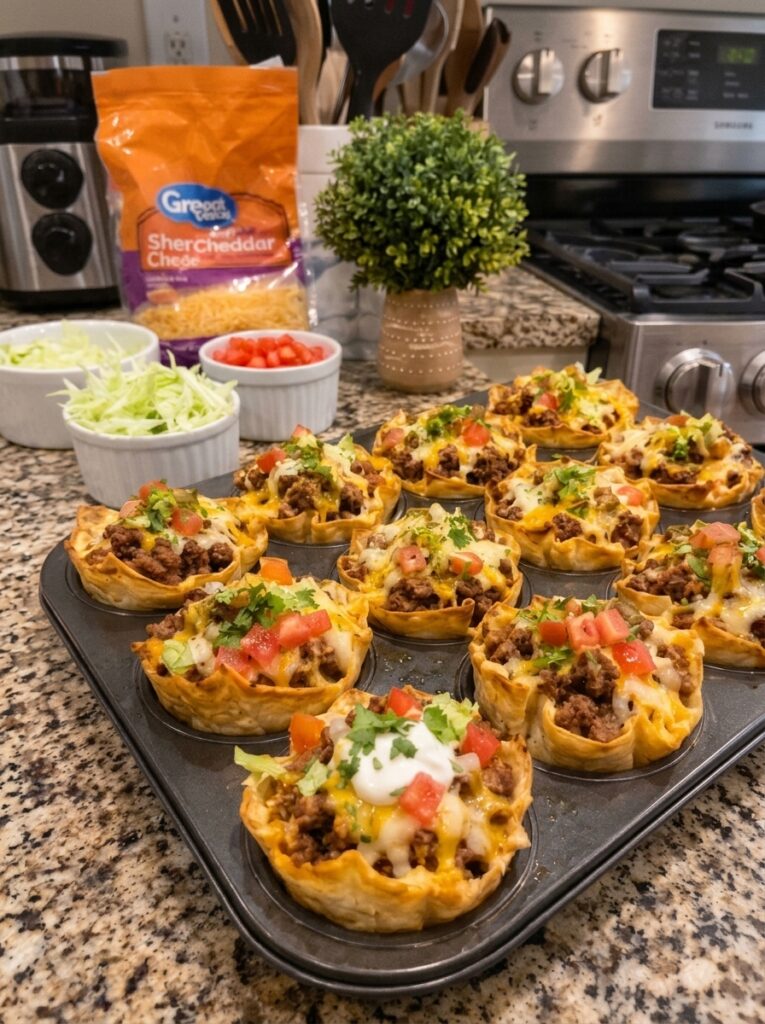
Why You’ll Love These Easy Cheesy Beef Taco Cups
If you love taco night but want something more fun, more portable, and a little less messy, these easy cheesy beef taco cups are the answer. Each one is a small tortilla cup, baked until golden and crunchy at the edges. It’s filled with juicy seasoned ground beef, covered in melted cheddar and Monterey Jack, and finished with cool, crisp toppings.
Think of them as everything you love about a classic taco, in a bite-sized shell that holds together. There’s no cracked hard shell, no filling falling into your lap, and no standing at the stove assembling plates while everyone waits. You make the cups, fill them, bake them, and let everyone grab their own.
These taco cups are one of those recipes that work in almost any situation:
- Weeknight family dinners: Kids love the individual portions, and adults love that cleanup is easy.
- Game-day gatherings: They’re easy to grab with one hand while you watch the game.
- Parties and potlucks: One muffin pan makes 12, and doubling the recipe is simple.
- Appetizer spreads: They’re colorful, shareable, and always disappear first.
- Meal prep: The beef filling keeps well, so you can prep ahead and bake when you’re ready.
The best part is that you only need basic ingredients, and most of them are probably already in your kitchen. A pack of small flour tortillas, a pound of ground beef, taco seasoning, shredded cheese, and a handful of fresh toppings are all it takes.
What Makes This Taco Cups Recipe Special?
Plenty of taco cup recipes exist, but a few details make this version stand out.
1. The tortillas are pre-baked. A lot of recipes skip this step, and that’s why their cups turn soggy at the bottom. Baking the empty shells for 8–10 minutes first sets the structure and gives you a crisp, sturdy base that holds up to the juicy beef.
2. The tortilla pieces overlap. Cutting each tortilla into smaller squares or circles and overlapping them in the muffin well creates a ruffled, layered cup with extra crunch and plenty of golden edges. It also means the cups don’t tear or leak.
3. Two cheeses are better than one. Sharp cheddar gives you that classic taco flavor and a beautiful golden color. Monterey Jack melts smooth and creamy, which gives you that gooey, stretchy cheese pull.
4. Fresh toppings go on after baking. Adding the lettuce, tomatoes, avocado, cilantro, and sour cream after the cups come out of the oven keeps them cool, crisp, and bright against the hot, melted filling.
5. The beef stays juicy. A small amount of water stirred in with the taco seasoning creates a light sauce that coats the beef. Simmering it briefly thickens that sauce without drying out the meat.
Ingredients You’ll Need
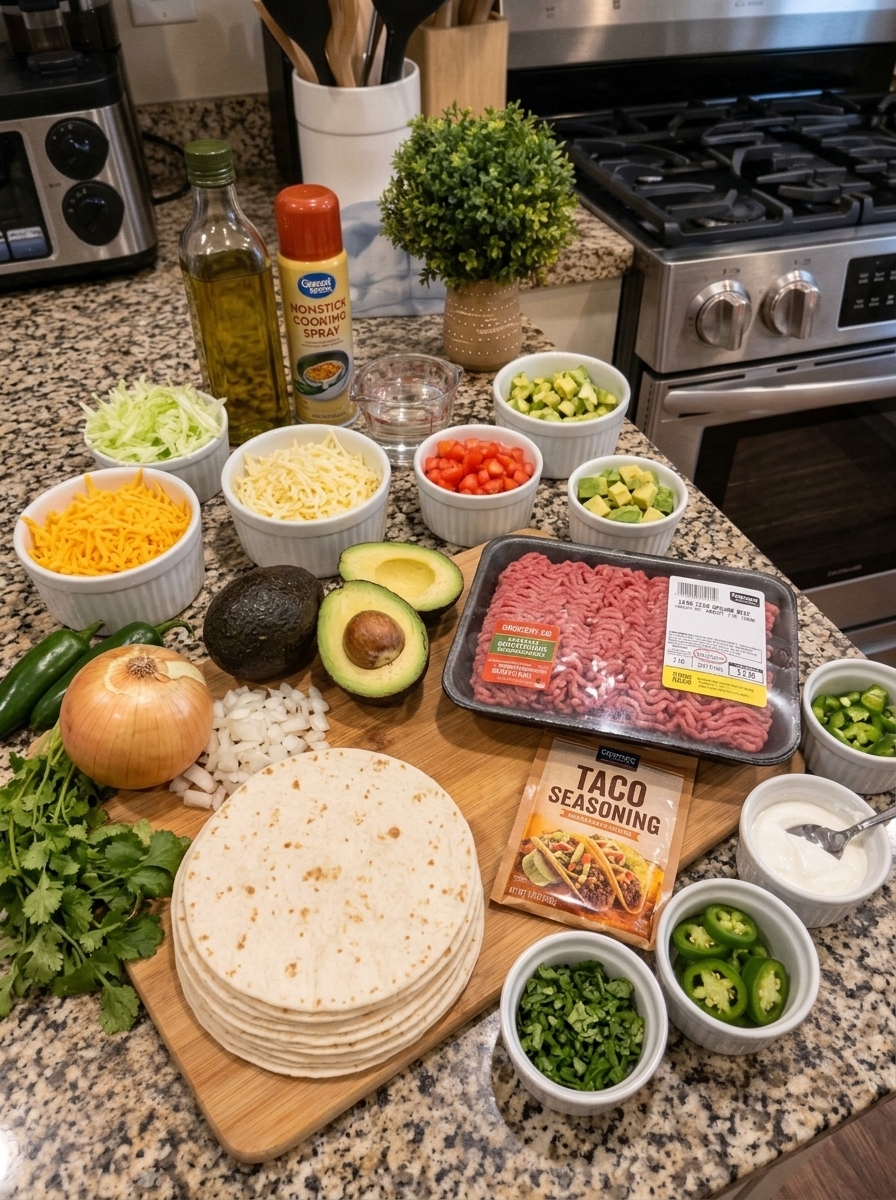
Here’s everything you need to make 12 taco cups, plus a few notes on each ingredient.
For the Tortilla Cups
- 12 small flour tortillas (6-inch): Soft taco-size tortillas work best because they bend easily without cracking.
- Nonstick cooking spray: This keeps the cups from sticking and helps the edges crisp and brown.
For the Beef Filling
- 1 lb (450 g) lean ground beef: Lean beef means less grease and a filling that doesn’t soak the tortilla.
- 1 small yellow onion, finely chopped: The onion adds sweetness and depth.
- 2 tablespoons olive oil: For sautéing the onion and starting the beef.
- 1 packet (28 g) taco seasoning: Use your favorite store-bought packet or homemade taco seasoning.
- ¼ cup (60 ml) water: This helps the seasoning turn into a light, flavorful sauce.
For the Cheese Layer
- 1 cup (100 g) shredded cheddar cheese
- ½ cup (50 g) shredded Monterey Jack cheese
For the Toppings
- 1 cup shredded lettuce
- 1 cup diced tomatoes
- ½ cup sour cream
- ¼ cup diced avocado (optional)
- 2 tablespoons chopped fresh cilantro
- 2 tablespoons sliced jalapeños (optional)
Pro tip: Shred your own cheese from a block when you have time. Pre-shredded cheese is coated with anti-caking agents, so it melts a little less smoothly, but the bagged kind still works well and saves time on busy nights.
Equipment Checklist
You don’t need anything fancy:
- A standard 12-cup muffin pan
- A large skillet
- A sharp knife or kitchen scissors
- A cutting board
- A wooden spoon or spatula for breaking up the beef
- A small spoon or offset spatula for lifting the finished cups
How to Make Easy Cheesy Beef Taco Cups (Step by Step)
Step 1: Prepare the Oven and Muffin Pan
Preheat your oven to 375°F (190°C). Lightly coat a 12-cup muffin pan with nonstick cooking spray, making sure to get the sides of each well. Set the pan aside.
Step 2: Warm and Shape the Tortillas
Warm the tortillas in the microwave for 15–20 seconds, just until they’re soft and pliable. Warming matters because cold tortillas crack when you press them into the pan.
Cut each tortilla into 4 smaller squares or circles, large enough to line the muffin wells. Press the pieces into each cup, overlapping the edges slightly so there are no gaps. You’re building a sturdy little shell, so press down firmly and let the edges ruffle up naturally for that restaurant-style look.
Step 3: Pre-Bake the Tortilla Cups
Bake the empty shells for 8–10 minutes, until lightly golden and beginning to crisp. Remove the pan from the oven and set it aside while you make the filling. Leave the oven on.
This step is what keeps the cups crunchy rather than chewy once the filling goes in.
Step 4: Cook the Beef and Onion
Heat the olive oil in a large skillet over medium-high heat. Add the chopped onion and cook for 2–3 minutes, until softened and fragrant.
Add the ground beef and cook for 6–8 minutes, breaking it into small crumbles with a spoon, until it’s browned and fully cooked through. Small crumbles are important here because they fit neatly into the cups and are easy to eat in a bite or two. Drain any excess grease if needed.
Step 5: Season the Beef Filling
Stir in the taco seasoning and water, mixing until the beef is evenly coated. Reduce the heat to medium and simmer for 3–4 minutes, stirring occasionally, until the sauce thickens slightly and the beef looks juicy and flavorful.
You want a moist, saucy filling, not a wet one. If it looks too loose, let it simmer another minute or two.
Step 6: Fill the Tortilla Cups
Spoon the seasoned beef evenly into the pre-baked shells. Divide the cheddar and Monterey Jack over the beef, making sure every cup gets a generous layer, including the edges so the cheese melts into the beef.
Step 7: Bake Until Cheesy
Return the muffin pan to the oven and bake for 5–8 minutes, until the cheese is completely melted and bubbly and the tortilla edges are golden and crispy. Keep an eye on them near the end, since thin tortilla edges can brown quickly.
Step 8: Prepare the Fresh Toppings
While the cups finish baking, shred the lettuce, dice the tomatoes and avocado, and chop the cilantro. Keep the sour cream and jalapeños ready for serving.
Step 9: Add the Toppings
Remove the taco cups from the oven and let them cool in the pan for 2–3 minutes. This short rest helps them firm up so they’re easier to lift out. Top each cup with shredded lettuce, diced tomatoes, avocado, and cilantro.
Step 10: Finish and Serve
Add a dollop of sour cream to each cup and garnish with sliced jalapeños if you like some heat. Carefully lift the taco cups from the pan with a small spoon or spatula. Serve them warm while the shells are still crispy and the cheese is melted.
Tips for Perfectly Crispy Taco Cups Every Time
Even simple recipes have a few tricks that make a big difference. Here’s what I recommend for the best results:
Don’t skip the pre-bake. It’s the single biggest factor in avoiding soggy bottoms.
Use cooking spray generously. A light, even coat on the muffin pan helps the tortillas brown and release cleanly.
Drain the beef well. Extra grease can seep into the tortilla and soften it. If your beef is a bit fattier, blot the cooked meat with a paper towel-lined plate before adding the seasoning.
Don’t overfill. It’s tempting to pile on the beef, but too much filling can make the cups hard to lift and cause the cheese to spill over the sides. A heaping tablespoon or two is plenty.
Let them rest briefly. Two to three minutes in the pan lets the cheese set slightly and the shells firm up, so they come out in one piece.
Add cold toppings last. Lettuce, tomatoes, and sour cream should always go on after baking. Heat will wilt the lettuce and turn the sour cream runny.
Use a spoon to lift them out. Slide a small spoon or offset spatula under each cup and gently pop it out. Avoid pulling on the edges, which can tear.
Fun Variations to Try
Once you’ve made the classic version, these cups are easy to customize. Here are some of my favorite ways to switch things up.
Swap the Protein
- Ground turkey or chicken: A lighter option that takes taco seasoning beautifully.
- Shredded chicken: Great for using up rotisserie chicken. Toss it with a little taco seasoning and a splash of water.
- Chorizo: For a smoky, spicy twist, mix half chorizo and half beef.
- Plant-based crumbles or black beans: A great vegetarian version. Season them the same way.
Change the Cheese
- Pepper Jack: Adds a gentle heat and creamy melt.
- Mexican cheese blend: A convenient all-in-one option.
- Queso fresco or cotija: Crumble on top after baking for a salty, fresh finish.
Add Extra Layers
- Refried beans: Spread a teaspoon in the bottom of each shell before adding the beef.
- Corn or black beans: Stir into the beef for extra texture and fiber.
- Rice: A spoonful of cilantro-lime rice turns these into mini burrito bowls.
Upgrade the Toppings
- Guacamole instead of diced avocado: Creamy and rich.
- Pico de gallo or fresh salsa: Brighter and juicier than plain tomatoes.
- Pickled red onions: A tangy, colorful topping.
- Hot sauce, chipotle crema, or taco sauce: Drizzle on right before serving.
- Crushed tortilla chips: For extra crunch.
Make Them Mini
Use a mini muffin pan and cut the tortillas into smaller circles to make bite-sized taco cups. They bake faster, about 5 to 6 minutes for the pre-bake, which makes them perfect for party platters.
What to Serve With Taco Cups
These cups are filling on their own, but if you’re serving them as a full dinner, a few simple sides round things out:
- Mexican street corn salad or grilled corn on the cob
- Cilantro-lime rice or Spanish rice
- Black bean and corn salsa with tortilla chips
- Chips and guacamole
- A crisp green salad with lime vinaigrette
- Refried beans or charro beans
- Fresh fruit, like watermelon or mango, for a cool, sweet contrast
For drinks, think lime-based. Margaritas, agua fresca, limeade, or an ice-cold Mexican lager all pair well. For a kid-friendly option, sparkling water with lime or a fruit punch works nicely.
Make-Ahead, Storage, and Reheating Tips
One of the best things about taco cups is how flexible they are for planning ahead.
Make-Ahead Instructions
- Beef filling: Cook and season the beef up to 3 days ahead. Store it in an airtight container in the refrigerator, then reheat before filling.
- Tortilla shells: Pre-bake the shells, cool them completely, and store them in an airtight container at room temperature for up to 1 day. Re-crisp them in the oven for 2 to 3 minutes before filling.
- Toppings: Chop the lettuce, tomatoes, and cilantro in advance and store them separately in the fridge. Add the avocado right before serving so it doesn’t brown.
Storing Leftovers
Store leftover taco cups (without fresh toppings) in an airtight container in the refrigerator for up to 3 days. Keep any cold toppings in separate containers.
Reheating
For the crispiest results, reheat in a 350°F (175°C) oven or air fryer for 5 to 8 minutes, until warmed through and the edges are crisp again. The microwave will heat them quickly, but the shells will soften.
Freezing
You can freeze the cooked beef filling for up to 3 months. Thaw overnight in the refrigerator before using. For best texture, I don’t recommend freezing fully assembled cups, since the tortillas can lose their crunch.
Nutrition and Healthy Swaps
Taco cups are a satisfying, portion-controlled meal, and it’s easy to adjust them to fit your needs. If you’d like a lighter version, here are some easy swaps:
- Use ground turkey or chicken instead of beef.
- Choose reduced-fat cheese or use a little less.
- Swap sour cream for plain Greek yogurt, which adds protein and a similar tang.
- Use whole wheat or low-carb tortillas.
- Load up on extra vegetables, like diced bell peppers, corn, or spinach, in the filling.
- Bump up the avocado for healthy fats and creaminess.
Nutritional values will vary depending on the brands and ingredients you choose, so use a nutrition calculator if you need exact numbers.
Common Mistakes to Avoid
- Skipping the pre-bake: This leads to soft, floppy shells.
- Using cold tortillas: They crack when pressed into the pan.
- Not draining the beef: Excess grease makes the cups soggy.
- Overbaking the second time: The edges are thin and can burn quickly, so watch them closely.
- Adding toppings before baking: Fresh toppings wilt in the oven.
- Pulling cups out too soon: Without a brief rest, they may fall apart.
Frequently Asked Questions
Can I make taco cups without a muffin pan?
A muffin pan gives the best shape, but you can also drape tortillas over the back of an upside-down muffin tin or place them in oven-safe ramekins. The shape will be slightly different, but they’ll still crisp up nicely.
Can I use corn tortillas instead of flour?
Yes, but corn tortillas are more brittle. Warm them well, brush them lightly with oil, and handle them gently. Flour tortillas are easier to shape and give you a sturdier cup.
Why are my taco cups soggy?
The most common reasons are skipping the pre-bake, not draining the beef, or using a filling that’s too wet. Simmer the beef until the sauce thickens, and make sure the shells are lightly golden before filling.
Can I make these ahead for a party?
Absolutely. Make the beef and shells ahead, then fill and bake just before guests arrive. You can also fill and bake them early and reheat in a 350°F oven for a few minutes to re-crisp.
Are taco cups good for kids?
Yes. The individual portions are easy for little hands, and you can customize toppings for picky eaters. Keep the jalapeños optional and offer plain cheese and beef cups for the youngest guests.
Can I make taco cups in an air fryer?
You can. Use silicone or foil muffin liners in the air fryer basket and bake at 350°F (175°C), checking at 4 to 5 minutes for the pre-bake and again after adding the filling. Cooking times vary by model.
How many taco cups does this recipe make?
This recipe makes 12 taco cups, which usually serves 4 as a main meal (3 each) or 6 to 8 as an appetizer.
What taco seasoning is best?
Use any taco seasoning you like, whether it’s store-bought or homemade. If you’re watching sodium, a homemade blend of chili powder, cumin, paprika, garlic powder, onion powder, oregano, and a little salt lets you control the salt level.
Final Thoughts: Your New Go-To Taco Night Upgrade
These Easy Cheesy Beef Taco Cups are everything a great weeknight recipe should be: simple, flavorful, budget-friendly, and fun to eat. The crispy golden tortilla shells, juicy seasoned beef, and melted cheese are balanced by the fresh crunch of lettuce, the brightness of tomatoes, and the cool creaminess of sour cream and avocado.
They’re just as welcome at a Tuesday family dinner as they are at a Sunday football party. Make a batch, set out the toppings, and watch them disappear. Once you’ve tried them, you’ll probably want to keep this recipe on repeat.
Print
Easy Cheesy Beef Taco Cups
Ingredients
Here’s everything you need to make 12 taco cups, plus a few notes on each ingredient.
For the Tortilla Cups
- 12 small flour tortillas (6-inch): Soft taco-size tortillas work best because they bend easily without cracking.
- Nonstick cooking spray: This keeps the cups from sticking and helps the edges crisp and brown.
For the Beef Filling
- 1 lb (450 g) lean ground beef: Lean beef means less grease and a filling that doesn’t soak the tortilla.
- 1 small yellow onion, finely chopped: The onion adds sweetness and depth.
- 2 tablespoons olive oil: For sautéing the onion and starting the beef.
- 1 packet (28 g) taco seasoning: Use your favorite store-bought packet or homemade taco seasoning.
- ¼ cup (60 ml) water: This helps the seasoning turn into a light, flavorful sauce.
Instructions
Preheat your oven to 375°F (190°C). Lightly coat a 12-cup muffin pan with nonstick cooking spray, making sure to get the sides of each well. Set the pan aside.
Warm the tortillas in the microwave for 15–20 seconds, just until they’re soft and pliable. Warming matters because cold tortillas crack when you press them into the pan.
Cut each tortilla into 4 smaller squares or circles, large enough to line the muffin wells. Press the pieces into each cup, overlapping the edges slightly so there are no gaps. You’re building a sturdy little shell, so press down firmly and let the edges ruffle up naturally for that restaurant-style look.
Bake the empty shells for 8–10 minutes, until lightly golden and beginning to crisp. Remove the pan from the oven and set it aside while you make the filling. Leave the oven on.
This step is what keeps the cups crunchy rather than chewy once the filling goes in.
Heat the olive oil in a large skillet over medium-high heat. Add the chopped onion and cook for 2–3 minutes, until softened and fragrant.
Add the ground beef and cook for 6–8 minutes, breaking it into small crumbles with a spoon, until it’s browned and fully cooked through. Small crumbles are important here because they fit neatly into the cups and are easy to eat in a bite or two. Drain any excess grease if needed.
Stir in the taco seasoning and water, mixing until the beef is evenly coated. Reduce the heat to medium and simmer for 3–4 minutes, stirring occasionally, until the sauce thickens slightly and the beef looks juicy and flavorful.
You want a moist, saucy filling, not a wet one. If it looks too loose, let it simmer another minute or two.
Spoon the seasoned beef evenly into the pre-baked shells. Divide the cheddar and Monterey Jack over the beef, making sure every cup gets a generous layer, including the edges so the cheese melts into the beef.
Return the muffin pan to the oven and bake for 5–8 minutes, until the cheese is completely melted and bubbly and the tortilla edges are golden and crispy. Keep an eye on them near the end, since thin tortilla edges can brown quickly.
While the cups finish baking, shred the lettuce, dice the tomatoes and avocado, and chop the cilantro. Keep the sour cream and jalapeños ready for serving.
Remove the taco cups from the oven and let them cool in the pan for 2–3 minutes. This short rest helps them firm up so they’re easier to lift out. Top each cup with shredded lettuce, diced tomatoes, avocado, and cilantro.
Add a dollop of sour cream to each cup and garnish with sliced jalapeños if you like some heat. Carefully lift the taco cups from the pan with a small spoon or spatula. Serve them warm while the shells are still crispy and the cheese is melted.