Easy No-Knead Homemade Pita Bread: Soft, Puffy Pockets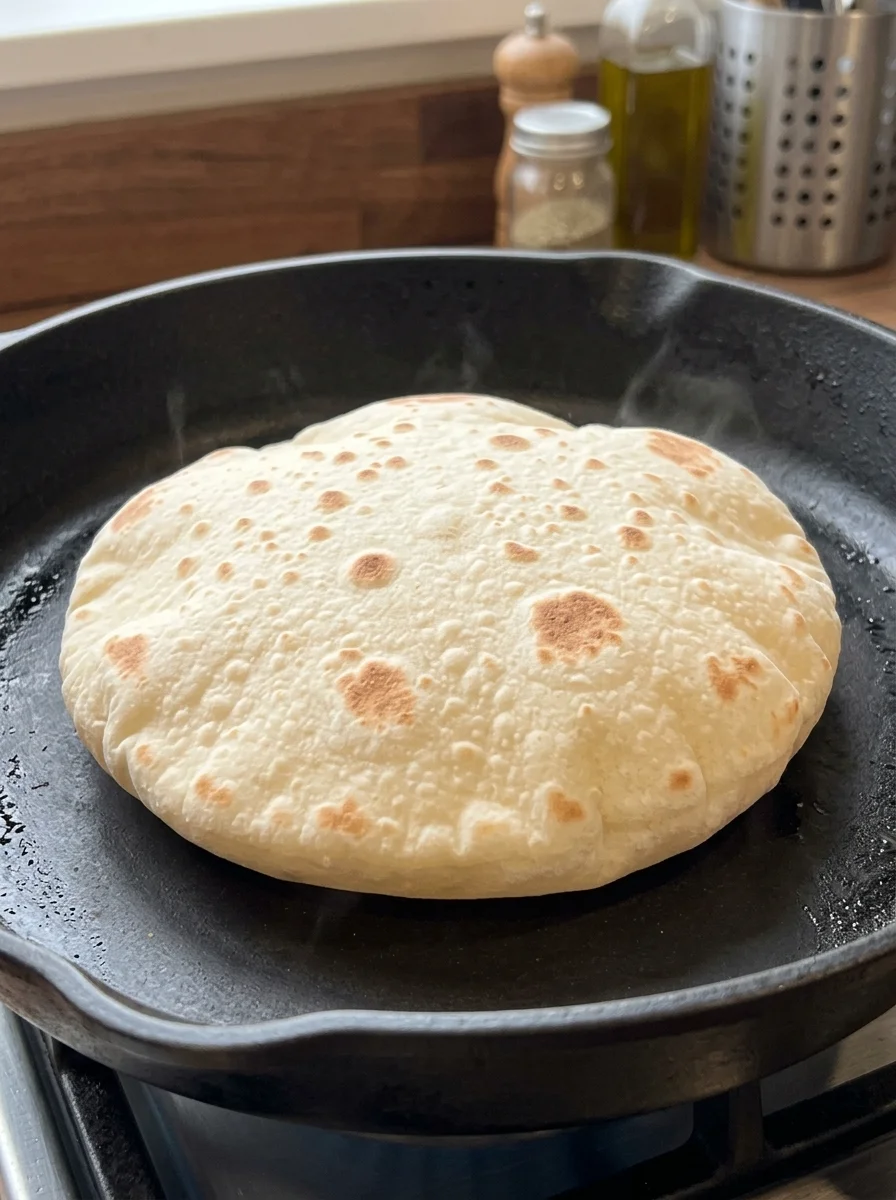
· @oussama
Soft, fluffy homemade pita bread with golden spots and a pocket perfect for stuffing with your favorite fillings is easier to make than you might think. This no-knead pita bread recipe uses simple pantry ingredients, needs no stand mixer and cooks quickly in a hot skillet or oven.
The dough is just flour, warm water, yeast, olive oil, sugar and salt. You stir it together in one bowl, let it rise while you do something else, then roll it into rounds and cook each one in a few minutes. Watching a flat circle puff up into a hollow pocket is one of the most rewarding moments in home baking, and the bread tastes far fresher than anything from a bag.
Why you will love this no-knead pita bread
This recipe keeps the work low and the results high. Here is what makes it special.
- No kneading. A wooden spoon and a bowl are all you need. Time and a good rise do the work.
- Simple pantry ingredients. You likely already have everything in your kitchen.
- Soft and fluffy texture. The wetter dough bakes into a tender, pillowy bread with a gentle chew.
- Real pockets. When the dough is rolled evenly and the pan is hot, steam inflates each pita into a pocket.
- Fast cooking. Each pita cooks in about 1 to 2 minutes in a skillet.
- Two cooking methods. Use a skillet on the stove or a very hot oven.
- Freezer friendly. Make a batch and keep fresh pita ready for weeks.
What is pita bread?
Pita is a round, soft flatbread that is traditional across the Middle East and the Mediterranean. It is made from a simple yeast dough that is rolled thin and cooked quickly at a very high heat. The heat turns the water in the dough to steam, which pushes the top and bottom layers apart and forms the pocket. That pocket is what makes pita so handy for sandwiches and fillings, though the bread is equally good torn up for scooping dips.
How does a no-knead pita differ from a traditional one?
Traditional pita dough is kneaded for several minutes to develop gluten. In this version, the dough is a little wetter, and the long rise lets gluten develop without kneading. The texture is slightly softer and more rustic, and the dough is stickier to handle, so you roll it on a lightly floured surface. The cooking method and the puffing are the same.
What does homemade pita taste like?
Fresh pita tastes mild, slightly yeasty and lightly sweet, with a soft, chewy crumb and a few golden-brown blisters. Warm from the pan, it is tender and fragrant, and it goes well with nearly any dip, salad or grilled filling.
No-knead pita bread recipe details
This recipe makes 8 pita breads. Most of the time is hands-off rising.
- Prep time: 15 minutes
- Rise time: 60-90 minutes
- Cook time: 15-20 minutes
- Total time: approximately 1 hour 45 minutes
- Yield: 8 pita breads
Ingredients for no-knead pita bread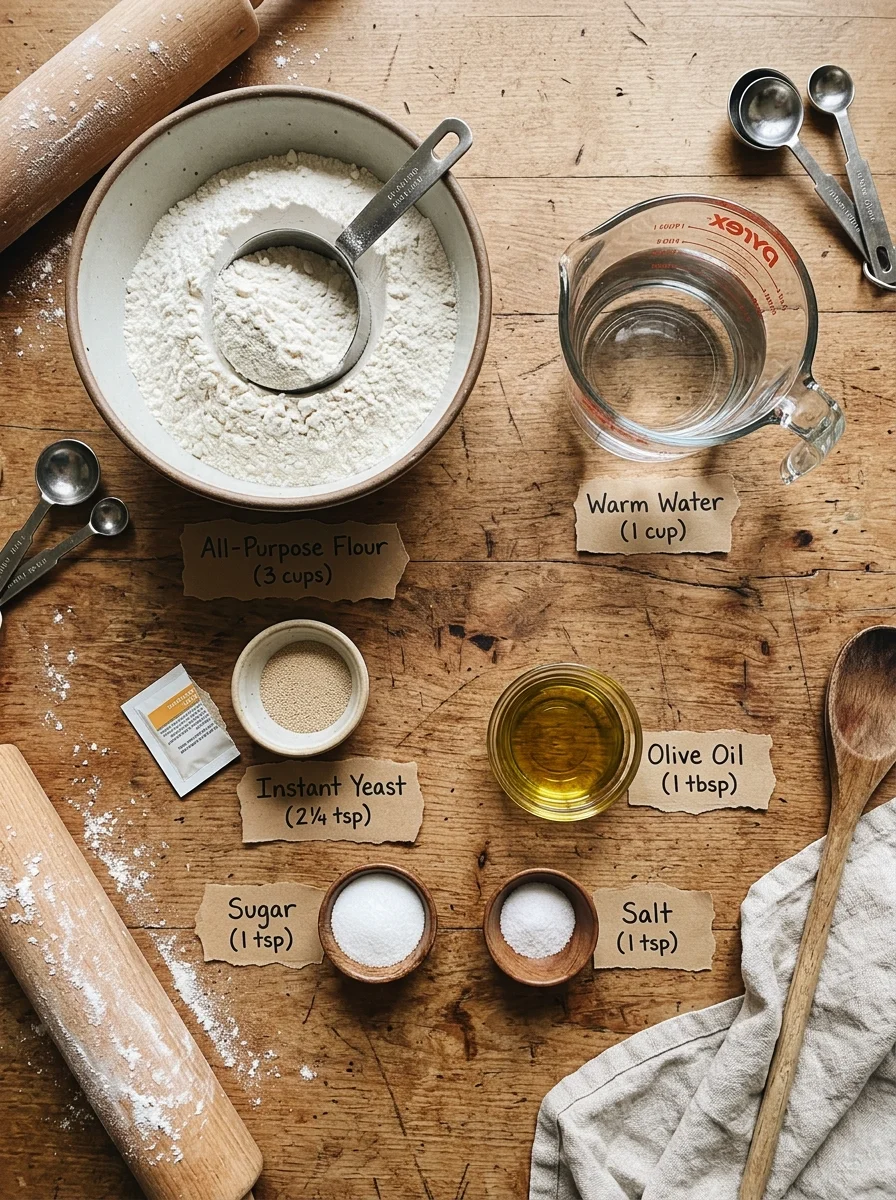
- 3 cups (375 g) all-purpose flour, plus extra for rolling
- 1 cup (240 ml) warm water
- 2¼ teaspoons (7 g) instant yeast
- 1 tablespoon olive oil
- 1 teaspoon sugar or honey
- 1 teaspoon salt
Equipment you will need
- Large mixing bowl and a wooden spoon
- Heavy skillet or cast-iron pan, or a baking stone or heavy baking tray
- Rolling pin
- Clean kitchen towel
- Kitchen scale or measuring cups
- Tongs or a spatula for flipping
How to make no-knead pita bread, step by step
Follow these four steps for soft, puffy pitas. Read through them once first, since the pan needs to be hot when the dough is ready.
Step 1: Mix the dough
- In a large bowl, combine the warm water, yeast and sugar. If you are using active dry yeast, let the mixture stand for 5-10 minutes until foamy.
- Add the flour, olive oil and salt.
- Stir with a wooden spoon until a rough, sticky dough forms and no dry flour remains.
- Cover the bowl with a clean kitchen towel or reusable cover.
- No kneading is necessary.
Step 2: Let the dough rise
- Leave the dough in a warm place for 60-90 minutes, or until approximately doubled in size.
- If your kitchen is cool, it may need a little longer.
Step 3: Divide and shape
- Lightly flour your work surface and transfer the dough onto it.
- Divide it into 8 equal pieces.
- Shape each piece into a ball and cover them for 10 minutes to relax the dough.
- Roll each ball into a circle about 6-7 inches (15-18 cm) wide and approximately ¼ inch (5-6 mm) thick.
- Try to keep the thickness even so the pita can puff properly.
Step 4: Cook in a skillet
- Heat a heavy skillet or cast-iron pan over medium-high heat until thoroughly hot. Do not add oil.
- Place one pita into the dry skillet.
- Cook for about 30-60 seconds, until bubbles begin to form and the underside develops light golden spots.
- Flip and cook for another 30-60 seconds.
- Flip once more if needed. The pita may inflate into a pocket as steam forms inside.
- Transfer to a clean kitchen towel and cover to keep it soft while you cook the remaining breads.
- Cooking times vary with the pan and stove. If the bread browns too quickly before puffing, reduce the heat slightly.
Alternative: Oven method
- Preheat the oven to 475°F (245°C), with a heavy baking tray or baking stone inside.
- Carefully place the rolled pita rounds on the hot surface.
- Bake for approximately 2-4 minutes, until puffed.
- Remove promptly and wrap in a clean towel.
Skillet or oven: which is better?
- Skillet: Best for small batches and for watching the pita puff. It gives light golden spots and takes only minutes per pita.
- Oven: Best for baking several pitas at once. A preheated stone or tray gives strong, even heat.
- Safety: Both methods involve very high heat. Use tongs and oven mitts, and keep your face back when you open the oven.
Tips for soft, puffy pita
These small details make the difference between flat bread and puffy, soft pita.
- Use warm, not hot, water. Very hot water can damage the yeast, and cold water slows it down.
- Preheat the skillet thoroughly. A hot cooking surface helps create the steam needed for puffing.
- Roll evenly. Thick centers and thin edges can prevent an even pocket.
- Avoid excessive flour when rolling. Too much can dry the surface and affect puffing.
- Keep cooked pita covered. Stacking and covering the breads traps moisture and keeps them flexible.
- Do not worry if every pita does not puff completely. They will still taste delicious and work well as flatbreads.
- Handle the dough gently. Use just enough flour to prevent sticking, and keep the remaining balls covered while you work.
- Cook one at a time. This gives you control over the heat and the timing.
Ingredient notes and substitutions
- Flour. All-purpose flour gives a soft, tender pita. Bread flour gives a slightly chewier one. Both work well.
- Whole wheat. Replace up to half of the flour with whole wheat flour. Add a little extra water if the dough feels dry.
- Yeast. Instant yeast can be mixed straight in. If you use active dry yeast, use the same amount and let it foam in the warm water and sugar first.
- Olive oil. It adds softness and flavor. A neutral oil can replace it.
- Sugar or honey. A small amount feeds the yeast and helps browning.
- Salt. It adds flavor and strengthens the dough. Do not skip it.
- Water. Use warm water, about 100-110°F (38-43°C).
Pita bread troubleshooting
- Pitas did not puff: The dough was rolled too thin or too thick, or the pan was not hot enough. Roll evenly and preheat thoroughly.
- Pitas are dry or crisp: They were overcooked or left uncovered. Cook for less time and cover with a towel right away.
- Pitas are tough: Too much flour was added or the dough did not rise enough. Keep the dough soft and let it double.
- Dough did not rise: The yeast may be old, or the water was too hot or too cold. Check the expiry date and use warm water.
- Dough is too sticky to roll: That is normal for a no-knead dough. Flour your hands and surface lightly, and chill the dough for 10 minutes if needed.
- Dough shrinks when rolling: It needs to rest. Cover the balls for 10 more minutes and try again.
- Pitas are pale: The pan was not hot enough. Increase the heat slightly.
- Pitas burn quickly: The heat is too high. Lower it a little.
Variations
Once you have the base dough down, try one of these easy changes.
- Whole-wheat pita. Replace up to half of the all-purpose flour with whole-wheat flour. Add a little extra water if the dough feels dry.
- Garlic herb pita. Brush warm pita with olive oil mixed with minced garlic and chopped parsley.
- Soft buttery pita. Brush with melted butter immediately after cooking.
- Za’atar pita. Brush lightly with olive oil and sprinkle with za’atar after cooking.
- Mini pita. Divide the dough into 12 pieces and roll them slightly smaller, keeping the thickness even.
- Seeded pita. Press sesame or nigella seeds into the surface before cooking.
- Pita chips. Cut the pitas into wedges, toss them with oil and salt, and bake at 350°F (180°C) for 8-12 minutes until crisp.
Serving ideas
Serve your homemade pita with:
- Hummus, baba ganoush or tzatziki
- Falafel and fresh vegetables
- Grilled chicken, lamb or beef
- Mediterranean salads and feta
- Shakshuka or scrambled eggs
- Olive oil and za’atar for dipping
Slice each pita in half and gently open the pocket once cooled slightly, then fill with your favorite ingredients.
Storage and reheating
- Room temperature: Store cooled pita in an airtight bag for up to 2 days.
- Refrigerator: Store airtight for up to 4-5 days, though refrigeration may make the bread firmer.
- Freezer: Freeze in a sealed freezer-safe bag for up to 3 months, separating the breads with parchment if desired.
- Reheat: Warm briefly in a dry skillet, or wrap in a slightly damp paper towel and microwave for 10-20 seconds.
Make-ahead tips
- Refrigerate the dough. After mixing, cover and refrigerate overnight. Let it come to room temperature for about 30 minutes before dividing and rolling.
- Freeze the dough balls. Freeze the shaped balls on a tray, then move them to a bag. Thaw in the fridge overnight before rolling.
- Cook in batches. Roll and cook as many as you need, since fresh pita is best the same day.
- Freeze cooked pitas. Cool them completely so you can take out one at a time.
No-knead pita bread FAQ
Can I really make pita without kneading? Yes. A wetter dough with a good rise develops gluten on its own, so you can mix it with a spoon. The pitas will be soft, though slightly more rustic than a kneaded version.
Why did my pita not puff up? The common causes are uneven rolling, dough rolled too thin or too thick, or a pan that is not hot enough. Roll evenly to about ¼ inch and preheat the pan thoroughly.
Do I need a cast-iron pan? No. Any heavy skillet works, or you can use a preheated baking stone or tray in the oven.
Can I use active dry yeast instead of instant? Yes. Use the same amount and let it foam in the warm water and sugar for 5-10 minutes before adding the flour.
Can I use bread flour? Yes. Bread flour makes a slightly chewier pita. You may need a little more water if the dough feels stiff.
Why is my dough so sticky? That is normal for a no-knead dough. Flour your hands and surface lightly, and avoid adding too much flour.
Can I make the dough ahead of time? Yes. Refrigerate it overnight after mixing, then let it warm up for 30 minutes before dividing and rolling.
How do I keep pita soft? Cover cooked pitas with a clean towel right away. The trapped steam keeps them soft and flexible.
Can I freeze pita bread? Yes. Freeze cooled pitas in a sealed bag for up to 3 months, and reheat in a skillet or microwave.
Is this pita bread vegan? The recipe has no eggs or dairy, so it is vegan as written. If you use honey, swap it for sugar.
Can I make it whole wheat? Yes. Replace up to half of the flour with whole wheat flour, and add a little extra water if the dough feels dry.
Final thoughts
This easy no-knead homemade pita bread gives you soft, warm pitas with a tender texture, lightly golden spots and, when the conditions are right, a beautiful hollow pocket. It is perfect for everyday wraps, Mediterranean meals, dipping and meal prep.
Stir the dough, let it rise, roll and cook. Homemade pita tastes best warm, straight from the skillet.
Print
Easy No-Knead Homemade Pita Bread
Ingredients
- 3 cups (375 g) all-purpose flour, plus extra for rolling
- 1 cup (240 ml) warm water
- 2¼ teaspoons (7 g) instant yeast
- 1 tablespoon olive oil
- 1 teaspoon sugar or honey
- 1 teaspoon salt
Equipment you will need
- Large mixing bowl and a wooden spoon
- Heavy skillet or cast-iron pan, or a baking stone or heavy baking tray
- Rolling pin
- Clean kitchen towel
- Kitchen scale or measuring cups
- Tongs or a spatula for flipping
Instructions
Follow these four steps for soft, puffy pitas. Read through them once first, since the pan needs to be hot when the dough is ready.
Step 1: Mix the dough
- In a large bowl, combine the warm water, yeast and sugar. If you are using active dry yeast, let the mixture stand for 5-10 minutes until foamy.
- Add the flour, olive oil and salt.
- Stir with a wooden spoon until a rough, sticky dough forms and no dry flour remains.
- Cover the bowl with a clean kitchen towel or reusable cover.
- No kneading is necessary.
Step 2: Let the dough rise
- Leave the dough in a warm place for 60-90 minutes, or until approximately doubled in size.
- If your kitchen is cool, it may need a little longer.
Step 3: Divide and shape
- Lightly flour your work surface and transfer the dough onto it.
- Divide it into 8 equal pieces.
- Shape each piece into a ball and cover them for 10 minutes to relax the dough.
- Roll each ball into a circle about 6-7 inches (15-18 cm) wide and approximately ¼ inch (5-6 mm) thick.
- Try to keep the thickness even so the pita can puff properly.
Step 4: Cook in a skillet
- Heat a heavy skillet or cast-iron pan over medium-high heat until thoroughly hot. Do not add oil.
- Place one pita into the dry skillet.
- Cook for about 30-60 seconds, until bubbles begin to form and the underside develops light golden spots.
- Flip and cook for another 30-60 seconds.
- Flip once more if needed. The pita may inflate into a pocket as steam forms inside.
- Transfer to a clean kitchen towel and cover to keep it soft while you cook the remaining breads.
- Cooking times vary with the pan and stove. If the bread browns too quickly before puffing, reduce the heat slightly.
Alternative: Oven method
- Preheat the oven to 475°F (245°C), with a heavy baking tray or baking stone inside.
- Carefully place the rolled pita rounds on the hot surface.
- Bake for approximately 2-4 minutes, until puffed.
- Remove promptly and wrap in a clean towel.