Quinoa Chickpea Bread (Gluten-Free): A Hearty, Tender Loaf Made with Simple Ingredients
SEO title: Quinoa Chickpea Bread (Gluten-Free, 7 Ingredients) | Easy High-Protein Loaf
Meta description: This gluten-free quinoa chickpea bread is hearty, tender, and made with just 7 simple ingredients. Learn how to make it, plus tips, variations, storage, and FAQs.
Primary keyword: quinoa chickpea bread
Secondary keywords: gluten-free bread recipe, high-protein bread, chickpea bread, quinoa bread, flourless bread, gluten-free sandwich bread, healthy homemade bread
If you have been searching for a gluten-free bread that is more than a dry, crumbly substitute, this quinoa chickpea bread deserves a spot in your kitchen. It is hearty, tender, and lightly nutty, and it is made without any flour. The base is just soaked quinoa and chickpeas blended into a smooth batter, then baked into a sturdy, sliceable loaf.
The recipe uses only seven everyday ingredients and comes together with a blender, a loaf pan, and a little planning ahead. It is a good fit for gluten-free breakfasts, sandwiches, meal prep, and serving alongside soups and salads.
In this guide you will find the full recipe, the reasoning behind each step, troubleshooting tips, flavor variations, storage advice, and answers to common questions. Whether you are gluten-free for medical reasons, cooking for someone who is, or just want to try a different kind of homemade bread, this loaf is worth making.
Why You Will Love This Quinoa Chickpea Bread
Most gluten-free breads rely on long lists of starches and gums. This one keeps things simple and lets whole foods do the work.
- Naturally gluten-free. There is no wheat, barley, or rye. The structure comes from quinoa, chickpeas, and eggs.
- Only 7 ingredients. Chickpeas, quinoa, water, eggs, olive oil, baking powder, and salt.
- Flourless. You do not need to buy or mix specialty gluten-free flour blends.
- Protein-rich. Chickpeas, quinoa, and eggs each contribute protein, so a slice is more filling than a typical white loaf.
- Tender and sliceable. Soaking and thorough blending give a smooth crumb that holds up to toasting and sandwich fillings.
- Versatile. Sweet or savory toppings both work.
- Freezer-friendly. Slice it, freeze it, and toast slices straight from the freezer for quick meals.
- Beginner-friendly. If you can operate a blender, you can make this bread. There is no kneading, proofing, or yeast.
What Does Quinoa Chickpea Bread Taste Like?
This loaf has a mild, slightly nutty flavor from the quinoa and a soft, earthy background note from the chickpeas. It does not taste like hummus or like a bowl of quinoa. Once baked and cooled, the flavors mellow into something closer to a hearty, wholesome sandwich bread.
The texture is moist and tender with a firm, sliceable crumb. It is denser than a fluffy white loaf, which is typical of flourless and gluten-free breads, but it should not be gummy or wet. Toasting improves it: the edges crisp up, the inside stays soft, and the flavor gets deeper and nuttier.
Ingredients You Will Need
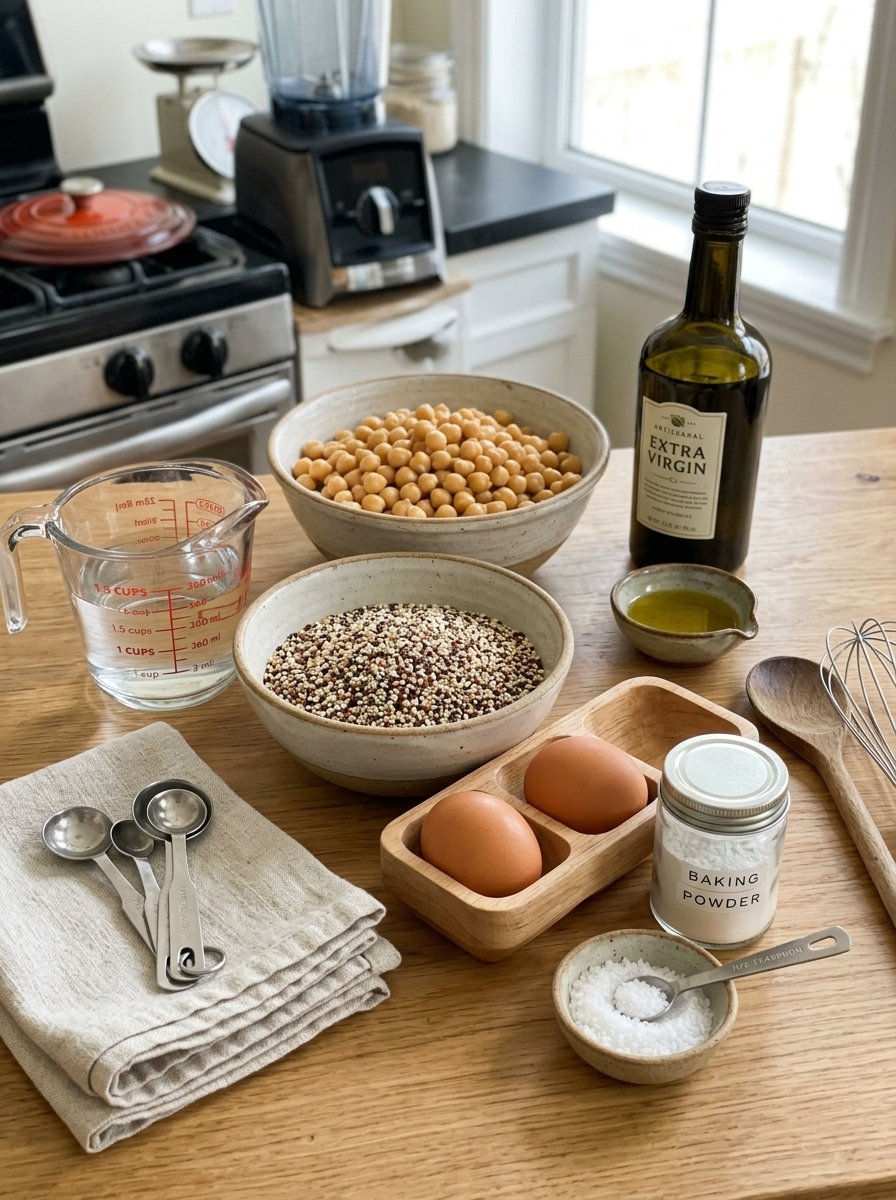
Everything here is simple and easy to find in most grocery stores.
- 1½ cups (250 g) cooked chickpeas, drained and rinsed. Canned or freshly cooked both work.
- 1 cup (170 g) uncooked quinoa. Any color works. White quinoa gives the mildest flavor and lightest crumb.
- 1½ cups (360 ml) water, plus more for soaking. The soaking water is discarded. The 360 ml goes into the batter.
- 2 large eggs. They bind the loaf and help it set.
- 2 tablespoons olive oil. This adds moisture and richness.
- 1 teaspoon baking powder. This gives a little lift.
- ½ teaspoon salt. This brings out the flavor of the grains and legumes.
Ingredient Notes
Quinoa. Quinoa naturally has a coating called saponin, which can taste bitter or soapy. Rinsing it thoroughly under cool running water before soaking removes most of it. Some packaged quinoa is pre-rinsed, but rinsing again is still a good habit.
Chickpeas. Canned chickpeas are the easiest option. Drain them well and rinse them until the water runs clear. If you cook your own, make sure they are completely tender and cooled so they blend smoothly.
Eggs. The eggs are essential to this version of the recipe because they bind the batter. Note that this makes the loaf vegetarian and plant-forward, but not vegan.
Gluten-free safety. Quinoa and chickpeas are naturally gluten-free, but cross-contamination can happen during processing. If you are baking for someone with celiac disease or a gluten sensitivity, look for products labeled gluten-free.
Equipment
- A high-speed blender (a food processor can work, but a blender gives a smoother batter)
- A large bowl for soaking
- A fine-mesh strainer for rinsing and draining
- An 8 × 4-inch loaf pan
- Parchment paper or oil for the pan
- A wire cooling rack
- A sharp serrated knife for slicing
How to Make Quinoa Chickpea Bread (Step by Step)
Time: about 15 minutes prep, 4–6 hours soaking, 50–60 minutes baking. Total roughly 5–7 hours, and most of that is hands-off.
Step 1: Rinse and Soak the Quinoa
Place the quinoa in a fine-mesh strainer and rinse it thoroughly under cool running water, moving it around with your hand. Transfer it to a bowl, cover it with plenty of water, and let it soak for 4 to 6 hours or overnight. Then drain it very well.
Soaking softens the quinoa so it blends into a smooth batter instead of leaving gritty bits in the finished loaf. It also helps remove any remaining bitterness. Soaking overnight is the easiest approach, since you can set it up before bed and bake the next morning.
Step 2: Prepare the Chickpeas
If you are using canned chickpeas, drain them and rinse them under cool water. Let them sit in the strainer for several minutes so excess water drains away. Too much moisture can make the batter loose and the bread gummy.
If you are using freshly cooked chickpeas, make sure they are fully tender and cooled before blending.
Step 3: Blend the Batter
Preheat your oven to 350°F (175°C). Add the drained quinoa, chickpeas, water, eggs, olive oil, baking powder, and salt to a high-speed blender.
Blend until the mixture is thick and mostly smooth, stopping to scrape down the sides as needed. Keep going until no large pieces of chickpea or quinoa remain. The batter should look thick and pourable, somewhere between pancake batter and cake batter.
The more thoroughly you blend, the better the texture of the finished bread. Underblended batter can lead to a coarser, grainier crumb.
Step 4: Prepare the Loaf Pan
Lightly grease an 8 × 4-inch loaf pan or line it with parchment paper. Parchment makes it much easier to lift the loaf out cleanly. Pour in the batter and smooth the top with a spatula.
Step 5: Bake
Bake for 50 to 60 minutes, until the top is lightly golden and the center feels firm to the touch. Insert a toothpick into the middle. It should come out mostly clean.
Ovens vary, so start checking around the 50-minute mark. If the top browns too quickly, loosely cover the loaf with foil for the last part of baking.
Step 6: Cool Completely Before Slicing
Let the bread cool in the pan for 10 to 15 minutes, then carefully transfer it to a wire rack. Allow it to cool completely before slicing.
This step matters. Gluten-free and flourless breads continue to set as they cool. If you cut into the loaf while it is still warm, the inside can seem gummy or fall apart. Patience gives you clean, even slices. Use a sharp serrated knife and a gentle sawing motion.
Tips for the Best Quinoa Chickpea Bread
- Rinse the quinoa thoroughly. This removes the natural bitter coating.
- Do not skip the soak. Soaking is what makes the loaf tender and smooth.
- Drain everything well. Excess water from the quinoa or chickpeas can make the bread dense and wet.
- Blend until very smooth. A high-speed blender makes a real difference here.
- Do not open the oven early. Let the loaf bake undisturbed for the first 40 minutes or so to help it set.
- Use the toothpick test. A mostly clean toothpick means it is done. Wet batter on the toothpick means it needs more time.
- Cool completely. This is the single best thing you can do for the texture.
- Toast your slices. Toasting improves flavor and gives a lightly crisp exterior.
Troubleshooting Common Problems
My bread is gummy in the middle. This usually means it was underbaked, sliced while warm, or the batter had too much moisture. Drain the chickpeas and quinoa more thoroughly next time, bake a few minutes longer, and let the loaf cool fully.
My bread is too dense. Flourless breads are naturally denser than wheat breads. Make sure your baking powder is fresh, and blend the batter until smooth so it traps air evenly.
The texture is grainy. The quinoa may not have soaked long enough, or the batter was not blended thoroughly. Soak for the full 4 to 6 hours and keep blending until there are no visible pieces.
The bread tastes bitter. Rinse the quinoa more thoroughly before soaking. Fresh water for soaking and a good drain afterward also help.
The top is browning too fast. Tent the loaf with foil for the last 15 to 20 minutes of baking.
The loaf stuck to the pan. Line the pan with parchment paper, leaving a little overhang so you can lift the bread out.
Variations and Flavor Ideas
The base recipe is simple, which makes it easy to customize. If you add anything, keep the amounts modest so the batter does not get too wet or too heavy.
- Herb and garlic. Add dried Italian herbs or a little garlic powder to the batter for a savory loaf that pairs well with soup.
- Seeded top. Sprinkle sesame seeds, sunflower seeds, or pumpkin seeds over the batter before baking for crunch.
- Everything seasoning. A light sprinkle on top gives a bagel-style flavor.
- Cheesy version. Fold in a small amount of grated hard cheese for extra savory flavor.
- Spiced. A pinch of cumin, paprika, or turmeric adds warmth and color.
Serving Ideas
This bread is flexible enough to use at any meal.
For breakfast:
- Toast a slice and top it with avocado and a fried or soft-boiled egg.
- Spread with cottage cheese and add sliced tomato and cracked pepper.
- Serve toasted with a scrambled egg on the side.
For lunch:
- Build a hearty sandwich with vegetables, cheese, chicken, or your favorite fillings.
- Make an open-faced sandwich with fresh vegetables and a savory spread.
- Top toasted slices with hummus, cucumber, and herbs.
For dinner:
- Serve warm or toasted alongside soup, salad, or roasted vegetables.
- Use it to scoop up stews and saucy dishes.
For snacks:
- Toast small slices and top with your favorite savory spread.
- Pair with cheese, olives, and sliced vegetables for a simple snack plate.
How to Store Quinoa Chickpea Bread
Refrigerator. Once the loaf is completely cool, store it in an airtight container or wrap it tightly. It keeps for 4 to 5 days in the refrigerator.
Freezer. For longer storage, slice the loaf first, then place the slices in a freezer-safe bag or container. They keep for 2 to 3 months. Slicing before freezing means you can take out only what you need.
Reheating. Thaw individual slices and warm them in a toaster, oven, or skillet. Toasting restores a pleasant texture and brings out the flavor. Because this loaf is moist, it tends to taste best toasted after refrigeration or freezing.
Is Quinoa Chickpea Bread Healthy?
This bread is built from whole-food ingredients rather than refined flours or starches, which is a big part of its appeal.
- Chickpeas provide plant protein, fiber, and a range of minerals.
- Quinoa is a seed that is naturally gluten-free and contains protein and fiber. It is often praised because it contains all nine essential amino acids.
- Eggs add protein and help bind the loaf.
- Olive oil contributes healthy monounsaturated fats.
Compared with many store-bought gluten-free loaves, which can be low in protein and long on additives, this recipe is short on ingredients and more filling per slice. Actual nutrition will vary based on the exact ingredients you use and how you slice the loaf. If you are following a specific medical diet or managing a condition, check with your doctor or a registered dietitian.
Frequently Asked Questions
Is this quinoa chickpea bread really gluten-free?
Yes. All the ingredients are naturally gluten-free. If you need to avoid gluten strictly, choose products labeled gluten-free to reduce the risk of cross-contamination.
Do I have to soak the quinoa?
Soaking is strongly recommended. It softens the quinoa so it blends into a smooth batter and produces a more tender loaf. Skipping it can leave the bread gritty.
Can I use canned chickpeas?
Yes. Just drain and rinse them well, then let them sit for a few minutes so excess liquid drains away.
Can I make this bread without a high-speed blender?
A food processor may work, but you may need to process longer and scrape the bowl often. A high-speed blender gives the smoothest results.
Can I make this bread vegan?
This recipe relies on eggs for binding, so as written it is not vegan. Egg replacements can behave differently in flourless batters, so results may vary and would need testing.
How do I know when the bread is done?
The top should be lightly golden, the center should feel firm, and a toothpick inserted into the middle should come out mostly clean.
Why do I need to let it cool completely?
The crumb continues to set as it cools. Slicing too early can make the bread seem gummy and cause it to crumble.
Can I freeze this bread?
Yes. Slice it, place the slices in a freezer-safe bag or container, and freeze for up to 2 to 3 months. Toast or warm slices as needed.
How many slices does one loaf make?
About 10 to 12 slices, depending on thickness.
Can I double the recipe?
You can bake two loaves at once in separate pans, or blend the batter in two batches if your blender is small. Avoid overfilling the blender.
Quick Recipe Card
Quinoa Chickpea Bread (Gluten-Free)
- Prep time: about 15 minutes
- Soaking time: 4–6 hours
- Cook time: 50–60 minutes
- Total time: about 5–7 hours
- Yield: 1 loaf, 10–12 slices
- Oven temperature: 350°F (175°C)
- Pan size: 8 × 4-inch loaf pan
Ingredients: 1½ cups (250 g) cooked chickpeas, drained and rinsed; 1 cup (170 g) uncooked quinoa; 1½ cups (360 ml) water, plus more for soaking; 2 large eggs; 2 tablespoons olive oil; 1 teaspoon baking powder; ½ teaspoon salt.
Instructions:
- Rinse the quinoa, then soak it in plenty of water for 4–6 hours or overnight. Drain well.
- Drain and rinse the chickpeas, then let them drain for several minutes.
- Preheat the oven to 350°F (175°C).
- Blend the quinoa, chickpeas, water, eggs, olive oil, baking powder, and salt until thick and very smooth.
- Pour into a greased or parchment-lined 8 × 4-inch loaf pan and smooth the top.
- Bake for 50–60 minutes, until golden on top and a toothpick comes out mostly clean. Tent with foil if it browns too quickly.
- Cool in the pan for 10–15 minutes, then transfer to a wire rack and cool completely before slicing.
Final Thoughts
Quinoa chickpea bread proves that gluten-free baking does not have to be complicated. With a handful of simple ingredients, a blender, and a bit of soaking time, you get a loaf that is hearty, tender, and satisfying. It works as toast, as a sandwich base, or as a side for a warm bowl of soup.
The keys to success are simple: rinse and soak the quinoa, drain everything well, blend until smooth, and let the loaf cool completely before slicing. Follow those steps and you will have a reliable, wholesome bread you can keep in the fridge or freezer all week.
If you make this recipe, try it toasted with your favorite toppings and see which combination becomes your go-to.
Print
Quinoa Chickpea Bread (Gluten-Free)
Ingredients
Everything here is simple and easy to find in most grocery stores.
- 1½ cups (250 g) cooked chickpeas, drained and rinsed. Canned or freshly cooked both work.
- 1 cup (170 g) uncooked quinoa. Any color works. White quinoa gives the mildest flavor and lightest crumb.
- 1½ cups (360 ml) water, plus more for soaking. The soaking water is discarded. The 360 ml goes into the batter.
- 2 large eggs. They bind the loaf and help it set.
- 2 tablespoons olive oil. This adds moisture and richness.
- 1 teaspoon baking powder. This gives a little lift.
- ½ teaspoon salt. This brings out the flavor of the grains and legumes.
Ingredient Notes
Quinoa. Quinoa naturally has a coating called saponin, which can taste bitter or soapy. Rinsing it thoroughly under cool running water before soaking removes most of it. Some packaged quinoa is pre-rinsed, but rinsing again is still a good habit.
Chickpeas. Canned chickpeas are the easiest option. Drain them well and rinse them until the water runs clear. If you cook your own, make sure they are completely tender and cooled so they blend smoothly.
Eggs. The eggs are essential to this version of the recipe because they bind the batter. Note that this makes the loaf vegetarian and plant-forward, but not vegan.
Gluten-free safety. Quinoa and chickpeas are naturally gluten-free, but cross-contamination can happen during processing. If you are baking for someone with celiac disease or a gluten sensitivity, look for products labeled gluten-free.
Instructions
Time: about 15 minutes prep, 4–6 hours soaking, 50–60 minutes baking. Total roughly 5–7 hours, and most of that is hands-off.
Place the quinoa in a fine-mesh strainer and rinse it thoroughly under cool running water, moving it around with your hand. Transfer it to a bowl, cover it with plenty of water, and let it soak for 4 to 6 hours or overnight. Then drain it very well.
Soaking softens the quinoa so it blends into a smooth batter instead of leaving gritty bits in the finished loaf. It also helps remove any remaining bitterness. Soaking overnight is the easiest approach, since you can set it up before bed and bake the next morning.
If you are using canned chickpeas, drain them and rinse them under cool water. Let them sit in the strainer for several minutes so excess water drains away. Too much moisture can make the batter loose and the bread gummy.
If you are using freshly cooked chickpeas, make sure they are fully tender and cooled before blending.
Preheat your oven to 350°F (175°C). Add the drained quinoa, chickpeas, water, eggs, olive oil, baking powder, and salt to a high-speed blender.
Blend until the mixture is thick and mostly smooth, stopping to scrape down the sides as needed. Keep going until no large pieces of chickpea or quinoa remain. The batter should look thick and pourable, somewhere between pancake batter and cake batter.
The more thoroughly you blend, the better the texture of the finished bread. Underblended batter can lead to a coarser, grainier crumb.
Lightly grease an 8 × 4-inch loaf pan or line it with parchment paper. Parchment makes it much easier to lift the loaf out cleanly. Pour in the batter and smooth the top with a spatula.
Bake for 50 to 60 minutes, until the top is lightly golden and the center feels firm to the touch. Insert a toothpick into the middle. It should come out mostly clean.
Ovens vary, so start checking around the 50-minute mark. If the top browns too quickly, loosely cover the loaf with foil for the last part of baking.
Let the bread cool in the pan for 10 to 15 minutes, then carefully transfer it to a wire rack. Allow it to cool completely before slicing.
This step matters. Gluten-free and flourless breads continue to set as they cool. If you cut into the loaf while it is still warm, the inside can seem gummy or fall apart. Patience gives you clean, even slices. Use a sharp serrated knife and a gentle sawing motion.