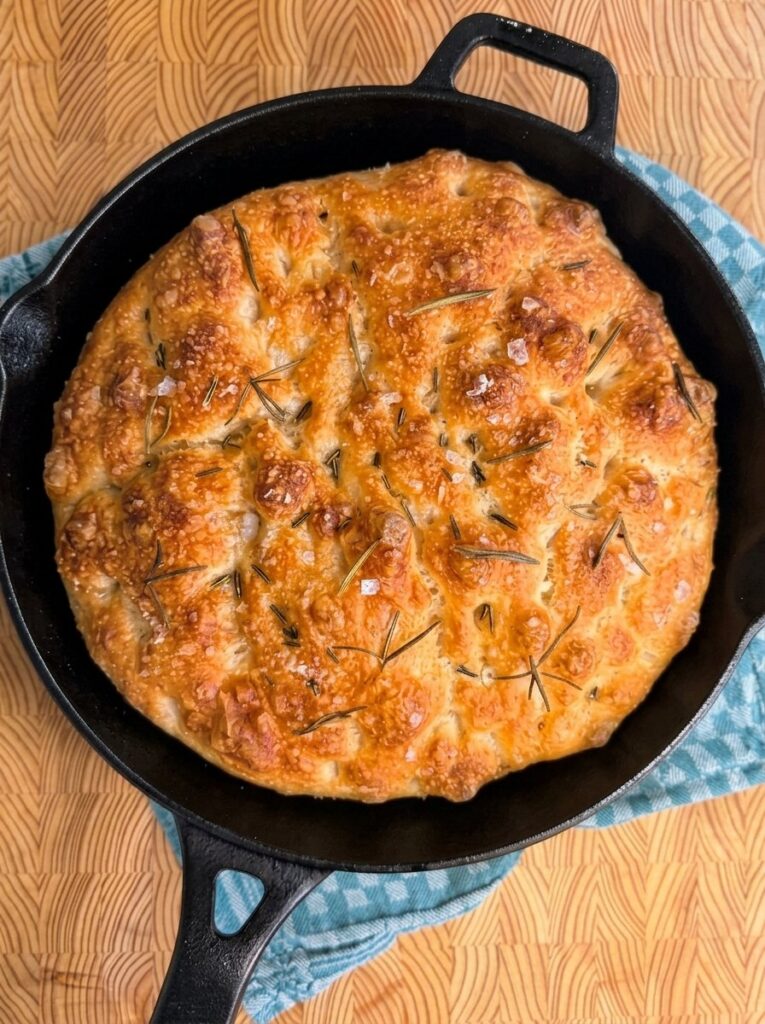
There is nothing quite like the smell of fresh bread baking in your kitchen, but most bread recipes ask for time, planning, and a lot of kneading. This same-day no-knead cast iron focaccia needs none of that. It is golden, crispy, airy, and wonderfully chewy, and you can go from a bowl of flour to a warm, olive-oil-kissed loaf in about two hours.
You stir a very wet dough, let it rise twice, dimple it generously, and bake it in a hot cast-iron skillet. The skillet gives the bottom and edges a crisp, almost fried crust, while the inside stays soft, open, and fluffy. A scattering of fresh rosemary on top makes the whole thing smell like an Italian bakery.
If you have ever wanted homemade bread but felt intimidated by kneading, proofing schedules, or overnight ferments, this recipe is for you.
Why You’ll Love This No-Knead Focaccia Recipe
Plenty of focaccia recipes exist, so here is what makes this one worth bookmarking:
- It’s truly same-day. No overnight rise, no cold fermentation, no planning ahead. Decide at 4 p.m. that you want fresh bread with dinner, and you can have it.
- No kneading at all. A wooden spoon or sturdy spatula is all you need. You mix until no dry patches remain, and the wet dough does the rest.
- Minimal ingredients. All-purpose flour, water, instant yeast, salt, olive oil, and rosemary. You probably have most of them already.
- The cast iron crust. A well-oiled cast-iron skillet holds and distributes heat so well that the bottom of the focaccia turns deeply golden and crisp.
- Versatile. Serve it as a side, an appetizer, a snack, or sliced open for sandwiches.
- Beginner-friendly. The dough is forgiving, and the main skill is resisting the urge to add extra flour.
What Is Focaccia?
Focaccia is a flat, oven-baked Italian bread known for its dimpled surface, generous olive oil, and soft, airy crumb. Unlike a sandwich loaf, which is tightly structured and sliced thin, focaccia is rustic and open, with a tender interior and a crisp, oil-rich crust. It is often topped with herbs such as rosemary, along with flaky salt, olives, tomatoes, or onions.
The dimples are not just decoration. Pressing your fingertips into the dough creates little wells that catch olive oil and give the bread its signature look and texture.
Why Bake Focaccia in a Cast Iron Skillet?
You can bake focaccia in a baking pan, but a cast-iron skillet offers real advantages:
- Even, strong heat. Cast iron holds heat well, which helps the bottom crust brown deeply.
- A crisp, fried-style base. With plenty of olive oil in the pan, the underside of the dough gets crunchy and golden, a bit like shallow-frying.
- Great edges. The sides of the skillet encourage a crisp, caramelized outer rim.
- Rustic presentation. A round focaccia straight from a cast-iron skillet looks beautiful on the table.
This recipe is written for a 10-inch skillet, which gives you a thick, pillowy focaccia that yields about 8 to 10 pieces.
Ingredients for Same-Day Cast Iron Focaccia
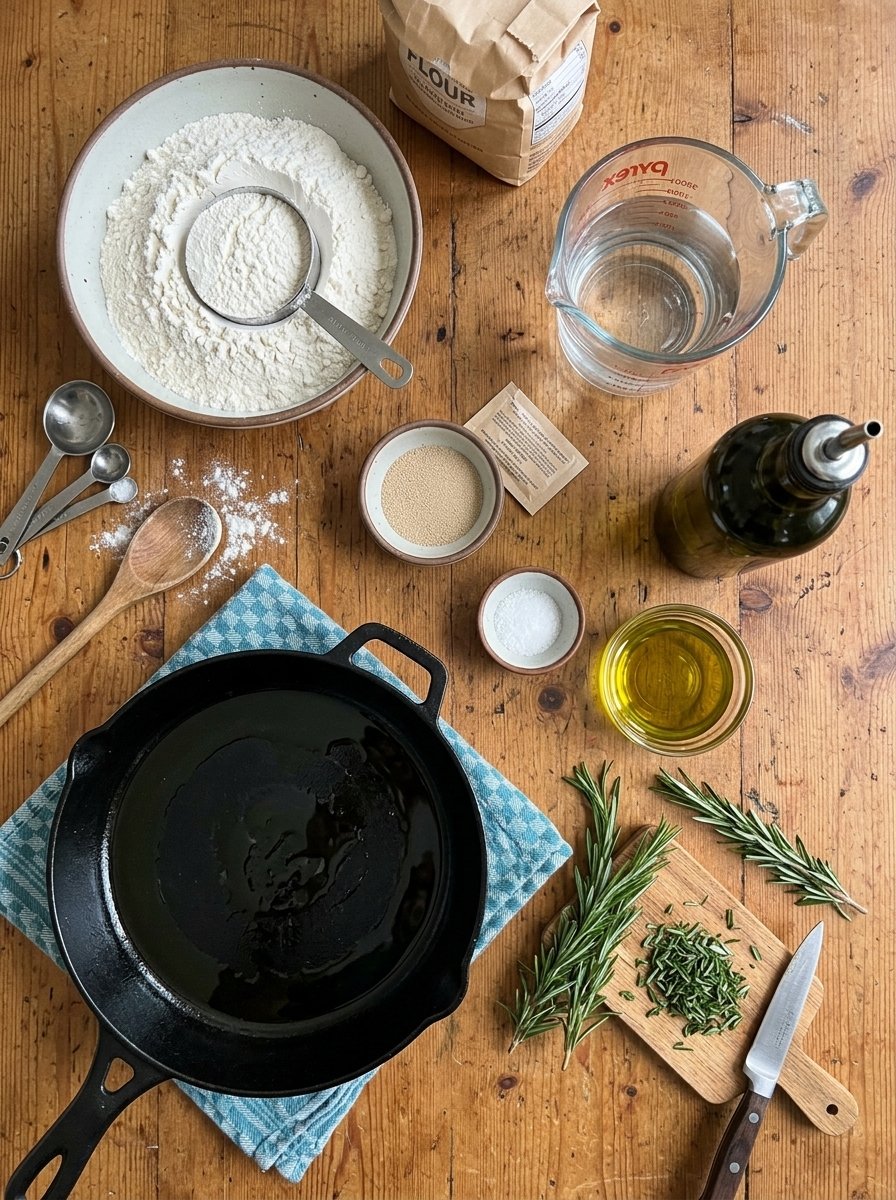
Here is everything you need for one 10-inch focaccia.
For the focaccia:
- 400 g (about 3¼ cups) all-purpose flour
- 360 g (1½ cups) lukewarm water
- 2 tsp (7 g) instant yeast
- 1½ tsp salt
- 2 tbsp olive oil, plus more for the skillet and topping
- 1–2 tbsp fresh rosemary, finely chopped
A Quick Note on the Ingredients
Flour: All-purpose flour works well here and keeps things simple. Weighing your flour with a kitchen scale is the most reliable way to get the right hydration. If you use cups, spoon the flour into the measuring cup and level it off rather than scooping, which packs in extra flour.
Water: Lukewarm water is important. It wakes up the yeast without slowing fermentation, and it avoids the risk of overheating and damaging the yeast. It should feel comfortably warm to the touch, not hot.
Yeast: Instant yeast makes the same-day timeline possible, since it works quickly and reliably.
Olive oil: This is not the place to skimp. Olive oil flavors the dough, helps create the crisp crust, and makes the dough easier to handle. A good extra-virgin olive oil is worth using, especially for the final drizzle.
Rosemary: Fresh rosemary gives the best fragrance and flavor. Chop it finely so it distributes evenly and doesn’t poke out of the crust in sharp pieces.
How to Make No-Knead Cast Iron Focaccia (Step by Step)
Step 1: Mix the Dough
In a large mixing bowl, combine the lukewarm water and instant yeast. Let it sit for about 2 to 3 minutes.
Add the flour, salt, and 2 tablespoons of olive oil. Stir with a wooden spoon or sturdy spatula until all the flour is incorporated and a very wet, sticky dough forms.
There is no need to knead. Simply mix until no dry patches remain. The dough will look shaggy and messy, and that is exactly right.
Step 2: First Rise
Cover the bowl loosely with plastic wrap or a clean kitchen towel. Place the dough in a warm, draft-free spot and let it rise for about 45 to 60 minutes, or until it is noticeably puffed and bubbly.
Look for bubbles on the surface and around the edges of the bowl. The dough should look visibly larger and feel airy.
Step 3: Prepare the Cast Iron Skillet
Generously coat a 10-inch cast-iron skillet with olive oil, making sure the bottom and sides are well covered. Then pour a little extra olive oil into the center of the skillet.
This may look like a lot of oil, but it is what produces that crisp, golden bottom crust and keeps the focaccia from sticking.
Step 4: Transfer and Stretch the Dough
Drizzle a little olive oil over your hands. Gently transfer the risen dough into the prepared skillet.
Using your fingertips, carefully stretch the dough toward the edges of the skillet. Don’t force it. If the dough springs back, let it rest for about 10 minutes and try again. Once it reaches most of the edges, leave it to relax and spread naturally.
Step 5: Second Rise
Cover the skillet loosely and let the dough rise again for about 30 to 45 minutes, or until it looks light, puffy, and airy.
While it rises, preheat your oven to 425°F (220°C).
Step 6: Dimple the Focaccia
Drizzle the surface generously with olive oil. With well-oiled fingertips, gently press deep dimples all over the dough, pressing down toward the bottom of the skillet without completely deflating it.
Scatter the chopped fresh rosemary evenly over the top. For extra flavor, gently press the rosemary into the dough just before baking.
Step 7: Bake
Place the skillet in the preheated oven and bake for about 22 to 28 minutes, until the focaccia is puffed and the top is deep golden brown. The edges should be crisp and golden while the center stays soft and airy.
Step 8: Finish and Cool
Remove the skillet from the oven and, if you like, drizzle the focaccia with a little more olive oil right away. Let it cool in the skillet for 10 to 15 minutes, then carefully transfer it to a cutting board.
Slice into squares or wedges and serve warm.
Tips for the Best Cast Iron Focaccia
Small details make a big difference with a simple recipe like this one.
1. Keep the dough wet and sticky.
The sticky, wet dough is what creates the airy interior. It is tempting to add flour when the dough feels messy, but resist. A wetter dough produces bigger air pockets and a softer crumb.
2. Use plenty of olive oil in the skillet.
Generous oil encourages a crisp, golden bottom crust. A dry or lightly oiled pan can lead to a paler, less crunchy base and a greater chance of sticking.
3. Use lukewarm water.
Water that is too cold slows the yeast, and water that is too hot can harm it. Lukewarm is the sweet spot.
4. Choose a warm, draft-free spot for rising.
Yeast works best in gentle warmth. Drafts can slow the rise and lead to a denser loaf.
5. Oil your hands.
A well-oiled hand keeps the sticky dough from clinging to you, which makes stretching and transferring so much easier.
6. Don’t force the stretch.
If the dough springs back, give it a 10-minute rest. Gluten relaxes with time, and the dough will stretch more easily afterward.
7. Press the rosemary in gently.
Lightly pressing the rosemary into the dough just before baking helps it stay in place and infuse the top with flavor.
8. Make sure your skillet is well seasoned.
A well-seasoned cast-iron skillet, generously coated with olive oil, helps prevent sticking and makes removal much easier.
Troubleshooting Common Focaccia Problems
My dough is too sticky to handle.
That is expected. This is a very wet dough. Use oiled hands rather than flour to manage it.
My focaccia turned out dense.
A few things can cause this: not letting the dough rise long enough, using water that was too hot or too cold, rising in a cold or drafty spot, or adding too much flour. Look for puffy, bubbly dough after the first rise and a light, airy look after the second.
The dough keeps shrinking back when I stretch it.
Let it rest for about 10 minutes, then try again. Stretching gently with your fingertips works better than pulling.
The bottom isn’t crisp.
Use more olive oil in the skillet, and make sure the skillet is well coated on both the bottom and the sides.
The focaccia stuck to the skillet.
Check that your skillet is well seasoned and generously oiled. Letting the bread cool for 10 to 15 minutes before transferring it also helps it release more cleanly.
Variations and Topping Ideas
Rosemary is classic, but the same dough is a great base for your own twists. Add any of these just before baking, using the same dimpling method:
- Flaky sea salt for a salty, crunchy finish
- Olives, pressed into the dimples
- Cherry tomatoes, halved and pressed in
- Thinly sliced onions for a sweet, savory top
- Garlic, minced or sliced thin and tucked into the dough
- Other herbs, such as thyme or oregano, alongside or instead of the rosemary
If you add moist toppings like tomatoes, press them in well so they stay in place during baking.
What to Serve with Cast Iron Focaccia
This focaccia is wonderfully versatile. Here are some ideas:
- Serve it warm with extra-virgin olive oil for dipping. Simple and always a hit.
- Pair it with soups, salads, pasta, or roasted vegetables. It is perfect for soaking up sauces and broths.
- Turn it into sandwiches. Slice it horizontally and fill it with your favorite Italian-style fixings.
- Serve it as an appetizer with olives and cheese for an easy, impressive spread.
- Enjoy it as a snack with your favorite savory spread.
How to Store and Reheat Focaccia
At room temperature: Store leftover focaccia in an airtight container for up to 2 days.
In the freezer: For longer storage, wrap individual pieces tightly and freeze for up to 2 to 3 months.
Reheating: Reheat thawed pieces in a 350°F (175°C) oven for several minutes to bring back some of the crispness. The oven works much better than a microwave, which tends to make bread soft and chewy rather than crisp.
Timeline at a Glance
| Stage | Time |
|---|---|
| Prep | About 15 minutes |
| First rise | 45–60 minutes |
| Second rise | 30–45 minutes |
| Baking | 22–28 minutes |
| Total | About 2–2½ hours |
| Yield | 1 10-inch focaccia, about 8–10 pieces |
Most of that time is hands-off. You are only actively working for a few minutes at the start, when stretching the dough, and when dimpling.
Frequently Asked Questions
Can I make this focaccia without a cast-iron skillet?
Cast iron gives the best crisp crust, but if you don’t have one, you can use another oven-safe pan. Oil it generously, and expect the crust to turn out a little less crisp.
Do I have to knead this dough?
No. This is a no-knead recipe. You just stir the ingredients until no dry patches remain, and the rises do the work.
Why is the dough so wet?
A very wet dough creates the airy, open interior that focaccia is known for. Avoid adding extra flour, even though the dough looks sticky.
Can I use dried rosemary instead of fresh?
Fresh rosemary gives the best flavor and aroma, and this recipe is built around it. If you only have dried, use a smaller amount, since dried herbs are more concentrated.
Can I make focaccia the same day without an overnight rise?
Yes, that is exactly what this recipe is for. With instant yeast, two short rises, and a hot oven, you can have fresh focaccia in about 2 to 2½ hours.
How do I know when the focaccia is done?
Look for a puffed loaf with a deep golden-brown top and crisp, golden edges, while the center stays soft and airy. This usually takes about 22 to 28 minutes at 425°F (220°C).
Can I freeze focaccia?
Yes. Wrap individual pieces tightly and freeze for up to 2 to 3 months. Reheat in a 350°F (175°C) oven to refresh the crust.
Why did my focaccia stick to the pan?
This usually comes down to not enough oil or a skillet that isn’t well seasoned. Coat the pan generously, including the sides, and let the bread cool for 10 to 15 minutes before moving it.
Final Thoughts
If you have been waiting for a reason to start baking bread at home, this same-day no-knead cast iron focaccia is it. There is no kneading, no overnight planning, and no special equipment beyond a cast-iron skillet. You get a golden, crispy crust, a soft and airy center, and the unmistakable aroma of rosemary and olive oil.
Keep the dough wet, be generous with the oil, and give the dough the time it needs to rise. Do that, and you will be pulling a gorgeous, bakery-style focaccia out of your oven in about two hours.
Give it a try, and enjoy it warm, straight from the skillet, with a little extra olive oil for dipping.
Print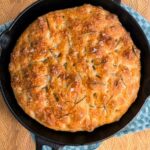
Same-Day No-Knead Cast Iron Focaccia
Ingredients
Here is everything you need for one 10-inch focaccia.
For the focaccia:
- 400 g (about 3¼ cups) all-purpose flour
- 360 g (1½ cups) lukewarm water
- 2 tsp (7 g) instant yeast
- 1½ tsp salt
- 2 tbsp olive oil, plus more for the skillet and topping
- 1–2 tbsp fresh rosemary, finely chopped
A Quick Note on the Ingredients
Flour: All-purpose flour works well here and keeps things simple. Weighing your flour with a kitchen scale is the most reliable way to get the right hydration. If you use cups, spoon the flour into the measuring cup and level it off rather than scooping, which packs in extra flour.
Water: Lukewarm water is important. It wakes up the yeast without slowing fermentation, and it avoids the risk of overheating and damaging the yeast. It should feel comfortably warm to the touch, not hot.
Yeast: Instant yeast makes the same-day timeline possible, since it works quickly and reliably.
Olive oil: This is not the place to skimp. Olive oil flavors the dough, helps create the crisp crust, and makes the dough easier to handle. A good extra-virgin olive oil is worth using, especially for the final drizzle.
Rosemary: Fresh rosemary gives the best fragrance and flavor. Chop it finely so it distributes evenly and doesn’t poke out of the crust in sharp pieces.
Instructions
In a large mixing bowl, combine the lukewarm water and instant yeast. Let it sit for about 2 to 3 minutes.
Add the flour, salt, and 2 tablespoons of olive oil. Stir with a wooden spoon or sturdy spatula until all the flour is incorporated and a very wet, sticky dough forms.
There is no need to knead. Simply mix until no dry patches remain. The dough will look shaggy and messy, and that is exactly right.
Cover the bowl loosely with plastic wrap or a clean kitchen towel. Place the dough in a warm, draft-free spot and let it rise for about 45 to 60 minutes, or until it is noticeably puffed and bubbly.
Look for bubbles on the surface and around the edges of the bowl. The dough should look visibly larger and feel airy.
Generously coat a 10-inch cast-iron skillet with olive oil, making sure the bottom and sides are well covered. Then pour a little extra olive oil into the center of the skillet.
This may look like a lot of oil, but it is what produces that crisp, golden bottom crust and keeps the focaccia from sticking.
Drizzle a little olive oil over your hands. Gently transfer the risen dough into the prepared skillet.
Using your fingertips, carefully stretch the dough toward the edges of the skillet. Don’t force it. If the dough springs back, let it rest for about 10 minutes and try again. Once it reaches most of the edges, leave it to relax and spread naturally.
Cover the skillet loosely and let the dough rise again for about 30 to 45 minutes, or until it looks light, puffy, and airy.
While it rises, preheat your oven to 425°F (220°C).
Drizzle the surface generously with olive oil. With well-oiled fingertips, gently press deep dimples all over the dough, pressing down toward the bottom of the skillet without completely deflating it.
Scatter the chopped fresh rosemary evenly over the top. For extra flavor, gently press the rosemary into the dough just before baking.
Place the skillet in the preheated oven and bake for about 22 to 28 minutes, until the focaccia is puffed and the top is deep golden brown. The edges should be crisp and golden while the center stays soft and airy.
Remove the skillet from the oven and, if you like, drizzle the focaccia with a little more olive oil right away. Let it cool in the skillet for 10 to 15 minutes, then carefully transfer it to a cutting board.
Slice into squares or wedges and serve warm.
Small details make a big difference with a simple recipe like this one.
1. Keep the dough wet and sticky.
The sticky, wet dough is what creates the airy interior. It is tempting to add flour when the dough feels messy, but resist. A wetter dough produces bigger air pockets and a softer crumb.
2. Use plenty of olive oil in the skillet.
Generous oil encourages a crisp, golden bottom crust. A dry or lightly oiled pan can lead to a paler, less crunchy base and a greater chance of sticking.
3. Use lukewarm water.
Water that is too cold slows the yeast, and water that is too hot can harm it. Lukewarm is the sweet spot.
4. Choose a warm, draft-free spot for rising.
Yeast works best in gentle warmth. Drafts can slow the rise and lead to a denser loaf.
5. Oil your hands.
A well-oiled hand keeps the sticky dough from clinging to you, which makes stretching and transferring so much easier.
6. Don’t force the stretch.
If the dough springs back, give it a 10-minute rest. Gluten relaxes with time, and the dough will stretch more easily afterward.
7. Press the rosemary in gently.
Lightly pressing the rosemary into the dough just before baking helps it stay in place and infuse the top with flavor.
8. Make sure your skillet is well seasoned.
A well-seasoned cast-iron skillet, generously coated with olive oil, helps prevent sticking and makes removal much easier.