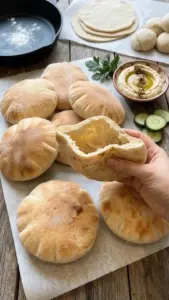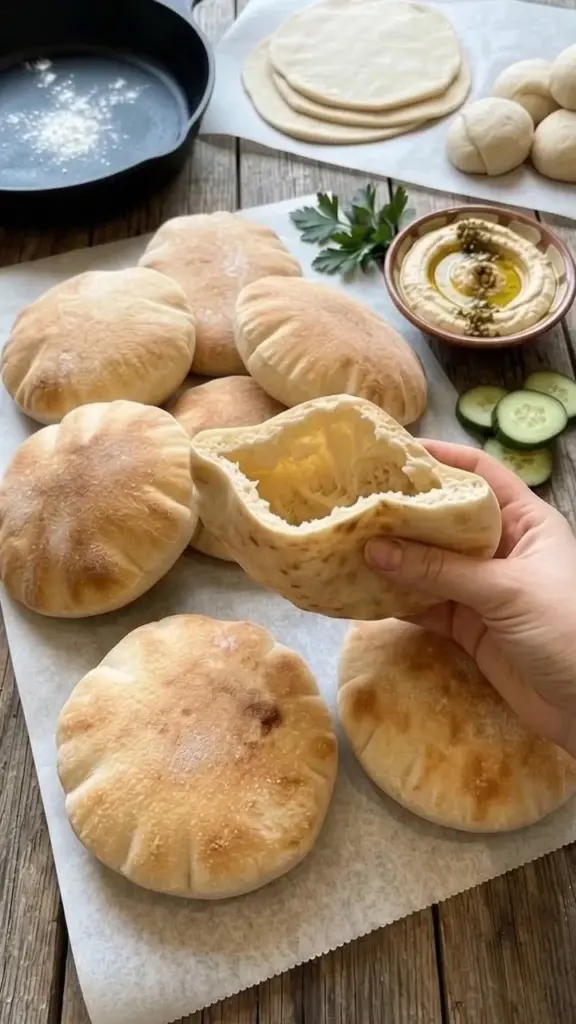
The thrill of pulling freshly baked pita bread from your oven is positively intoxicating. The gentle aromas of warm flour, yeast, and olive oil waft through your kitchen, beckoning all those nearby to gather, anticipating a delicious bite. Each pocket, golden and puffed, is a promise of soft, fluffy goodness that you can fill with just about anything your heart desires. Imagine the satisfying bite, yielding to your touch, revealing steam that escapes, bringing with it a comforting warmth. Bite into it, and you’ll experience a delightful combination of chewy texture, minimal crunch, and an inviting flavor that makes every mouthful memorable.
Soft & Fluffy Pocket Pita Bread is more than just a side dish; it elevates any meal into something truly special. Picture serving your homemade pita pockets during a lively family gathering or an intimate dinner with friends. As you fill them with aromatic grilled vegetables, savory meats, or creamy dips, watch as everyone’s faces light up with joy. The moment you tear into a still-warm pita, the memories of laughter, aromas, and shared stories begin to flow, making this simple bread an integral part of your culinary landscape.
Why You’ll Love This Pocket Pita Bread
The beauty of this Soft & Fluffy Pocket Pita lies in its versatility. Perfect for wrapping savory fillings or mopping up saucy dishes, its soft texture complements any meal beautifully. Whether you’re hosting a brunch, a casual weeknight dinner, or preparing a sumptuous spread for a gathering, this pita elevates your table. The gentle balance of flavor makes it a crowd-pleaser, inviting your guests to fill it with whatever tantalizes their taste buds. With just a handful of ingredients, you’ll create something far more special than store-bought alternatives. Your homemade pita will shine with freshness, and the warmth will wrap around your heart, making moments more memorable.
Preparation Phase & Tools to Use
Embarking on your pita-making journey requires just a few essential tools that will elevate your baking experience:
- Mixing Bowl: Choose a large bowl for mixing ingredients and allowing the dough to rise. It should be spacious enough for it to expand and develop.
- Rolling Pin: This kitchen marvel helps you flatten the dough to the perfect thickness, ensuring even baking.
- Baking Stone or Tray: A baking stone evenly distributes heat, giving your pitas that perfect puff. If you don’t have one, a heavy baking tray works just fine!
- Damp Cloth: Cover your dough during rising to prevent it from drying out, ensuring a soft texture.
Equipped with these tools, you can enjoy a seamless preparation experience. Remember to keep your workspace tidy and organized; it makes the whole process feel less daunting and much more enjoyable.
Ingredients for Soft & Fluffy Pocket Pita Bread
The beauty of this recipe lies in its simplicity. Here’s what you’ll need:
- 300 g all-purpose flour: The backbone of your pita. Look for a high-protein flour for an amazing texture.
- 1 tsp instant yeast: This is your magical ingredient that makes the dough rise and become fluffy.
- 1 tsp sugar: A little sweetness to nourish the yeast and balance flavors.
- 1 tsp salt: Essential for flavor; it enhances each bite.
- 200 ml warm water: The warmth activates the yeast, helping your dough rise beautifully.
- 1 tbsp olive oil: Adds richness and moisture, enhancing flavor.
Feel free to experiment with whole wheat flour or gluten-free alternatives if you’re looking for different flavors or dietary options. Just remember that adjustments may be necessary in texture and rising time!
How to Make Soft & Fluffy Pocket Pita Bread
- In a large mixing bowl, combine the flour, instant yeast, sugar, and salt. Whisk them together to combine evenly.
- Pour in the warm water and olive oil into the dry mixture. Gently mix until the dough begins to form.
- Knead the dough on a lightly floured surface for about 8-10 minutes, until it feels soft and elastic.
- Place the kneaded dough back into the bowl, cover it with a damp cloth, and let it rise for 1 hour, or until doubled in size.
- Preheat your oven to 230°C (450°F). If using a baking stone or tray, place it inside to heat as well.
- Once risen, gently punch down the dough to release the air. Divide it into six equal pieces and roll each piece into a ball.
- Flatten each ball gently with your palm, then use a rolling pin to create discs that are about 5-6 inches in diameter.
- Lay the discs on a floured surface and allow them to rest for 10-15 minutes while the oven finishes heating up.
- Carefully transfer the discs to the preheated baking stone or tray, ensuring they have space to puff. Bake for 10-15 minutes, or until they are puffed and lightly golden.
- Remove them from the oven and cover with a clean towel. This keeps them soft. Serve warm and enjoy the delightful pockets!
Pro tip: Make sure your oven is fully preheated for that perfect puff!
Chef’s Notes & Helpful Tips
- Make-ahead tips: Prep the dough the night before and refrigerate it after rising. Take it out an hour before baking to bring it back to room temperature.
- Cooking alternatives: You can also cook these in an air fryer for a unique touch, just slightly reducing the cooking time.
- Customization ideas: Experiment with additives like herbs, spices, or even cheese mixed into the dough for a fun twist!
Common Mistakes to Avoid
- Dough not rising: Make sure your yeast is fresh and your water is warm, not too hot (around 110°F/43°C) to avoid killing the yeast.
- Overworking the dough: Knead only until smooth and elastic; over-kneading can lead to tough pitas.
- Crowding the oven: Give your pitas enough space when baking to puff properly. Baking in batches if necessary ensures the best texture.
What to Serve With Soft & Fluffy Pocket Pita Bread
The possibilities are virtually endless, but here are some delicious ideas to fill your pitas:
- Grilled Chicken Shawarma: Spiced to perfection, the tender chicken pairs beautifully with your fluffy pita.
- Roasted Vegetables: Fill your pockets with colorful, caramelized veggies for a wholesome bite.
- Hummus: A classic pairing—its creaminess enhances each bite of warm pita while providing a satisfying dip!
- Falafel: Deep-fried chickpea balls bring crunchy texture and flavor.
- Tzatziki Sauce: This refreshing yogurt-based dip adds an element of coolness to your warm pita.
- Tabbouleh Salad: The bright, fresh flavors create a vibrant filling that complements the pita wonderfully.
- Kebabs: Whether lamb or beef, flavorful kebabs create a hearty and satisfying meal inside your pita.
- Feta and olives: An easy Mediterranean option for a light lunch or snack.
Storage & Reheating Instructions
Store leftover pitas in an airtight container in the fridge for up to 3 days. For longer storage, freeze them in a freezer bag for up to 2 months. To reheat, warm them in the oven at a low temperature for a few minutes until they soften, or pop them in the microwave for 10-15 seconds.
Estimated Nutrition Information
Approximate values per pita (not including fillings):
- Calories: 150
- Protein: 4g
- Carbohydrates: 30g
- Fat: 3g
- Fiber: 1g
(Note: Nutrition information may vary based on specific ingredients and preparation methods.)
FAQs
1. What makes my pita bread flat?
If your pitas don’t puff up, check that your yeast is fresh and your oven reaches the proper temperature. Also, rolling your dough too thin can prevent puffs; aim for a thickness of about ¼ inch.
2. Can I use whole wheat flour?
Absolutely! Whole wheat flour will give a nuttier flavor and a slightly denser texture. You may need to adjust the water according to the absorption of the flour.
3. How can I make a vegan version?
This recipe is naturally vegan as long as you omit any dairy fillings.
4. What should I do if my dough is too sticky?
If you find the dough overly sticky while kneading, sprinkle in a tiny bit of flour at a time until it becomes manageable.
5. Can I double this recipe?
Certainly! Just ensure you have sufficient space for rising and baking, as more dough requires more room.
In every kitchen, there lies the potential for warmth, comfort, and joy, and what better way to encapsulate that feeling than with freshly baked Soft & Fluffy Pocket Pita Bread? As you take this journey into bread-making, take pride in each step—the careful mixing, the dough rising in warmth, the glorious moments when they puff perfectly in the oven. Cherish the flavor and texture as you tear them open, watching steam escape, just waiting for delicious fillings to work their magic. So, grab your ingredients and tools, and let the aroma of homemade pita bread fill your home. It’s time to create memories that not only taste delightful but feel heartwarming too. Enjoy the process, and most importantly, enjoy every last bite!
Print
Soft & Fluffy Pocket Pita Bread
- Total Time: 30 minutes
- Yield: 6 servings 1x
- Diet: Vegan
Description
Freshly baked pita bread with soft, fluffy pockets perfect for various fillings.
Ingredients
- 300 g all-purpose flour
- 1 tsp instant yeast
- 1 tsp sugar
- 1 tsp salt
- 200 ml warm water
- 1 tbsp olive oil
Instructions
- Combine the flour, instant yeast, sugar, and salt in a large mixing bowl.
- Pour in the warm water and olive oil and gently mix until the dough begins to form.
- Knead the dough on a lightly floured surface for about 8-10 minutes until soft and elastic.
- Place the kneaded dough back into the bowl, cover with a damp cloth, and let it rise for 1 hour or until doubled in size.
- Preheat your oven to 230°C (450°F), placing a baking stone or tray inside to heat.
- Punch down the risen dough to release air, then divide it into six equal pieces and roll each into a ball.
- Flatten each ball gently, then use a rolling pin to create discs about 5-6 inches in diameter.
- Lay the discs on a floured surface and allow to rest for 10-15 minutes while the oven heats.
- Transfer the discs to the preheated baking stone or tray, ensuring space to puff, and bake for 10-15 minutes until lightly golden.
- Remove from the oven and cover with a clean towel to keep soft. Serve warm.
Notes
Make-ahead tips: Prepare the dough the night before and refrigerate. Bring to room temperature before baking.
- Prep Time: 15 minutes
- Cook Time: 15 minutes
- Category: Bread
- Method: Baking
- Cuisine: Mediterranean
Nutrition
- Serving Size: 1 pita
- Calories: 150
- Sugar: 1g
- Sodium: 400mg
- Fat: 3g
- Saturated Fat: 0g
- Unsaturated Fat: 1g
- Trans Fat: 0g
- Carbohydrates: 30g
- Fiber: 1g
- Protein: 4g
- Cholesterol: 0mg
Keywords: pita bread, homemade pita, bread recipe, Mediterranean bread