Zero-Sugar Chocolate Peanut Butter Crunch Cups: The Easy No-Bake Treat You’ll Make on Repeat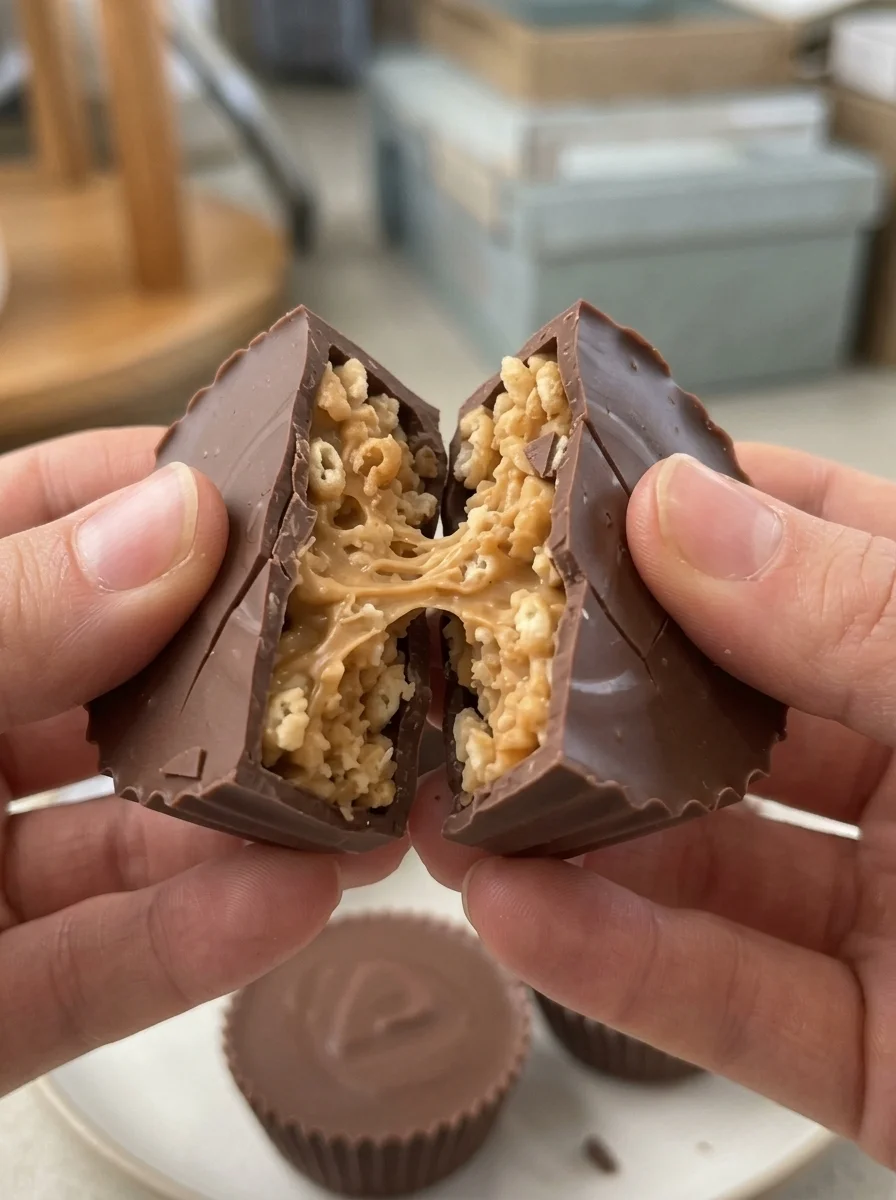
SEO Title (under 60 characters): Zero-Sugar Chocolate Peanut Butter Crunch Cups Recipe
Meta Description (under 160 characters): Make creamy, crunchy zero-sugar chocolate peanut butter cups with just a handful of ingredients. No-bake, easy, and perfect for satisfying chocolate cravings.
Primary Keyword: zero-sugar chocolate peanut butter cups
Secondary Keywords: sugar-free peanut butter cups, no-bake sugar-free dessert, low-carb chocolate peanut butter cups, healthy peanut butter cups, sugar-free chocolate chips recipe, keto-friendly peanut butter cups
If you have ever stood in front of the candy aisle wishing you could grab a peanut butter cup without the sugar crash that follows, this recipe is for you. These Zero-Sugar Chocolate Peanut Butter Crunch Cups are rich, creamy, and wonderfully crunchy, combining smooth natural peanut butter, sugar-free dark chocolate, and crispy rice cereal into one irresistible no-bake treat.
There is no oven, no complicated technique, and no hunt for exotic ingredients. You melt, spoon, shape, chill, and enjoy. In under an hour (most of it hands-off chilling time), you will have a dozen mini chocolate peanut butter cups that taste like a classic candy-shop favorite, without any added sugar.
In this guide, you will find the full recipe, step-by-step instructions, expert tips, ingredient swaps, storage advice, troubleshooting help, and answers to the most common questions about making sugar-free peanut butter cups at home.
Why You’ll Love These Zero-Sugar Peanut Butter Cups
Before we get to the recipe, here is why this treat deserves a permanent spot in your dessert rotation:
- Truly zero added sugar. Every component, from the chocolate to the filling, is sweetened with sugar-free alternatives such as stevia, erythritol, or monk fruit.
- No baking required. Everything sets in the fridge or freezer, which makes this a perfect recipe for hot days, busy evenings, or beginner cooks.
- Ready in about an hour. Most of the time is simply waiting for the chocolate to firm up.
- Satisfyingly crunchy. The crispy rice cereal and optional chopped peanuts add texture that sets these apart from a plain peanut butter cup.
- Simple ingredients. You likely have most of them in your pantry already.
- Great for meal prep. They keep for weeks in the fridge and months in the freezer, so you always have a treat on hand.
- Portion-controlled. The mini muffin size makes it easy to enjoy a small, satisfying bite of chocolate without overdoing it.
- Naturally gluten-free ingredients. Just double-check your cereal and chocolate labels if you need a certified gluten-free product.
What Makes This Recipe Different?
Many sugar-free peanut butter cup recipes fall into one of two traps. Either the filling is gritty and dry, or the chocolate layer turns waxy and bland. This recipe avoids both problems with a few thoughtful choices.
First, a small amount of coconut oil is melted into the chocolate. It gives the chocolate a glossy finish and a smooth snap, and it helps the chocolate coat evenly. Second, coconut flour is added to the peanut butter filling. This is a clever trick: coconut flour absorbs excess oil from natural peanut butter, giving you a thick, moldable filling that holds its shape instead of oozing out. Third, powdered sweetener dissolves into the filling far better than granulated, which keeps the texture silky rather than sandy. Finally, the crispy rice cereal gives every bite a light crunch that makes the cups feel fun and a bit more indulgent.
Ingredients for Zero-Sugar Chocolate Peanut Butter Crunch Cups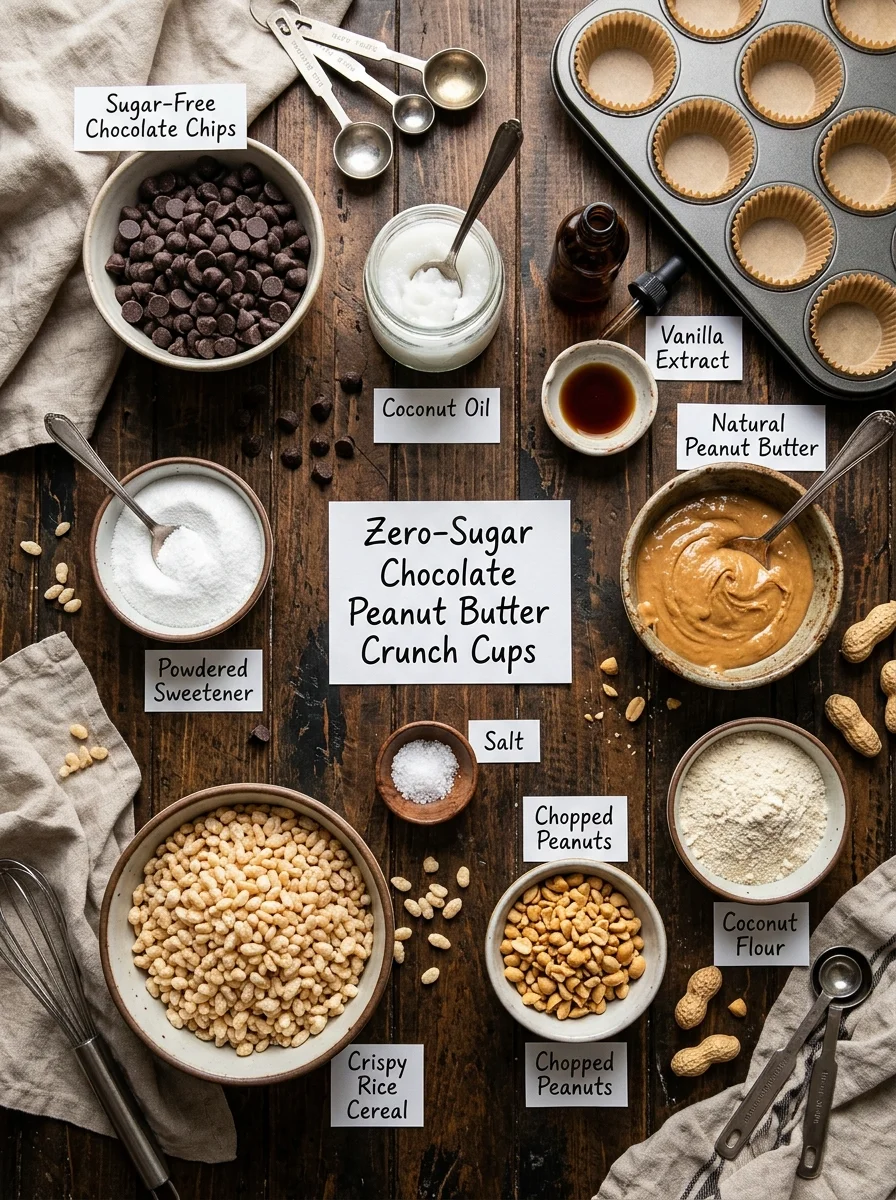
This recipe makes 12 mini cups. Here is everything you need, divided by layer.
For the Chocolate Layer
- 1 cup (170 g) sugar-free dark chocolate chips
- 1 tablespoon coconut oil
- ½ teaspoon vanilla extract
For the Peanut Butter Filling
- ½ cup (125 g) natural peanut butter, unsweetened
- 2 tablespoons powdered erythritol or monk fruit sweetener
- 2 tablespoons coconut flour
- ¼ teaspoon salt
For the Crunchy Layer
- ½ cup (20 g) unsweetened crispy rice cereal
- 2 tablespoons chopped roasted peanuts (optional)
Equipment
- 12-cup mini muffin pan
- Paper or silicone mini liners
- Microwave-safe bowl (or a double boiler)
- Small spoon or cookie scoop
- Mixing bowl and spatula
Step-by-Step Instructions
Follow these steps for perfectly layered, bakery-quality peanut butter cups.
Step 1: Prepare the Cups
Line a 12-cup mini muffin pan with paper liners. Liners make removal effortless and keep the cups looking neat. If you prefer, silicone liners work beautifully and can be reused.
Step 2: Melt the Chocolate
Combine the sugar-free chocolate chips and coconut oil in a microwave-safe bowl. Microwave in 20-second intervals, stirring thoroughly after each one, until the mixture is completely smooth. Stir in the vanilla extract. Heating in short bursts is important because chocolate can scorch quickly, and sugar-free chocolate tends to be even more sensitive to heat than the traditional kind.
Step 3: Create the Chocolate Base
Spoon about 1 teaspoon of melted chocolate into the bottom of each liner. Use the back of the spoon to spread it slightly. Freeze for 10 minutes so the base firms up. Set the remaining chocolate aside at room temperature, stirring occasionally. If it thickens, warm it for 5 to 10 seconds.
Step 4: Mix the Peanut Butter Filling
In a bowl, combine the natural peanut butter, powdered sweetener, coconut flour, and salt. Stir until the mixture is thick, smooth, and cohesive. It should feel like soft cookie dough. If it seems too loose, add another teaspoon of coconut flour; if it is too crumbly, stir in a little more peanut butter.
Step 5: Add the Crunch
Gently fold in the unsweetened crispy rice cereal and the chopped roasted peanuts, if using. Fold gently so the cereal stays crisp and does not crumble into dust.
Step 6: Shape the Filling
Roll the mixture into 12 small portions and flatten each one slightly into a disc that fits inside the liner. Place one portion on top of each chocolate base, pressing lightly. Leave a little space around the edges so the top layer of chocolate can flow down the sides.
Step 7: Add the Chocolate Topping
Spoon the remaining melted chocolate over each filling, covering it completely. Tap the pan gently on the counter to settle the chocolate and smooth the tops. Complete coverage matters, because it seals the filling and keeps it from drying out.
Step 8: Chill Until Set
Refrigerate for 30 to 45 minutes, or until the chocolate is fully set and firm to the touch.
Step 9: Serve and Enjoy
Peel away the liners and enjoy. For the best texture, let the cups sit at room temperature for about 5 minutes before eating so the filling softens slightly.
Tips for Success
A few small details make a big difference in the final result.
Choose the Right Peanut Butter
Use unsweetened natural peanut butter with no added sugar. Check the label: the ingredients should be peanuts and salt, and nothing else. Brands that contain added sugar, honey, or hydrogenated oils will change both the flavor and the nutrition. Stir natural peanut butter very well before measuring, since the oil often separates and settles on top.
Pick a Quality Sugar-Free Chocolate
Look for chocolate sweetened with stevia or monk fruit if you want to avoid sugar alcohols, or with erythritol if you do not mind them. Taste varies widely from brand to brand, so choose one you already enjoy eating on its own. A dark chocolate with a good cocoa percentage will give the cups a deeper, more satisfying flavor.
Use Powdered Sweetener
Granulated sweeteners can leave a gritty texture in no-bake fillings. Powdered erythritol or powdered monk fruit blends dissolve into the peanut butter and create a smooth, creamy mouthfeel. If you only have granulated sweetener, grind it in a clean coffee grinder or blender until it becomes a fine powder.
Add Flaky Sea Salt
A pinch of flaky sea salt on top transforms these cups. The salt sharpens the chocolate, enhances the peanut flavor, and gives the cups a gourmet look.
Cover the Filling Completely
Make sure the chocolate fully covers the filling. Any exposed peanut butter can dry out in the fridge and become crumbly. A complete chocolate shell keeps the center soft and fresh.
Do Not Overheat the Chocolate
Sugar-free chocolate can seize or turn grainy if it gets too hot. Melt slowly, stir often, and stop heating as soon as only a few small pieces remain. The residual heat will melt them as you stir.
Ingredient Substitutions and Variations
One of the best things about this recipe is how easy it is to customize.
- Almond butter or sunflower seed butter: Swap the peanut butter for a different nut or seed butter. Sunflower seed butter is an excellent choice for peanut-free kitchens, though it may turn slightly green when combined with baking soda in other recipes (not an issue here).
- Coconut flour alternatives: If you do not have coconut flour, try a tablespoon of almond flour, but you may need slightly more to reach the right thickness.
- Different sweeteners: Allulose, a powdered stevia blend, or a monk fruit and erythritol blend all work. Adjust to taste, since sweeteners vary in intensity.
- Dark chocolate vs. milk chocolate style: Sugar-free milk chocolate chips are available and create a sweeter, creamier cup.
- Cereal swaps: Use crushed unsweetened puffed quinoa, chopped nuts, or toasted coconut flakes for different textures.
- Extra crunch: Add a spoonful of cacao nibs or finely chopped almonds to the filling.
- Mint chocolate version: Replace the vanilla with a drop of peppermint extract in the chocolate layer.
- Espresso twist: Stir a pinch of instant espresso powder into the chocolate for a mocha flavor.
- Dairy-free option: Choose dairy-free sugar-free chocolate chips to make the entire recipe vegan-friendly.
Common Mistakes to Avoid
Even simple recipes have pitfalls. Here is how to sidestep the most common ones.
The filling is too oily or sticky. Natural peanut butter varies in consistency. Add coconut flour one teaspoon at a time until the mixture holds together when pressed.
The chocolate is thick and clumpy. Chocolate that has cooled too much becomes difficult to spread. Reheat it for a few seconds and stir well.
The layers are blending together. If the base chocolate was not chilled long enough, the filling can push into it. Give the base the full 10 minutes in the freezer.
The chocolate cracks when you bite in. Too much coconut oil can make the chocolate brittle, while too little can make it hard. Stick to the measured tablespoon for the best snap.
The cereal turns soft. Moisture is the enemy of crunch. Store the cups in an airtight container and avoid leaving them out in humid conditions for long periods.
Storage Instructions
Proper storage keeps these cups fresh, crunchy, and delicious.
- Refrigerator: Store in an airtight container for up to 2 weeks. Place parchment paper between layers if you stack them.
- Freezer: Freeze for up to 3 months. For easy grab-and-go snacking, freeze the cups on a tray first, then transfer them to a freezer-safe bag or container.
- Serving from the fridge or freezer: Let the cups sit at room temperature for about 5 minutes before eating. This softens the filling and brings out the flavor of the chocolate.
Because these cups contain no sugar to act as a preservative, keeping them chilled is important. Do not leave them in a warm place for long, since the coconut oil in the chocolate will soften and the cups may lose their shape.
Serving Suggestions
These mini cups are versatile enough to fit into any part of your day.
- Afternoon snack: One or two cups pair well with a cup of tea or a handful of berries when the mid-afternoon slump hits.
- After-dinner dessert: Serve a small plate of cups with fresh strawberries or raspberries for a light finish to a meal.
- With your coffee: The slight bitterness of coffee complements the chocolate and peanut butter beautifully.
- Topped with extras: Sprinkle crushed peanuts and a touch of sea salt on top before the chocolate sets for a bakery-style presentation.
- For entertaining: Arrange them on a platter for parties, movie nights, or holiday dessert tables. Guests will not guess they are sugar-free.
- As a gift: Pack them in a small tin lined with parchment for a thoughtful homemade present, and remind the recipient to keep them refrigerated.
Why Choose a Zero-Sugar Treat?
Many people look for sugar-free desserts for different reasons. Some are following a low-carb or keto-style eating plan, some are managing blood sugar and working with their healthcare provider on dietary choices, and others simply want to reduce the amount of added sugar in their everyday routine. Whatever your reason, a homemade zero-sugar treat gives you control over every ingredient.
This recipe uses peanut butter, which provides protein and healthy fats, along with dark chocolate, which many people find so rich that a small portion feels satisfying. The crispy rice cereal and peanuts add texture without relying on sweetness. Keep in mind that sugar-free does not mean calorie-free or carb-free, and ingredient labels vary between brands. If you have specific dietary needs, check the nutrition information on the products you use, and speak with a registered dietitian or healthcare professional for personalized guidance.
Also note that some people experience digestive discomfort from sugar alcohols such as erythritol when eaten in large amounts. Enjoying one or two cups at a time is a sensible way to appreciate the treat comfortably.
Frequently Asked Questions
Are these peanut butter cups really sugar-free?
Yes, as long as you choose a sugar-free chocolate, an unsweetened natural peanut butter, and unsweetened cereal. Always read the labels on your ingredients, since formulations differ by brand and region.
Can I make these keto-friendly?
They can fit into many low-carb eating plans, but the cereal adds carbohydrates. For a lower-carb version, replace the crispy rice cereal with extra chopped nuts or unsweetened coconut flakes, and check the carbohydrate content of your chocolate and sweetener.
Can I make them without a microwave?
Absolutely. Melt the chocolate and coconut oil in a heatproof bowl set over a pot of gently simmering water, stirring until smooth. Make sure no water touches the chocolate.
Why is my chocolate not setting?
Usually this happens when the chocolate was overheated, or when there is too much coconut oil. Measure carefully and chill for the full time. Placing the cups in the freezer for 10 minutes can speed things up.
Can I use a regular muffin pan instead of a mini one?
Yes, but the recipe will yield fewer, larger cups. Adjust the amount of chocolate and filling per cup, and allow a little more chilling time.
Can I use crunchy peanut butter?
Yes. Crunchy peanut butter adds extra texture. You may want to skip the chopped peanuts so the filling does not become overly chunky.
What can I use instead of peanut butter for an allergy-friendly version?
Sunflower seed butter is a popular nut-free alternative. Make sure your chocolate is also produced in a nut-free facility if allergies are severe.
How long do they last?
They keep for up to 2 weeks in the refrigerator and up to 3 months in the freezer when stored in an airtight container.
Can I double the recipe?
Yes. Use a 24-cup mini muffin pan, or work in two batches. Keep the second batch of chocolate warm and stirred so it stays smooth.
Do I need to use coconut oil?
Coconut oil gives the chocolate a smooth texture and glossy finish. If you prefer, you can substitute another mild solid fat such as cocoa butter, though results may vary slightly.
Final Thoughts
These Zero-Sugar Chocolate Peanut Butter Crunch Cups prove that you do not have to give up classic flavors to cut back on sugar. With a silky chocolate shell, a thick and creamy peanut butter center, and a satisfying crunch in every bite, they deliver everything you want from a chocolate peanut butter treat. The recipe is quick, forgiving, and endlessly adaptable, which makes it ideal for beginners and seasoned bakers alike.
Make a batch this weekend, keep a few in the freezer for emergencies, and share them with friends who are always looking for a sugar-free dessert that actually tastes indulgent. Once you taste how easy it is to make your own peanut butter cups, the store-bought version may lose its appeal.
If you try this recipe, leave a rating and a comment below to share your favorite variation, and do not forget to pin it or save it for later. Happy snacking!
Recipe Snapshot
- Prep time: 20 minutes
- Chill time: 40 to 55 minutes (including the freezer step)
- Yield: 12 mini cups
- Category: Dessert, snack
- Method: No-bake
- Diet: Sugar-free, gluten-free ingredients (verify labels)Print
Zero-Sugar Chocolate Peanut Butter Crunch Cups
Ingredients
ScaleThis recipe makes 12 mini cups. Here is everything you need, divided by layer.
For the Chocolate Layer
- 1 cup (170 g) sugar-free dark chocolate chips
- 1 tablespoon coconut oil
- ½ teaspoon vanilla extract
For the Peanut Butter Filling
- ½ cup (125 g) natural peanut butter, unsweetened
- 2 tablespoons powdered erythritol or monk fruit sweetener
- 2 tablespoons coconut flour
- ¼ teaspoon salt
For the Crunchy Layer
- ½ cup (20 g) unsweetened crispy rice cereal
- 2 tablespoons chopped roasted peanuts (optional)
Equipment
- 12-cup mini muffin pan
- Paper or silicone mini liners
- Microwave-safe bowl (or a double boiler)
- Small spoon or cookie scoop
- Mixing bowl and spatula
Instructions
Follow these steps for perfectly layered, bakery-quality peanut butter cups.
Step 1: Prepare the Cups
Line a 12-cup mini muffin pan with paper liners. Liners make removal effortless and keep the cups looking neat. If you prefer, silicone liners work beautifully and can be reused.
Step 2: Melt the Chocolate
Combine the sugar-free chocolate chips and coconut oil in a microwave-safe bowl. Microwave in 20-second intervals, stirring thoroughly after each one, until the mixture is completely smooth. Stir in the vanilla extract. Heating in short bursts is important because chocolate can scorch quickly, and sugar-free chocolate tends to be even more sensitive to heat than the traditional kind.
Step 3: Create the Chocolate Base
Spoon about 1 teaspoon of melted chocolate into the bottom of each liner. Use the back of the spoon to spread it slightly. Freeze for 10 minutes so the base firms up. Set the remaining chocolate aside at room temperature, stirring occasionally. If it thickens, warm it for 5 to 10 seconds.
Step 4: Mix the Peanut Butter Filling
In a bowl, combine the natural peanut butter, powdered sweetener, coconut flour, and salt. Stir until the mixture is thick, smooth, and cohesive. It should feel like soft cookie dough. If it seems too loose, add another teaspoon of coconut flour; if it is too crumbly, stir in a little more peanut butter.
Step 5: Add the Crunch
Gently fold in the unsweetened crispy rice cereal and the chopped roasted peanuts, if using. Fold gently so the cereal stays crisp and does not crumble into dust.
Step 6: Shape the Filling
Roll the mixture into 12 small portions and flatten each one slightly into a disc that fits inside the liner. Place one portion on top of each chocolate base, pressing lightly. Leave a little space around the edges so the top layer of chocolate can flow down the sides.
Step 7: Add the Chocolate Topping
Spoon the remaining melted chocolate over each filling, covering it completely. Tap the pan gently on the counter to settle the chocolate and smooth the tops. Complete coverage matters, because it seals the filling and keeps it from drying out.
Step 8: Chill Until Set
Refrigerate for 30 to 45 minutes, or until the chocolate is fully set and firm to the touch.
Step 9: Serve and Enjoy
Peel away the liners and enjoy. For the best texture, let the cups sit at room temperature for about 5 minutes before eating so the filling softens slightly.