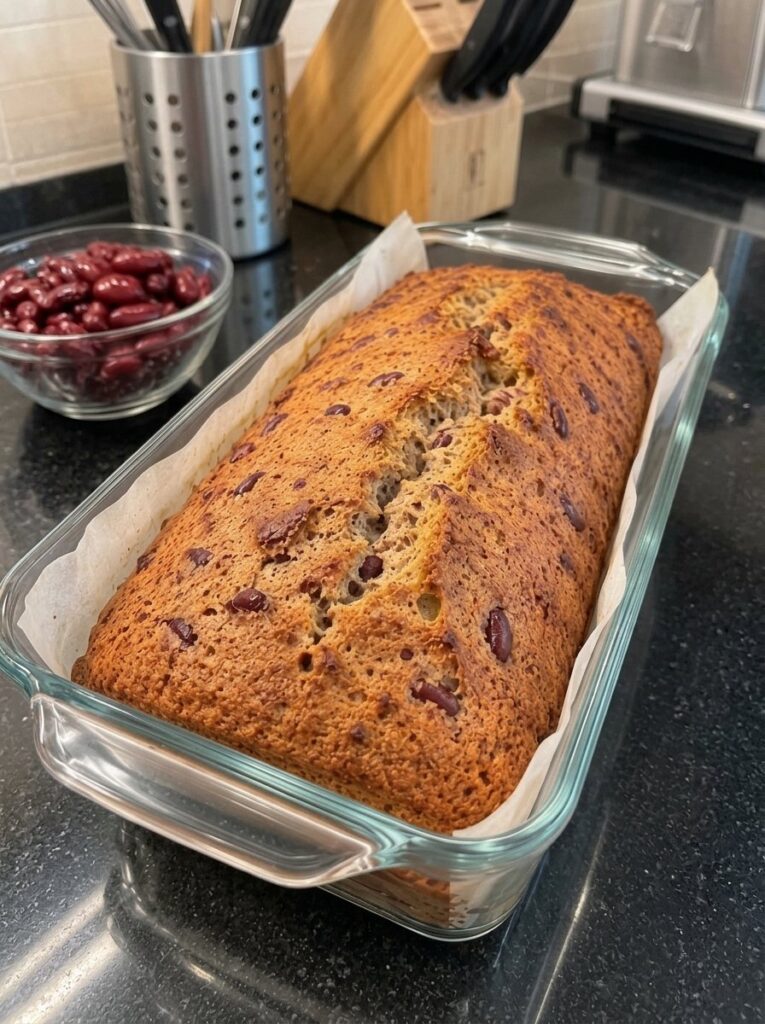
If you’ve been searching for an easy homemade bread that’s packed with plant-based protein and needs only a few simple ingredients, this 3-Ingredient High-Protein Kidney Bean Bread deserves a spot in your recipe collection. Made with just kidney beans, eggs, and baking powder, this flourless loaf has a soft, moist texture and a mild flavor that works beautifully with both savory and sweet toppings.
There’s no yeast, no kneading, no proofing, and no complicated technique. You simply blend the ingredients, pour the batter into a loaf pan, and bake. It’s a convenient option for breakfast, sandwiches, or a quick snack when you want something different from traditional wheat bread.
In this complete guide, you’ll find the full recipe, step-by-step instructions, troubleshooting tips, flavor variations, serving ideas, storage advice, and answers to the most common questions about bean-based bread.
Table of Contents
- Why You’ll Love This Kidney Bean Bread
- What Is Kidney Bean Bread?
- Ingredients
- Ingredient Notes and Substitutions
- Equipment You’ll Need
- How to Make Kidney Bean Bread (Step by Step)
- Tips for the Best Texture
- Common Mistakes to Avoid
- Flavor Variations
- Serving Ideas
- Storage, Freezing, and Reheating
- Nutrition and Protein Notes
- Recipe Details at a Glance
- Frequently Asked Questions
- Final Thoughts
Why You’ll Love This Kidney Bean Bread
Before we get into the recipe, here’s why this loaf has become such a popular choice for home cooks looking for a simple, protein-rich bread alternative:
- Only 3 ingredients. Kidney beans, eggs, and baking powder are all you need. Most of these items are probably already in your kitchen.
- Flourless. There’s no wheat flour, which makes it a great option when you want a break from traditional bread.
- No yeast or kneading. Skip the waiting, the proofing, and the sticky hands. This is a blend-and-bake recipe.
- High in protein. Beans and eggs are both natural protein sources, so each slice is more filling than a typical slice of white bread.
- Soft and moist. The blended beans create a tender, custard-like crumb that holds together well for slicing.
- Beginner friendly. If you can use a blender and an oven, you can make this bread.
- Budget friendly. A can of beans and a few eggs cost far less than specialty protein breads from the store.
- Versatile. It works with avocado, cream cheese, peanut butter, honey, eggs, and just about anything else you’d put on toast.
What Is Kidney Bean Bread?
Kidney bean bread is a flourless, bean-based loaf made by blending cooked kidney beans with eggs and a leavening agent, then baking the batter in a loaf pan. Instead of relying on gluten for structure, the bread gets its shape from the proteins in the eggs and the starches in the beans.
The result is a dense-but-tender loaf that sits somewhere between a soft sandwich bread and a savory quick bread. Because kidney beans have a mild, slightly earthy flavor, the finished bread doesn’t taste strongly of beans, especially when the batter is blended until completely smooth. Toasting a slice brings out a lightly golden, slightly crisp edge that makes it even more enjoyable.
Bean-based baking is part of a growing trend in high-protein and plant-forward cooking. People use chickpeas, black beans, white beans, and kidney beans in everything from brownies to flatbreads. This particular recipe keeps things as minimal as possible, which makes it an ideal starting point if you’ve never baked with beans before.
Ingredients
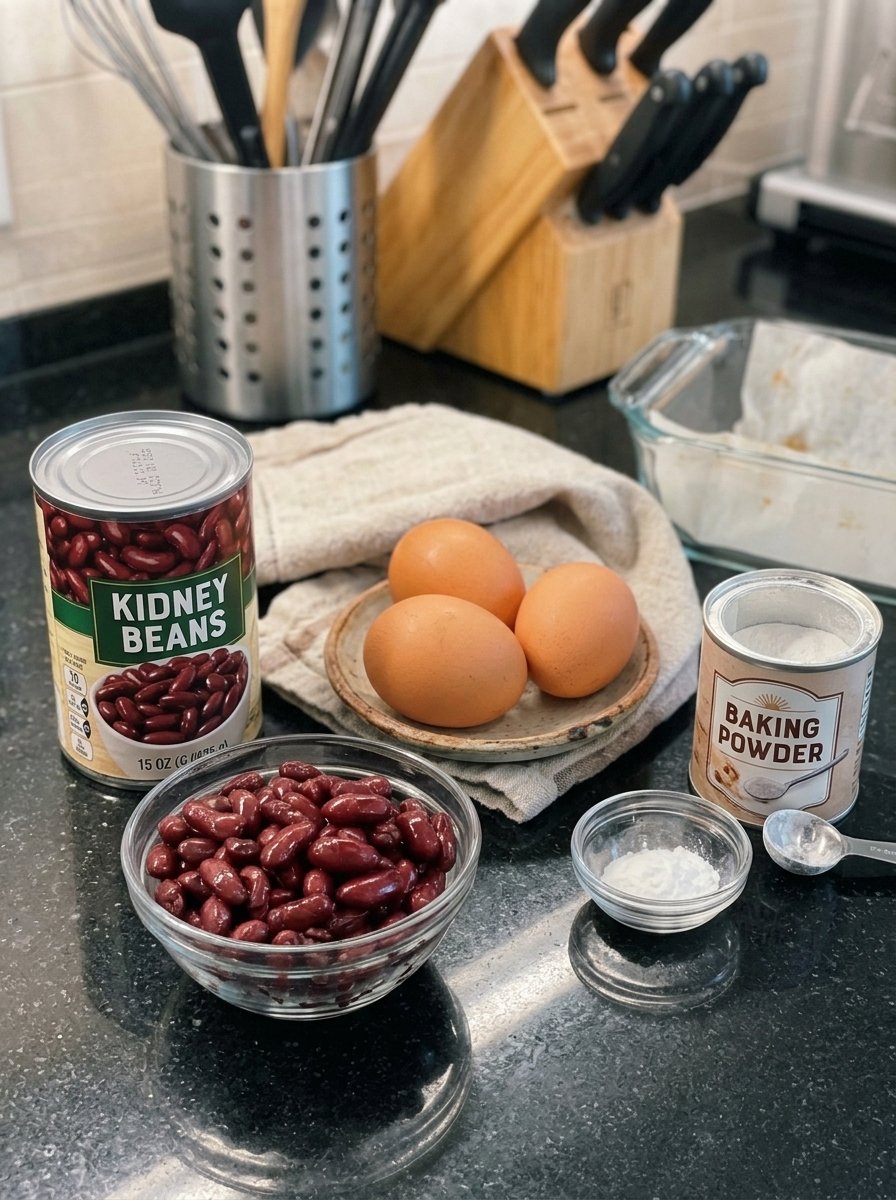
You only need three ingredients for this recipe:
- 1 can (15 oz / 425 g) kidney beans, drained and rinsed (about 250 g after draining)
- 3 large eggs, at room temperature
- 1 teaspoon baking powder
You’ll also want a little parchment paper for lining your loaf pan.
Ingredient Notes and Substitutions
Kidney Beans
Canned kidney beans are the easiest choice because they’re already fully cooked, soft, and ready to blend. Look for plain beans without added seasonings or sauces. Draining and rinsing them well removes the thick canning liquid and excess sodium, which gives you a cleaner flavor and a better batter consistency.
If you’d rather cook your own beans from dried, make sure they are fully cooked before using them. Kidney beans must never be eaten undercooked, because raw or undercooked kidney beans contain a natural compound that can cause stomach upset. Canned beans are already safely cooked, which is one more reason they’re a convenient option here. If you do cook dried beans, you’ll want roughly 1½ cups of cooked, well-drained beans (about 250 g) to match the can.
Eggs
The eggs provide structure, moisture, and additional protein. Room-temperature eggs blend more smoothly into the beans, so take them out of the refrigerator about 20 to 30 minutes before you begin. If you’re in a hurry, place the whole eggs in a bowl of warm (not hot) water for about 5 minutes.
Because eggs are doing the structural work in this recipe, there isn’t a reliable one-to-one swap for a fully egg-free version. Some people experiment with flax eggs or other binders, but results vary and the texture will be different from the original.
Baking Powder
Baking powder gives the loaf a little lift so it isn’t overly dense. Check that yours is fresh. If it’s been in the pantry for more than six months to a year, test it by stirring a small spoonful into hot water. If it fizzes vigorously, it’s still active.
Optional Add-Ins
The base recipe uses three ingredients, but you can season the batter if you like. A pinch of salt, a little garlic powder, or a spoonful of dried herbs can make the bread more savory. For a slightly sweeter loaf, a small amount of cinnamon works well. Keep add-ins modest so you don’t throw off the moisture balance of the batter.
Equipment You’ll Need
- A food processor or high-speed blender
- A small loaf pan (approximately 8 × 4 inches)
- Parchment paper
- A spatula
- A clean kitchen towel or paper towels
- A wire cooling rack
- A toothpick for testing doneness
A food processor tends to work best because you can scrape down the sides easily, but a good blender will also do the job. If you use a blender, you may need to pause and stir a couple of times so the beans blend evenly.
How to Make Kidney Bean Bread (Step by Step) 🥄
Step 1: Prepare the Kidney Beans
Preheat your oven to 350°F (175°C). Drain the kidney beans in a colander and rinse them thoroughly under cold running water. Then pat them lightly with a clean kitchen towel to remove excess moisture. This small step matters, because extra water can make the finished bread too wet in the center.
Line a small loaf pan (approximately 8 × 4 inches) with parchment paper, leaving a little overhang on the long sides. The overhang will act as handles later, so you can lift the loaf out easily once it has cooled.
Step 2: Blend the Ingredients
Add the drained kidney beans and the eggs to a food processor or high-speed blender. Blend until the mixture is completely smooth and creamy, stopping to scrape down the sides as needed. You shouldn’t see any visible bean skins or chunks. Add the baking powder and blend briefly, just until it’s evenly incorporated.
The batter will be thick but pourable, with a color similar to a light brownish-pink. Don’t worry about the color. It will bake to a warm golden-brown.
Step 3: Prepare the Loaf Pan
Pour the smooth batter into the prepared loaf pan. Use a spatula to spread it evenly into the corners, then gently tap the pan on the counter a few times to release any large air bubbles. This helps the loaf bake evenly and gives you a more uniform crumb.
Step 4: Bake the Bread
Place the pan in the preheated oven and bake for approximately 40 to 50 minutes, or until the top is set and a toothpick inserted into the center comes out mostly clean. Baking time can vary depending on your oven and how much moisture is in your beans, so start checking at the 40-minute mark.
The top should look golden brown with a lightly textured surface, and it may develop small cracks along the center. That’s completely normal and part of this bread’s rustic charm.
Step 5: Cool and Slice
Remove the bread from the oven and let it cool in the pan for about 10 to 15 minutes. Then lift it out using the parchment paper and transfer it to a wire rack. Allow it to cool completely before slicing, which usually takes another 30 to 45 minutes. Because this bread is naturally moist, the interior needs time to set. Slicing too early can give you a gummy, crumbly texture.
Use a sharp serrated knife and a gentle sawing motion for clean slices.
Tips for the Best Kidney Bean Bread
- Drain the beans well. Excess liquid can make the bread too wet, so drain and rinse them thoroughly before blending.
- Blend until completely smooth. A smooth batter gives the bread a more even texture without noticeable pieces of beans.
- Use room-temperature eggs. They blend more easily into the bean mixture and create a more consistent batter.
- Don’t overbake. Bake just until the center is set. Overbaking can make the bread dry.
- Let it cool completely. The bread is naturally moist, so cooling helps it firm up and makes slicing easier.
- Use parchment paper. Bean-based batters can stick to bare pans, and parchment makes removal effortless.
- Toast your slices. Toasting adds a pleasant crispness and mellows the mild bean flavor even further.
Common Mistakes to Avoid
1. Skipping the draining and patting step. Wet beans lead to a soggy, dense loaf. Take the extra minute to dry them.
2. Under-blending the batter. If bean pieces remain, the texture will be uneven and the bean flavor will be stronger. Keep blending until silky.
3. Using a pan that’s too large. A larger pan spreads the batter thin, so the loaf bakes faster, turns out flatter, and can dry out. Stick with an 8 × 4 inch pan or a similar size.
4. Cutting the loaf while it’s warm. It’s tempting, but warm bean bread is soft and fragile. Patience is rewarded with clean slices.
5. Expecting it to behave like yeast bread. This loaf is more tender and moist than a wheat sandwich loaf. Think of it as a high-protein quick bread, and it will exceed your expectations.
Flavor Variations
Once you’ve mastered the base recipe, you can customize it in several ways while keeping the loaf simple:
- Savory herb loaf: Add a pinch of salt, ½ teaspoon garlic powder, and a teaspoon of dried Italian herbs to the blender.
- Everything-seasoning loaf: Sprinkle everything bagel seasoning over the top before baking.
- Cheesy loaf: Fold in a small handful of shredded cheese after blending, or sprinkle some on top during the last 10 minutes of baking.
- Cinnamon breakfast loaf: Add ½ teaspoon cinnamon and a small splash of vanilla for a lightly sweet, breakfast-friendly version.
- Seeded loaf: Top the batter with sesame seeds, sunflower seeds, or pumpkin seeds for extra crunch.
- Spicy loaf: Add a pinch of paprika, chili flakes, or cumin for a warm, savory flavor.
When adding extras, start small. A little goes a long way in a three-ingredient batter, and too many add-ins can change the texture.
Serving Ideas
This versatile kidney bean bread works with both sweet and savory toppings.
Savory Options
Enjoy slices with avocado, cream cheese, sliced tomatoes, cucumber, or your favorite sandwich fillings. A slice topped with smashed avocado, a drizzle of olive oil, and a sprinkle of black pepper makes a satisfying light lunch. It’s also sturdy enough for open-faced sandwiches with turkey, hummus, or sliced cheese.
Breakfast
Serve it toasted with scrambled eggs or a little butter. You can also top a toasted slice with a fried egg for an extra protein boost, or pair it with fresh fruit and yogurt on the side.
Sweet Options
Try it with peanut butter, almond butter, honey, or your favorite fruit spread. A thin layer of nut butter with banana slices is a classic combination that turns this loaf into a quick, energizing snack.
As a Snack
Toast a slice and enjoy it warm with your favorite topping. Because the bread is filling, one or two slices can tide you over between meals.
Storage, Freezing, and Reheating
Proper storage keeps your kidney bean bread fresh and safe to eat.
- Room temperature: Because this bread contains eggs and cooked beans, refrigerate it rather than leaving it out for extended periods.
- Refrigerator: Store cooled slices in an airtight container for up to 4 days.
- Freezer: Freeze individual slices with parchment paper between them in a freezer-safe bag or container for up to 2 months.
- To reheat: Warm slices in a toaster, toaster oven, or skillet until heated through.
Meal prep tip: Slice the entire loaf once it has cooled completely, then freeze the slices flat. You can pull out exactly what you need each morning and toast straight from frozen, adding a minute or two to the usual toasting time.
Nutrition and Protein Notes
One of the main reasons people love this recipe is its protein content. Kidney beans provide plant-based protein along with fiber, while eggs add complete protein. Together, they create a loaf that tends to be more filling than a standard slice of white bread, and it contains no wheat flour.
Exact nutrition will vary depending on the brand of beans, the size of your eggs, and how thick you slice the loaf. As a rough guide, a small loaf cut into 8 to 10 slices will give you a modest amount of protein per slice, along with fiber from the beans. If you track macros or have specific dietary needs, it’s best to calculate the numbers using the nutrition labels on your own ingredients.
A few things worth keeping in mind:
- This bread is flourless, but that does not automatically make every version gluten-free. If you need to avoid gluten strictly, check that your canned beans and baking powder are labeled gluten-free.
- Canned beans can be high in sodium. Rinsing them well helps, and you can choose a low-sodium or no-salt-added variety.
- Because it contains eggs, this recipe is not vegan.
- If you have a medical condition or follow a therapeutic diet, check with a healthcare professional or registered dietitian about whether this bread fits your plan.
Recipe Details at a Glance
- Prep Time: 10 minutes
- Bake Time: 40–50 minutes
- Cooling Time: 45–60 minutes
- Total Time: Approximately 1 hour 40 minutes
- Yield: 1 small loaf (approximately 8–10 slices)
- Oven Temperature: 350°F (175°C)
- Difficulty: Easy
- Main Ingredients: Kidney beans, eggs, and baking powder
Frequently Asked Questions
Does kidney bean bread taste like beans?
The flavor is mild and slightly earthy, but when the beans are blended until completely smooth, the taste is much less noticeable than most people expect. Toasting the slices and adding toppings like avocado, nut butter, or honey makes the bean flavor fade even further.
Can I use other types of beans?
Yes. Many people experiment with black beans, pinto beans, white beans, or chickpeas. Each bean will change the color, flavor, and moisture level slightly, so you may need to adjust the baking time by a few minutes. White beans tend to give the mildest flavor.
Why is my bread too wet or gummy in the middle?
This usually comes from excess moisture in the beans, slicing the bread before it cools completely, or underbaking. Make sure to drain, rinse, and pat the beans dry, bake until a toothpick comes out mostly clean, and let the loaf cool fully before cutting.
Why is my bread dry?
Overbaking is the most common cause. Begin checking the loaf at about 40 minutes, and remove it from the oven as soon as the center is set.
Can I make this bread without a food processor?
A high-speed blender works well. You can also use an immersion blender in a tall container. If you only have a regular blender, blend in short bursts and scrape the sides frequently to get a smooth batter.
Can I double the recipe?
Yes, you can double the ingredients and bake in a larger loaf pan, or divide the batter between two small pans. A larger single loaf will need a longer baking time, so check for doneness with a toothpick.
Is kidney bean bread good for sandwiches?
It works well for open-faced sandwiches and lightly filled sandwiches, especially when toasted. Because the texture is softer and more tender than wheat bread, it’s best to avoid very heavy or very wet fillings.
Can I freeze kidney bean bread?
Absolutely. Slice the cooled loaf, place parchment paper between the slices, and freeze them in a freezer-safe bag or container for up to 2 months. Reheat in a toaster, toaster oven, or skillet.
How long does it keep in the refrigerator?
Stored in an airtight container, cooled slices will keep for up to 4 days in the refrigerator.
Is this recipe vegan or dairy-free?
It is dairy-free as written, but it is not vegan because it contains eggs.
Do I have to use parchment paper?
Parchment paper is strongly recommended. It prevents sticking and lets you lift the loaf out cleanly. A well-greased pan can work in a pinch, but the loaf may be harder to release.
Final Thoughts
This 3-Ingredient High-Protein Kidney Bean Bread proves that a satisfying, homemade loaf doesn’t have to be complicated. With just kidney beans, eggs, and baking powder, you can have a soft, moist, flourless bread that’s ready for toast, sandwiches, snacks, and meal prep. There’s no yeast, no kneading, and no special equipment beyond a blender and a loaf pan.
The key to success is simple: drain the beans well, blend until completely smooth, bake just until set, and let the loaf cool before slicing. Once you’ve tried the base recipe, you can explore savory herbs, cheese, seeds, or a touch of cinnamon to make it your own.
If you give this recipe a try, store a few slices in the freezer for busy mornings, and share your favorite toppings with friends and family. Happy baking!
Print
3-Ingredient High-Protein Kidney Bean Bread
Ingredients
You only need three ingredients for this recipe:
- 1 can (15 oz / 425 g) kidney beans, drained and rinsed (about 250 g after draining)
- 3 large eggs, at room temperature
- 1 teaspoon baking powder
You’ll also want a little parchment paper for lining your loaf pan.
Ingredient Notes and Substitutions
Kidney Beans
Canned kidney beans are the easiest choice because they’re already fully cooked, soft, and ready to blend. Look for plain beans without added seasonings or sauces. Draining and rinsing them well removes the thick canning liquid and excess sodium, which gives you a cleaner flavor and a better batter consistency.
If you’d rather cook your own beans from dried, make sure they are fully cooked before using them. Kidney beans must never be eaten undercooked, because raw or undercooked kidney beans contain a natural compound that can cause stomach upset. Canned beans are already safely cooked, which is one more reason they’re a convenient option here. If you do cook dried beans, you’ll want roughly 1½ cups of cooked, well-drained beans (about 250 g) to match the can.
Eggs
The eggs provide structure, moisture, and additional protein. Room-temperature eggs blend more smoothly into the beans, so take them out of the refrigerator about 20 to 30 minutes before you begin. If you’re in a hurry, place the whole eggs in a bowl of warm (not hot) water for about 5 minutes.
Because eggs are doing the structural work in this recipe, there isn’t a reliable one-to-one swap for a fully egg-free version. Some people experiment with flax eggs or other binders, but results vary and the texture will be different from the original.
Baking Powder
Baking powder gives the loaf a little lift so it isn’t overly dense. Check that yours is fresh. If it’s been in the pantry for more than six months to a year, test it by stirring a small spoonful into hot water. If it fizzes vigorously, it’s still active.
Instructions
Preheat your oven to 350°F (175°C). Drain the kidney beans in a colander and rinse them thoroughly under cold running water. Then pat them lightly with a clean kitchen towel to remove excess moisture. This small step matters, because extra water can make the finished bread too wet in the center.
Line a small loaf pan (approximately 8 × 4 inches) with parchment paper, leaving a little overhang on the long sides. The overhang will act as handles later, so you can lift the loaf out easily once it has cooled.
Step 2: Blend the Ingredients
Add the drained kidney beans and the eggs to a food processor or high-speed blender. Blend until the mixture is completely smooth and creamy, stopping to scrape down the sides as needed. You shouldn’t see any visible bean skins or chunks. Add the baking powder and blend briefly, just until it’s evenly incorporated.
The batter will be thick but pourable, with a color similar to a light brownish-pink. Don’t worry about the color. It will bake to a warm golden-brown.
Step 3: Prepare the Loaf Pan
Pour the smooth batter into the prepared loaf pan. Use a spatula to spread it evenly into the corners, then gently tap the pan on the counter a few times to release any large air bubbles. This helps the loaf bake evenly and gives you a more uniform crumb.
Step 4: Bake the Bread
Place the pan in the preheated oven and bake for approximately 40 to 50 minutes, or until the top is set and a toothpick inserted into the center comes out mostly clean. Baking time can vary depending on your oven and how much moisture is in your beans, so start checking at the 40-minute mark.
The top should look golden brown with a lightly textured surface, and it may develop small cracks along the center. That’s completely normal and part of this bread’s rustic charm.
Step 5: Cool and Slice
Remove the bread from the oven and let it cool in the pan for about 10 to 15 minutes. Then lift it out using the parchment paper and transfer it to a wire rack. Allow it to cool completely before slicing, which usually takes another 30 to 45 minutes. Because this bread is naturally moist, the interior needs time to set. Slicing too early can give you a gummy, crumbly texture.