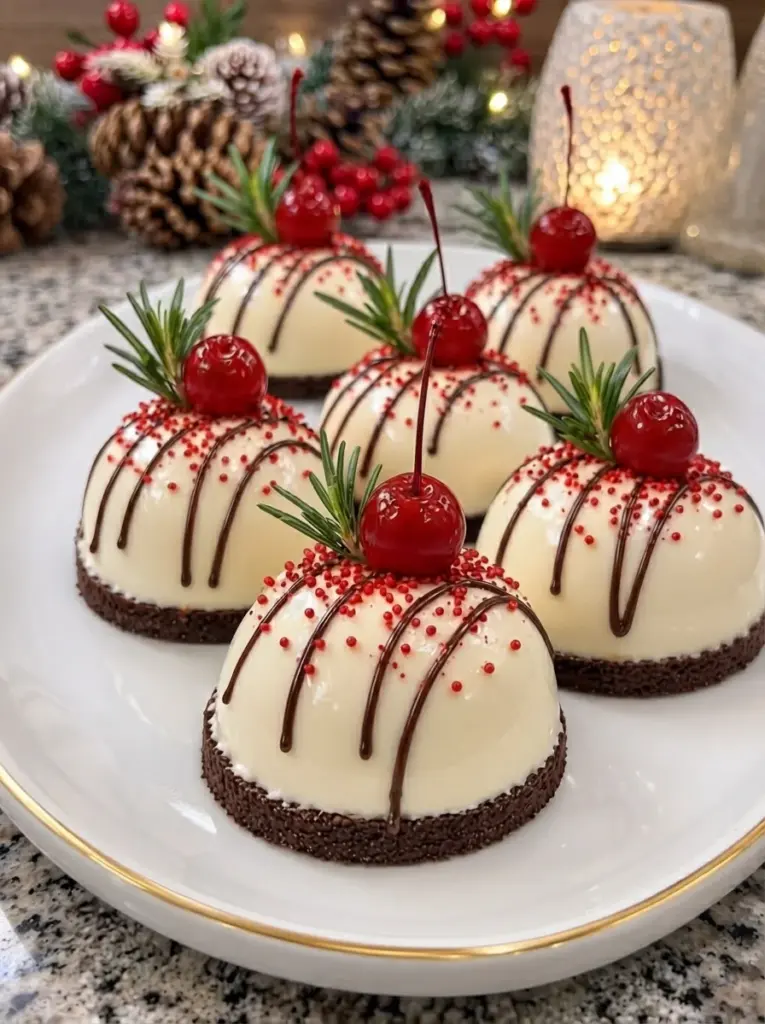
These Christmas White Chocolate Mousse Domes combine silky white chocolate mousse with crisp chocolate-cookie bases and festive decorations. Thin chocolate drizzles, red sprinkles, and glossy cherries give each dessert a holiday finish, while small rosemary sprigs add a touch of green.
Inspired by the pictured desserts, these individual domes have smooth ivory surfaces and a dark cookie layer underneath. The mousse is lightly stabilized with gelatin, frozen in silicone molds for easy removal, then thawed in the refrigerator until soft and creamy.
There’s no baking required, but the desserts need plenty of chilling time. Prepare them a day ahead so they can freeze completely before unmolding. Add the decorations after thawing for the neatest presentation.
The finished texture is delicate and spoonable, with rich white chocolate flavor balanced by the bittersweet cookie base. Serve chilled on small dessert plates for a Christmas dinner, winter celebration, or festive afternoon gathering.
Yield: 6 individual domes
Prep Time: Approximately 45 minutes
Stovetop Time: Approximately 5 minutes
Base Chilling: 30 minutes, overlapping
Freezing: At least 6 hours, preferably overnight
Refrigerator Thawing: Approximately 4–6 hours
Total Time: Approximately 12 hours, including freezing and thawing
What Are White Chocolate Mousse Domes?
Mousse domes are individual desserts set inside half-sphere molds. Freezing makes them firm enough to release cleanly from flexible silicone, revealing a smooth, rounded surface.
In this version, whipped cream gives the mousse its airy texture, white chocolate adds flavor and body, and a little gelatin helps the thawed desserts hold their shape.
Each dome rests on a separate chocolate-cookie base. This provides support and adds a pleasant crunch beneath the creamy filling.
The smooth exterior comes directly from the silicone mold. This recipe does not require a separate chocolate shell or mirror glaze.
Why You’ll Love This Recipe
- Festive appearance: Ivory mousse, red decorations, and green rosemary create a Christmas color palette.
- No baking needed: The bases set in the refrigerator.
- Convenient advance preparation: Freeze the mousse before your celebration.
- Individual portions: Each guest gets a complete little dessert.
- Contrasting textures: Soft mousse meets a crisp chocolate-cookie base.
- Flexible decoration: Keep the finish simple or recreate the cherry-topped look in the photograph.
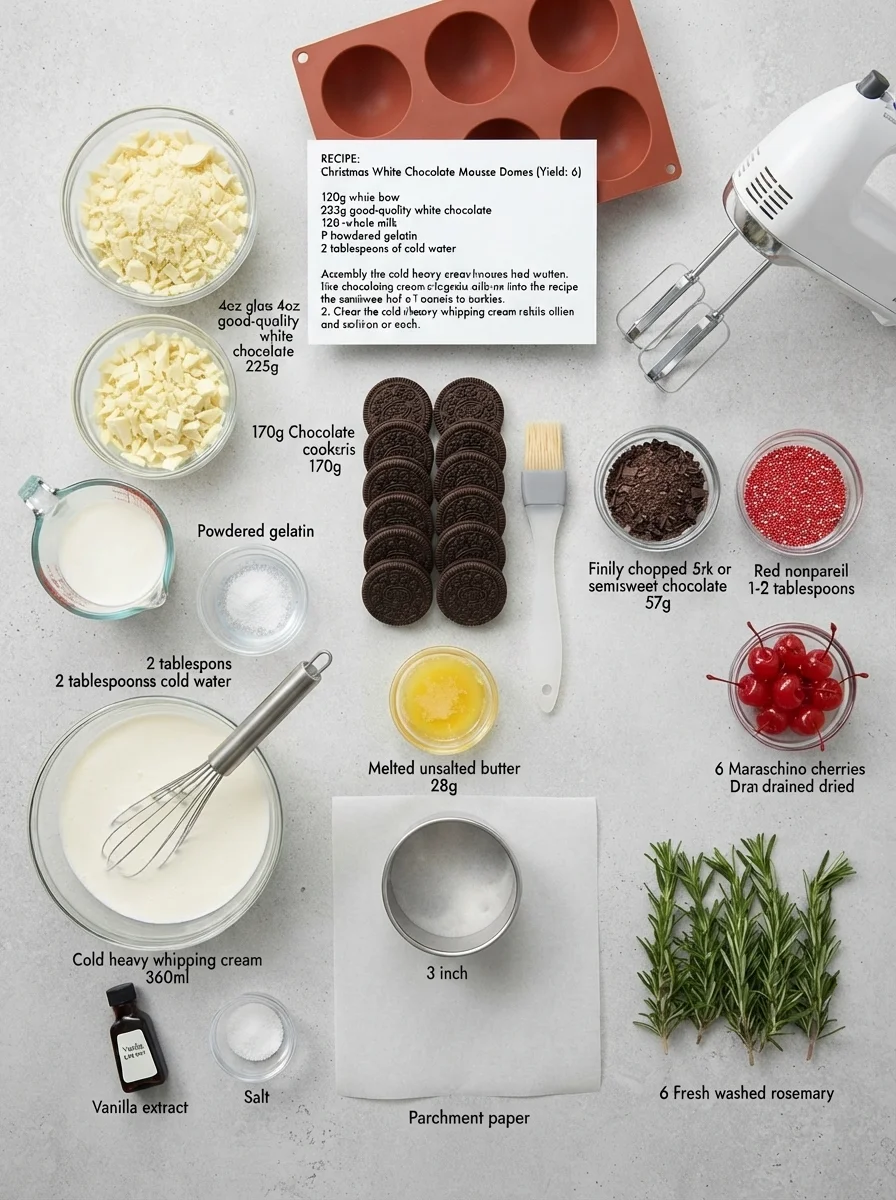
Ingredients 🛒
For the White Chocolate Mousse
- 8 ounces (225 g) good-quality white chocolate, finely chopped
- ½ cup (120 ml) whole milk
- 1½ teaspoons (approximately 4.5–5 g) powdered unflavored gelatin
- 2 tablespoons (30 ml) cold water
- 1½ cups (360 ml) heavy whipping cream, cold
- 1 teaspoon vanilla extract
- ⅛ teaspoon fine salt
For the Chocolate-Cookie Bases
- 15 chocolate sandwich cookies, approximately 6 ounces (170 g), including their filling
- 2 tablespoons (28 g) unsalted butter, melted
For the Christmas Decorations
- 2 ounces (57 g) semisweet or dark chocolate, finely chopped
- 1–2 tablespoons red nonpareil sprinkles
- 6 maraschino or cocktail cherries with stems, drained and thoroughly patted dry
- 6 small fresh rosemary sprigs, washed and thoroughly dried, optional
Equipment: Six silicone half-sphere cavities, each approximately 3 inches across and 150 ml capacity; a tray that fits in the freezer; parchment paper; a 3-inch round cutter; and an electric mixer.
Mold note: Silicone molds vary considerably in capacity. Measure yours with water before starting. If you have extra mousse, spoon it into a small dessert glass and refrigerate separately.
Ingredient Notes
Choose Real White Chocolate
Use white chocolate containing cocoa butter for the intended flavor and texture. Finely chopped baking bars usually melt more smoothly than chips designed to hold their shape.
White candy melts behave differently and are not a direct substitute here.
Use Unflavored Gelatin
Gelatin helps the mousse retain its shape after thawing. Sprinkle it over cold water and let it hydrate before dissolving it in the warm milk.
Use the measured amount rather than assuming you need a whole packet.
Keep the Cream Cold
Cold heavy whipping cream whips more reliably. Beat it only to soft or medium-soft peaks so it folds smoothly into the chocolate mixture.
Very stiff cream can leave small lumps and produce a heavier mousse.
Dry the Decorations
Wet cherries can leave red streaks on the mousse. Drain them well and blot gently with paper towels before decorating.
Rosemary is an optional decorative garnish. Remove the sprigs before eating.
How to Make Christmas White Chocolate Mousse Domes 👩🍳
1. Prepare the Molds
Place the silicone molds on a rigid tray that fits flat in your freezer.
Check that the cavities are clean and completely dry. The mousse will pick up the surface of the mold, so a smooth interior gives the cleanest finish.
There’s no need to grease the silicone.
2. Bloom the Gelatin
Pour 2 tablespoons cold water into a small bowl.
Sprinkle the gelatin evenly over the surface and let stand for 5–10 minutes, until swollen and spongy.
Avoid pouring the powder into one mound, which can leave dry gelatin trapped inside.
3. Melt the White Chocolate
Place the chopped white chocolate in a heatproof bowl.
Warm the milk in a small saucepan until steaming but not boiling. Remove from the heat, add the bloomed gelatin, and stir until completely dissolved.
Pour the warm milk mixture over the white chocolate. Let stand for 1–2 minutes, then stir gently from the center outward until smooth.
If small pieces remain, set the bowl over barely simmering water and stir briefly until melted. Keep water out of the chocolate.
Stir in the vanilla and salt.
4. Cool the Chocolate Mixture
Let the mixture cool until barely lukewarm and still fluid, stirring occasionally.
It should no longer feel hot against your finger. Warm chocolate can deflate whipped cream, while a mixture that has cooled until thick or partly set can create lumps.
If it begins setting around the edges, warm it very gently until fluid again.
5. Whip the Cream
In a chilled bowl, whip the cold heavy cream to soft or medium-soft peaks.
The cream should hold gentle folds, with the peak bending over when the beaters are lifted. Stop before it becomes stiff or grainy.
6. Fold the Mousse
Stir approximately one-quarter of the whipped cream into the white chocolate mixture to lighten it.
Fold in the remaining cream in two additions using a flexible spatula. Scrape along the bottom of the bowl and turn the mixture gently until evenly combined.
The mousse should be smooth, airy, and thick enough to portion.
7. Fill and Freeze
Divide the mousse among the six silicone cavities, leaving a small amount of room at the top if needed.
Use a spoon to guide mousse against the curved sides so there are fewer trapped air pockets. Smooth the exposed surfaces level and gently tap the tray once or twice.
Freeze for at least 6 hours, preferably overnight, until completely solid.
Once the surface has firmed, cover the molds without pressing against the mousse.
8. Make the Cookie Bases
Crush the whole chocolate sandwich cookies into fine crumbs.
Mix with the melted butter until evenly moistened.
On a parchment-lined tray, use a 3-inch round cutter as a guide to form six compact cookie discs. Divide the mixture evenly, pressing each disc firmly into a level layer.
The bases should be approximately ¼ inch thick. Lift the cutter carefully after shaping each one.
Refrigerate for at least 30 minutes, until firm.
9. Unmold the Frozen Domes
Arrange the chilled cookie bases on a serving tray or individual plates.
Working with one dome at a time, gently peel the silicone away from the frozen mousse. Support the flat underside rather than pressing on the rounded top.
Place each dome flat-side down on a cookie base.
Unmold while fully frozen. Partly thawed mousse is more likely to stick or lose its shape.
10. Thaw in the Refrigerator
Refrigerate the assembled desserts for approximately 4–6 hours, until the centers are soft and creamy.
Keep them protected in a covered container with enough clearance above the domes.
Thawing time depends on mold size and refrigerator temperature. They should hold their shape but yield easily to a spoon.
11. Decorate
Melt the dark chocolate in a dry microwave-safe bowl in 15-second intervals, stirring between each interval.
Let it cool slightly while remaining fluid, then transfer to a small piping bag.
Drizzle thin lines over the chilled domes. Immediately scatter red sprinkles over the chocolate lines so some adhere before the chocolate sets.
Finish each dome with one dried cherry and, if using, a small rosemary sprig.
Refrigerate until serving.
Tips for Smooth, Neatly Shaped Domes 💡
Check Mold Capacity First
Diameter alone doesn’t tell you how much mousse a cavity holds. Measuring with water helps avoid unexpectedly small portions or overflowing molds.
Fold at the Right Temperature
The white chocolate mixture should be barely lukewarm and fluid before adding whipped cream.
Avoid Overwhipping
Softly whipped cream blends more easily and gives the mousse a delicate texture.
Freeze Completely
Firmly frozen domes release more cleanly. Overnight freezing is a convenient choice.
Peel the Mold Away
Gently turn the silicone back from the mousse rather than pushing hard on the dome.
Keep the Drizzle Thin
Thick chocolate lines become hard when chilled and can be awkward to cut through. Fine ribbons provide the decorative effect with a more delicate bite.
Easy Variations
Orange White Chocolate Domes
Add ½ teaspoon finely grated orange zest to the warm chocolate mixture with the vanilla.
Vanilla Bean Mousse
Replace the vanilla extract with an equal amount of vanilla bean paste. Small vanilla flecks will show in the ivory mousse.
Different Cookie Bases
Use the same weight of another chocolate sandwich cookie. Plain chocolate wafers require a different butter ratio because they don’t contain cream filling.
Simpler Holiday Decorations
Replace the rosemary and cherries with red-and-green sprinkles or a small chocolate decoration.
Dessert Glasses
If you don’t have silicone molds, divide the mousse among dessert glasses over a thin layer of cookie crumbs. Refrigerate until set rather than freezing and unmolding.
Serving Suggestions 🍽️
Serve each dome chilled on a small dessert plate with a spoon or dessert fork.
The white chocolate mousse is rich, so a few fresh raspberries or sliced strawberries make a pleasant accompaniment. Add fruit shortly before serving.
For the closest presentation to the photograph, arrange the domes on a white platter with space between them. Keep the cherries upright and use small rosemary sprigs so they don’t overwhelm the dessert.
Storage and Make-Ahead Instructions 🥡
Frozen Mousse
Keep the mousse covered in its molds in the freezer for up to 2 weeks for best quality.
Unmold onto freshly prepared bases the day before or morning of serving, allowing enough refrigerator thawing time.
Cookie Bases
Prepare the bases up to 2 days ahead and refrigerate in an airtight container. Handle carefully, since thin crumb bases can break.
Thawed Domes
Keep covered and refrigerated, and enjoy within 2 days of thawing.
The cookie bases gradually soften beneath the mousse. Assemble on the day of serving when possible for the clearest texture contrast.
Decorations
Add the chocolate drizzle and sprinkles after thawing. Place the cherries and rosemary closer to serving for the freshest appearance.
Troubleshooting
The Mousse Has Small Lumps
The chocolate may not have melted completely, or the mixture may have cooled too far before folding. Make sure the chocolate base is smooth and fluid first.
The Domes Stick to the Mold
They may not be fully frozen. Return them to the freezer and try again once solid.
The Mousse Slumps After Thawing
Check that the gelatin was measured accurately, fully bloomed, and completely dissolved. Molded mousse also needs to remain refrigerated.
The Cookie Bases Crumble
Crush the cookies finely and press the mixture firmly. Chill thoroughly before moving.
The Cherry Leaves Red Marks
Drain and dry the cherries more thoroughly, and add them shortly before serving.
Frequently Asked Questions ❓
1. Do the domes have a hard white chocolate shell?
No. Their smooth surface comes from the silicone molds. The exterior is the same mousse as the center.
2. Do I need gelatin?
For this molded recipe, gelatin helps the thawed mousse hold its shape. Omitting it would require a different formulation.
3. Can I use agar instead?
Agar behaves differently and isn’t a direct substitute for the quantity or method given here.
4. Can I use white chocolate chips?
Use chips suitable for melting. A finely chopped white chocolate baking bar is generally easier to incorporate smoothly.
5. Can I unmold without freezing?
Freezing is recommended for clean release and a smooth dome shape.
6. Are the desserts served frozen?
No. Freezing is a shaping step. Thaw in the refrigerator before serving.
7. Can I use smaller molds?
Yes. You’ll make more domes and need smaller cookie bases. Freezing and thawing times may also be shorter.
8. Can I use a metal mold?
Flexible silicone is recommended because it peels away from the frozen mousse without warming the surface.
9. Can I replace the cookie bases with cake?
Yes. Use thin rounds of fully baked, cooled chocolate cake cut to match the domes.
10. Is the rosemary necessary?
No. It’s an optional decorative garnish and should be removed before eating.
11. Can I prepare them for a party?
Yes. Freeze the mousse ahead, prepare the bases separately, and allow enough refrigerator time for thawing before decorating.
12. Can I double the recipe?
Yes. Double the ingredients and use additional molds, checking that you have enough freezer and refrigerator space for level trays.

Christmas White Chocolate Mousse Domes
Description
Yield: 6 domes
Prep: 45 minutes
Stovetop: Approximately 5 minutes
Freeze: At least 6 hours
Thaw: Approximately 4–6 hours
Ingredients
Ingredients
Mousse
- 8 ounces (225 g) white chocolate, finely chopped
- ½ cup (120 ml) whole milk
- 1½ teaspoons (4.5–5 g) powdered unflavored gelatin
- 2 tablespoons cold water
- 1½ cups (360 ml) cold heavy whipping cream
- 1 teaspoon vanilla extract
- ⅛ teaspoon fine salt
Bases
- 15 chocolate sandwich cookies, approximately 6 ounces (170 g), including filling
- 2 tablespoons (28 g) unsalted butter, melted
Decorations
- 2 ounces (57 g) dark or semisweet chocolate
- 1–2 tablespoons red nonpareils
- 6 stemmed maraschino or cocktail cherries, drained and dried
- 6 small rosemary sprigs, optional; remove before eating
Instructions
- Set six approximately 150 ml silicone dome cavities on a freezer-safe tray.
- Sprinkle gelatin over cold water. Let bloom for 5–10 minutes.
- Heat milk until steaming. Remove from heat and dissolve the bloomed gelatin in it.
- Pour over chopped white chocolate. Rest briefly, then stir until smooth. Add vanilla and salt. Cool until barely lukewarm and fluid.
- Whip cream to soft or medium-soft peaks. Stir one-quarter into the chocolate mixture, then fold in the remainder.
- Divide among molds, smooth, and freeze for at least 6 hours, preferably overnight.
- Crush cookies and mix with melted butter. Press into six 3-inch discs on parchment. Refrigerate for 30 minutes.
- Peel the molds away from the frozen domes and place each on a cookie base.
- Thaw covered in the refrigerator for approximately 4–6 hours.
- Decorate with thin melted chocolate drizzles, red sprinkles, dried cherries, and optional rosemary. Keep refrigerated until serving.