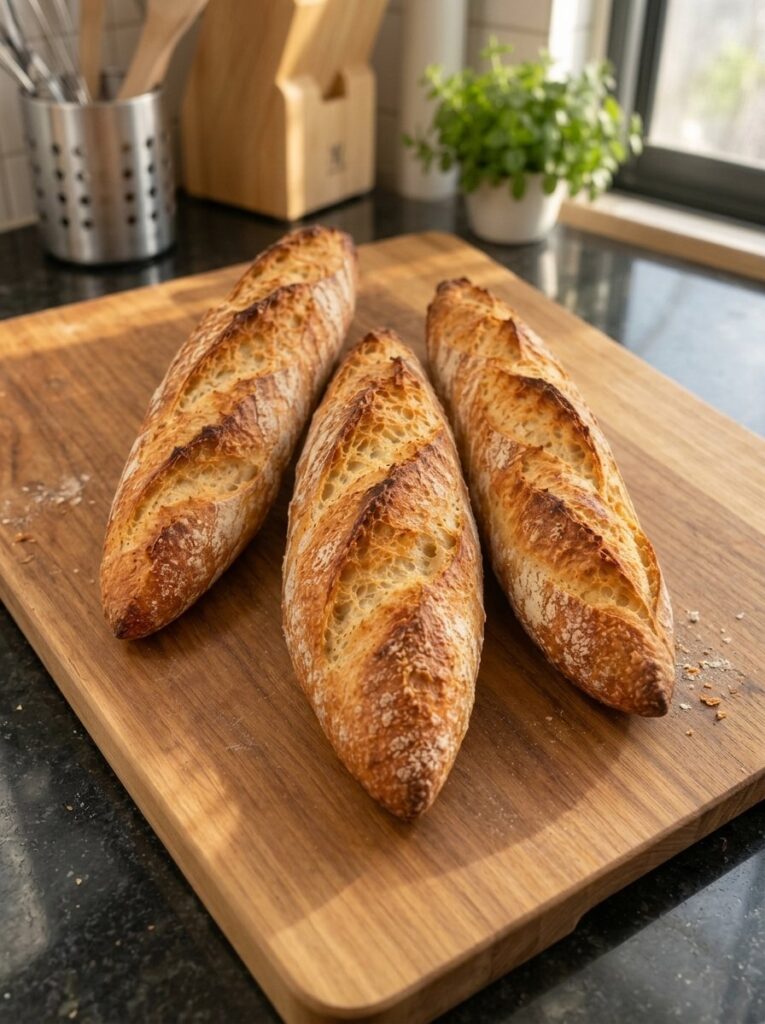
Crusty Mini Sourdough Baguettes: An Easy Homemade Recipe With a Crackly Golden Crust
There is something almost magical about pulling a tray of golden, crackling baguettes out of your own oven. The crust sings as it cools, the kitchen smells like a French bakery, and the first slice reveals a chewy, open, flavorful crumb. The best part is that you do not need commercial yeast, sugar, or fat to get there.
These mini sourdough baguettes are made with only four ingredients: ripe sourdough starter, bread flour, water, and fine sea salt. The flavor comes from slow, natural fermentation, and the shape comes from a few simple folding and rolling techniques. They are smaller than a classic baguette, so they are easier to shape, easier to fit in a home oven, and perfect for sandwiches, soup nights, and dinner tables.
This guide covers the full sourdough baguette recipe, plus the tips, troubleshooting advice, serving ideas, and storage methods you need to bake them with confidence.
Why You’ll Love This Sourdough Baguette Recipe
Not all baguette recipes are equal, and not all of them suit home bakers. Here is why this one earns a permanent place in your recipe rotation:
- Only four ingredients. Starter, flour, water, and salt. There is no commercial yeast, sugar, or added fat, so the flavor comes entirely from fermentation.
- Mini size. Four small loaves are more manageable than long, floppy full-size baguettes, and they bake evenly in a standard home oven.
- A shatteringly crisp crust. Steam in the oven helps the loaves expand fully and sets a golden, crackly crust.
- A chewy, tangy crumb. Gentle stretch and folds build strength without traditional kneading.
- Flexible timing. You can bake the same day or refrigerate the shaped loaves overnight for even more flavor.
- Versatile. These baguettes work for breakfast, lunch, dinner, and snacks, and they make excellent garlic bread.
Ingredients for Mini Sourdough Baguettes
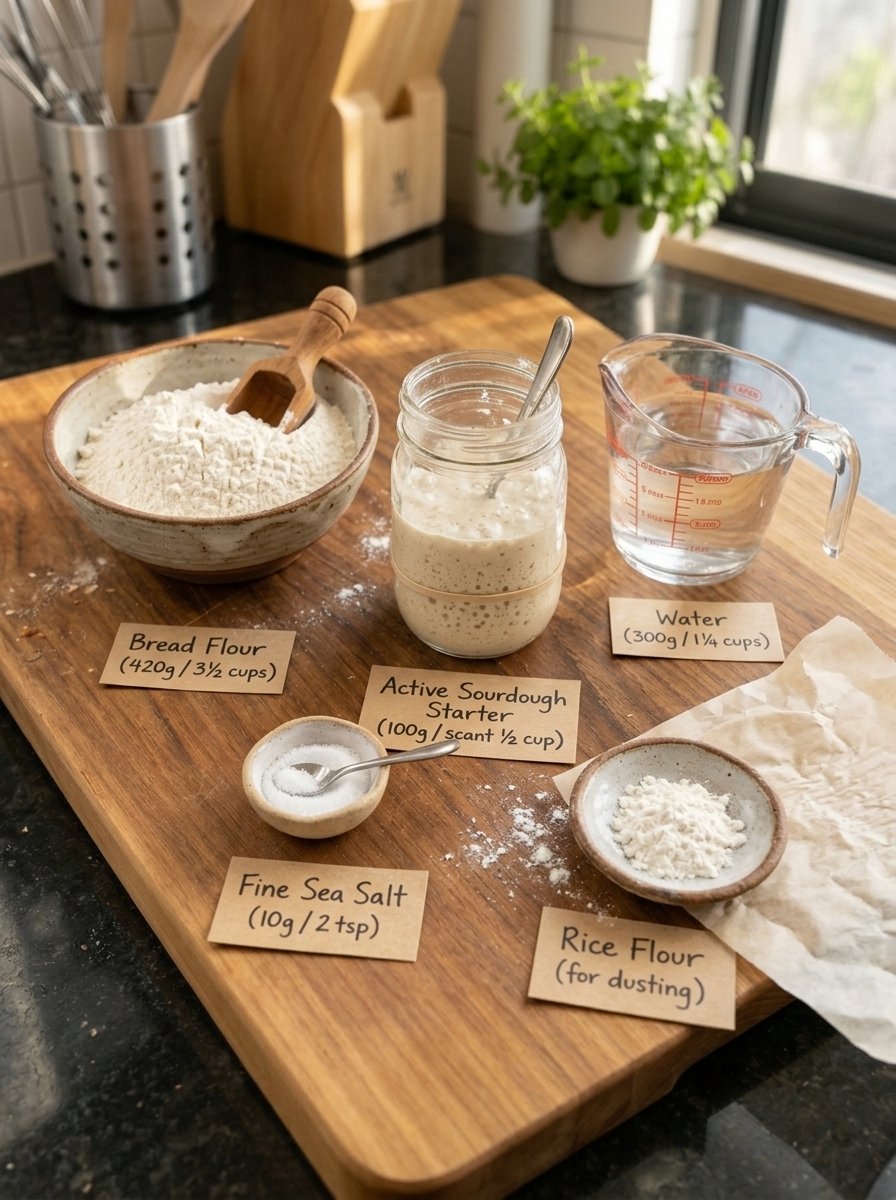
You need very little, so quality and accuracy matter.
| Ingredient | Amount | Weight |
|---|---|---|
| Ripe 100%-hydration sourdough starter | Scant ½ cup | 100 g |
| Bread flour | 3½ cups | 420 g |
| Water, room temperature | 1¼ cups | 300 g |
| Fine sea salt | 2 teaspoons | 10 g |
You will also need extra flour for dusting, plus rice flour or parchment paper for lining the proofing surface.
Ingredient Notes
Sourdough starter. Use a starter that is bubbly, recently fed, and near its peak. A 100%-hydration starter means equal weights of flour and water. A sluggish starter produces dense, flat baguettes with little flavor development, so do not skip the feeding schedule before baking day.
Bread flour. Bread flour has a higher protein content than all-purpose flour, which helps create the strong gluten network that gives baguettes their chew and structure. All-purpose flour can work in a pinch, but the dough may feel slacker and the crumb will be softer.
Water. Room temperature water keeps fermentation steady. Water that is too warm speeds up fermentation and can make the dough overproof before you finish shaping.
Fine sea salt. Salt strengthens gluten, controls fermentation speed, and brings out the flavor of the wheat. Fine salt dissolves more evenly than coarse salt.
Rice flour. Rice flour is a handy dusting option because it does not absorb moisture as quickly as wheat flour, so it keeps dough from sticking to your cloth or board.
Tips for the Best Mini Sourdough Baguettes
Sourdough rewards attention more than speed. These tips make the difference between a decent loaf and a bakery-quality one.
1. Use an active starter. A starter at its peak provides the lift and flavor that make sourdough worth the effort. If your starter has not been fed recently, give it a feeding and wait until it is domed, bubbly, and airy.
2. Measure by weight. Cup measurements can vary widely depending on how flour is scooped. A kitchen scale delivers consistent hydration and predictable results every time.
3. Watch the dough, not the clock. Fermentation depends on starter strength and room temperature. A cooler kitchen means a longer rise, and a warm kitchen speeds everything up. Look for volume, bubbles, and a relaxed, airy texture.
4. Keep the dough slightly tacky. It is tempting to add flour when dough feels sticky, but too much extra flour leads to a denser crumb. Use damp hands instead.
5. Build strength gently. Stretch and folds develop gluten without intensive kneading, which suits a hydrated dough like this one.
6. Shape with care. Create surface tension as you roll, but avoid pressing out all the air. You want a tight skin and a lively interior.
7. Use steam. Steam keeps the crust flexible during the first minutes of baking, allowing the loaf to expand fully before the crust sets into a crisp shell.
8. Score just before baking. Shallow, confident diagonal cuts with a sharp blade control how the loaf expands.
9. Cool completely. Slicing too early releases steam from the crumb and can leave the interior gummy. Patience pays off.
Equipment You’ll Need
You do not need professional equipment, but a few tools make baguette baking easier:
- A large mixing bowl
- A kitchen scale
- A wooden spoon or clean hands
- A linen couche or clean kitchen towel
- A baking stone or heavy baking sheet
- A baguette peel or parchment paper
- A bread lame or razor blade
- An empty oven-safe metal pan for steam
- A wire cooling rack
- A serrated bread knife
How to Make Mini Sourdough Baguettes: Step by Step
Step 1: Mix the Starter and Water
In a large bowl, combine the ripe sourdough starter with the room-temperature water. Stir until the starter is mostly dissolved and the mixture looks cloudy. Dissolving the starter first helps it distribute evenly through the dough.
Step 2: Add the Flour and Salt
Add the bread flour and salt. Mix with a wooden spoon or your hands until no dry flour remains. The dough will look rough and slightly sticky, and that is exactly right at this stage.
Cover the bowl and let the dough rest for 30 to 45 minutes. This rest, often called an autolyse-style rest, lets the flour absorb the water fully and makes the dough smoother and easier to handle.
Step 3: Develop the Dough With Stretch and Folds
Dampen your hands slightly. Grab one side of the dough, stretch it upward gently, and fold it over the center. Turn the bowl and repeat on all four sides.
Cover the dough and rest it for 30 minutes. Repeat the process three to four times, leaving about 30 minutes between each set. Over time the dough becomes smoother, stronger, and more elastic.
Step 4: Begin the Bulk Fermentation
After the final set of folds, cover the bowl and leave the dough at room temperature. You are looking for the dough to increase in volume by approximately 50 to 75 percent, look airy, and show bubbles along the sides of the bowl.
Expect this to take roughly 4 to 7 hours in total, depending on your starter’s strength and your kitchen temperature. If the dough is already very bubbly and relaxed, do not wait for it to double completely. Overfermented dough can turn slack and sour.
Step 5: Divide the Dough
Lightly flour your work surface and gently turn out the fermented dough. Divide it into four equal portions. A kitchen scale helps here, since equal pieces bake at the same rate. Handle the dough gently to preserve as much of its internal air as possible.
Step 6: Pre-Shape the Portions
Shape each portion into a loose rectangle. Fold the top edge toward the center and press lightly to seal. Fold the bottom edge toward the center, then gently roll each piece into a short cylinder.
Cover the portions with a clean kitchen towel and let them rest for 15 to 20 minutes. This rest relaxes the gluten so the final shaping goes smoothly.
Step 7: Shape the Mini Baguettes
Working with one piece at a time, gently flatten it into a small rectangle. Fold the top edge toward the center and press to seal, then fold the bottom edge over it. Fold the dough in half lengthwise and pinch the seam closed.
Roll gently with your hands, working from the center outward, to create a slender baguette with slightly tapered ends. Repeat with the remaining portions.
Step 8: Arrange and Proof the Baguettes
Place the shaped baguettes seam-side up on a lightly floured linen couche or clean kitchen towel. Use folds in the cloth to support the sides so each loaf holds its shape.
Cover loosely and let them proof for approximately 1 to 2 hours, until they are noticeably puffy and slightly springy when pressed gently.
For deeper sourdough flavor, refrigerate the shaped baguettes overnight and bake them the next day.
Step 9: Preheat the Oven
Preheat your oven to 475°F (245°C). Place a baking stone or heavy baking sheet inside to heat thoroughly. If you are using a steam pan, put an empty oven-safe metal pan on a lower rack while the oven preheats.
Step 10: Score the Baguettes
Carefully transfer the baguettes seam-side down onto parchment paper or a lightly floured baguette peel. Use a sharp bread lame or razor blade to make three to four shallow diagonal slashes along the top of each loaf. Keep the cuts slightly overlapping for that classic baguette look.
Step 11: Bake With Steam
Slide the baguettes onto the preheated baking surface. Carefully pour about 1 cup of hot water into the preheated metal pan, avoiding splashes and rising steam, and close the oven door immediately.
Bake with steam for about 10 to 12 minutes. If possible, remove the steam pan, then continue baking for another 8 to 12 minutes, until the baguettes are deeply golden brown and crisp.
Step 12: Cool on a Wire Rack
Move the baguettes to a wire rack and let them cool for at least 30 to 45 minutes before slicing. The interior finishes setting during this time, and the crust stays crisp.
Step 13: Slice and Enjoy
Use a serrated bread knife to slice the loaves. Enjoy them fresh with butter, turn them into small sandwiches, or serve them alongside soups and hearty meals.
Recipe Details at a Glance
- Prep time: 35 minutes
- Bulk fermentation: approximately 4 to 7 hours
- Resting and shaping time: 35 to 45 minutes
- Final proof: approximately 1 to 2 hours
- Bake time: 18 to 24 minutes
- Cooling time: 30 to 45 minutes
- Total time: approximately 7 to 10 hours, depending on fermentation conditions
- Yield: 4 mini sourdough baguettes
- Oven temperature: 475°F (245°C)
Troubleshooting Common Sourdough Baguette Problems
Even experienced bakers run into trouble. Here is how to fix the most common issues.
My baguettes came out dense and flat.
The most likely culprit is an underactive starter or an underfermented dough. Make sure your starter is fed and bubbly before mixing, and let bulk fermentation reach that 50 to 75 percent volume increase. Over-handling during shaping can also push out too much air.
The crust is pale or soft.
Pale crust usually means the oven was not hot enough or the bake was too short. Preheat the baking surface fully, and bake until the baguettes are a deep golden brown. Remember to remove the steam pan partway through so the crust can dry and crisp. Too much steam for too long leaves the crust soft.
The dough is too sticky to shape.
A slightly tacky dough is normal and desirable. Dampen your hands, use a light dusting of flour on the work surface, and move confidently. Resist adding large amounts of flour, which tightens the crumb.
The loaves spread sideways instead of rising.
This usually points to overproofing or weak shaping tension. Check your proof by gently pressing a finger into the dough. If it springs back slowly, it is ready. If it stays dented and feels fragile, it may be overproofed. Use the folds in your couche to support the sides.
The scoring did not open properly.
Use a very sharp blade and cut quickly at a shallow diagonal angle. A dull blade drags the dough and deflates it. Scoring just before the loaves go in the oven also helps, because the dough is at its most responsive.
The crumb is gummy.
Slicing too soon is the usual cause. Let the baguettes cool for at least 30 to 45 minutes so moisture can redistribute and the crumb can set.
Serving Ideas for Sourdough Baguettes
These mini baguettes adapt to almost any meal:
- French breakfast: Serve with butter, jam, or honey alongside coffee or tea.
- Mini sandwiches: Fill with turkey, ham, cheese, lettuce, tomatoes, or grilled vegetables.
- Soup companion: Pair with French onion soup, tomato soup, or creamy vegetable soup.
- Garlic bread: Slice lengthwise, brush with garlic butter, and toast until golden.
- Cheese board: Serve with brie, cheddar, olives, grapes, and savory spreads.
- Family dinner: Add warm baguettes to the table alongside roasted chicken, pasta, or a hearty stew.
How to Store and Reheat Sourdough Baguettes
Baguettes are at their best the day they are baked, but you can keep them fresh with the right storage.
Room temperature: Once completely cooled, store them in a paper bread bag or loosely wrapped in a clean kitchen towel for up to 2 days. Avoid airtight plastic, which softens the crust.
Freezer: Freeze fully cooled baguettes in a freezer-safe bag for up to 2 months.
Reheating: Lightly mist the crust with water and warm the loaves in a 350°F (175°C) oven for 5 to 8 minutes to refresh the crisp exterior.
Make-ahead tip: After shaping, refrigerate the baguettes overnight in a covered couche or proofing container. If they are properly proofed, bake them directly from the refrigerator, adjusting the bake time slightly if needed. This also deepens the sourdough flavor.
Frequently Asked Questions
Can I make sourdough baguettes without commercial yeast?
Yes. This recipe uses only ripe sourdough starter to leaven the dough. The wild yeast and bacteria in your starter do all the work, which is also what gives the bread its complex flavor.
How long does it take to make sourdough baguettes?
Plan on roughly 7 to 10 hours from start to finish, including bulk fermentation, shaping, proofing, baking, and cooling. Most of that time is hands-off waiting. Active work is only a small portion of the day.
Can I use all-purpose flour instead of bread flour?
You can, but bread flour is recommended. Its higher protein content builds a stronger gluten network, which supports the chewy crumb and structure baguettes need. With all-purpose flour, the result will be a little softer and the dough may feel slacker.
How do I know when the bulk fermentation is finished?
Look for a 50 to 75 percent increase in volume, an airy appearance, and visible bubbles along the sides of the bowl. If the dough is already very bubbly and relaxed, it is ready even if it has not fully doubled.
Do I really need steam?
Steam is one of the most important factors in getting a crisp, golden, well-expanded crust. A preheated metal pan on a lower rack filled with hot water at the start of baking works well in a home oven.
Can I make the dough ahead of time?
Yes. After shaping, refrigerate the baguettes overnight in a covered couche or proofing container. The cold rest develops flavor and fits easily into a busy schedule.
Why are these called mini baguettes?
The recipe divides the dough into four portions rather than the two or three of a traditional recipe. The loaves are shorter and slimmer, which makes them easier to shape and bake at home and ideal for individual sandwiches.
How do I keep the crust crisp after baking?
Cool the loaves completely on a wire rack, store them in a paper bag or kitchen towel instead of plastic, and refresh them in a 350°F (175°C) oven with a light mist of water when you reheat.
Can I freeze sourdough baguettes?
Yes. Freeze fully cooled baguettes in a freezer-safe bag for up to 2 months, then reheat in the oven to restore their crisp crust.
Final Thoughts
Homemade sourdough baguettes may seem intimidating, but they come down to a handful of simple habits: use an active starter, keep the dough gently hydrated, build strength with stretch and folds, shape with care, and bake with steam. Each batch teaches you something about your starter, your oven, and your kitchen, and the results improve with every bake.
These crusty mini sourdough baguettes give you the taste of a French bakery with only four humble ingredients and a little patience. Serve them warm with butter, tuck them around your favorite sandwich fillings, or tear them beside a bowl of soup. Once you hear that crust crackle, you will want to bake them again.
Print
Crusty Mini Sourdough Baguettes
Ingredients
You need very little, so quality and accuracy matter.
Ingredients 🫙
-
Ripe 100%-hydration sourdough starter: Scant ½ cup (100 g)
-
Bread flour: 3½ cups (420 g)
-
Water, room temperature: 1¼ cups (300 g)
-
Fine sea salt: 2 teaspoons (10 g)
Instructions
In a large bowl, combine the ripe sourdough starter with the room-temperature water. Stir until the starter is mostly dissolved and the mixture looks cloudy. Dissolving the starter first helps it distribute evenly through the dough.
Add the bread flour and salt. Mix with a wooden spoon or your hands until no dry flour remains. The dough will look rough and slightly sticky, and that is exactly right at this stage.
Cover the bowl and let the dough rest for 30 to 45 minutes. This rest, often called an autolyse-style rest, lets the flour absorb the water fully and makes the dough smoother and easier to handle.
Dampen your hands slightly. Grab one side of the dough, stretch it upward gently, and fold it over the center. Turn the bowl and repeat on all four sides.
Cover the dough and rest it for 30 minutes. Repeat the process three to four times, leaving about 30 minutes between each set. Over time the dough becomes smoother, stronger, and more elastic.
After the final set of folds, cover the bowl and leave the dough at room temperature. You are looking for the dough to increase in volume by approximately 50 to 75 percent, look airy, and show bubbles along the sides of the bowl.
Expect this to take roughly 4 to 7 hours in total, depending on your starter’s strength and your kitchen temperature. If the dough is already very bubbly and relaxed, do not wait for it to double completely. Overfermented dough can turn slack and sour.
Lightly flour your work surface and gently turn out the fermented dough. Divide it into four equal portions. A kitchen scale helps here, since equal pieces bake at the same rate. Handle the dough gently to preserve as much of its internal air as possible.
Shape each portion into a loose rectangle. Fold the top edge toward the center and press lightly to seal. Fold the bottom edge toward the center, then gently roll each piece into a short cylinder.
Cover the portions with a clean kitchen towel and let them rest for 15 to 20 minutes. This rest relaxes the gluten so the final shaping goes smoothly.
Working with one piece at a time, gently flatten it into a small rectangle. Fold the top edge toward the center and press to seal, then fold the bottom edge over it. Fold the dough in half lengthwise and pinch the seam closed.
Roll gently with your hands, working from the center outward, to create a slender baguette with slightly tapered ends. Repeat with the remaining portions.
Place the shaped baguettes seam-side up on a lightly floured linen couche or clean kitchen towel. Use folds in the cloth to support the sides so each loaf holds its shape.
Cover loosely and let them proof for approximately 1 to 2 hours, until they are noticeably puffy and slightly springy when pressed gently.
For deeper sourdough flavor, refrigerate the shaped baguettes overnight and bake them the next day.
Preheat your oven to 475°F (245°C). Place a baking stone or heavy baking sheet inside to heat thoroughly. If you are using a steam pan, put an empty oven-safe metal pan on a lower rack while the oven preheats.
Carefully transfer the baguettes seam-side down onto parchment paper or a lightly floured baguette peel. Use a sharp bread lame or razor blade to make three to four shallow diagonal slashes along the top of each loaf. Keep the cuts slightly overlapping for that classic baguette look.
Slide the baguettes onto the preheated baking surface. Carefully pour about 1 cup of hot water into the preheated metal pan, avoiding splashes and rising steam, and close the oven door immediately.
Bake with steam for about 10 to 12 minutes. If possible, remove the steam pan, then continue baking for another 8 to 12 minutes, until the baguettes are deeply golden brown and crisp.
Move the baguettes to a wire rack and let them cool for at least 30 to 45 minutes before slicing. The interior finishes setting during this time, and the crust stays crisp.
Use a serrated bread knife to slice the loaves. Enjoy them fresh with butter, turn them into small sandwiches, or serve them alongside soups and hearty meals.