Easy 3-Ingredient Chickpea Bread: A Soft, Hearty, Yeast-Free Loaf
If you’ve ever wanted fresh homemade bread without proofing yeast, kneading dough, or waiting hours for it to rise, this easy chickpea bread is for you. It’s a soft, hearty, naturally yeast-free loaf made mostly from cooked chickpeas, eggs, and Greek yogurt. You blend everything, pour it into a pan, and bake. That’s the whole method.
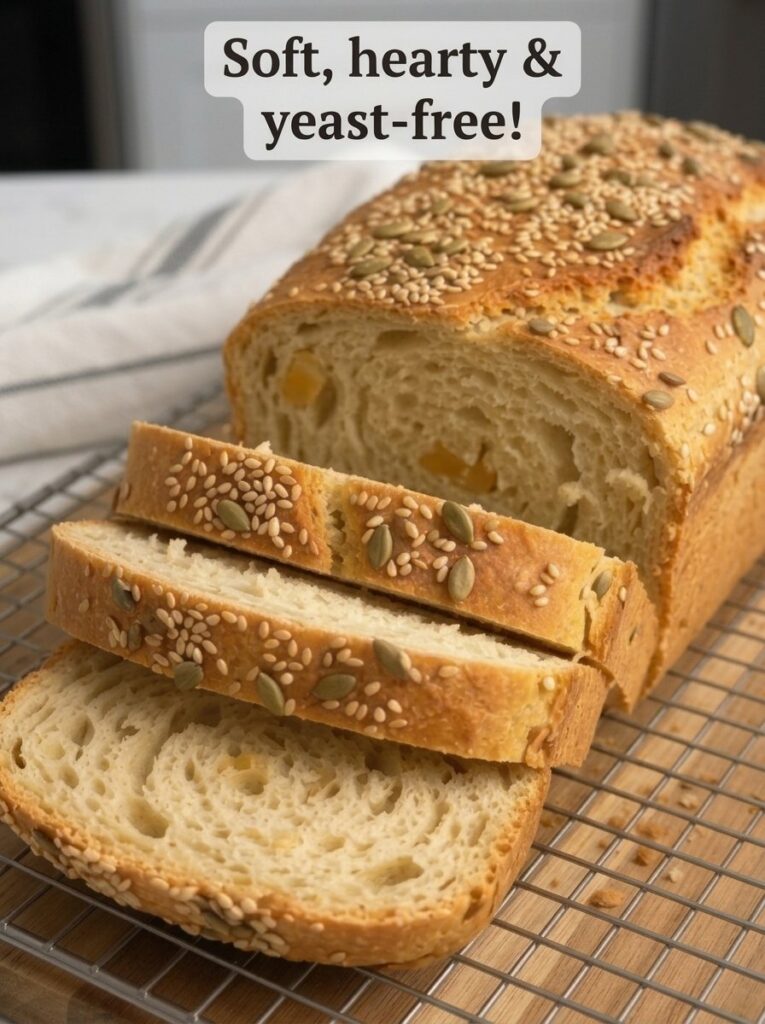
The finished loaf has a mild savory flavor, a tender and moist interior, and a golden top scattered with crunchy sesame and pumpkin seeds. It’s great for breakfast toast, sandwiches, or dunking into a bowl of soup. It’s also high in protein and can be made gluten-free when you use certified gluten-free baking powder.
This guide covers everything you need: the ingredients and why each one matters, step-by-step instructions, troubleshooting tips, flavor variations, serving ideas, storage and freezing, and answers to common questions.
What Is Chickpea Bread?
Chickpea bread is a savory quick bread. Instead of wheat flour and yeast, it gets its structure from blended chickpeas and eggs. The eggs set as they bake and hold the loaf together. The Greek yogurt adds moisture and a subtle tang, and a little baking powder lightens the texture.
Because the batter is blended rather than kneaded, there’s no gluten to develop and no rising time. That makes it a very forgiving recipe, even if you’ve never baked bread before. If you can use a blender and a loaf pan, you can make this.
The texture is different from a classic wheat sandwich loaf. It’s soft, moist, and slightly dense, with a hearty crumb and a gentle nutty flavor from the chickpeas. Toasting brings out that flavor and gives the slices a crisp edge while the center stays tender.
Why You’ll Love This Recipe
- No yeast required. There’s no proofing, no rising, and no waiting around for dough to double.
- No kneading. A blender or food processor does all the work.
- Simple ingredients. The base is chickpeas, eggs, and Greek yogurt, plus baking powder, salt, and optional olive oil.
- High in protein. Chickpeas, eggs, and yogurt all contribute protein, which makes this a filling slice.
- Versatile. Use it for avocado toast, sandwiches, snacks, or a side for soup.
- Great for meal prep. It keeps in the fridge for several days and freezes well in slices.
- Easy to customize. Add garlic powder, herbs, or different seeds to suit your taste.
Ingredients You’ll Need
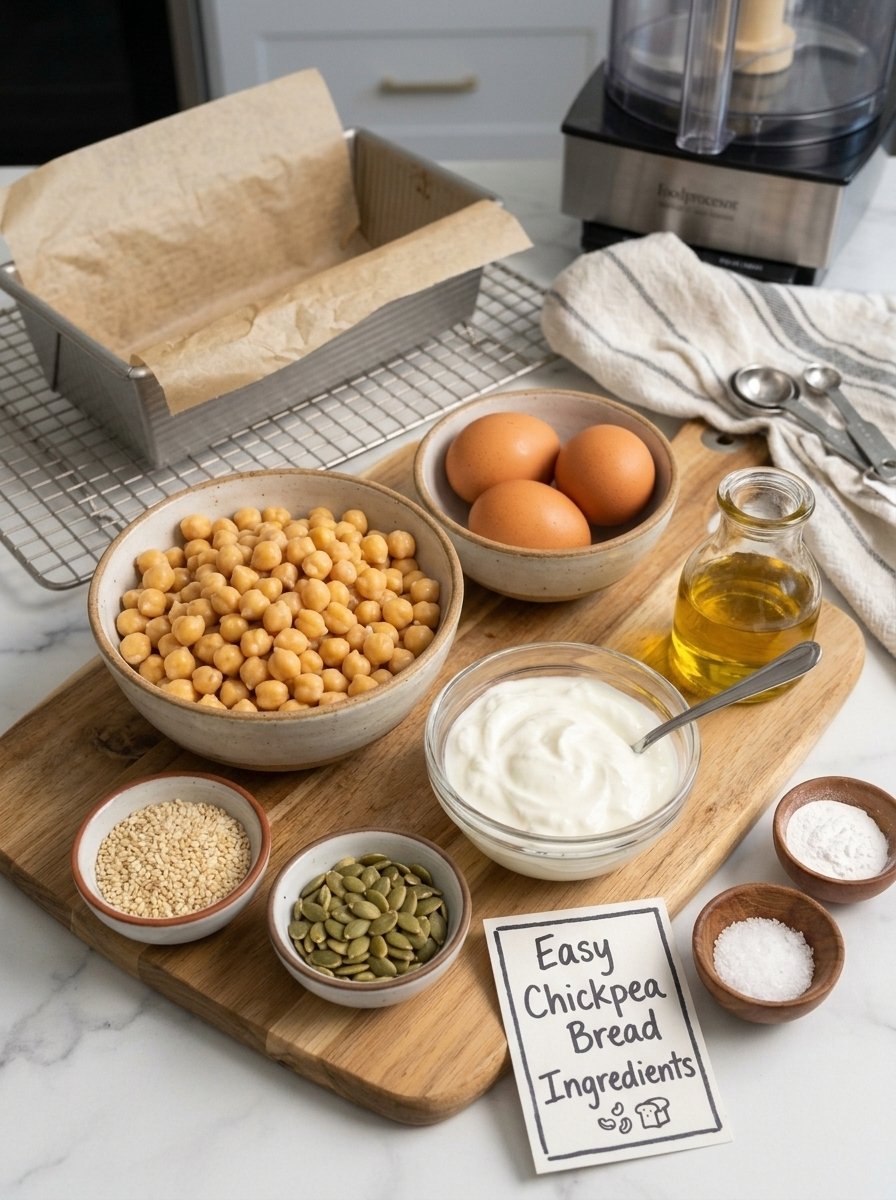
Here’s what goes into one 9 × 5-inch loaf:
- 2 cups (330 g) cooked chickpeas, thoroughly drained and rinsed
- 3 large eggs, at room temperature
- ½ cup (120 g) plain Greek yogurt
- 1 teaspoon baking powder
- ½ teaspoon salt
- 1 tablespoon olive oil (optional, for extra moisture)
- 2 tablespoons sesame seeds, for topping
- 1 tablespoon pumpkin seeds, for topping
Why Each Ingredient Matters
Cooked chickpeas are the foundation of the loaf. Blended until smooth, they replace flour and give the bread its hearty texture and mild, nutty taste. Canned chickpeas work well, as do home-cooked ones. Whichever you use, drain and rinse them thoroughly. Extra liquid is the most common reason this kind of loaf turns out wet or gummy.
Eggs are the binder. As they bake, the proteins set and hold the crumb together so the loaf can be sliced. Room-temperature eggs blend more evenly into the batter than cold ones.
Plain Greek yogurt adds moisture, richness, and a slight tang without thinning the batter. Thick Greek yogurt is the best choice here. Full-fat or 2% both work well.
Baking powder is what makes this a bread rather than a dense chickpea cake. Even without yeast, it gives the loaf a lighter texture. Don’t skip it.
Salt brings out the savory flavor of the chickpeas. Without enough salt, the loaf can taste flat.
Olive oil is optional, but it adds a little extra moisture and helps keep the crumb tender.
Sesame and pumpkin seeds give the crust a toasty crunch and make the loaf look bakery-worthy. They also add a pleasant contrast to the soft interior.
Tips for the Best Chickpea Bread
A few small habits make a big difference with this recipe.
1. Drain the chickpeas thoroughly. Excess liquid can make the batter too wet and keep the loaf from setting properly. After rinsing, let the chickpeas drain completely, then pat them dry with a clean kitchen towel or paper towels.
2. Blend until completely smooth. A high-speed blender or food processor gives you the most uniform texture, without large chickpea pieces. Stop and scrape down the sides as needed so every chickpea gets incorporated.
3. Use room-temperature eggs. They combine more easily with the other ingredients and help you get an evenly mixed batter.
4. Choose thick Greek yogurt. Thinner yogurts can make the batter too loose. Thick yogurt adds moisture without making it runny.
5. Don’t over-blend after adding baking powder. Once the baking powder goes in, pulse just until combined.
6. Customize the flavor. Add ½ teaspoon garlic powder, a little dried oregano or rosemary, or some chopped fresh parsley for a savory variation.
7. Watch the seeds. If the top starts browning too quickly, loosely cover the loaf with aluminum foil for the final stretch of baking.
8. Cool completely before slicing. This bread is naturally moist and needs time to set. Slicing it warm can make it crumble.
How to Make Chickpea Bread: Step-by-Step
Total time: about 1 hour 40 minutes to 2 hours 5 minutes, including cooling.
Yield: 1 small loaf, about 8–10 slices.
Step 1: Prepare the oven and loaf pan
Preheat your oven to 350°F (180°C). Line a 9 × 5-inch (23 × 13 cm) loaf pan with parchment paper, leaving a little overhang on the sides so you can lift the loaf out easily later. Lightly grease any exposed areas with olive oil or cooking spray.
Step 2: Prepare the chickpeas
Drain and rinse the cooked chickpeas under cool running water. Let them drain completely, then gently pat them dry with a clean kitchen towel or paper towels. This step matters more than it seems. Too much liquid can make the bread gummy or keep it from baking evenly.
Step 3: Blend the wet ingredients and chickpeas
Add the chickpeas, eggs, and Greek yogurt to a high-speed blender or food processor. Add the olive oil if you’re using it, and blend until the mixture is smooth and creamy. Pause occasionally to scrape down the sides so everything is incorporated.
Step 4: Add the remaining ingredients
Add the baking powder and salt to the blended mixture. Pulse briefly until everything is evenly combined, and avoid blending for long after the baking powder goes in. The finished batter should be thick but pourable, with a smooth consistency.
Step 5: Transfer the batter to the pan
Pour the batter into the prepared loaf pan. Use a spatula to spread it evenly and smooth the surface. Sprinkle the sesame seeds and pumpkin seeds over the top, gently pressing them into the batter so they stay put while baking.
Step 6: Bake until golden and set
Place the pan on the center rack of the preheated oven. Bake for about 45–55 minutes, until the top is golden brown and the center is completely set.
To check doneness, insert a toothpick into the middle of the loaf. It should come out without wet batter. For extra accuracy, the center should reach roughly 200°F–205°F (93°C–96°C) on an instant-read thermometer. If the seeds or surface get too dark before the center is cooked, loosely cover the loaf with aluminum foil.
Step 7: Cool the bread
Remove the loaf from the oven and let it rest in the pan for 10–15 minutes. Then lift it out using the parchment paper and move it to a wire rack. Let it cool completely, about 45–60 minutes. This is especially important for a chickpea-based crumb, which needs time to firm up and become easier to slice.
Step 8: Slice and serve
Once the loaf is fully cooled, use a sharp serrated bread knife to cut it into even slices. Enjoy it fresh, toasted with butter, topped with avocado, or served alongside your favorite savory dishes.
Troubleshooting Common Problems
My bread is gummy in the middle.
This usually comes from too much moisture or underbaking. Make sure the chickpeas are well drained and patted dry, and check the center with a toothpick or thermometer before taking the loaf out. If the top is browning but the middle isn’t done, cover the loaf loosely with foil and bake a few more minutes.
My bread crumbled when I sliced it.
It was most likely still warm. Chickpea bread needs to cool completely so the crumb can firm up. Use a sharp serrated knife and a gentle sawing motion.
The texture is grainy or has chickpea pieces.
The batter wasn’t blended long enough. Next time, blend until completely smooth and scrape down the sides between pulses. A high-speed blender or a good food processor makes the biggest difference.
The loaf didn’t rise much.
Chickpea bread rises modestly compared with yeast bread, and a slightly dense texture is normal. If it seems flat, check that your baking powder is fresh, and avoid over-blending once it’s added.
The top browned too fast.
Seeds on top can darken quickly. Loosely cover the loaf with aluminum foil during the final baking time.
Flavor Variations to Try
The base recipe is mild and savory, which makes it easy to adapt:
- Garlic and herb: Add ½ teaspoon garlic powder and a little dried oregano or rosemary to the batter.
- Fresh parsley: Stir in some chopped fresh parsley for a bright, herby loaf.
- Seed swap: Use different seeds on top, or add more of what you like. The sesame and pumpkin seed combination is the classic version here.
- Extra moisture: Include the optional tablespoon of olive oil if you like a softer, richer crumb.
When adding extras, keep the batter thick but pourable. Dry herbs and spices are safe additions, but big wet add-ins could throw off the texture.
Serving Ideas
This bread is versatile enough to fit into almost any meal.
- Avocado toast: Toast a slice and top it with mashed avocado, lemon juice, black pepper, and chili flakes.
- Cream cheese breakfast: Spread with cream cheese and add fresh cucumber, tomatoes, or herbs.
- Protein-packed sandwiches: Fill with sliced cheese, lettuce, tomatoes, turkey, or your favorite sandwich ingredients.
- Hummus snack: Spread with homemade hummus and sprinkle with paprika or fresh parsley.
- Soup companion: Serve alongside tomato soup, lentil soup, vegetable soup, or creamy chicken soup.
- Mediterranean plate: Pair with olives, feta cheese, cucumber, cherry tomatoes, and olive oil.
- Simple toast: Warm a slice and finish with butter, garlic, or your favorite savory spread.
Toasting is worth doing even when you’re not making a sandwich. It brings out the nutty chickpea flavor and gives the outside a crisp texture while keeping the center tender.
How to Store Chickpea Bread
Because this bread contains eggs and Greek yogurt, it needs a little more care than a typical wheat loaf.
- At room temperature: Avoid leaving it out for extended periods. Refrigerate within 2 hours of baking.
- Refrigerator: Once completely cooled, store it in an airtight container in the fridge for up to 4–5 days.
- Freezer: Slice the cooled loaf and place parchment paper between the slices. Transfer to a freezer-safe bag or airtight container and freeze for up to 2 months.
- Reheating: Toast refrigerated slices in a toaster, or warm them in a 325°F (165°C) oven for about 5–8 minutes.
- From frozen: Put frozen slices straight into the toaster, adding extra time as needed.
Slicing before freezing is a handy trick. You can pull out exactly as many slices as you need, and the parchment keeps them from sticking together.
Recipe at a Glance
- Prep time: 10 minutes
- Cook time: 45–55 minutes
- Cooling time: 45–60 minutes
- Total time: approximately 1 hour 40 minutes to 2 hours 5 minutes
- Yield: 1 small loaf (about 8–10 slices)
- Pan size: 9 × 5-inch (23 × 13 cm) loaf pan
- Oven temperature: 350°F (180°C)
- Difficulty: Easy
- Diet: Gluten-free (when using certified gluten-free baking powder), yeast-free
- Texture: Soft, hearty, moist, and slightly dense
- Recipe type: High-protein savory quick bread
Is Chickpea Bread Healthy?
Chickpea bread is built from whole-food ingredients: legumes, eggs, and yogurt. Compared with many store-bought breads, the ingredient list is short and simple. Chickpeas bring plant-based protein and fiber, while eggs and Greek yogurt add more protein, which is why the loaf is considered high-protein and filling.
It’s naturally yeast-free, and it can be gluten-free as long as your baking powder is certified gluten-free. If you’re cooking for someone with celiac disease or a serious allergy, always check ingredient labels. This recipe contains eggs and dairy, so it isn’t suitable for people who avoid those. If you follow a specific diet for medical reasons, check with your doctor or a registered dietitian about how this loaf fits into it.
Frequently Asked Questions
Can I use canned chickpeas?
Yes. Canned chickpeas work well. Just drain and rinse them thoroughly, then pat them dry so they don’t add too much liquid to the batter.
Do I need a high-speed blender?
It helps, but it’s not essential. A food processor also works. The goal is a smooth, uniform batter without large chickpea pieces, so blend longer and scrape down the sides if your machine is less powerful.
Is this bread really yeast-free?
Yes. It uses baking powder for lift instead of yeast, so there’s no proofing or rising time.
Is chickpea bread gluten-free?
The ingredients are naturally free of wheat, but baking powder can sometimes contain gluten. Use certified gluten-free baking powder if you need the loaf to be gluten-free.
Can I leave out the olive oil?
Yes, it’s optional. It adds a bit of extra moisture, but the loaf still works without it.
Why does the bread need to cool before slicing?
The chickpea crumb is moist and needs time to firm up. Slicing too early can make it crumble or seem gummy. Waiting 45–60 minutes after it leaves the pan makes slicing much cleaner.
How do I know when it’s done?
Look for a golden-brown top and a set center. A toothpick inserted in the middle should come out without wet batter, and the center should reach about 200°F–205°F (93°C–96°C).
Can I freeze chickpea bread?
Yes. Slice the cooled loaf, place parchment paper between the slices, and freeze in an airtight container or freezer-safe bag for up to 2 months. Toast slices straight from frozen.
How long does it last in the fridge?
Stored in an airtight container, it keeps for 4–5 days. Refrigerate it within 2 hours of baking.
What can I add for more flavor?
Garlic powder, dried oregano, rosemary, or chopped fresh parsley all work nicely in the batter.
Final Thoughts
This easy chickpea bread proves that homemade bread doesn’t have to be complicated. With no yeast, no kneading, and just a handful of simple ingredients, you get a soft, hearty, golden loaf that’s ready in about two hours, most of which is hands-off baking and cooling. The recipe is forgiving, adaptable, and easy to keep on hand as sliced portions in the freezer.
Drain your chickpeas well, blend until smooth, and let the loaf cool completely. Those three habits are the secret to clean slices and a tender crumb. Once you’ve made it, try the garlic and herb variation, or pile a toasted slice high with avocado.
Print
Easy 3-Ingredient Chickpea Bread
- Total Time: 45–60 minutes
Ingredients
Here’s what goes into one 9 × 5-inch loaf:
- 2 cups (330 g) cooked chickpeas, thoroughly drained and rinsed
- 3 large eggs, at room temperature
- ½ cup (120 g) plain Greek yogurt
- 1 teaspoon baking powder
- ½ teaspoon salt
- 1 tablespoon olive oil (optional, for extra moisture)
- 2 tablespoons sesame seeds, for topping
- 1 tablespoon pumpkin seeds, for topping
Instructions
A few small habits make a big difference with this recipe.
1. Drain the chickpeas thoroughly. Excess liquid can make the batter too wet and keep the loaf from setting properly. After rinsing, let the chickpeas drain completely, then pat them dry with a clean kitchen towel or paper towels.
2. Blend until completely smooth. A high-speed blender or food processor gives you the most uniform texture, without large chickpea pieces. Stop and scrape down the sides as needed so every chickpea gets incorporated.
3. Use room-temperature eggs. They combine more easily with the other ingredients and help you get an evenly mixed batter.
4. Choose thick Greek yogurt. Thinner yogurts can make the batter too loose. Thick yogurt adds moisture without making it runny.
5. Don’t over-blend after adding baking powder. Once the baking powder goes in, pulse just until combined.
6. Customize the flavor. Add ½ teaspoon garlic powder, a little dried oregano or rosemary, or some chopped fresh parsley for a savory variation.
7. Watch the seeds. If the top starts browning too quickly, loosely cover the loaf with aluminum foil for the final stretch of baking.
8. Cool completely before slicing. This bread is naturally moist and needs time to set. Slicing it warm can make it crumble.
Total time: about 1 hour 40 minutes to 2 hours 5 minutes, including cooling.
Yield: 1 small loaf, about 8–10 slices.
Preheat your oven to 350°F (180°C). Line a 9 × 5-inch (23 × 13 cm) loaf pan with parchment paper, leaving a little overhang on the sides so you can lift the loaf out easily later. Lightly grease any exposed areas with olive oil or cooking spray.
Drain and rinse the cooked chickpeas under cool running water. Let them drain completely, then gently pat them dry with a clean kitchen towel or paper towels. This step matters more than it seems. Too much liquid can make the bread gummy or keep it from baking evenly.
Add the chickpeas, eggs, and Greek yogurt to a high-speed blender or food processor. Add the olive oil if you’re using it, and blend until the mixture is smooth and creamy. Pause occasionally to scrape down the sides so everything is incorporated.
Add the baking powder and salt to the blended mixture. Pulse briefly until everything is evenly combined, and avoid blending for long after the baking powder goes in. The finished batter should be thick but pourable, with a smooth consistency.
Pour the batter into the prepared loaf pan. Use a spatula to spread it evenly and smooth the surface. Sprinkle the sesame seeds and pumpkin seeds over the top, gently pressing them into the batter so they stay put while baking.
Place the pan on the center rack of the preheated oven. Bake for about 45–55 minutes, until the top is golden brown and the center is completely set.
To check doneness, insert a toothpick into the middle of the loaf. It should come out without wet batter. For extra accuracy, the center should reach roughly 200°F–205°F (93°C–96°C) on an instant-read thermometer. If the seeds or surface get too dark before the center is cooked, loosely cover the loaf with aluminum foil.
Remove the loaf from the oven and let it rest in the pan for 10–15 minutes. Then lift it out using the parchment paper and move it to a wire rack. Let it cool completely, about 45–60 minutes. This is especially important for a chickpea-based crumb, which needs time to firm up and become easier to slice.
Once the loaf is fully cooled, use a sharp serrated bread knife to cut it into even slices. Enjoy it fresh, toasted with butter, topped with avocado, or served alongside your favorite savory dishes.
- Prep Time: 10 minutes
- Cook Time: 45–55 minutes