If you have ever wanted fresh homemade bread on the table but did not have the time, patience, or yeast to make it happen, these easy Greek yogurt dinner rolls are about to become your new favorite shortcut. With just plain Greek yogurt and self-rising flour as the base, plus a single egg for a glossy finish, you can go from a bare countertop to a tray of warm, golden rolls in roughly 35 to 40 minutes.
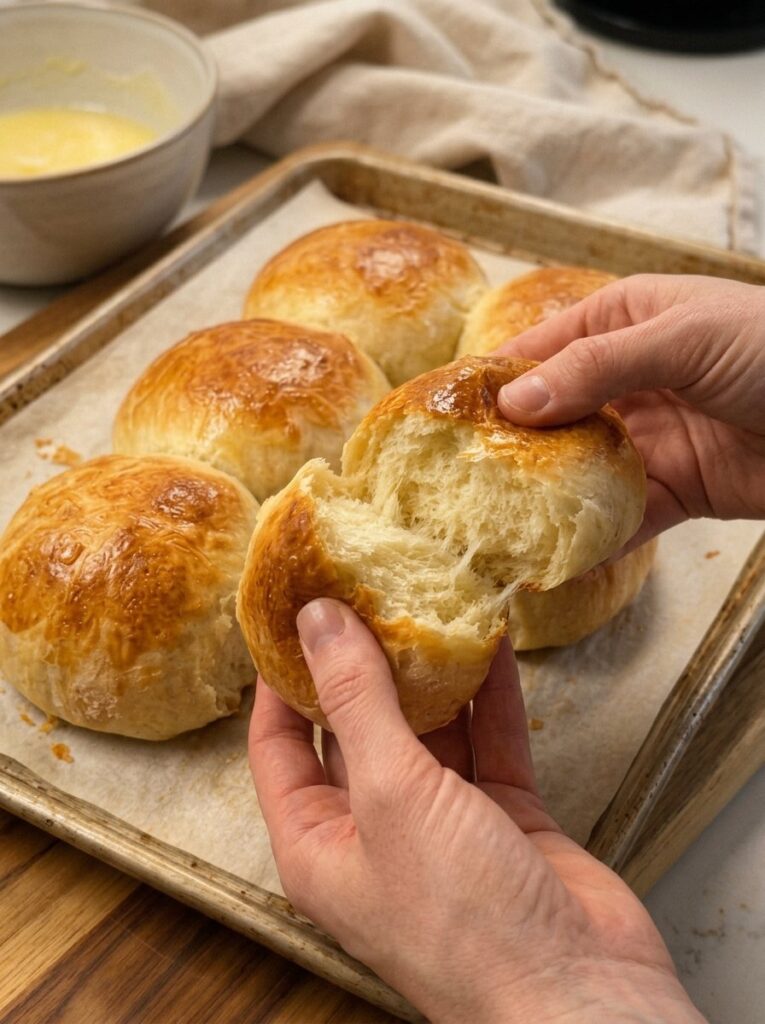
There is no yeast to proof, no dough to knead, and no hour-long rise. You stir, shape, brush, and bake. The result is a batch of six tender, pull-apart dinner rolls with lightly crisp tops and soft, fluffy centers that are perfect with butter, soup, or a full family dinner.
In this guide, you will find everything you need to make the best Greek yogurt dinner rolls: the exact ingredients, step-by-step instructions, troubleshooting tips, flavor variations, serving ideas, storage advice, and answers to the most common questions.
Table of Contents
- Why You’ll Love These Greek Yogurt Dinner Rolls
- What Are Greek Yogurt Dinner Rolls?
- Ingredients You’ll Need
- Why Greek Yogurt and Self-Rising Flour Work So Well Together
- Tips for the Best Greek Yogurt Dinner Rolls
- Step-by-Step Instructions
- Common Mistakes and How to Fix Them
- Flavor Variations to Try
- What to Serve with Yogurt Dinner Rolls
- How to Store, Freeze, and Reheat
- Make-Ahead and Meal Prep Ideas
- Frequently Asked Questions
- Final Thoughts
Why You’ll Love These Greek Yogurt Dinner Rolls
There are plenty of quick bread recipes online, but this one stands out for a handful of very practical reasons.
They are genuinely simple. The dough needs only two ingredients: Greek yogurt and self-rising flour. The egg is used only for brushing the tops, and you can skip it if you want a strict two-ingredient dough. That means almost no shopping list and almost no cleanup.
They are fast. Prep takes about 10 minutes, baking takes 20 to 25 minutes, and a short 5-minute rest finishes the job. From start to table, you are looking at about 35 to 40 minutes. That makes them a realistic option for a busy weeknight.
They need no yeast. Traditional dinner rolls rely on yeast, which means proofing, kneading, and at least one rise. These rolls use self-rising flour, which already contains the leavening agent, so the dough puffs up in the oven without any waiting.
They are soft and satisfying. Greek yogurt adds moisture and a gentle tang, which keeps the crumb tender. The tops turn golden and slightly crisp while the centers stay soft enough to tear apart with your hands.
They are versatile. Serve them plain, split them for mini sandwiches, dip them in soup, or turn them into savory or sweet variations with a few easy add-ins.
What Are Greek Yogurt Dinner Rolls?
Greek yogurt dinner rolls are a type of quick bread roll made from a simple dough of thick Greek yogurt and self-rising flour. Instead of depending on yeast to create lift, the dough relies on the leavening already built into the flour. The acidity and thickness of the yogurt help create a soft, slightly tangy texture that sits somewhere between a biscuit and a classic bread roll.
Because they are a quick yogurt dough, their texture is a little different from traditional yeast dinner rolls. They are not as stretchy or chewy as a long-fermented bread, but they are wonderfully convenient, and when they are fresh from the oven, they are hard to resist.
People often search for these rolls under several names, including 2-ingredient yogurt rolls, no-yeast yogurt bread rolls, easy Greek yogurt buns, and quick yogurt dinner rolls. They all describe the same idea: a fast, forgiving dough that anyone can make, even without baking experience.
Ingredients You’ll Need
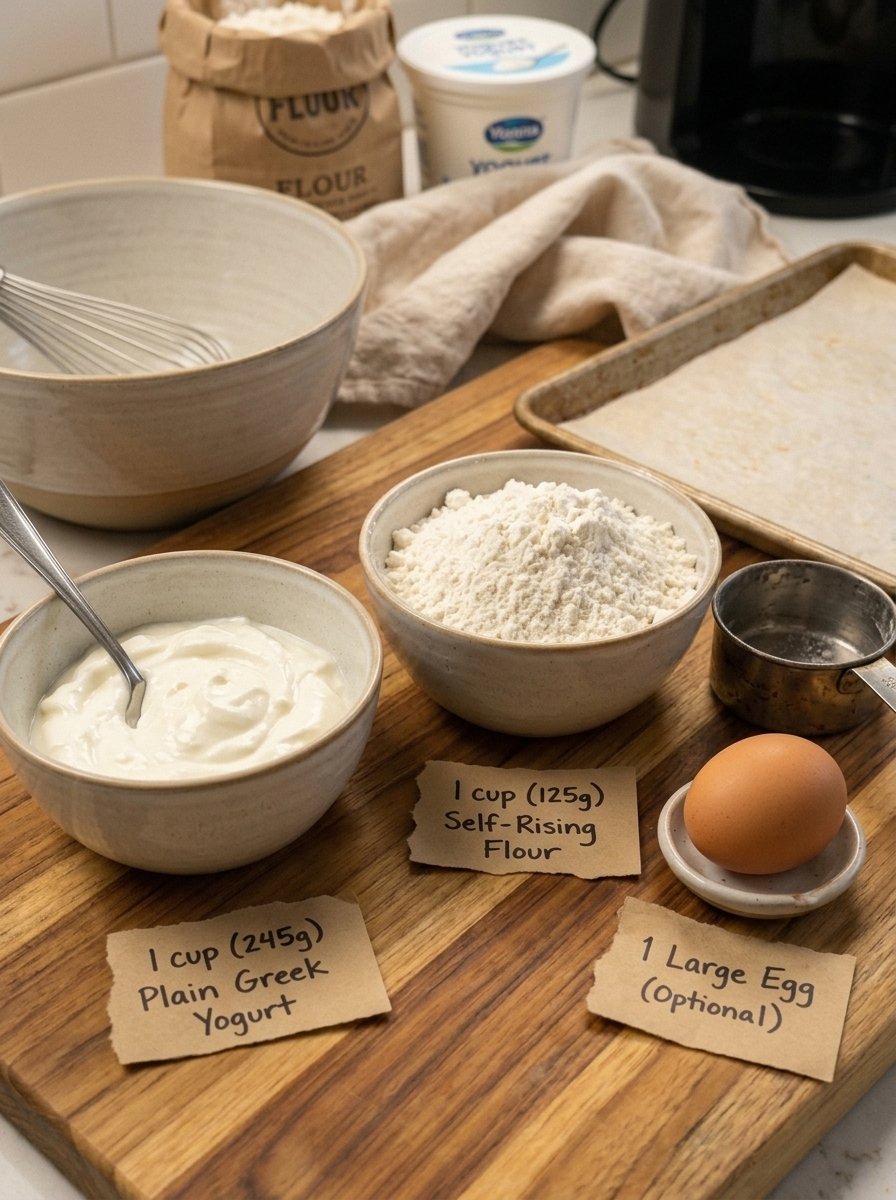
This recipe makes 6 small dinner rolls.
- 1 cup (245 to 250 g) plain Greek yogurt
- 1 cup (125 to 130 g) self-rising flour
- 1 large egg, for brushing the tops (optional)
For a strict three-ingredient version, the egg is optional. The yogurt and self-rising flour are the two ingredients needed for the dough itself. The egg simply gives the tops a shiny, golden finish.
Ingredient notes
Plain Greek yogurt. Choose thick Greek yogurt. Full-fat and low-fat plain Greek yogurt both work well. Regular yogurt is thinner, so it can make the dough too sticky to shape. Make sure the yogurt is plain and unsweetened so the rolls taste like bread rather than dessert.
Self-rising flour. This is all-purpose flour that has been mixed with baking powder and salt. It is what makes these rolls rise without yeast. If you want to weigh your flour, the target is about 125 to 130 grams per cup, which is the most reliable way to avoid dry, dense rolls.
Egg (optional). A single beaten egg brushed over the tops gives the rolls a glossy, bakery-style golden color. If you skip it, the rolls will still bake perfectly well, but the tops may look a little less shiny.
Why Greek Yogurt and Self-Rising Flour Work So Well Together
It may seem almost too simple to be true that two ingredients can become bread, but there is a good reason this combination works.
Self-rising flour already contains baking powder, which releases gas when it is moistened and heated. Greek yogurt supplies the moisture needed to activate it, and its natural acidity supports that lift. At the same time, the thick, creamy texture of Greek yogurt keeps the dough soft and tender instead of dry.
Greek yogurt is also much thicker than regular yogurt because much of the liquid whey has been strained out. That thickness matters. It gives you a dough that is soft and slightly sticky but still holds together when you scoop and shape it, rather than a runny batter.
The result is a dough that comes together in minutes, bakes up with a soft interior, and carries a mild, pleasant tang that pairs beautifully with butter and savory dishes.
Tips for the Best Greek Yogurt Dinner Rolls
A few small habits make a big difference in how your rolls turn out.
- Use thick Greek yogurt. Thin yogurt leads to sticky dough that is hard to portion. Stick with plain Greek yogurt for the best structure.
- Measure the flour carefully. Too much flour is the number one cause of dry, dense rolls. Weigh it if you can. If you are using cups, spoon the flour into the measuring cup and level it off rather than scooping directly from the bag.
- Expect a slightly sticky dough. The dough should be soft and easy to portion with lightly floured hands. If you need extra flour, add it a teaspoon at a time.
- Do not overmix. Stir only until the flour and yogurt come together and there are no dry patches. Overworking the dough can make the rolls tougher.
- Make evenly sized rolls. Dividing the dough into equal portions helps all the rolls bake at the same rate. A kitchen scale makes this easy.
- Brush for a golden finish. A light coat of beaten egg gives you glossy, golden tops, but the rolls can also be baked without it.
- Enjoy them fresh. These quick yogurt rolls are at their best warm from the oven, when the centers are soft and the tops are lightly crisp.
Step-by-Step Instructions
Here is exactly how to make Greek yogurt dinner rolls from start to finish.
Step 1: Preheat the oven
Preheat your oven to 375°F (190°C). Line a baking sheet with parchment paper, or lightly grease a baking dish.
The pan you choose affects the final texture. A small baking dish lets the rolls sit close together, which helps them develop soft, tender sides. A baking sheet gives each roll a little more crust all the way around.
Step 2: Mix the yogurt and flour
Add the Greek yogurt to a medium mixing bowl. Gradually add the self-rising flour, stirring with a spoon or spatula until a soft dough begins to form.
Keep mixing just until there are no dry patches of flour. The dough should be slightly sticky but still hold together when scooped.
Step 3: Bring the dough together
Lightly flour your work surface and your hands. Transfer the dough to the surface and gently bring it together.
Do not knead it like traditional bread dough. Simply fold it over itself once or twice if needed to make it easier to handle. If the dough is extremely sticky, sprinkle on a small amount of extra flour, using as little as possible so the rolls do not turn out dry.
Step 4: Divide into rolls
Divide the dough into 6 equal portions for small dinner rolls. With lightly floured hands, gently shape each portion into a ball, taking care not to compress the dough too tightly.
Place the rolls on the prepared baking sheet, leaving a little space between them so they have room to expand.
Step 5: Brush the tops (optional)
For a golden, glossy finish, beat the egg in a small bowl and lightly brush it over the tops of the rolls.
You can skip this step if you prefer to keep things as simple as possible. The rolls will still bake without an egg wash, although their tops may look a little less shiny.
Step 6: Bake until golden
Place the rolls in the preheated oven and bake for about 20 to 25 minutes, depending on their size and the type of pan you used.
The rolls should be lightly golden on top and firm enough to hold their shape. Check the bottoms as well to make sure they are cooked through. If the tops brown too quickly while the centers are still doughy, loosely cover them with foil and continue baking until done.
Step 7: Cool briefly
Remove the rolls from the oven and let them rest for about 5 minutes. If you want to prevent the bottoms from becoming damp from trapped steam, move them to a wire rack.
Allow them to cool slightly before serving, but try to enjoy them while they are still warm for the softest texture.
Step 8: Serve and enjoy
Serve the rolls warm with butter, alongside soup or a family dinner, or split them open for small sandwiches.
Recipe at a glance
- Prep time: about 10 minutes
- Cooking time: 20 to 25 minutes
- Cooling time: about 5 minutes
- Total time: about 35 to 40 minutes
- Yield: 6 small dinner rolls
Common Mistakes and How to Fix Them
Even a simple recipe can go sideways. Here are the most common issues and how to avoid them.
The dough is too sticky to handle. A little stickiness is normal. If the dough is clinging to everything, make sure you used thick Greek yogurt rather than regular yogurt. Lightly flour your hands and work surface, and add extra flour only a teaspoon at a time.
The rolls turned out dry or dense. This usually comes from using too much flour or overmixing. Weigh the flour if possible, add extra flour sparingly, and stir only until everything just comes together.
The tops browned before the centers cooked. Ovens vary. If the tops are getting dark but the centers still feel doughy, loosely cover the rolls with foil and keep baking until done.
The rolls baked unevenly. Rolls of different sizes bake at different speeds. Divide the dough into equal portions, and weigh them if you want to be precise.
The bottoms feel damp after baking. Trapped steam can soften the bottoms as the rolls cool. Transfer them to a wire rack after resting for about 5 minutes.
The rolls did not rise much. Check that you used self-rising flour rather than all-purpose flour. Self-rising flour contains the leavening that gives these rolls their lift.
Flavor Variations to Try
The base recipe is delicious on its own, but it is also a great canvas for creativity. Here are a few ideas to try, keeping in mind that any additions should be mixed in gently and in small amounts so the dough stays easy to shape.
- Garlic and herb rolls. Brush the baked rolls with melted butter mixed with minced garlic and chopped parsley for a classic garlic bread flavor.
- Cheesy rolls. Fold a small handful of shredded cheese into the dough, or sprinkle a little on top before baking.
- Everything-seasoning rolls. After brushing with egg, sprinkle the tops with a savory seed and spice blend for extra flavor and crunch.
- Sesame or poppy seed rolls. Scatter seeds over the egg wash for a bakery-style look.
- Herbed yogurt rolls. Stir a pinch of dried herbs such as rosemary or oregano into the flour before mixing.
- Sweet butter rolls. Brush the warm rolls with a little melted butter and serve with jam or honey for a simple breakfast treat.
Start with small additions and adjust to your taste. Remember that the base dough is meant to stay soft and lightly sticky, so avoid adding too many dry ingredients at once.
What to Serve with Yogurt Dinner Rolls
These rolls are flexible enough to fit into almost any meal. Here are some of the best ways to serve them.
With butter. The simplest option is often the best. Split a warm roll and spread it with butter while the center is still warm.
Alongside soup. Serve with tomato soup, vegetable soup, or creamy chicken soup. The soft interior is ideal for soaking up broth.
With dinner. Pair the rolls with roasted chicken, baked fish, or roasted vegetables for a cozy family meal.
As mini sandwiches. Slice the rolls and fill them with cheese, turkey, eggs, or your favorite sandwich fillings. They are the perfect size for small sliders or lunchbox sandwiches.
With savory dips. Serve with hummus, herbed yogurt dip, or a little olive oil for dipping.
For breakfast. Enjoy them with scrambled eggs and sliced avocado for a quick morning meal.
How to Store, Freeze, and Reheat
These rolls taste best freshly baked, while their centers are soft and their tops are lightly golden. If you have leftovers, a little care will help them stay enjoyable.
Cool completely first. Let any leftovers cool completely before storing them. Storing warm rolls traps steam and makes them soggy.
Room temperature. Store in an airtight container for up to 1 day in a cool kitchen.
Refrigerator. Keep in an airtight container for up to 3 days. Because the rolls contain yogurt, refrigerate leftovers promptly if you will not eat them within a short period.
Freezer. Freeze completely cooled rolls in a freezer-safe bag for up to 2 months. Thaw them at room temperature or in the refrigerator before reheating.
Reheating. Warm the rolls in a 300°F (150°C) oven for about 5 to 8 minutes, or microwave them briefly until heated through. The oven method helps restore a little of the crisp on the tops.
Make-Ahead and Meal Prep Ideas
Because the dough is so quick, these rolls do not really need a make-ahead strategy, but a few habits can make your life even easier.
- Bake a batch and freeze them. Cool the rolls completely, freeze them in a freezer-safe bag, and reheat as needed for fast sides on busy nights.
- Prep your ingredients. Keep a container of plain Greek yogurt and a bag of self-rising flour on hand, and you are always minutes away from fresh rolls.
- Double the recipe for gatherings. Doubling the ingredients gives you 12 small rolls. Keep the portions equal so they bake evenly, and watch the baking time since a fuller pan may need a little longer.
- Pack them for lunch. Split cooled rolls for mini sandwiches that travel well.
Frequently Asked Questions
Can I make these rolls without eggs?
Yes. The egg is only used for brushing the tops, and it is optional. The dough itself needs just yogurt and self-rising flour. Without the egg wash, the rolls will still bake through, but the tops may look a little less shiny.
Can I use regular yogurt instead of Greek yogurt?
It is not recommended. Regular yogurt is thinner and may make the dough too sticky to shape. Thick plain Greek yogurt gives the dough the right structure.
Can I use full-fat or low-fat Greek yogurt?
Either works well. Both full-fat and low-fat plain Greek yogurt will give you soft, tender rolls, as long as the yogurt is thick.
Do I need yeast for this recipe?
No. These rolls use self-rising flour, which contains leavening, so there is no yeast, no proofing, and no rising time.
Why is my dough so sticky?
A slightly sticky dough is normal for this recipe. Lightly flour your hands and work surface, and add extra flour only a teaspoon at a time if needed. Using too much flour can make the rolls dry.
How do I know when the rolls are done?
They should be lightly golden on top and firm enough to hold their shape. Check the bottoms too, to make sure they are cooked through. If the tops are browning too quickly while the centers are doughy, cover the rolls loosely with foil and keep baking.
Should I bake them on a baking sheet or in a baking dish?
Both work. A small baking dish helps the rolls sit close together and develop soft sides, while a baking sheet gives them a little more crust all around.
How long do Greek yogurt dinner rolls last?
They are best fresh. Store leftovers in an airtight container for up to 1 day at room temperature in a cool kitchen, up to 3 days in the refrigerator, or up to 2 months in the freezer.
How do I reheat leftover rolls?
Warm them in a 300°F (150°C) oven for about 5 to 8 minutes, or microwave them briefly until heated through. If frozen, thaw them first at room temperature or in the refrigerator.
Are these the same as traditional yeast dinner rolls?
Not exactly. Because they use a quick yogurt dough instead of yeast, their texture is a little different. They are softer and more tender in a biscuit-like way rather than chewy and stretchy, but they are a convenient homemade alternative when you want fresh bread fast.
How many rolls does this recipe make?
The recipe makes 6 small dinner rolls. Double the ingredients for 12.
Final Thoughts
Easy Greek yogurt dinner rolls prove that great homemade bread does not have to be complicated. With just thick Greek yogurt and self-rising flour, plus an optional egg for a golden finish, you can have a tray of warm, tender rolls on the table in under 40 minutes.
They are ideal for busy weeknights, last-minute guests, cozy soup dinners, and anyone who wants the satisfaction of fresh bread without the time commitment of a yeast dough. Measure your flour carefully, keep the dough gentle, divide it evenly, and bake until golden. Then tear one open while it is still warm, add a little butter, and enjoy.
Print
Easy 3-Ingredient Greek Yogurt Dinner Rolls
Ingredients
This recipe makes 6 small dinner rolls.
- 1 cup (245 to 250 g) plain Greek yogurt
- 1 cup (125 to 130 g) self-rising flour
- 1 large egg, for brushing the tops (optional)
For a strict three-ingredient version, the egg is optional. The yogurt and self-rising flour are the two ingredients needed for the dough itself. The egg simply gives the tops a shiny, golden finish.
Ingredient notes
Plain Greek yogurt. Choose thick Greek yogurt. Full-fat and low-fat plain Greek yogurt both work well. Regular yogurt is thinner, so it can make the dough too sticky to shape. Make sure the yogurt is plain and unsweetened so the rolls taste like bread rather than dessert.
Self-rising flour. This is all-purpose flour that has been mixed with baking powder and salt. It is what makes these rolls rise without yeast. If you want to weigh your flour, the target is about 125 to 130 grams per cup, which is the most reliable way to avoid dry, dense rolls.
Egg (optional). A single beaten egg brushed over the tops gives the rolls a glossy, bakery-style golden color. If you skip it, the rolls will still bake perfectly well, but the tops may look a little less shiny.
Instructions
Here is exactly how to make Greek yogurt dinner rolls from start to finish.
Preheat your oven to 375°F (190°C). Line a baking sheet with parchment paper, or lightly grease a baking dish.
The pan you choose affects the final texture. A small baking dish lets the rolls sit close together, which helps them develop soft, tender sides. A baking sheet gives each roll a little more crust all the way around.
Add the Greek yogurt to a medium mixing bowl. Gradually add the self-rising flour, stirring with a spoon or spatula until a soft dough begins to form.
Keep mixing just until there are no dry patches of flour. The dough should be slightly sticky but still hold together when scooped.
Lightly flour your work surface and your hands. Transfer the dough to the surface and gently bring it together.
Do not knead it like traditional bread dough. Simply fold it over itself once or twice if needed to make it easier to handle. If the dough is extremely sticky, sprinkle on a small amount of extra flour, using as little as possible so the rolls do not turn out dry.
Divide the dough into 6 equal portions for small dinner rolls. With lightly floured hands, gently shape each portion into a ball, taking care not to compress the dough too tightly.
Place the rolls on the prepared baking sheet, leaving a little space between them so they have room to expand.
For a golden, glossy finish, beat the egg in a small bowl and lightly brush it over the tops of the rolls.
You can skip this step if you prefer to keep things as simple as possible. The rolls will still bake without an egg wash, although their tops may look a little less shiny.
Place the rolls in the preheated oven and bake for about 20 to 25 minutes, depending on their size and the type of pan you used.
The rolls should be lightly golden on top and firm enough to hold their shape. Check the bottoms as well to make sure they are cooked through. If the tops brown too quickly while the centers are still doughy, loosely cover them with foil and continue baking until done.
Remove the rolls from the oven and let them rest for about 5 minutes. If you want to prevent the bottoms from becoming damp from trapped steam, move them to a wire rack.
Allow them to cool slightly before serving, but try to enjoy them while they are still warm for the softest texture.
Serve the rolls warm with butter, alongside soup or a family dinner, or split them open for small sandwiches.