Homemade Pumpkin Oat Dog Biscuits: Easy, Wholesome Treats with Just 5 Ingredients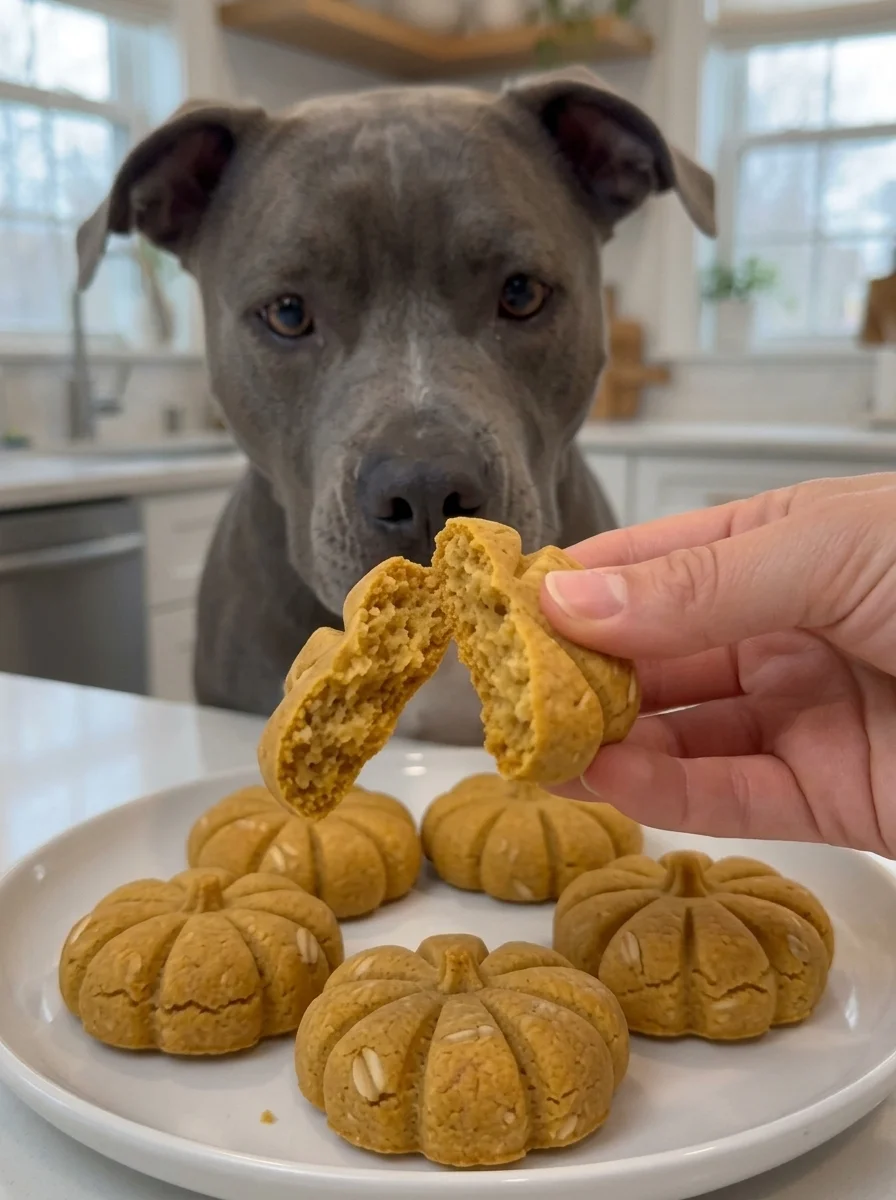
SEO title: Homemade Pumpkin Oat Dog Biscuits Recipe (Easy, 5 Ingredients)
Meta description: Make crunchy homemade pumpkin oat dog biscuits with pumpkin purée, oats, egg, and xylitol-free peanut butter. Easy dog treat recipe with safety tips, variations, storage, and FAQ.
Focus keyword: pumpkin oat dog biscuits
Secondary keywords: homemade dog treats, pumpkin dog biscuits, dog treats with oats, peanut butter dog treats, easy dog biscuit recipe, training treats for dogs, healthy dog treats, xylitol-free dog treats, DIY dog biscuits
There is something special about baking for your dog. Their tail starts to wag the moment the oven warms up, the kitchen smells like pumpkin and oats, and the finished biscuits give you a treat you can feel good about handing out. These pumpkin oat dog biscuits are crunchy, simple, and made from just a few dog-friendly ingredients: plain pumpkin purée, rolled oats, an egg, a little natural peanut butter, and an optional pinch of cinnamon.
There is no added sugar, no artificial sweetener, and no long ingredient list full of things you cannot pronounce. The dough comes together in one bowl, rolls out like a cookie dough, and bakes into small, firm biscuits that work as everyday treats, training rewards, or a little extra happiness in the afternoon. Because you control every ingredient, you know exactly what your dog is eating.
In this guide you will find the full recipe, step-by-step instructions, an explanation of how each ingredient works, important dog-safety tips (including which ingredients to avoid), troubleshooting advice, variations, serving suggestions, storage instructions, approximate nutrition, and answers to the questions pet parents ask most often about homemade dog treats.
Why You’ll Love These Pumpkin Oat Dog Biscuits
There are plenty of dog treats at the store, so why bake your own? Here are the main reasons.
- Simple ingredients. Plain pumpkin purée, rolled oats, egg, natural peanut butter, and a little cinnamon are all you need.
- No added sugar or artificial sweeteners. The only sweetness comes from the pumpkin, and there is no salt or sweetener added.
- You control what goes in. You can check every label, avoid ingredients your dog does not tolerate, and skip anything you are unsure about.
- Crunchy and satisfying. Thorough baking and drying produce firm biscuits that many dogs love to chew.
- Easy to make. One bowl, a rolling pin, and a cookie cutter are all the equipment you need.
- Great for training. Cut the dough into tiny squares for small, low-calorie training rewards.
- Fun to customize. Use bone-shaped cutters, change the size, or add dog-safe extras like carrot or apple.
- Budget friendly. A single batch makes 25 to 35 small biscuits from inexpensive ingredients.
Recipe Overview
- Prep time: 15 minutes
- Bake time: 25 to 35 minutes
- Cooling time: 30 minutes
- Total time: Approximately 1 hour 20 minutes
- Yield: 25 to 35 small biscuits, depending on cutter size
- Difficulty: Easy
- Equipment: Blender or food processor, rolling pin, small cookie cutter, baking sheet, and parchment paper
Ingredients for Pumpkin Oat Dog Biscuits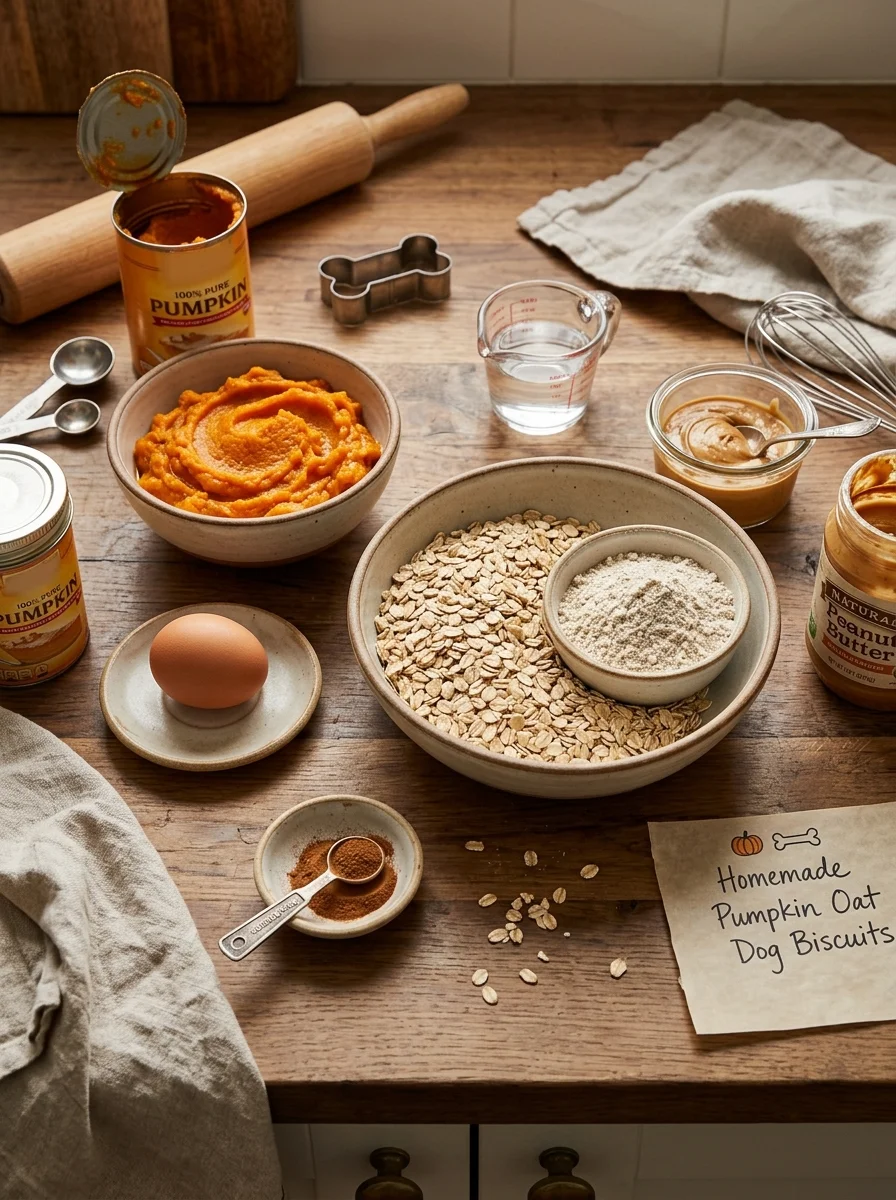
- 1 cup (240 g) plain pumpkin purée
- 2½ cups (225 g) old-fashioned rolled oats, divided
- 1 large egg
- 2 tablespoons (32 g) natural peanut butter
- ¼ teaspoon ground cinnamon, optional
- 1 to 3 tablespoons water, as needed
Important: Use plain pumpkin purée, not sweetened pumpkin pie filling. Choose peanut butter without xylitol (also called birch sugar), which is toxic to dogs. Avoid added salt, sugar, and other sweeteners.
A Closer Look at the Key Ingredients
Plain pumpkin purée. Pumpkin is the base of the dough. It adds moisture, a mild natural sweetness, and fiber. Be sure the can says pure pumpkin or pumpkin purée and contains nothing else. Pumpkin pie filling contains sugar and spices that are not suitable for dogs.
Old-fashioned rolled oats. Oats give the biscuits their structure and a hearty texture. In this recipe, part of the oats is ground into a coarse flour, which helps bind the dough, and the rest is left whole for texture. Plain, unflavored oats are the right choice, with no added sugar, salt, or flavorings.
Egg. The egg binds the dough so it can be rolled and cut without crumbling. It also adds a little protein.
Natural peanut butter. A small amount of peanut butter adds flavor that many dogs find irresistible. The most important rule is to check the label and choose a peanut butter that contains no xylitol, also called birch sugar, because xylitol is toxic to dogs. Also look for a variety with no added sugar or salt.
Cinnamon (optional). A small pinch adds a warm aroma that people enjoy. It is optional, and the biscuits are perfectly good without it. Use only a small amount.
Water. Pumpkin purée varies in moisture from brand to brand, so a spoonful or two of water helps adjust the dough if it is too dry or crumbly.
How to Make Pumpkin Oat Dog Biscuits: Step by Step
Step 1: Prepare the Oven
- Preheat the oven to 350°F (175°C).
- Line a baking sheet with parchment paper.
- Set aside a small cookie cutter or use a knife to cut simple squares.
Step 2: Prepare the Oats
- Place 1½ cups of rolled oats in a blender or food processor.
- Blend until they resemble a coarse flour.
- Keep the remaining 1 cup of rolled oats whole for texture.
You can use store-bought oat flour if preferred. Make sure it is plain and unsweetened.
Step 3: Mix the Wet Ingredients
- In a large mixing bowl, combine the pumpkin purée, egg, and peanut butter.
- Stir until smooth and evenly combined.
- Add the cinnamon if using.
The mixture should be creamy and easy to stir.
Step 4: Make the Dough
- Add the ground oats and whole rolled oats to the pumpkin mixture.
- Stir until a thick dough forms.
- If the dough is too dry or crumbly, add water one tablespoon at a time.
- If it feels too sticky, add a little extra oat flour.
The dough should be firm enough to roll out without sticking excessively.
Step 5: Roll and Cut the Biscuits
- Lightly dust your work surface with oat flour.
- Place the dough on the surface and roll it to approximately ¼ inch (6 mm) thick.
- Use a small bone-shaped cookie cutter to cut out the biscuits.
- Gather the leftover dough, roll it again, and continue cutting until all the dough is used.
- Transfer the biscuits to the prepared baking sheet.
For smaller dogs, make smaller biscuits that are easy to chew.
Step 6: Bake Until Firm
- Bake for 25 to 35 minutes, depending on the size and thickness of the biscuits.
- Turn the biscuits over halfway through baking if you want them to brown more evenly.
- For crunchier treats, reduce the oven temperature to 250°F (120°C) and continue drying them for another 20 to 30 minutes.
- Remove from the oven when the biscuits are firm and lightly golden.
Thicker biscuits may need additional time. Allow them to cool completely before judging their final crunchiness.
Step 7: Cool Completely
- Transfer the biscuits to a wire rack.
- Let them cool completely before serving.
- Once cooled, break one open to check that the center is fully baked and dry.
Never give your dog a hot biscuit.
Dog Safety: What to Use and What to Avoid
Baking for dogs is rewarding, but it comes with a few rules that matter. The ingredients that are perfectly fine in human baking can be harmful to dogs, so it pays to check labels carefully.
Always check peanut butter for xylitol. Xylitol, sometimes listed as birch sugar, is toxic to dogs. It appears in some sugar-free products and a growing number of nut butters. Read the full ingredient list every time, even for brands you have used before, since formulas change. Choose a natural peanut butter made from peanuts, with no added sugar or salt.
Use plain pumpkin purée only. Pumpkin pie filling contains sugar and spices that are not appropriate for dogs. The can should list a single ingredient: pumpkin.
Avoid added salt, sugar, and sweeteners. Dogs do not need them, and artificial sweeteners can be dangerous.
Keep a list of foods to avoid. Do not add chocolate, raisins, grapes, macadamia nuts, onion, garlic, or artificial sweeteners to dog treats. These can be harmful to dogs.
Introduce new foods gradually. If your dog has never eaten pumpkin or oats, offer a small piece first and watch for any signs of an upset stomach before offering more.
Keep treats in proportion. Treats should make up no more than about 10 percent of your dog’s daily calories, with the rest coming from a complete and balanced diet.
Check with your veterinarian when needed. If your dog has food allergies, diabetes, digestive problems, or follows a veterinary diet, ask your veterinarian before introducing homemade treats.
Tips for Perfect Pumpkin Dog Biscuits
A few small habits make a big difference to how the biscuits turn out.
- Use plain pumpkin. Pumpkin pie filling often contains added sugar and spices that are not suitable for dogs.
- Choose xylitol-free peanut butter. Always check the ingredient label carefully.
- Adjust the dough gradually. Pumpkin purée varies in moisture, so add water or oat flour as needed.
- Make appropriately sized treats. Small dogs need smaller pieces, while larger dogs can enjoy bigger biscuits.
- Bake thoroughly. Drier biscuits generally keep longer than soft, moist ones.
- Cool completely. Warm treats can retain moisture and become soft during storage.
- Introduce gradually. If your dog has not eaten pumpkin or oats before, start with a small piece to check tolerance.
- Flour the surface lightly. Use oat flour for dusting so you do not add wheat flour to the dough.
Troubleshooting Common Problems
The dough is too sticky. Pumpkin purée can be very moist. Add a little extra oat flour, one tablespoon at a time, and dust your work surface and rolling pin lightly.
The dough is too dry or crumbly. Add water, one tablespoon at a time, until the dough holds together when pressed.
The biscuits are soft in the middle. They may be too thick or underbaked. Roll the dough to about ¼ inch (6 mm), and extend the baking or low-temperature drying time. Break one biscuit open to check the center.
The biscuits are not crunchy. For crunchier treats, reduce the oven temperature to 250°F (120°C) and dry them for another 20 to 30 minutes. They will also firm up as they cool.
The biscuits spread or lost their shape. The dough may have been too wet. Add a little oat flour, and chill the dough briefly before cutting.
The biscuits are too hard for my dog. Roll the dough thinner or shorten the drying time. Smaller or softer biscuits may be better for older dogs or dogs with sensitive teeth.
The biscuits went moldy. They were probably stored while still moist. Dry them thoroughly, cool them completely, and store them in the refrigerator or freezer if you are not sure they are fully dry.
My dog is not interested. Try a slightly larger amount of peanut butter within the recipe, or warm the biscuit briefly, since some dogs prefer a stronger aroma. Not every dog loves every flavor, and that is fine.
Easy Recipe Variations
Always use dog-safe, plain ingredients and introduce new foods gradually.
- Apple Pumpkin Biscuits. Add ¼ cup of finely grated, peeled apple with the seeds and core removed.
- Banana Pumpkin Treats. Add ½ mashed ripe banana and reduce the pumpkin slightly if necessary.
- Carrot Oat Biscuits. Add ¼ cup of finely grated carrot.
- Parsley Pumpkin Biscuits. Add 1 teaspoon of finely chopped fresh parsley.
- Extra Crunchy Biscuits. Roll the dough thinner and extend the low-temperature drying time.
- Mini Training Treats. Cut the dough into tiny squares for small training rewards.
Avoid adding chocolate, raisins, grapes, macadamia nuts, onion, garlic, or artificial sweeteners. Never use nut butter containing xylitol.
How to Serve
- Offer one small biscuit as an occasional reward.
- Break larger biscuits into smaller pieces for training.
- Serve alongside your dog’s regular balanced food as a treat.
- Place a biscuit inside a suitable treat toy for a little extra enrichment.
- Crumble a small amount over your dog’s regular food for a special treat.
Remember that treats should make up no more than about 10 percent of your dog’s daily calorie intake. Adjust portions based on your dog’s size, activity, and dietary needs.
Storage Instructions
Because homemade treats contain no commercial preservatives, storage depends on how thoroughly they are dried.
- Room temperature. Store completely cooled, thoroughly dry biscuits in an airtight container in a cool, dry place for up to 3 to 5 days.
- Refrigerator. Store in an airtight container for up to 1 week.
- Freezer. Freeze in a sealed freezer-safe bag or container for up to 2 to 3 months.
- Thawing. Thaw frozen biscuits in the refrigerator or at room temperature, then check that they remain dry and fresh before serving.
If biscuits develop mold, an unusual smell, or signs of moisture, discard them. When in doubt, freeze the treats rather than storing them at room temperature for an extended period.
Approximate Nutrition
Per biscuit, assuming 30 small biscuits:
- Calories: 25 to 35
- Protein: 1 to 2 g
- Carbohydrates: 4 to 5 g
- Fat: 1 to 2 g
- Fiber: Approximately 0.5 to 1 g
These are rough estimates and vary with biscuit size, peanut butter, and ingredient quantities. They are not a complete or balanced dog food.
Frequently Asked Questions
Is pumpkin safe for dogs?
Plain pumpkin purée is commonly used in dog-friendly treats. Use only plain pumpkin, not pumpkin pie filling, and introduce it gradually. If your dog has digestive problems, check with your veterinarian first.
Can I use any peanut butter?
No. Always check the label and choose a peanut butter with no xylitol (also called birch sugar), which is toxic to dogs. Choose a variety with no added sugar or salt.
Can I use quick oats instead of old-fashioned rolled oats?
You can, but old-fashioned rolled oats give the best texture. Make sure whatever oats you use are plain, unsweetened, and unflavored.
Can I leave out the egg?
The egg helps bind the dough. If you leave it out, the dough may be crumblier, and you may need a little extra pumpkin or water to hold it together.
Is cinnamon safe for dogs?
A very small amount of cinnamon is commonly used in dog treats, and it is optional in this recipe. Use only a small pinch and skip it if you are unsure or if your dog is sensitive.
How many biscuits can my dog have?
Treats should make up no more than about 10 percent of your dog’s daily calorie intake. Size, activity level, and individual dietary needs all matter, so adjust accordingly and ask your veterinarian if you are unsure.
How long do the biscuits last?
Store thoroughly dry biscuits in an airtight container at room temperature for up to 3 to 5 days, in the refrigerator for up to 1 week, or in the freezer for up to 2 to 3 months.
How do I make them crunchier?
Roll the dough thinner and, after the initial bake, reduce the oven to 250°F (120°C) and dry the biscuits for another 20 to 30 minutes.
Can I freeze dog biscuits?
Yes. Freeze completely cooled biscuits in a sealed freezer-safe bag or container for up to 2 to 3 months. Thaw in the refrigerator or at room temperature and check that they remain dry before serving.
Can puppies eat these biscuits?
Puppies have specific dietary needs. Check with your veterinarian before offering homemade treats, and make the biscuits small and soft enough for a puppy to chew safely.
A Little Note for Pet Parents
Homemade dog treats are a fun way to add variety to your pup’s snack routine, but every dog has different dietary needs. Pumpkin and oats are commonly used in dog-friendly treats, although some dogs may be sensitive to new ingredients.
If your dog has food allergies, diabetes, digestive problems, or follows a veterinary diet, check with your veterinarian before introducing homemade treats.
Final Thoughts
Making a batch of golden pumpkin oat biscuits is a simple way to show your dog some love. The recipe uses just a few plain ingredients, comes together in one bowl, and bakes into crunchy, wholesome treats that are easy to customize for dogs of every size. With a few safety checks, especially for xylitol in peanut butter, you can bake with confidence.
A little pumpkin, a little peanut butter, and a whole lot of tail-wagging happiness. Bake a batch this weekend, cool them completely, and surprise your four-legged family member.
Print
Homemade Pumpkin Oat Dog Biscuits
Ingredients
- 1 cup (240 g) plain pumpkin purée
- 2½ cups (225 g) old-fashioned rolled oats, divided
- 1 large egg
- 2 tablespoons (32 g) natural peanut butter
- ¼ teaspoon ground cinnamon, optional
- 1 to 3 tablespoons water, as needed
Important: Use plain pumpkin purée, not sweetened pumpkin pie filling. Choose peanut butter without xylitol (also called birch sugar), which is toxic to dogs. Avoid added salt, sugar, and other sweeteners.
A Closer Look at the Key Ingredients
Plain pumpkin purée. Pumpkin is the base of the dough. It adds moisture, a mild natural sweetness, and fiber. Be sure the can says pure pumpkin or pumpkin purée and contains nothing else. Pumpkin pie filling contains sugar and spices that are not suitable for dogs.
Old-fashioned rolled oats. Oats give the biscuits their structure and a hearty texture. In this recipe, part of the oats is ground into a coarse flour, which helps bind the dough, and the rest is left whole for texture. Plain, unflavored oats are the right choice, with no added sugar, salt, or flavorings.
Egg. The egg binds the dough so it can be rolled and cut without crumbling. It also adds a little protein.
Natural peanut butter. A small amount of peanut butter adds flavor that many dogs find irresistible. The most important rule is to check the label and choose a peanut butter that contains no xylitol, also called birch sugar, because xylitol is toxic to dogs. Also look for a variety with no added sugar or salt.
Cinnamon (optional). A small pinch adds a warm aroma that people enjoy. It is optional, and the biscuits are perfectly good without it. Use only a small amount.
Water. Pumpkin purée varies in moisture from brand to brand, so a spoonful or two of water helps adjust the dough if it is too dry or crumbly.
Instructions
Step 1: Prepare the Oven
- Preheat the oven to 350°F (175°C).
- Line a baking sheet with parchment paper.
- Set aside a small cookie cutter or use a knife to cut simple squares.
Step 2: Prepare the Oats
- Place 1½ cups of rolled oats in a blender or food processor.
- Blend until they resemble a coarse flour.
- Keep the remaining 1 cup of rolled oats whole for texture.
You can use store-bought oat flour if preferred. Make sure it is plain and unsweetened.
Step 3: Mix the Wet Ingredients
- In a large mixing bowl, combine the pumpkin purée, egg, and peanut butter.
- Stir until smooth and evenly combined.
- Add the cinnamon if using.
The mixture should be creamy and easy to stir.
Step 4: Make the Dough
- Add the ground oats and whole rolled oats to the pumpkin mixture.
- Stir until a thick dough forms.
- If the dough is too dry or crumbly, add water one tablespoon at a time.
- If it feels too sticky, add a little extra oat flour.
The dough should be firm enough to roll out without sticking excessively.
Step 5: Roll and Cut the Biscuits
- Lightly dust your work surface with oat flour.
- Place the dough on the surface and roll it to approximately ¼ inch (6 mm) thick.
- Use a small bone-shaped cookie cutter to cut out the biscuits.
- Gather the leftover dough, roll it again, and continue cutting until all the dough is used.
- Transfer the biscuits to the prepared baking sheet.
For smaller dogs, make smaller biscuits that are easy to chew.
Step 6: Bake Until Firm
- Bake for 25 to 35 minutes, depending on the size and thickness of the biscuits.
- Turn the biscuits over halfway through baking if you want them to brown more evenly.
- For crunchier treats, reduce the oven temperature to 250°F (120°C) and continue drying them for another 20 to 30 minutes.
- Remove from the oven when the biscuits are firm and lightly golden.
Thicker biscuits may need additional time. Allow them to cool completely before judging their final crunchiness.
Step 7: Cool Completely
- Transfer the biscuits to a wire rack.
- Let them cool completely before serving.
- Once cooled, break one open to check that the center is fully baked and dry.
Never give your dog a hot biscuit.