Cheesy Baked Beef Rigatoni: The Ultimate Baked Pasta for Cheese Lovers
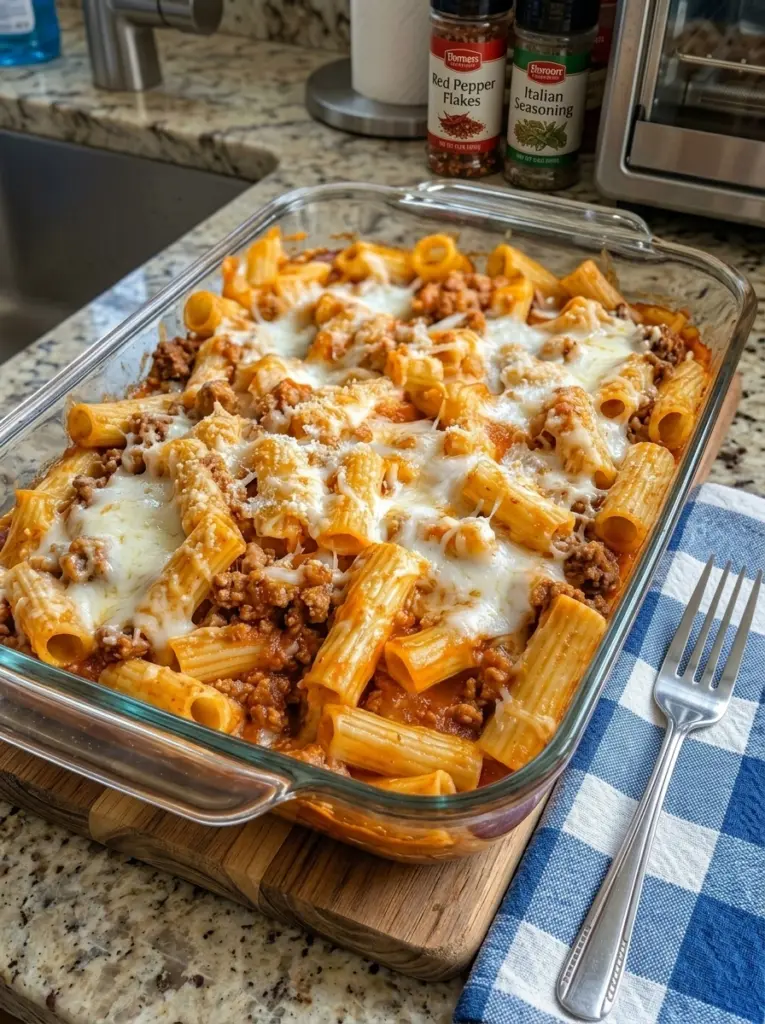
There’s a special kind of joy that comes from pulling a bubbling, golden pasta bake out of the oven, and Cheesy Baked Beef Rigatoni delivers that moment in spades. This dish combines a rich, slow-simmered beef and tomato sauce with tender rigatoni and a triple-cheese topping of mozzarella, provolone, and Parmesan, plus optional dollops of ricotta tucked throughout for little pockets of creaminess in every bite. It’s the kind of comforting, crowd-pleasing dinner that disappears fast at the table and reheats beautifully for days afterward.
What makes this recipe stand out is the care put into the sauce. Rather than a quick jarred-sauce shortcut, this dish builds real depth by sautéing onion and garlic, blooming tomato paste, and simmering crushed tomatoes and tomato sauce together with herbs and a touch of sugar to balance the acidity. Rigatoni’s large, ridged tubes are the perfect vessel for this sauce, trapping it both inside and around each piece. And with three types of cheese (plus an optional fourth in the form of ricotta) blanketing the top, this bake achieves that perfect combination of gooey, sharp, nutty, and creamy in every forkful.
In this article, we’ll cover everything you need to make this dish a success: a complete ingredient breakdown, detailed step-by-step instructions, expert tips for building the richest possible sauce and the best cheese topping, creative variation ideas, storage and freezing guidance, and answers to the most frequently asked questions about this recipe.
Why This Recipe Works So Well
Baked rigatoni dishes have a well-earned place in the comfort food hall of fame, and this cheesy beef version brings together several smart techniques that elevate it above a basic pasta bake:
The sauce is built with real depth, not rushed. Sautéing the aromatics, browning the beef, blooming the tomato paste, and letting the sauce simmer with herbs creates a far richer, more complex flavor than simply combining canned tomatoes and beef straight away.
Rigatoni is the ideal pasta for this dish. Its large diameter and deep ridges are specifically suited to trapping thick, hearty sauces both inside the tube and along its exterior, ensuring every bite is fully coated.
The triple-cheese topping (plus optional ricotta) creates layered texture. Mozzarella brings the gooey stretch, provolone or Monterey Jack adds a mild, slightly tangy depth, Parmesan contributes salty complexity, and the optional ricotta creates soft, creamy pockets scattered throughout the dish.
It’s a fantastic make-ahead and freezer-friendly meal. Like most baked pasta dishes, this recipe can be assembled in advance and baked when needed, or frozen for a future dinner with minimal effort.
It feeds a crowd generously. With a full pound of rigatoni and a hearty sauce, this dish is well-suited for family dinners, potlucks, or meal prepping for the week ahead.
Ingredients You’ll Need
This recipe comes together in three components: the beef and tomato sauce, the pasta, and the cheese topping. Here’s exactly what you’ll need for each.
For the Beef & Tomato Sauce
- 1 lb (450 g) ground beef, preferably 80/20 — the higher fat content keeps the sauce rich and flavorful
- 1 tbsp olive oil — used to sauté the aromatics and help brown the beef
- 1 medium yellow onion, finely diced — forms the aromatic base of the sauce
- 4 cloves garlic, minced — adds essential savory depth
- 2 tbsp tomato paste — concentrated tomato flavor that deepens the sauce’s color and richness
- 1 can (28 oz / 800 g) crushed tomatoes — forms the bulk of the sauce’s texture and body
- 1 can (14 oz / 400 g) tomato sauce or passata — adds smoothness and helps bind the sauce together
- 1 tsp Italian seasoning — a blend of herbs essential to the flavor profile
- 1 tsp dried oregano — reinforces the classic Italian herb flavor
- ½ tsp red pepper flakes, optional — for a gentle kick of heat
- 1 tsp sugar, optional — balances the natural acidity of the tomatoes
- 1 tsp salt, plus more to taste — essential for properly seasoning the sauce throughout
- ½ tsp black pepper — adds a gentle background heat
- ½ cup (120 ml) beef stock or water — thins the sauce slightly and adds savory depth
- ¼ cup fresh basil or parsley, chopped — brightens the finished sauce with fresh, herbaceous flavor
For the Pasta
- 1 lb (450 g) rigatoni — its large, ridged tubes are perfectly suited to holding onto a thick, hearty sauce
- Salt for the pasta water — essential for properly seasoning the pasta itself as it cooks
For the Cheese Topping
- 2 cups (200 g) shredded low-moisture mozzarella — creates that classic gooey, stretchy cheese pull
- 1 cup (100 g) shredded provolone or Monterey Jack — adds a mild, slightly tangy depth and excellent melting quality
- ½ cup (50 g) finely grated Parmesan — contributes salty, nutty, umami-rich complexity
- 4 oz (115 g) ricotta, optional — for little creamy pockets throughout — dolloped over the dish before baking, ricotta creates soft, creamy bites scattered throughout the finished casserole
Step-by-Step Instructions
Step 1: Sauté the Aromatics
Heat the olive oil in a large, heavy-bottomed pot or Dutch oven over medium heat. Add the diced onion and sauté for 4 to 5 minutes, stirring occasionally, until softened and translucent. Add the minced garlic and cook for another 30 to 60 seconds, until fragrant, being careful not to let it burn.
Step 2: Brown the Ground Beef
Add the ground beef to the pot with the onion and garlic. Break it apart with a wooden spoon or spatula as it cooks. Season with a pinch of the salt and pepper at this stage to help the meat absorb flavor as it browns. Cook for 8 to 10 minutes, stirring occasionally, until the beef is fully browned with no pink remaining.
If there’s excess grease in the pot, drain most of it off, leaving just a thin coating to help build flavor in the next step.
Step 3: Build the Sauce Base
Stir the tomato paste directly into the browned beef and cook for 1 to 2 minutes, stirring frequently. This step, known as blooming the tomato paste, deepens its flavor and color by lightly caramelizing its natural sugars.
Pour in the crushed tomatoes, tomato sauce or passata, and beef stock or water, stirring well to combine everything. Add the remaining salt, black pepper, Italian seasoning, oregano, red pepper flakes (if using), and sugar (if using), stirring thoroughly to distribute the seasonings evenly throughout the sauce.
Step 4: Simmer the Sauce
Bring the sauce to a gentle simmer, then reduce the heat to low. Partially cover the pot and let the sauce simmer for at least 25 to 30 minutes, stirring occasionally, allowing the flavors to meld and deepen. If you have extra time, simmering for up to 45 minutes will result in an even richer, more developed sauce.
Taste and adjust the seasoning as needed. Stir in the chopped fresh basil or parsley during the final few minutes of simmering.
Step 5: Cook the Rigatoni
While the sauce simmers, bring a large pot of well-salted water to a rolling boil. Add the rigatoni and cook according to the package instructions until just al dente, usually 1 to 2 minutes less than the package suggests. Since the pasta will continue cooking in the oven, slightly undercooking it at this stage helps prevent it from becoming mushy in the finished bake.
Drain the pasta and set it aside.
Step 6: Preheat the Oven and Combine
Preheat your oven to 375°F (190°C). Lightly grease a 9×13-inch baking dish.
Add the drained rigatoni directly into the pot with the beef and tomato sauce, stirring gently until every piece of pasta is well coated. Transfer the sauced pasta to the prepared baking dish, spreading it out into an even layer.
Step 7: Add the Cheese Topping
If using the optional ricotta, dollop spoonfuls of it evenly over the surface of the pasta, spacing them out so they create pockets of creaminess throughout the dish once baked.
Sprinkle the shredded mozzarella evenly over the top, followed by the shredded provolone or Monterey Jack, and finally the grated Parmesan, covering the entire surface for an even, golden finish.
Step 8: Bake
Transfer the casserole to the preheated oven and bake, uncovered, for 20 to 25 minutes, or until the cheese is fully melted, golden, and bubbling at the edges. For an extra golden, slightly crisped top, switch the oven to broil for the final 2 to 3 minutes, watching closely to prevent burning.
Step 9: Rest and Serve
Remove the casserole from the oven and let it rest for 5 to 10 minutes before serving. This resting period allows the cheese and sauce to set slightly, making it easier to serve clean, satisfying portions. Garnish with a bit of extra fresh basil or parsley before serving, if desired.
Expert Tips for the Best Results
Don’t skip blooming the tomato paste. This small step significantly deepens the flavor of the sauce and removes any raw, tinny taste that tomato paste can have when added directly to liquid.
Let the sauce simmer as long as you can. While 25 to 30 minutes is the minimum for good flavor, letting the sauce simmer longer, adding a splash of extra stock or water if it becomes too thick, results in an even richer, more developed final product.
Slightly undercook your pasta. Since the pasta will continue to cook while the casserole bakes in the oven, pulling it just shy of al dente on the stovetop prevents it from becoming mushy in the finished dish.
Use freshly shredded and grated cheese when possible. Pre-shredded cheeses are coated with anti-caking agents that can affect melting texture. Freshly shredded mozzarella, provolone, and Parmesan will give you a smoother, creamier finish.
Don’t skip the ricotta dollops if you have it on hand. While optional, the pockets of creamy ricotta scattered throughout the dish add a wonderful textural contrast to the melted cheese topping and hearty beef sauce.
Let the casserole rest before serving. A brief resting period after baking allows the sauce and cheese to set slightly, making for cleaner, more satisfying servings.
Layer your cheeses in the order given. Adding mozzarella first, followed by provolone, and finishing with Parmesan on top helps create the ideal combination of gooey texture underneath and a flavorful, golden-brown crust on top.
Delicious Variations to Try
This recipe is a wonderful base for experimentation. Here are some popular ways to switch it up:
Sausage-Beef Blend: Replace half of the ground beef with mild or spicy Italian sausage for an extra layer of herby, slightly spicier flavor.
Vegetable-Loaded Version: Stir sautéed mushrooms, diced bell peppers, or baby spinach into the sauce before combining it with the pasta for added nutrition and texture.
Extra Spicy Version: Increase the red pepper flakes to a full teaspoon, or add a diced fresh chili to the sauce while it simmers for a bolder, spicier kick.
White Sauce Swirl: For an extra indulgent version, swirl a thin layer of béchamel (white sauce) into the dish along with the ricotta dollops for a richer, creamier finish reminiscent of baked pasta al forno.
Individual Baked Portions: Divide the assembled pasta into individual ramekins or oven-safe bowls for perfectly portioned, single-serving bakes — great for meal prepping or entertaining.
Lighter Version: Substitute lean ground turkey or a lean ground beef blend for the standard 80/20 beef, and use part-skim mozzarella and ricotta to lighten the dish while keeping the core flavors intact.
What to Serve With Cheesy Baked Beef Rigatoni
This dish is hearty and rich enough to be the centerpiece of the meal, but a few well-chosen sides can round out the table beautifully:
- A crisp Caesar or arugula salad with a bright, acidic dressing helps balance the richness of the cheese and meat sauce
- Garlic bread or a crusty Italian loaf for scooping up any extra sauce left on the plate
- Roasted or steamed vegetables, such as green beans, broccoli, or asparagus, add color and freshness to the meal
- A glass of medium-to-full-bodied red wine, like Chianti, Sangiovese, or Cabernet Sauvignon, pairs beautifully with the rich tomato and beef flavors
Make-Ahead, Storage, and Freezing Instructions
Making ahead: This rigatoni bake can be fully assembled up to 24 hours in advance. Cover tightly with foil or plastic wrap and refrigerate unbaked. When ready to bake, add about 10 extra minutes to the baking time, since it will be starting from cold.
Refrigerating leftovers: Store baked, cooled rigatoni in an airtight container in the refrigerator for up to 5 days.
Freezing before baking: Assemble the casserole in a freezer-safe dish, wrap tightly with plastic wrap and then foil, and freeze for up to 3 months. Thaw overnight in the refrigerator before baking as directed, adding extra time as needed since it will still be quite cold.
Freezing after baking: Baked rigatoni can also be frozen, either whole or in individual portions. Wrap tightly and freeze for up to 3 months. Thaw overnight in the refrigerator before reheating.
Reheating in the oven: Cover with foil and reheat at 350°F (175°C) for 20 to 25 minutes, or until heated through, removing the foil for the final 5 minutes to re-crisp the top.
Reheating in the microwave: Place a portion on a microwave-safe plate and heat in 1-minute intervals, checking frequently, until warmed through.
Frequently Asked Questions
Can I use a different pasta shape? Yes. While rigatoni’s large, ridged tubes are ideal for trapping this thick, hearty sauce, you can substitute penne, ziti, or shells with excellent results.
Is the ricotta necessary, or can I skip it? The ricotta is entirely optional. The dish is still rich and delicious with just the three shredded and grated cheeses, but the ricotta adds a lovely textural contrast in the form of soft, creamy pockets scattered throughout the bake.
Why is my sauce watery? This is usually caused by not simmering the sauce long enough to reduce excess liquid, or by not draining the browned beef of excess grease. Be sure to let the sauce simmer for the full recommended time and drain the beef as directed.
Can I make this casserole without browning the beef first? Browning the beef is an important step for building flavor and ensuring it’s fully cooked before assembly. It’s not recommended to skip this step, as the beef needs to be cooked through before the relatively short baking time in the oven.
Can I make this recipe gluten-free? Yes, simply substitute your favorite gluten-free rigatoni or a similar tubular pasta shape. The rest of the ingredients in this recipe are naturally gluten-free, though it’s worth double-checking your beef stock label.
How many servings does this recipe make? This recipe, made in a standard 9×13-inch baking dish, typically yields 6 to 8 generous servings, depending on portion size and any accompanying sides.
Can I add other vegetables to the sauce? Absolutely. Finely diced carrots or celery can be sautéed along with the onion for added depth and a subtle natural sweetness, similar to a classic Bolognese base.
Final Thoughts
Cheesy Baked Beef Rigatoni brings together a deeply flavorful, slow-simmered beef and tomato sauce with tender, sauce-trapping rigatoni and a triple-layered cheese topping that turns golden and bubbly in the oven. The optional dollops of ricotta take this dish from great to unforgettable, adding pockets of creamy richness throughout every serving. It’s the kind of casserole that satisfies on every level — hearty, cheesy, saucy, and endlessly comforting.
Whether you’re making this for a busy weeknight dinner, a potluck, or a make-ahead meal for the week, this recipe delivers every time. Save it, bookmark it, or print it out — because once this bubbling, cheesy beef rigatoni comes out of the oven, it’s guaranteed to become a household favorite.