Cheesy Garlic Baked Hot Dogs: The Ultimate Cheesy, Garlicky Comfort Food Recipe
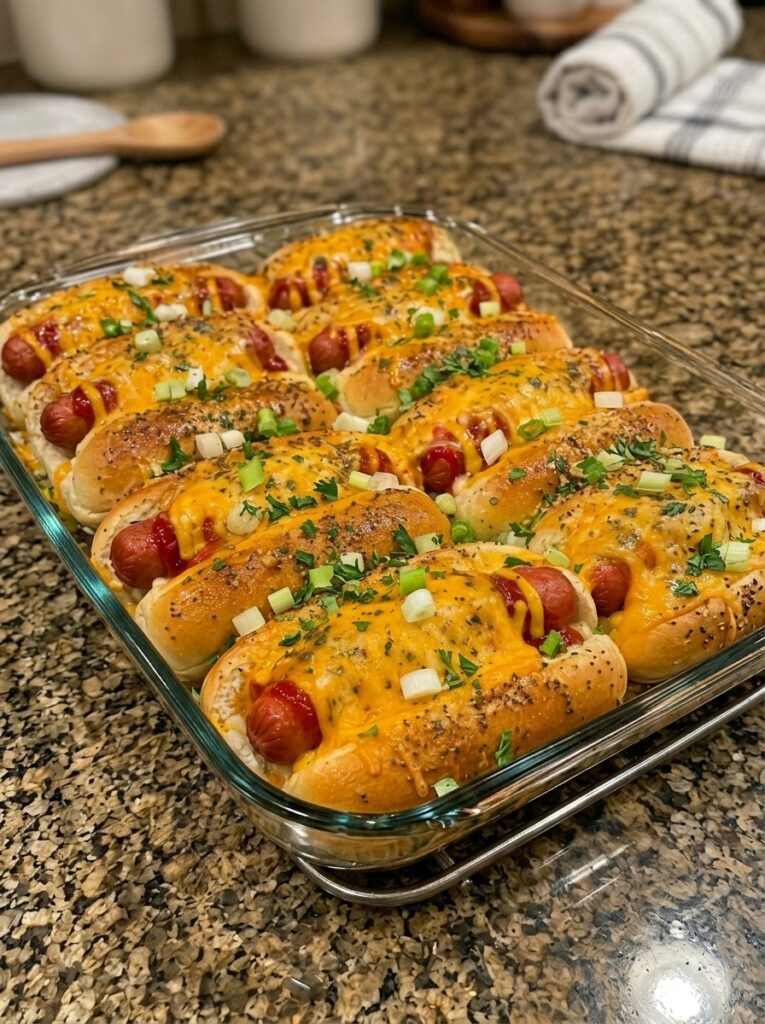
If you thought hot dogs couldn’t get any better, think again. Cheesy Garlic Baked Hot Dogs take the classic backyard favorite and transform it into an irresistible, oven-baked masterpiece loaded with melted cheddar and mozzarella, wrapped in a buttery garlic-Parmesan crust, and finished with a golden, bubbly top that practically begs to be photographed before you devour it. This isn’t your average grill-out hot dog — it’s a next-level comfort food recipe that combines the nostalgic flavors of a classic cookout with the indulgent, cheesy richness of a loaded garlic bread.
Whether you’re planning a quick weeknight dinner, a game-day appetizer spread, a kid-friendly meal the whole family will fight over, or a fun twist on your usual cookout menu, this recipe checks every box. It’s easy to make, requires simple pantry staples, and comes together in under 30 minutes of active cooking time. Best of all, it delivers restaurant-quality flavor without any complicated techniques or hard-to-find ingredients.
In this article, we’ll walk through everything you need to know about making the perfect Cheesy Garlic Baked Hot Dogs — from ingredient breakdowns and step-by-step instructions to expert tips, flavor variations, storage advice, and answers to the most frequently asked questions. By the end, you’ll be fully equipped to make this crowd-pleasing dish your new go-to recipe.
Why You’ll Love This Cheesy Garlic Baked Hot Dogs Recipe
There are plenty of reasons this recipe has been making waves across social media and home kitchens alike. Here’s why it deserves a permanent spot in your recipe rotation:
1. It’s incredibly easy to make. With just a handful of simple steps — assemble, brush with garlic butter, bake, and broil — this recipe is nearly foolproof. Even beginner cooks can pull off a perfect batch on the first try.
2. It’s packed with bold, comforting flavors. The combination of garlic butter, Italian seasoning, Parmesan, and two types of melty cheese creates a flavor profile that’s savory, rich, and deeply satisfying. Every bite delivers a perfect balance of buttery, cheesy, garlicky goodness.
3. It’s endlessly customizable. From swapping cheeses to adding jalapeños, bacon bits, or different sauces, this recipe serves as a fantastic base you can adapt to suit your taste preferences or whatever you have on hand.
4. It’s perfect for feeding a crowd. Whether you’re hosting a casual get-together, tailgating before the big game, or simply feeding a hungry family, this recipe scales easily and keeps everyone happy.
5. It reinvents a classic. Hot dogs are already a beloved comfort food, but baking them in the oven with garlic butter and gooey cheese elevates them into something truly special — familiar enough to please picky eaters, yet exciting enough to feel like a treat.
Ingredients You’ll Need
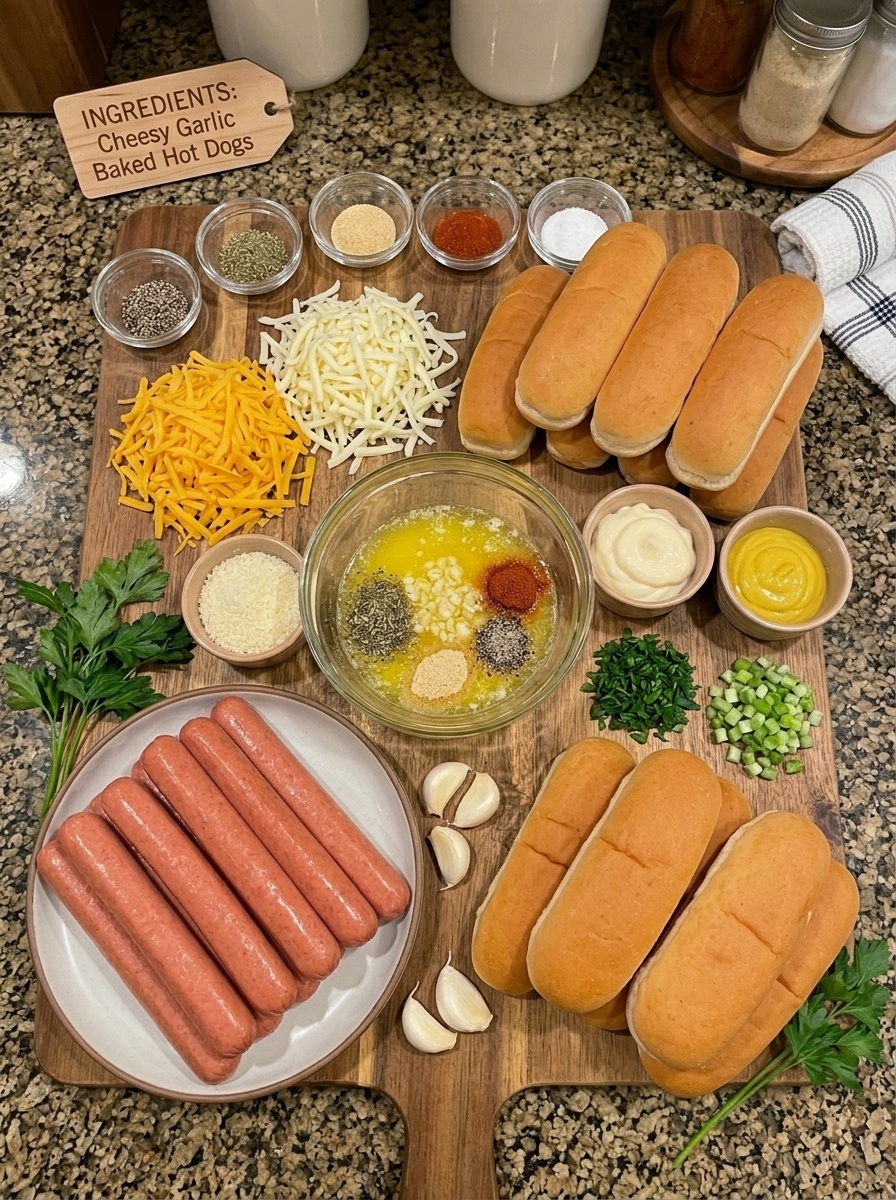
Let’s take a closer look at the ingredients that make this recipe shine. Each component plays an important role in building layers of flavor and texture.
- 8 beef hot dogs – Beef hot dogs provide a rich, savory base flavor and a satisfying snap. You can substitute with turkey, chicken, or plant-based hot dogs if preferred.
- 8 hot dog buns – Soft, standard-size hot dog buns work best for soaking up the garlic butter and holding all that melted cheese.
- 1 cup shredded cheddar cheese – Adds sharp, tangy flavor and a beautiful golden color when baked.
- 1 cup shredded mozzarella cheese – Provides that irresistible cheese-pull and gooey texture.
- ½ cup grated Parmesan cheese – Adds a salty, nutty depth of flavor and helps create a crisp, golden topping.
- 4 tbsp unsalted butter, melted – The base of the garlic butter mixture that makes the buns rich and flavorful.
- 3 cloves garlic, minced – Fresh garlic delivers a punchy, aromatic flavor that infuses the entire dish.
- 1 tsp Italian seasoning – A blend of herbs like oregano, basil, and thyme that rounds out the garlic butter with an earthy, herby note.
- ½ tsp garlic powder – Boosts the garlic flavor even further for an extra savory kick.
- ½ tsp paprika – Adds subtle warmth, color, and a hint of smokiness.
- 2 tbsp chopped fresh parsley – Brightens up the dish and adds a fresh, herbaceous finish.
- 2 tbsp mayonnaise – Adds creaminess and helps keep the hot dogs moist while baking.
- 2 tbsp yellow mustard – Provides the classic tangy hot dog flavor everyone loves.
- ¼ cup diced green onions – Adds a mild oniony crunch and a pop of color.
- Salt and black pepper, to taste – Essential for seasoning and balancing all the flavors.
Ingredient Substitutions and Swaps
One of the best things about this recipe is how flexible it is. Here are a few easy substitutions:
- Cheese: Swap cheddar and mozzarella for Monterey Jack, pepper jack (for some heat), Colby, or a Mexican cheese blend.
- Hot dogs: Use all-beef, turkey, chicken, or veggie hot dogs depending on your dietary preferences.
- Buns: Try brioche hot dog buns for an extra buttery, rich flavor, or whole wheat buns for a heartier option.
- Herbs: Fresh garlic and parsley can be swapped for dried versions in a pinch — just use about a third of the amount since dried herbs are more concentrated.
- Mustard: Dijon or spicy brown mustard can replace yellow mustard for a more sophisticated flavor.
Step-by-Step Instructions
Now let’s break down exactly how to make this recipe, step by step, with extra tips along the way to ensure perfect results every time.
Step 1: Preheat the Oven and Prep Your Baking Dish
Start by preheating your oven to 375°F (190°C). This moderate temperature is ideal for melting the cheese evenly while allowing the buns to turn golden without burning. Lightly grease a 9×13-inch baking dish with butter, non-stick spray, or a light coating of oil. This prevents the buns from sticking and makes cleanup a breeze.
Step 2: Make the Garlic Butter Mixture
In a small mixing bowl, combine the melted butter, minced garlic, Italian seasoning, garlic powder, paprika, grated Parmesan cheese, chopped parsley, salt, and black pepper. Stir everything together until well combined. This garlic butter mixture is the flavor powerhouse of the entire dish — it infuses the buns with rich, savory, herby goodness and helps create that gorgeous golden-brown crust once baked.
Pro tip: Let the garlic sit in the melted butter for a few minutes before mixing in the other ingredients. This helps mellow out any harsh raw garlic bite and allows the flavors to meld together beautifully.
Step 3: Assemble the Hot Dogs
Place each hot dog inside a bun and arrange them snugly, side by side, in your prepared baking dish. Nestling them close together helps them hold their shape while baking and ensures the cheese melts into every nook and cranny.
Step 4: Add the Mayo and Mustard
Spread a thin layer of mayonnaise and yellow mustard inside each bun, right around the hot dog. This step might seem small, but it’s essential — the mayo adds moisture and creaminess while the mustard brings that classic tangy hot dog flavor that ties the whole dish together.
Step 5: Load Up the Cheese
Generously sprinkle the shredded cheddar and mozzarella cheese over each hot dog. Don’t be shy here — the cheese is the star of the show, and a generous layer ensures every bite is loaded with gooey, melty goodness.
Step 6: Brush with Garlic Butter and Add Green Onions
Using a pastry brush or spoon, brush the garlic butter mixture generously over the tops of the buns. Make sure to coat every bun evenly so they all bake up golden and flavorful. Sprinkle the diced green onions over the top for a pop of color and mild oniony bite.
Step 7: Bake Covered
Cover the baking dish loosely with aluminum foil. This traps steam and heat, helping the cheese melt evenly and the hot dogs heat through without the buns drying out or over-browning too quickly. Bake for 10 minutes.
Step 8: Bake Uncovered
Remove the foil and continue baking for another 8–10 minutes, or until the cheese is fully melted, bubbly, and the buns have turned a light golden brown. This uncovered baking stage is what gives the dish its beautiful color and slightly crisp bun edges.
Step 9: Broil for Extra Crispiness (Optional but Recommended)
For an extra-crispy, golden-brown finish, switch your oven to broil and cook for 1–2 minutes, watching very closely. Broilers work fast, and cheese can go from perfectly golden to burnt in a matter of seconds, so don’t walk away during this step.
Step 10: Garnish and Serve
Remove the baking dish from the oven and garnish with additional fresh parsley for a bright, fresh finish. Serve immediately while hot, alongside your favorite dipping sauces like extra mustard, ketchup, ranch dressing, or a spicy aioli.
Expert Tips for the Best Cheesy Garlic Baked Hot Dogs
To make sure your Cheesy Garlic Baked Hot Dogs turn out perfectly every single time, keep these tips in mind:
Use freshly shredded cheese. Pre-shredded bagged cheese often contains anti-caking agents that prevent it from melting as smoothly. Shredding your own cheddar and mozzarella from a block results in a creamier, more even melt.
Don’t skip the mayo-mustard layer. It might seem like an unnecessary step, but this thin layer adds moisture and flavor that keeps the hot dogs from tasting dry or one-dimensional.
Watch the broiler closely. Broiling is what gives this dish its irresistible golden, bubbly top, but it can burn quickly. Stay by the oven and check every 30 seconds during this final step.
Arrange the hot dogs snugly. Packing the buns tightly together in the baking dish helps them support each other and prevents the fillings from spilling out.
Let them rest for a minute or two. After coming out of the oven, the cheese will be extremely hot and molten. Letting the dish rest for 1–2 minutes makes it easier to serve without burning your mouth.
Customize the spice level. If you like a bit of heat, add a pinch of red pepper flakes to the garlic butter mixture or use pepper jack cheese instead of mozzarella.
Delicious Variations to Try
One of the best things about this recipe is how easily it can be customized. Here are a few fun variations to switch things up:
Bacon Cheddar Baked Hot Dogs
Add crispy crumbled bacon on top of the cheese before baking for a smoky, savory upgrade that pairs perfectly with the garlic butter.
Spicy Jalapeño Baked Hot Dogs
Add sliced fresh or pickled jalapeños on top of the hot dogs before adding the cheese for a spicy kick. Pepper jack cheese works great here too.
Chili Cheese Baked Hot Dogs
Spoon a thin layer of warm chili over the hot dogs before adding the cheese for a heartier, chili-dog-inspired twist.
Everything Bagel Baked Hot Dogs
Sprinkle everything bagel seasoning over the garlic butter topping for a savory, seedy crunch that adds extra texture and flavor.
BBQ Baked Hot Dogs
Drizzle a little barbecue sauce over the hot dogs before topping with cheese for a smoky-sweet variation that’s perfect for summer gatherings.
What to Serve with Cheesy Garlic Baked Hot Dogs
This dish is hearty and satisfying on its own, but pairing it with the right sides can turn it into a complete meal. Here are some great serving suggestions:
- Classic coleslaw – The crunchy, tangy contrast balances the rich, cheesy hot dogs beautifully.
- Crispy oven-baked fries or tater tots – A comfort food classic pairing that never disappoints.
- Fresh garden salad – A light, refreshing side that cuts through the richness of the dish.
- Corn on the cob – A summery, casual side that complements the backyard-cookout vibe.
- Baked beans – A hearty, smoky side that pairs perfectly with the savory garlic butter flavor.
- Pickle spears – A crunchy, tangy bite that balances the richness of the melted cheese.
Storage and Reheating Instructions
If you happen to have leftovers (though they tend to disappear fast!), here’s how to store and reheat them properly:
Storing: Allow the baked hot dogs to cool completely, then transfer them to an airtight container. Store in the refrigerator for up to 3 days.
Reheating in the oven: Preheat your oven to 350°F (175°C), place the hot dogs in a baking dish, cover with foil, and bake for about 10 minutes, or until heated through. This method helps maintain the texture of the buns and keeps the cheese from becoming rubbery.
Reheating in the microwave: For a quicker option, microwave individual hot dogs for 30–45 seconds. Keep in mind the buns may soften more with this method.
Freezing: While possible, freezing is not highly recommended since the texture of the buns and cheese can change upon thawing. If you do freeze them, wrap each hot dog tightly in foil and store in a freezer-safe bag for up to 1 month. Thaw in the refrigerator overnight before reheating.
Frequently Asked Questions
Can I make this recipe ahead of time? Yes! You can assemble the hot dogs in the baking dish, cover tightly, and refrigerate for up to 24 hours before baking. Add the garlic butter topping just before baking for the best results.
Can I use turkey or chicken hot dogs instead of beef? Absolutely. Turkey, chicken, or even plant-based hot dogs work well in this recipe. Just keep an eye on the baking time, as leaner hot dogs may cook slightly faster.
What’s the best cheese combination for this recipe? Cheddar and mozzarella create the perfect balance of flavor and meltiness, but feel free to experiment with Monterey Jack, Colby, provolone, or a Mexican cheese blend for different flavor profiles.
Can I grill the hot dogs before baking them? Yes, grilling the hot dogs first adds a smoky char that pairs wonderfully with the garlic butter and cheese. Simply grill them until lightly charred, then proceed with the recipe as written.
How do I prevent the buns from getting soggy? Avoid over-soaking the buns with butter, and don’t skip the initial covered baking step, which helps everything heat through evenly before the uncovered baking stage crisps up the buns.
Is this recipe kid-friendly? Very much so! Kids tend to love the cheesy, familiar flavors of this dish. You can easily dial back the garlic and seasoning slightly if you’re cooking for younger, more sensitive palates.
Can I make this recipe dairy-free? Yes, you can substitute the butter, cheddar, mozzarella, and Parmesan with your favorite dairy-free alternatives. The texture may vary slightly, but the flavors will still shine through.
Final Thoughts
Cheesy Garlic Baked Hot Dogs are the perfect example of how a few simple ingredients and one clever baking technique can transform an everyday classic into something truly memorable. With juicy hot dogs, buttery garlic-infused buns, and a generous layer of melted, bubbly cheese, this recipe delivers big, bold comfort food flavor with minimal effort.
Whether you’re making it for a casual family dinner, a game-day gathering, or a fun twist on your next cookout, this recipe is guaranteed to earn a spot in your regular rotation. Its simplicity, customizability, and crowd-pleasing appeal make it a true winner in the kitchen.
So preheat that oven, grab your favorite hot dogs, and get ready to enjoy one of the cheesiest, most satisfying comfort food recipes you’ll ever make. Once you try these Cheesy Garlic Baked Hot Dogs, they just might replace your old hot dog routine for good.
Print
Cheesy Garlic Baked Hot Dogs
Ingredients
Let’s take a closer look at the ingredients that make this recipe shine. Each component plays an important role in building layers of flavor and texture.
- 8 beef hot dogs – Beef hot dogs provide a rich, savory base flavor and a satisfying snap. You can substitute with turkey, chicken, or plant-based hot dogs if preferred.
- 8 hot dog buns – Soft, standard-size hot dog buns work best for soaking up the garlic butter and holding all that melted cheese.
- 1 cup shredded cheddar cheese – Adds sharp, tangy flavor and a beautiful golden color when baked.
- 1 cup shredded mozzarella cheese – Provides that irresistible cheese-pull and gooey texture.
- ½ cup grated Parmesan cheese – Adds a salty, nutty depth of flavor and helps create a crisp, golden topping.
- 4 tbsp unsalted butter, melted – The base of the garlic butter mixture that makes the buns rich and flavorful.
- 3 cloves garlic, minced – Fresh garlic delivers a punchy, aromatic flavor that infuses the entire dish.
- 1 tsp Italian seasoning – A blend of herbs like oregano, basil, and thyme that rounds out the garlic butter with an earthy, herby note.
- ½ tsp garlic powder – Boosts the garlic flavor even further for an extra savory kick.
- ½ tsp paprika – Adds subtle warmth, color, and a hint of smokiness.
- 2 tbsp chopped fresh parsley – Brightens up the dish and adds a fresh, herbaceous finish.
- 2 tbsp mayonnaise – Adds creaminess and helps keep the hot dogs moist while baking.
- 2 tbsp yellow mustard – Provides the classic tangy hot dog flavor everyone loves.
- ¼ cup diced green onions – Adds a mild oniony crunch and a pop of color.
- Salt and black pepper, to taste – Essential for seasoning and balancing all the flavors.
Instructions
One of the best things about this recipe is how flexible it is. Here are a few easy substitutions:
- Cheese: Swap cheddar and mozzarella for Monterey Jack, pepper jack (for some heat), Colby, or a Mexican cheese blend.
- Hot dogs: Use all-beef, turkey, chicken, or veggie hot dogs depending on your dietary preferences.
- Buns: Try brioche hot dog buns for an extra buttery, rich flavor, or whole wheat buns for a heartier option.
- Herbs: Fresh garlic and parsley can be swapped for dried versions in a pinch — just use about a third of the amount since dried herbs are more concentrated.
- Mustard: Dijon or spicy brown mustard can replace yellow mustard for a more sophisticated flavor.
Step-by-Step Instructions
Now let’s break down exactly how to make this recipe, step by step, with extra tips along the way to ensure perfect results every time.
Step 1: Preheat the Oven and Prep Your Baking Dish
Start by preheating your oven to 375°F (190°C). This moderate temperature is ideal for melting the cheese evenly while allowing the buns to turn golden without burning. Lightly grease a 9×13-inch baking dish with butter, non-stick spray, or a light coating of oil. This prevents the buns from sticking and makes cleanup a breeze.
Step 2: Make the Garlic Butter Mixture
In a small mixing bowl, combine the melted butter, minced garlic, Italian seasoning, garlic powder, paprika, grated Parmesan cheese, chopped parsley, salt, and black pepper. Stir everything together until well combined. This garlic butter mixture is the flavor powerhouse of the entire dish — it infuses the buns with rich, savory, herby goodness and helps create that gorgeous golden-brown crust once baked.
Pro tip: Let the garlic sit in the melted butter for a few minutes before mixing in the other ingredients. This helps mellow out any harsh raw garlic bite and allows the flavors to meld together beautifully.
Step 3: Assemble the Hot Dogs
Place each hot dog inside a bun and arrange them snugly, side by side, in your prepared baking dish. Nestling them close together helps them hold their shape while baking and ensures the cheese melts into every nook and cranny.
Step 4: Add the Mayo and Mustard
Spread a thin layer of mayonnaise and yellow mustard inside each bun, right around the hot dog. This step might seem small, but it’s essential — the mayo adds moisture and creaminess while the mustard brings that classic tangy hot dog flavor that ties the whole dish together.
Step 5: Load Up the Cheese
Generously sprinkle the shredded cheddar and mozzarella cheese over each hot dog. Don’t be shy here — the cheese is the star of the show, and a generous layer ensures every bite is loaded with gooey, melty goodness.
Step 6: Brush with Garlic Butter and Add Green Onions
Using a pastry brush or spoon, brush the garlic butter mixture generously over the tops of the buns. Make sure to coat every bun evenly so they all bake up golden and flavorful. Sprinkle the diced green onions over the top for a pop of color and mild oniony bite.
Step 7: Bake Covered
Cover the baking dish loosely with aluminum foil. This traps steam and heat, helping the cheese melt evenly and the hot dogs heat through without the buns drying out or over-browning too quickly. Bake for 10 minutes.
Step 8: Bake Uncovered
Remove the foil and continue baking for another 8–10 minutes, or until the cheese is fully melted, bubbly, and the buns have turned a light golden brown. This uncovered baking stage is what gives the dish its beautiful color and slightly crisp bun edges.
Step 9: Broil for Extra Crispiness (Optional but Recommended)
For an extra-crispy, golden-brown finish, switch your oven to broil and cook for 1–2 minutes, watching very closely. Broilers work fast, and cheese can go from perfectly golden to burnt in a matter of seconds, so don’t walk away during this step.
Step 10: Garnish and Serve
Remove the baking dish from the oven and garnish with additional fresh parsley for a bright, fresh finish. Serve immediately while hot, alongside your favorite dipping sauces like extra mustard, ketchup, ranch dressing, or a spicy aioli.