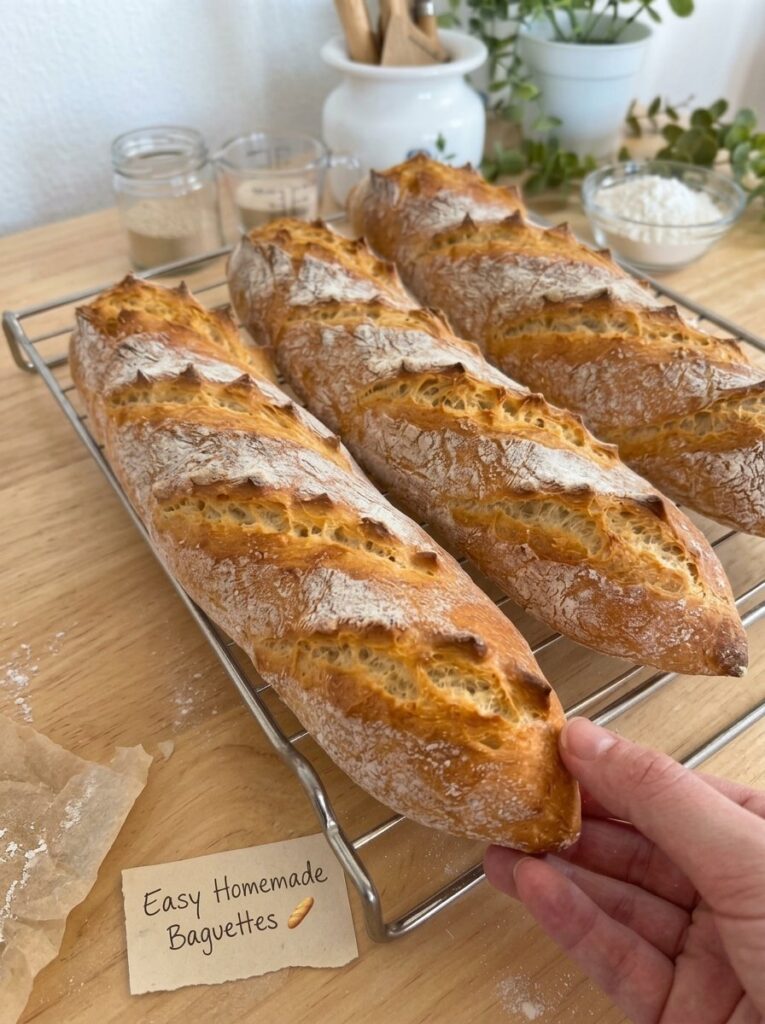
There are few things in the kitchen as satisfying as pulling a tray of golden baguettes out of your own oven. The crust crackles as it cools, the smell fills the whole house, and the first slice reveals a soft, airy center that no supermarket loaf can match. The good news is that you do not need a professional bakery, a special oven, or years of experience to get there. This easy homemade baguette recipe uses just four ingredients and a gentle stretch-and-fold method that replaces heavy kneading with patience.
In this guide, you will find the full recipe, the reasoning behind every step, practical tips for the best crust and crumb, troubleshooting advice, serving ideas, and storage instructions so nothing goes to waste. Whether you are baking your first loaf of bread or you are a seasoned home baker chasing the perfect French baguette, this article will walk you through the entire process.
Why Make Baguettes at Home?
A traditional French baguette is defined by its simplicity: flour, water, yeast, and salt. That short ingredient list is exactly what makes it so approachable at home. There are no eggs, no butter, no sugar, and no specialty ingredients to hunt down. If you have a well-stocked pantry, you probably already own everything you need.
Homemade baguettes also taste better than most store-bought versions for a simple reason: freshness. A baguette is at its peak within hours of leaving the oven, when the crust is crisp and the interior is tender. By baking at home, you control the timing, so your bread is always at its best when it reaches the table.
There are other benefits too:
- Cost: A batch of baguettes costs only a small fraction of what you would pay at a bakery.
- Control: You decide the salt level, the flour type, and the size of the loaves.
- Satisfaction: Shaping, scoring, and baking your own bread is deeply rewarding.
- Versatility: One batch can become breakfast toast, sandwiches, garlic bread, bruschetta, and crostini.
Recipe Overview
| Detail | Information |
|---|---|
| Prep time | 25–30 minutes |
| First rise and resting time | Approximately 2–2½ hours |
| Second rise | 30–45 minutes |
| Bake time | 20–25 minutes |
| Cooling time | 20–30 minutes |
| Total time | Approximately 3 hours 35 minutes to 4 hours 10 minutes |
| Yield | 3–4 baguettes, depending on size |
| Difficulty | Easy to moderate |
Most of the total time is hands-off. The active work is only a few minutes at a time, which makes this recipe ideal for a lazy weekend afternoon or a day when you are working around the house.
Ingredients for Easy Homemade Baguettes
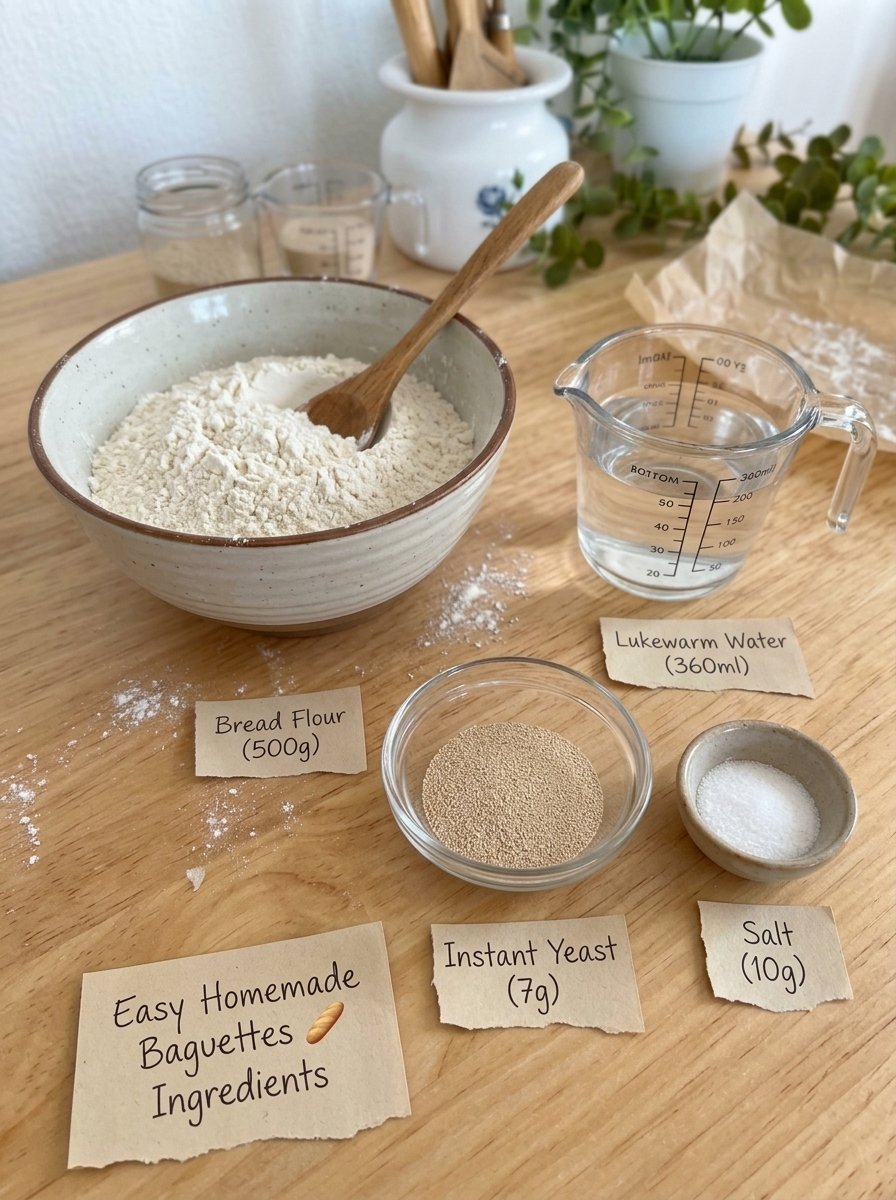
- 360 ml lukewarm water (38–40°C / 100–104°F)
- 7 g instant yeast (approximately 2¼ teaspoons)
- 500 g bread flour or all-purpose flour (approximately 4 cups, depending on how it is measured)
- 10 g salt (approximately 1¾ teaspoons)
- A little extra flour for dusting
- Water for creating steam in the oven, if desired
These quantities make four small baguettes, or three larger ones. Weighing the ingredients with a kitchen scale is strongly recommended, because flour measured by cups can vary widely and directly affects the texture of the bread.
A Note on Flour
Bread flour contains more protein than all-purpose flour, which means it builds more gluten and produces a chewier, more structured crumb with a slightly higher rise. All-purpose flour works well too and gives a slightly softer bite. Either will produce delicious baguettes, so use what you have.
A Note on Yeast
This recipe uses instant yeast, which can be mixed directly with flour. However, stirring it into the water first helps it distribute evenly through the dough. If you only have active dry yeast, you can substitute it, but allow it to dissolve in the warm water for a few minutes first and expect the rise to take slightly longer.
How to Make Homemade Baguettes: Step-by-Step Instructions
Step 1: Prepare the Yeast Mixture
Pour the lukewarm water into a large mixing bowl. Add the instant yeast and stir briefly to spread it through the water. The water should feel comfortably warm, not hot, at roughly 38–40°C (100–104°F). Water that is too hot can weaken or kill the yeast, while water that is too cold will slow fermentation.
Step 2: Add the Flour and Salt
Add the flour and salt to the bowl. Mix with a wooden spoon or sturdy spatula until all the flour is moistened and a rough, sticky dough forms. Scrape down the sides of the bowl to pick up any dry flour. The dough does not need to look smooth at this stage. In fact, it should look shaggy and rather unimpressive.
Cover the bowl and let the dough rest for about 20 minutes. This initial rest, often called an autolyse-style rest, allows the flour to absorb the water fully. As a result, the gluten begins to develop on its own, and the dough becomes much easier to handle.
Step 3: Perform the First Stretch and Fold
Wet your hands lightly so the dough does not stick. Grab one edge of the dough, stretch it gently upward without tearing it, and fold it over toward the center. Rotate the bowl and repeat the motion around the dough until you have completed about four folds.
Cover the bowl and let the dough rest for 20–30 minutes. This technique strengthens the gluten network without the need for intensive kneading, which is exactly why this recipe is so beginner friendly.
Step 4: Repeat the Folding Process
After the rest, perform another round of stretch-and-folds using the same method. Pull each section gently toward the center, rotating the bowl as you work. You will notice the dough becoming smoother and more elastic with each round.
Cover it again and let it rest for another 20–30 minutes. If the dough still feels very loose or slack, you can do one additional round of folds after another short rest.
Step 5: Let the Dough Rise
Cover the bowl and leave the dough in a warm, draft-free spot for about 60–90 minutes, or until it is noticeably puffy and roughly doubled in size. Look for small air bubbles on the surface and a dough that feels lighter than it did at the start.
Try not to rely only on the clock. A cool kitchen may need a longer rise, while a warm summer kitchen may need less time. The dough tells you when it is ready.
Step 6: Prepare the Work Surface and Divide the Dough
Lightly dust your work surface with flour. Gently transfer the risen dough onto it, taking care not to press out too much air. Divide the dough into four roughly equal portions for smaller baguettes, or three portions if you prefer larger ones.
Let the portions rest for 10–15 minutes, loosely covered. This short rest relaxes the gluten so the dough does not spring back when you shape it.
Step 7: Shape the Baguettes
Take one portion and gently flatten it into a rough rectangle. Fold the upper edge toward the center and press lightly to seal. Fold the opposite edge toward the center, then fold the dough in half lengthwise and pinch the seam closed.
Roll the dough gently with your hands, working from the center outward, until you have a long baguette shape with tapered ends. Repeat with the remaining portions. Handle the dough with care, since preserving the gas created during fermentation is the secret to an airy interior.
Step 8: Arrange the Baguettes for the Final Rise
Place the shaped baguettes seam-side down on a parchment-lined baking tray, leaving space between them for expansion. A baguette tray is helpful if you own one. If not, you can create raised folds in the parchment or use a clean kitchen towel to support the sides of each loaf so they hold their shape.
Cover loosely and let them rise for about 30–45 minutes, until slightly puffy. They should feel lighter but still hold their shape when gently touched.
Step 9: Preheat the Oven
During the last 20–30 minutes of the second rise, preheat your oven to 450°F (230°C). If you plan to create steam, place an oven-safe metal tray on a lower rack while the oven heats. Make sure the tray is suitable for this purpose and follow your oven manufacturer’s instructions. Prepare a sharp bread lame or razor blade for scoring.
Step 10: Score the Baguettes
Once the final rise is complete, use a sharp blade to make three or four shallow diagonal slashes along the top of each loaf. Hold the blade at a slight angle and work quickly but carefully. The cuts should run lengthwise along the baguette, not straight across.
Scoring is not just decoration. It gives the bread a controlled place to expand during baking and creates the classic look of a French baguette.
Step 11: Bake with Steam
Place the baguettes in the preheated oven. If you are using the steam method, carefully pour a small amount of hot water into the preheated metal tray, keeping your face and hands away from the escaping steam. Close the oven door right away to trap the moisture.
Safety matters here: never pour water directly onto the oven floor, a glass door, or any oven component that is not designed for it. Bake for about 20–25 minutes, until the baguettes are deeply golden and the crust looks crisp. Smaller loaves may finish sooner, while larger ones may need a few extra minutes.
Step 12: Check for Doneness
Look for a crisp, golden-brown crust and a loaf that feels light for its size. A properly baked baguette sounds slightly hollow when you tap the bottom. If the bread is still pale, bake it for another 3–5 minutes, checking often to avoid over-browning.
For an especially crisp crust, you can briefly open the oven door during the last few minutes to release excess moisture, as long as it is safe to do so with your oven.
Step 13: Cool the Baguettes
Transfer the baguettes to a wire rack and let them cool for at least 20–30 minutes before slicing. During this time the interior finishes setting and the crust stays crisp. Avoid covering hot baguettes, because trapped steam softens the crust.
Step 14: Slice and Enjoy
Slice with a serrated bread knife and serve right away. Homemade baguettes are at their best on the day they are baked, when the crust shatters and the center is soft and airy.
Tips for the Best Homemade Baguettes
Baguettes look simple, but small details make a big difference. Keep these tips in mind every time you bake.
Use the right water temperature. Lukewarm water activates the yeast without harming it. Too hot and the yeast weakens; too cold and the dough rises sluggishly.
Measure the flour carefully. Weighing flour gives the most consistent results. Scooping with a cup can pack in extra flour, and too much flour leads to dense baguettes rather than light and airy ones.
Expect a sticky dough. Baguette dough should be soft and slightly tacky. It is tempting to add more flour while mixing and folding, but resist. Wet hands are a better solution than extra flour.
Allow enough resting time. Resting lets the flour absorb water and the gluten develop naturally, which reduces the need for kneading.
Use stretch-and-fold techniques. Gentle folds build strength and structure with very little effort.
Be patient with fermentation. The dough should become noticeably puffy and full of air bubbles. Rising times vary with the temperature of your kitchen.
Handle the dough gently. Avoid pressing out all the air when shaping. Keeping some of the trapped gas creates an open, airy crumb.
Create steam while baking. Steam in the early stage of baking keeps the crust flexible so the loaf can expand fully before the crust sets. Use a safe method suited to your oven.
Score before baking. A sharp blade lets the bread expand in a controlled way and gives you the traditional baguette appearance.
Cool before slicing. Patience here protects both the crumb and the crust.
The Science Behind a Great Baguette
Understanding why each step matters will make you a better baker. Here is a quick look at what is happening in your dough.
Gluten Development Without Kneading
When flour and water meet, two proteins called glutenin and gliadin link together to form gluten. Traditional recipes develop gluten by kneading for ten minutes or more. This recipe achieves the same result through time and gentle folding. Each rest lets the gluten relax and align, and each fold strengthens the network. The outcome is a dough that traps gas efficiently, giving you a light crumb.
Fermentation and Flavor
Yeast feeds on the starches in flour and produces carbon dioxide and flavor compounds. A longer, slower fermentation develops more complex flavor, which is why the make-ahead option in this recipe is so appealing. Even in the standard version, the combined rest and rise time gives the bread a more rounded taste than a quick, same-hour loaf.
Steam and Crust Formation
Steam does two important jobs. First, it keeps the surface of the dough moist and stretchy, so the loaf can expand fully in the oven (this is called oven spring). Second, it helps gelatinize starches on the surface, which later browns into a shiny, crackly crust. Without steam, the crust sets too early and the loaf can look pale and tight.
Common Baguette Problems and How to Fix Them
My baguettes are dense. The most common causes are too much flour, an underproofed dough, or pressing out too much air during shaping. Weigh your flour, allow the dough to become visibly puffy, and shape gently.
The crust is pale and soft. This usually means not enough steam, an oven that was not fully preheated, or underbaking. Make sure the oven is at temperature, use a safe steam method, and bake until the crust is deep golden.
The dough is too sticky to handle. A sticky dough is normal for baguettes. Use slightly damp hands for folding and a light dusting of flour for shaping, rather than adding flour to the dough itself. An extra round of stretch-and-folds will also make it easier to manage.
The baguettes spread sideways instead of up. This often happens when the dough is overproofed or the shaping was too loose. Shape with a bit more tension and shorten the final rise slightly. Supporting the loaves with a towel or a baguette tray also helps.
The scores did not open. The blade may be dull, or the dough may be underproofed. Use a very sharp blade, cut at a shallow angle, and move quickly with confidence.
The crust is too hard. Smaller loaves can overbake quickly. Check early, and reduce the baking time slightly next time.
Serving Ideas for Homemade Baguettes
One of the best things about baguettes is how many ways you can enjoy them.
- Classic French breakfast: Serve slices with butter, jam, or honey alongside coffee or tea.
- Olive oil dipping bread: Cut into thick slices and serve with olive oil, black pepper, and dried herbs.
- Sandwich baguettes: Fill with turkey, cheese, lettuce, tomato, and your favorite condiments.
- Garlic bread: Brush slices with garlic butter and bake until lightly crisp.
- Soup companion: Serve alongside French onion soup, tomato soup, vegetable soup, or a hearty stew.
- Bruschetta: Top toasted slices with chopped tomatoes, basil, garlic, and olive oil.
- Cheese board: Pair with soft cheeses, olives, grapes, and fresh fruit.
- Rustic crostini: Slice thinly, brush with olive oil, and toast until crisp before adding savory toppings.
How to Store Baguettes
Baguettes contain no preservatives, so they stale faster than commercial bread. Proper storage helps you enjoy them for longer.
Room temperature: Store completely cooled baguettes in a paper bread bag or bread box for up to 1–2 days for the best crust. A sealed bag keeps the interior soft but will soften the crust.
Refrigerator: Refrigeration is generally not recommended for plain baguettes because it makes bread go stale more quickly.
Freezer: Freeze fully cooled baguettes in a freezer-safe bag for up to 2–3 months. You can freeze them whole or cut into portions for easier use.
Reheating: To refresh a whole or partially thawed baguette, warm it in a 350°F (175°C) oven for about 5–10 minutes. Check frequently so the crust does not become too hard.
Refreshing slices: Lightly sprinkle slices with water and toast them in the oven for a few minutes to restore some crispness.
Make-ahead option: Prepare the dough and refrigerate it after the initial mixing for a slower fermentation. Allow extra time for the dough to warm up and become active before shaping, keep it covered, and monitor its rise.
Frequently Asked Questions
Can I use all-purpose flour instead of bread flour?
Yes. All-purpose flour produces a slightly softer, less chewy baguette, but the results are still excellent. Bread flour gives a little more structure and chew.
Do I need a baguette pan?
No. A parchment-lined baking tray works perfectly well. A baguette pan helps the loaves keep their shape, but you can achieve a similar effect by supporting the sides with a rolled towel or folds in the parchment.
Can I make the dough ahead of time?
Yes. Refrigerate the dough after the initial mixing for a slower fermentation, which also deepens the flavor. Let it warm up and become active before shaping, and keep it covered while it rests.
Why is my dough so sticky?
Baguette dough is naturally soft and tacky because of its relatively high water content. Use damp hands during folding and avoid adding too much flour, which would make the bread dense.
How do I get a crispy crust?
Use steam during the first part of baking, make sure your oven is fully preheated, and bake until the crust is deeply golden. Cooling the loaves uncovered on a wire rack keeps the crust crisp.
How long do homemade baguettes last?
They are best on the day they are baked and stay good for 1–2 days when stored properly. For longer storage, freeze them for up to 2–3 months.
Can I freeze the baguettes?
Absolutely. Cool them completely, place them in a freezer-safe bag, and freeze whole or in portions. Reheat in a 350°F (175°C) oven for 5–10 minutes.
What is the best way to create steam at home?
Place an oven-safe metal tray on a lower rack while the oven preheats, then carefully add hot water when the bread goes in. Keep your face and hands away from the steam, and never pour water onto the oven floor, glass door, or any part not designed for it.
Final Thoughts
Homemade baguettes prove that great bread does not require complicated techniques or exotic ingredients. With water, yeast, flour, and salt, plus a little patience and a few gentle folds, you can bake loaves with a crackling crust and a soft, airy center in your own kitchen. The process is forgiving, the schedule is mostly hands-off, and the result is bread that tastes like a small trip to a French bakery.
Start with this easy recipe, pay attention to how the dough looks and feels at each stage, and adjust to your kitchen and your oven. With every batch, your shaping will improve, your scoring will get bolder, and your baguettes will get even better. Warm from the oven, with a little butter or a splash of olive oil, they are hard to beat.
Print
Easy Homemade Baguettes
Ingredients
- 360 ml lukewarm water (38–40°C / 100–104°F)
- 7 g instant yeast (approximately 2¼ teaspoons)
- 500 g bread flour or all-purpose flour (approximately 4 cups, depending on how it is measured)
- 10 g salt (approximately 1¾ teaspoons)
- A little extra flour for dusting
- Water for creating steam in the oven, if desired
These quantities make four small baguettes, or three larger ones. Weighing the ingredients with a kitchen scale is strongly recommended, because flour measured by cups can vary widely and directly affects the texture of the bread.
A Note on Flour
Bread flour contains more protein than all-purpose flour, which means it builds more gluten and produces a chewier, more structured crumb with a slightly higher rise. All-purpose flour works well too and gives a slightly softer bite. Either will produce delicious baguettes, so use what you have.
A Note on Yeast
This recipe uses instant yeast, which can be mixed directly with flour. However, stirring it into the water first helps it distribute evenly through the dough. If you only have active dry yeast, you can substitute it, but allow it to dissolve in the warm water for a few minutes first and expect the rise to take slightly longer.
Instructions
Pour the lukewarm water into a large mixing bowl. Add the instant yeast and stir briefly to spread it through the water. The water should feel comfortably warm, not hot, at roughly 38–40°C (100–104°F). Water that is too hot can weaken or kill the yeast, while water that is too cold will slow fermentation.
Add the flour and salt to the bowl. Mix with a wooden spoon or sturdy spatula until all the flour is moistened and a rough, sticky dough forms. Scrape down the sides of the bowl to pick up any dry flour. The dough does not need to look smooth at this stage. In fact, it should look shaggy and rather unimpressive.
Cover the bowl and let the dough rest for about 20 minutes. This initial rest, often called an autolyse-style rest, allows the flour to absorb the water fully. As a result, the gluten begins to develop on its own, and the dough becomes much easier to handle.
Wet your hands lightly so the dough does not stick. Grab one edge of the dough, stretch it gently upward without tearing it, and fold it over toward the center. Rotate the bowl and repeat the motion around the dough until you have completed about four folds.
Cover the bowl and let the dough rest for 20–30 minutes. This technique strengthens the gluten network without the need for intensive kneading, which is exactly why this recipe is so beginner friendly.
After the rest, perform another round of stretch-and-folds using the same method. Pull each section gently toward the center, rotating the bowl as you work. You will notice the dough becoming smoother and more elastic with each round.
Cover it again and let it rest for another 20–30 minutes. If the dough still feels very loose or slack, you can do one additional round of folds after another short rest.
Cover the bowl and leave the dough in a warm, draft-free spot for about 60–90 minutes, or until it is noticeably puffy and roughly doubled in size. Look for small air bubbles on the surface and a dough that feels lighter than it did at the start.
Try not to rely only on the clock. A cool kitchen may need a longer rise, while a warm summer kitchen may need less time. The dough tells you when it is ready.
Lightly dust your work surface with flour. Gently transfer the risen dough onto it, taking care not to press out too much air. Divide the dough into four roughly equal portions for smaller baguettes, or three portions if you prefer larger ones.
Let the portions rest for 10–15 minutes, loosely covered. This short rest relaxes the gluten so the dough does not spring back when you shape it.
Take one portion and gently flatten it into a rough rectangle. Fold the upper edge toward the center and press lightly to seal. Fold the opposite edge toward the center, then fold the dough in half lengthwise and pinch the seam closed.
Roll the dough gently with your hands, working from the center outward, until you have a long baguette shape with tapered ends. Repeat with the remaining portions. Handle the dough with care, since preserving the gas created during fermentation is the secret to an airy interior.
Place the shaped baguettes seam-side down on a parchment-lined baking tray, leaving space between them for expansion. A baguette tray is helpful if you own one. If not, you can create raised folds in the parchment or use a clean kitchen towel to support the sides of each loaf so they hold their shape.
Cover loosely and let them rise for about 30–45 minutes, until slightly puffy. They should feel lighter but still hold their shape when gently touched.
During the last 20–30 minutes of the second rise, preheat your oven to 450°F (230°C). If you plan to create steam, place an oven-safe metal tray on a lower rack while the oven heats. Make sure the tray is suitable for this purpose and follow your oven manufacturer’s instructions. Prepare a sharp bread lame or razor blade for scoring.
Once the final rise is complete, use a sharp blade to make three or four shallow diagonal slashes along the top of each loaf. Hold the blade at a slight angle and work quickly but carefully. The cuts should run lengthwise along the baguette, not straight across.
Scoring is not just decoration. It gives the bread a controlled place to expand during baking and creates the classic look of a French baguette.
Place the baguettes in the preheated oven. If you are using the steam method, carefully pour a small amount of hot water into the preheated metal tray, keeping your face and hands away from the escaping steam. Close the oven door right away to trap the moisture.
Safety matters here: never pour water directly onto the oven floor, a glass door, or any oven component that is not designed for it. Bake for about 20–25 minutes, until the baguettes are deeply golden and the crust looks crisp. Smaller loaves may finish sooner, while larger ones may need a few extra minutes.
Look for a crisp, golden-brown crust and a loaf that feels light for its size. A properly baked baguette sounds slightly hollow when you tap the bottom. If the bread is still pale, bake it for another 3–5 minutes, checking often to avoid over-browning.
For an especially crisp crust, you can briefly open the oven door during the last few minutes to release excess moisture, as long as it is safe to do so with your oven.
Transfer the baguettes to a wire rack and let them cool for at least 20–30 minutes before slicing. During this time the interior finishes setting and the crust stays crisp. Avoid covering hot baguettes, because trapped steam softens the crust.
Slice with a serrated bread knife and serve right away. Homemade baguettes are at their best on the day they are baked, when the crust shatters and the center is soft and airy.