Introduction: Fresh Sandwich Bread Without the Hard Work
There is something deeply satisfying about slicing into a loaf of bread you made yourself. The kitchen smells warm and yeasty, the crust crackles slightly under the knife, and the inside is soft, tender and still faintly steaming. For many people, though, homemade bread feels intimidating. Kneading takes time, requires technique, and leaves you wondering whether you have done it “right.”
This easy no-knead sandwich bread removes all of that stress. There is no stand mixer, no bread machine and no kneading at all. You stir a handful of pantry staples together in one bowl, let time do the work, and bake the dough in a standard loaf pan. The result is a soft, fluffy loaf with a beautifully golden crust that is ideal for everyday sandwiches, breakfast toast, or a warm slice with butter.
Whether you have never baked bread before or you simply want a reliable recipe for busy weeks, this no-knead bread recipe is built for you. In this guide you will find the complete ingredient list, a detailed step-by-step method, expert tips, troubleshooting advice, flavor variations, storage instructions and answers to the most common questions about homemade sandwich bread.
Why You Will Love This No-Knead Sandwich Bread
Before we get into the details, here is why this recipe deserves a permanent spot in your kitchen routine.
- It is truly beginner friendly. If you can stir ingredients with a spoon, you can make this bread. There is no shaping, scoring or special technique involved.
- It uses simple pantry staples. Flour, water, yeast, sugar, salt and oil are all you need. You probably have everything at home right now.
- It is mostly hands-off. Active work takes about 15 minutes. The rest of the time the dough rests, rises and bakes while you get on with your day.
- The texture is soft and sandwich ready. Thanks to the loaf pan and a touch of oil or butter, the crumb is tender and fluffy, and the slices hold together well for sandwiches.
- It is more affordable than store-bought. A single loaf costs only a fraction of a bakery-quality sandwich loaf, and you control exactly what goes into it.
- It tastes better. Fresh homemade bread has a flavor and aroma that packaged bread simply cannot match.
- It is versatile. Use it for toast, grilled cheese, breakfast sandwiches, French toast, croutons or breadcrumbs.
Recipe Overview
- Prep time: 15 minutes
- First rise: 60–90 minutes
- Second rise: 25–40 minutes
- Bake time: 35–45 minutes
- Cooling time: about 1 hour
- Total time: about 3–4 hours (mostly hands-off)
- Yield: 1 loaf, about 12–14 slices
- Difficulty: Easy
- Method: Oven-baked, no-knead yeast bread
Ingredients for Easy No-Knead Sandwich Bread
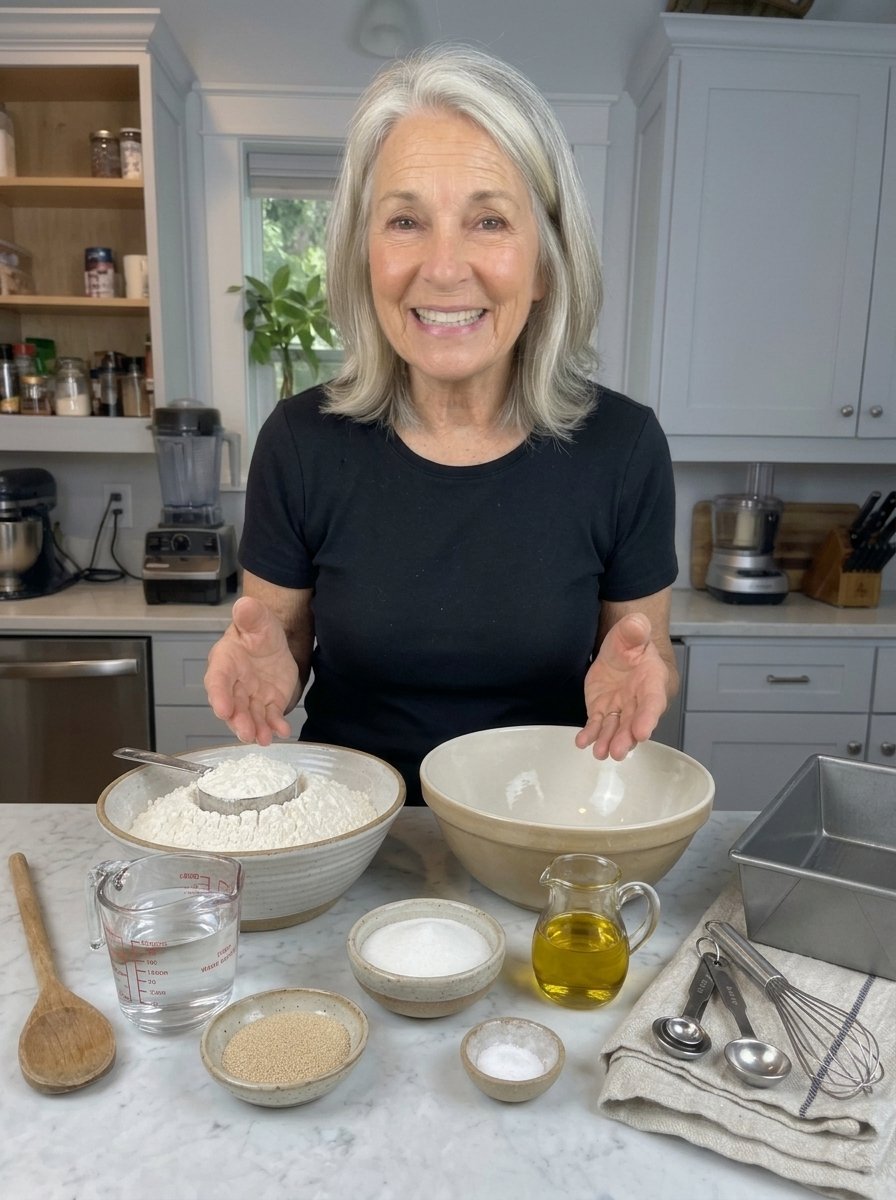
Here is everything you need for one standard loaf:
- 3½ cups (440 g) all-purpose flour or bread flour
- 1½ cups (360 ml) warm water
- 2¼ teaspoons (7 g) instant yeast
- 2 tablespoons (25 g) granulated sugar
- 1½ teaspoons (9 g) salt
- 2 tablespoons (30 ml) olive oil or melted butter
A Closer Look at Each Ingredient
Because this recipe is so simple, each ingredient plays an important role. Understanding what each one does will help you bake with more confidence.
Flour. Both all-purpose flour and bread flour work well. All-purpose flour gives a slightly softer, more tender crumb, while bread flour has more protein, which creates more structure and a chewier bite. If you want a loaf that is especially tall and sturdy for loaded sandwiches, choose bread flour. If you prefer a gentle, cake-like softness, all-purpose is perfect. For the most accurate results, weigh your flour with a kitchen scale. If you use measuring cups, spoon the flour into the cup and level it off rather than scooping directly from the bag, which packs in too much flour and leads to a dry, dense loaf.
Warm water. Water activates the yeast and hydrates the flour. Because there is no kneading, the dough relies on a fairly wet consistency to develop gluten slowly over time. The ideal temperature is between 38–43°C (100–110°F). It should feel comfortably warm on your wrist, never hot. Water that is too hot can kill the yeast and prevent the dough from rising, while water that is too cold will slow everything down.
Instant yeast. Instant yeast is the engine of this recipe. It is finely granulated and can be mixed straight into the liquid without a separate proofing step. One standard packet contains about 2¼ teaspoons, which is exactly what you need here. Make sure your yeast is fresh and stored in a cool, dry place. If you are unsure, check the expiration date.
Sugar. Two tablespoons of granulated sugar feed the yeast, encourage a golden crust and add a very subtle sweetness. It does not make the bread taste sweet. Instead it rounds out the flavor and helps the loaf brown beautifully.
Salt. Salt is essential for flavor. It also strengthens the dough and regulates yeast activity so the bread does not rise too quickly. Without salt, bread tastes flat and bland. Be sure to measure it accurately.
Olive oil or melted butter. Fat makes the crumb tender, keeps the bread soft for longer and adds richness. Olive oil gives a lightly fruity, soft crumb, while melted butter provides a more classic, mildly buttery flavor. Both work equally well, so choose whichever you prefer.
Equipment You Will Need
You do not need fancy tools for this recipe. Gather the following:
- A large mixing bowl
- A sturdy wooden spoon or silicone spatula
- Measuring cups and spoons (or a kitchen scale)
- A 9 × 5-inch (23 × 13 cm) loaf pan
- Plastic wrap or a clean kitchen towel
- Parchment paper or cooking spray (optional but helpful)
- A wire cooling rack
- A serrated bread knife
- An instant-read thermometer (optional, but useful for checking doneness)
How to Make No-Knead Sandwich Bread: Step-by-Step Instructions
Step 1: Mix the Wet Ingredients
In a large mixing bowl, combine the warm water, instant yeast and sugar. Stir briefly until the yeast is evenly distributed. You do not need to wait for it to foam, since instant yeast does not require a separate proofing stage, but a little bubbling is a good sign that your yeast is active.
Add the olive oil or melted butter and stir to combine.
Step 2: Add the Flour and Salt
Add the flour and salt to the bowl. Mix with a sturdy wooden spoon or spatula until all the flour is moistened and a thick, sticky dough forms.
The dough will look rough and shaggy, and it may be too sticky to handle comfortably. That is exactly what you want for a no-knead method, so resist the temptation to add lots of extra flour. The high moisture level is what allows gluten to develop on its own during the rise.
Make sure there are no dry pockets of flour hiding at the bottom or along the sides of the bowl. Scrape thoroughly so the dough hydrates evenly.
Cover the bowl and let the dough rest for 10–15 minutes. This short rest gives the flour time to absorb the water, which makes the dough smoother and easier to work with.
Step 3: Let the Dough Rise
Cover the bowl with plastic wrap or a clean kitchen towel and leave it in a warm, draft-free place for approximately 60–90 minutes.
The dough should expand noticeably and become airy, with bubbles appearing on the surface. If your kitchen is cool, it may take a little longer. A good rule is to watch the dough rather than the clock. When it looks puffy, jiggly and clearly larger than when you started, it is ready.
Warm spot ideas: Place the bowl in your oven with only the light turned on, on top of the refrigerator, or near (not on) a warm stovetop.
Step 4: Prepare the Loaf Pan
Grease a 9 × 5-inch (23 × 13 cm) loaf pan with butter or cooking spray. You can also line it with parchment paper for easier removal. A parchment sling, with extra paper hanging over the long sides, makes lifting the baked loaf out of the pan effortless.
Using a lightly oiled spatula, gently scrape the risen dough into the prepared pan. Spread it evenly toward the corners without pressing out too much of the air. Those bubbles are what give the bread its soft, open crumb.
Step 5: Let the Dough Rise Again
Cover the loaf pan loosely and let the dough rise for another 25–40 minutes, or until it looks puffy and has risen close to the top of the pan.
Meanwhile, preheat your oven to 180°C (350°F).
Keep an eye on the dough during this second rise. You want it light and airy, but not so overexpanded that it collapses when moved. A gentle poke with a floured finger can help: if the dent springs back slowly, the dough is ready. If it springs back immediately, give it a few more minutes. If the dent stays and the dough sighs, it is overproofed.
Step 6: Bake Until Golden
Place the loaf pan on the center rack of the preheated oven. Bake for approximately 35–45 minutes, until the top is golden brown and the loaf is cooked through.
If the top browns too quickly, loosely cover it with aluminum foil during the final 10–15 minutes.
For a more reliable doneness check, the center should reach approximately 93–96°C (200–205°F). The loaf should feel set rather than soft or doughy in the middle. You can also tap the bottom of the loaf after removing it from the pan. A hollow sound is another good sign that it is done.
Step 7: Cool and Slice
Remove the loaf from the oven and let it rest in the pan for 10 minutes.
Carefully turn it out onto a wire rack and allow it to cool completely, approximately 1 hour, before slicing.
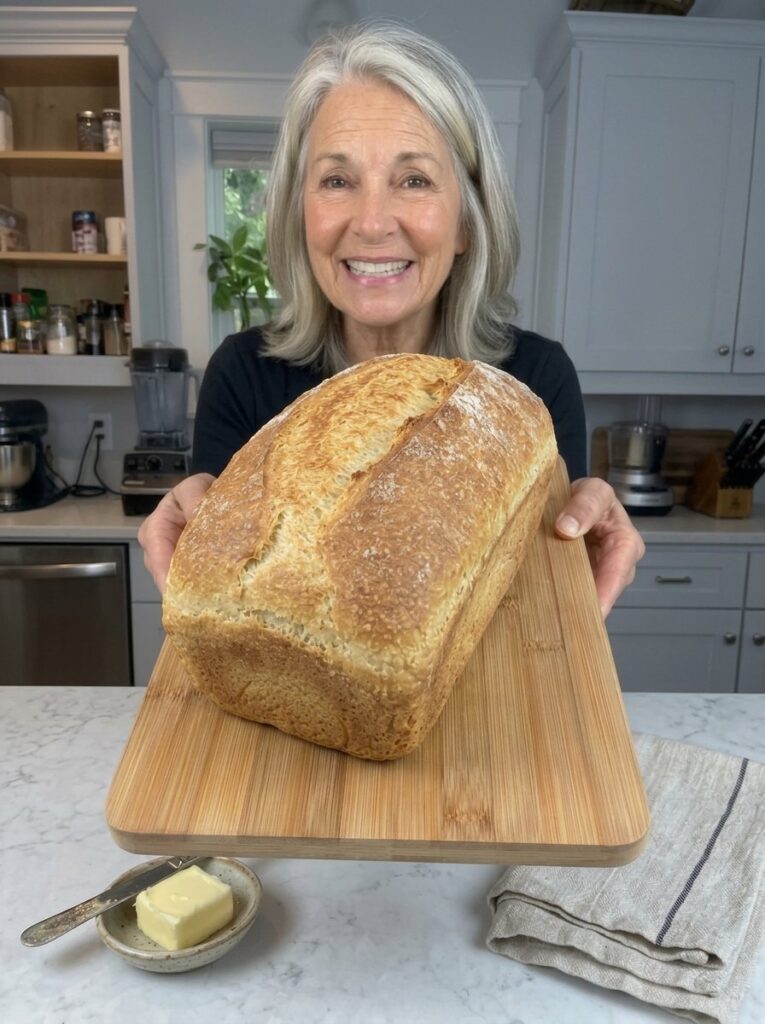
I know it is tempting to cut into warm bread right away, but patience pays off. Cooling allows the interior to finish setting. Slicing too early can result in a gummy, squished texture. Use a serrated bread knife and a gentle sawing motion to cut even slices. The finished bread should have a soft, fluffy crumb and a golden crust, making it ideal for everyday sandwiches and toast.
Tips for the Best Easy No-Knead Sandwich Bread
These practical tips will help you get consistent results every time.
- Use warm water, not hot. Water around 38–43°C (100–110°F) helps the yeast work effectively without damaging it.
- Mix thoroughly. Although this bread requires no kneading, make sure all the flour is incorporated so the dough hydrates evenly.
- Expect a sticky dough. The dough should be softer and stickier than traditional kneaded bread dough. Avoid adding too much extra flour, which can make the loaf dry and dense.
- Choose the right loaf pan. A standard 9 × 5-inch (23 × 13 cm) loaf pan works well for this recipe. A pan that is much larger will produce a shorter, flatter loaf.
- Give it enough time to rise. Let the dough become noticeably puffy before baking. Rising time varies with room temperature.
- Avoid overproofing. If the dough rises too much and begins collapsing, the finished loaf may have a dense texture.
- Cool completely before slicing. This allows the interior to set properly and makes clean, even sandwich slices.
- Use a thermometer if you have one. An internal temperature of 93–96°C (200–205°F) is the most dependable way to know your bread is fully baked.
- Weigh your ingredients. A kitchen scale removes the guesswork, especially with flour.
Troubleshooting: Common No-Knead Bread Problems and Fixes
Even simple recipes can go sideways occasionally. Here is how to diagnose and fix the most common issues.
My dough did not rise. The most likely culprits are old yeast or water that was too hot or too cold. Check the expiration date on your yeast and use a thermometer to confirm the water temperature. Also make sure your rising spot is not too cold. If the kitchen is chilly, simply allow more time.
My bread is dense and heavy. This usually comes from too much flour, underproofing or overproofing. Measure flour by weight if possible, and let the dough become noticeably puffy during both rises.
The loaf collapsed in the oven or on the counter. This is a classic sign of overproofing. The dough rose so far that its structure could not support itself. Next time, shorten the second rise and bake as soon as the dough crowns just above the pan edge.
The top is too dark but the inside is raw. Your oven may run hot. Cover the loaf loosely with foil for the last 10–15 minutes and verify the center temperature with a thermometer. An oven thermometer is a worthwhile, inexpensive investment.
The crumb is gummy. The bread was probably sliced before it cooled, or it was slightly underbaked. Always cool for about an hour and check for 93–96°C (200–205°F) in the center.
The bread sticks to the pan. Grease the pan generously or use a parchment paper sling. Letting the loaf rest for 10 minutes before turning it out also helps it release cleanly.
The crust is too hard. Brush the top with melted butter right after baking. This softens the crust and adds a lovely sheen.
Easy Variations to Try
Once you are comfortable with the basic recipe, experiment with these ideas.
- Herb and garlic loaf: Stir 1 teaspoon each of dried rosemary, thyme and garlic powder into the flour.
- Cheese bread: Fold in ½ cup of shredded cheddar or Parmesan just before transferring the dough to the pan.
- Honey sandwich bread: Replace the sugar with the same amount of honey for a gently sweet, extra-soft loaf.
- Seeded top: Brush the dough lightly with water and sprinkle sesame, sunflower or poppy seeds over the top before the second rise.
- Partial whole wheat: Swap up to 1 cup of the flour for whole wheat flour. You may need an extra tablespoon or two of water, and the loaf will be a little denser.
- Cinnamon raisin swirl: Fold in raisins and a teaspoon of cinnamon for a breakfast-friendly loaf.
Serving Ideas
This versatile bread is at home at every meal. Here are some of the best ways to enjoy it:
- Classic buttered toast: Toast a slice and spread it with butter while warm.
- Breakfast sandwiches: Fill with eggs, cheese, avocado or your favorite breakfast ingredients.
- Lunch sandwiches: Layer with turkey, chicken, cheese, lettuce and tomato.
- Sweet breakfast: Serve with peanut butter, honey, jam or sliced bananas.
- Grilled cheese: Use two slices with your favorite cheese and cook until golden and melty.
- Soup companion: Serve alongside tomato soup, vegetable soup or creamy mushroom soup.
How to Store Homemade Sandwich Bread
Because homemade bread contains no preservatives, proper storage matters.
- Room temperature: Store the completely cooled loaf in an airtight container or bread bag for up to 3 days.
- Refrigerator: Refrigeration is generally unnecessary and can make bread stale faster.
- Freezing: Slice the cooled loaf, separate slices with parchment if desired, and freeze in a sealed bag for up to 3 months.
- Reheating: Toast slices directly from frozen or warm them briefly in a toaster oven.
- Keep it soft: Make sure the loaf is completely cool before sealing it to prevent condensation from making the bread soggy.
Freezing pre-sliced bread is a great habit. You can pull out exactly the number of slices you need, and the bread tastes freshly baked once toasted.
Frequently Asked Questions
Can I really make bread without kneading?
Yes. In a no-knead recipe, time replaces effort. The wet dough rests and rises, and during that time the gluten strands develop and align on their own, giving the bread structure without any manual kneading.
Can I use all-purpose flour instead of bread flour?
Absolutely. This recipe works with either. All-purpose flour gives a softer crumb, while bread flour produces a slightly taller, chewier loaf.
Can I use active dry yeast instead of instant yeast?
Yes, though it behaves a little differently. Active dry yeast should be dissolved in the warm water with the sugar and left for about 5–10 minutes until foamy before you continue. Rising times may be slightly longer.
Why is my no-knead dough so sticky?
Stickiness is normal and intentional. The high hydration is what allows the dough to develop gluten without kneading. Use a lightly oiled spatula to handle it instead of adding more flour.
Can I make the dough ahead of time?
You can slow the process by letting the dough do its first rise in the refrigerator for several hours or overnight, then bringing it back toward room temperature before transferring it to the pan. Expect the timing to vary, and watch the dough rather than the clock.
How do I know when the bread is fully baked?
The top should be golden brown, the loaf should sound hollow when tapped on the bottom, and the center should reach about 93–96°C (200–205°F).
What size loaf pan should I use?
A standard 9 × 5-inch (23 × 13 cm) pan is ideal. Using a smaller pan may cause the dough to overflow, while a larger pan will give you a shorter loaf.
How long does homemade sandwich bread last?
At room temperature in an airtight container or bread bag, it stays fresh for up to 3 days. For longer storage, slice and freeze it for up to 3 months.
Can I use butter instead of olive oil?
Yes. Melted butter and olive oil are interchangeable here. Butter gives a classic, mildly buttery flavor, while olive oil adds a soft, slightly fruity note.
Why did my bread collapse?
Collapse usually means the dough was overproofed. Shorten the second rise next time and bake once the dough has risen close to the top of the pan.
Quick Recipe Card
Easy No-Knead Sandwich Bread
Ingredients: 3½ cups (440 g) flour, 1½ cups (360 ml) warm water, 2¼ tsp (7 g) instant yeast, 2 tbsp (25 g) sugar, 1½ tsp (9 g) salt, 2 tbsp (30 ml) olive oil or melted butter.
Method:
- Stir warm water, yeast and sugar together, then add the oil or butter.
- Add flour and salt and mix until a sticky dough forms. Rest 10–15 minutes.
- Cover and let rise 60–90 minutes until puffy and bubbly.
- Scrape into a greased 9 × 5-inch (23 × 13 cm) pan.
- Let rise 25–40 minutes while the oven preheats to 180°C (350°F).
- Bake 35–45 minutes until golden, with an internal temperature of 93–96°C (200–205°F).
- Rest 10 minutes in the pan, then cool on a rack for about 1 hour before slicing.
Final Thoughts
Homemade bread does not have to be complicated. With just six pantry ingredients, a bowl and a loaf pan, you can bake a soft, fluffy, golden sandwich loaf that rivals anything from the bakery. This easy no-knead sandwich bread is forgiving, affordable and endlessly useful, making it the perfect starting point for anyone new to baking and a dependable staple for experienced bakers too.
The secret is simple: use warm water, keep the dough sticky, watch the rise and let the loaf cool before slicing. Follow those few principles and you will be rewarded with fresh bread that makes everyday meals feel special.
Print
Easy No-Knead Sandwich Bread
Ingredients
Here is everything you need for one standard loaf:
- 3½ cups (440 g) all-purpose flour or bread flour
- 1½ cups (360 ml) warm water
- 2¼ teaspoons (7 g) instant yeast
- 2 tablespoons (25 g) granulated sugar
- 1½ teaspoons (9 g) salt
- 2 tablespoons (30 ml) olive oil or melted butter
A Closer Look at Each Ingredient
Because this recipe is so simple, each ingredient plays an important role. Understanding what each one does will help you bake with more confidence.
Flour. Both all-purpose flour and bread flour work well. All-purpose flour gives a slightly softer, more tender crumb, while bread flour has more protein, which creates more structure and a chewier bite. If you want a loaf that is especially tall and sturdy for loaded sandwiches, choose bread flour. If you prefer a gentle, cake-like softness, all-purpose is perfect. For the most accurate results, weigh your flour with a kitchen scale. If you use measuring cups, spoon the flour into the cup and level it off rather than scooping directly from the bag, which packs in too much flour and leads to a dry, dense loaf.
Warm water. Water activates the yeast and hydrates the flour. Because there is no kneading, the dough relies on a fairly wet consistency to develop gluten slowly over time. The ideal temperature is between 38–43°C (100–110°F). It should feel comfortably warm on your wrist, never hot. Water that is too hot can kill the yeast and prevent the dough from rising, while water that is too cold will slow everything down.
Instant yeast. Instant yeast is the engine of this recipe. It is finely granulated and can be mixed straight into the liquid without a separate proofing step. One standard packet contains about 2¼ teaspoons, which is exactly what you need here. Make sure your yeast is fresh and stored in a cool, dry place. If you are unsure, check the expiration date.
Sugar. Two tablespoons of granulated sugar feed the yeast, encourage a golden crust and add a very subtle sweetness. It does not make the bread taste sweet. Instead it rounds out the flavor and helps the loaf brown beautifully.
Salt. Salt is essential for flavor. It also strengthens the dough and regulates yeast activity so the bread does not rise too quickly. Without salt, bread tastes flat and bland. Be sure to measure it accurately.
Olive oil or melted butter. Fat makes the crumb tender, keeps the bread soft for longer and adds richness. Olive oil gives a lightly fruity, soft crumb, while melted butter provides a more classic, mildly buttery flavor. Both work equally well, so choose whichever you prefer.
Instructions
In a large mixing bowl, combine the warm water, instant yeast and sugar. Stir briefly until the yeast is evenly distributed. You do not need to wait for it to foam, since instant yeast does not require a separate proofing stage, but a little bubbling is a good sign that your yeast is active.
Add the olive oil or melted butter and stir to combine.
Add the flour and salt to the bowl. Mix with a sturdy wooden spoon or spatula until all the flour is moistened and a thick, sticky dough forms.
The dough will look rough and shaggy, and it may be too sticky to handle comfortably. That is exactly what you want for a no-knead method, so resist the temptation to add lots of extra flour. The high moisture level is what allows gluten to develop on its own during the rise.
Make sure there are no dry pockets of flour hiding at the bottom or along the sides of the bowl. Scrape thoroughly so the dough hydrates evenly.
Cover the bowl and let the dough rest for 10–15 minutes. This short rest gives the flour time to absorb the water, which makes the dough smoother and easier to work with.
Cover the bowl with plastic wrap or a clean kitchen towel and leave it in a warm, draft-free place for approximately 60–90 minutes.
The dough should expand noticeably and become airy, with bubbles appearing on the surface. If your kitchen is cool, it may take a little longer. A good rule is to watch the dough rather than the clock. When it looks puffy, jiggly and clearly larger than when you started, it is ready.
Warm spot ideas: Place the bowl in your oven with only the light turned on, on top of the refrigerator, or near (not on) a warm stovetop.
Grease a 9 × 5-inch (23 × 13 cm) loaf pan with butter or cooking spray. You can also line it with parchment paper for easier removal. A parchment sling, with extra paper hanging over the long sides, makes lifting the baked loaf out of the pan effortless.
Using a lightly oiled spatula, gently scrape the risen dough into the prepared pan. Spread it evenly toward the corners without pressing out too much of the air. Those bubbles are what give the bread its soft, open crumb.
Cover the loaf pan loosely and let the dough rise for another 25–40 minutes, or until it looks puffy and has risen close to the top of the pan.
Meanwhile, preheat your oven to 180°C (350°F).
Keep an eye on the dough during this second rise. You want it light and airy, but not so overexpanded that it collapses when moved. A gentle poke with a floured finger can help: if the dent springs back slowly, the dough is ready. If it springs back immediately, give it a few more minutes. If the dent stays and the dough sighs, it is overproofed.
Place the loaf pan on the center rack of the preheated oven. Bake for approximately 35–45 minutes, until the top is golden brown and the loaf is cooked through.
If the top browns too quickly, loosely cover it with aluminum foil during the final 10–15 minutes.
For a more reliable doneness check, the center should reach approximately 93–96°C (200–205°F). The loaf should feel set rather than soft or doughy in the middle. You can also tap the bottom of the loaf after removing it from the pan. A hollow sound is another good sign that it is done.
Remove the loaf from the oven and let it rest in the pan for 10 minutes.
Carefully turn it out onto a wire rack and allow it to cool completely, approximately 1 hour, before slicing.
I know it is tempting to cut into warm bread right away, but patience pays off. Cooling allows the interior to finish setting. Slicing too early can result in a gummy, squished texture. Use a serrated bread knife and a gentle sawing motion to cut even slices. The finished bread should have a soft, fluffy crumb and a golden crust, making it ideal for everyday sandwiches and toast.