There is something deeply satisfying about pulling a puffy, golden focaccia out of the oven, its surface dotted with dimples that hold little pools of olive oil. The problem is that most focaccia recipes are written for a crowd. They call for 500 grams of flour, a large sheet pan, and a loaf big enough to feed a dinner party. If you are cooking for yourself, or for two people, that is a lot of bread to eat before it goes stale.
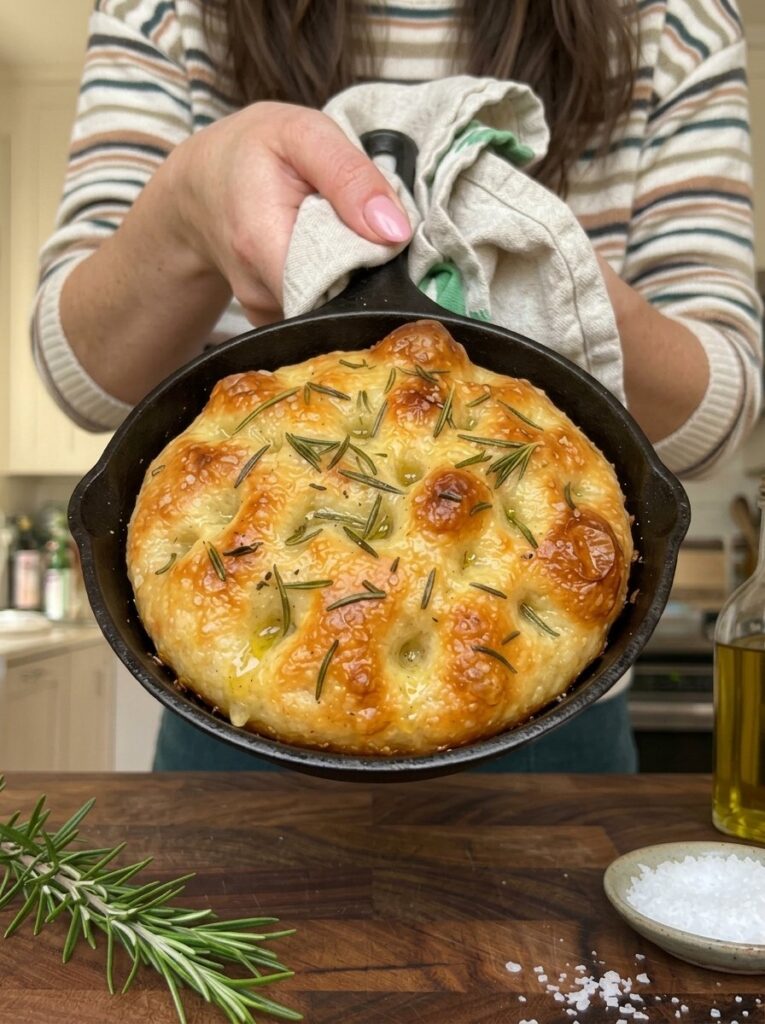
This easy skillet focaccia for one solves that. It uses just 80 grams of flour, a small bowl, a spoon, and a little cast iron or oven-safe skillet. There is no kneading, no stand mixer, and no special equipment. You stir, wait, dimple, and bake. The result is a personal-sized focaccia with a crisp, oily, golden bottom, a soft and airy center, and a flaky-salt-and-rosemary top that looks like it came from a bakery.
In this guide you will find the full recipe, a step-by-step walkthrough, the tips that make the difference between dense and dreamy, serving ideas, storage and reheating instructions, and answers to the most common questions about small-batch focaccia.
Why Make a Small-Batch Skillet Focaccia?
Baking in small quantities has real advantages, especially when you are new to bread or simply do not want leftovers.
No waste. A traditional focaccia is at its best on the day it is baked. A single-serving loaf means you eat it warm, at its peak, instead of wrestling with day-old bread.
Minimal ingredients. You need flour, water, instant yeast, salt, and olive oil. Rosemary and flaky sea salt are the finishing touches, and the rosemary is optional. Everything is likely already in your kitchen.
Almost no cleanup. One small bowl, one spoon, one skillet. That is the whole list.
A forgiving, beginner-friendly method. Because the dough is a soft, no-knead dough, you do not need to learn kneading technique or judge gluten development by feel. You simply mix until there are no dry patches and let time do the work.
Great results from a cast iron skillet. A skillet conducts heat evenly and holds it well. When the dough is nestled in a generous layer of olive oil, the bottom and edges fry as they bake, producing the crisp, golden crust that people love about good focaccia.
What Is Focaccia, and What Makes It Special?
Focaccia is a flat, oven-baked Italian bread that is traditionally made with olive oil and finished with salt and herbs. It sits somewhere between a bread and a pizza base: it is thicker and fluffier than pizza dough, but flatter and more rustic than a standard loaf.
The signature features of focaccia are:
- Dimples. Pressing your fingertips into the risen dough creates the characteristic hollows that collect olive oil and salt.
- A soft, airy crumb. The inside should feel tender and full of air pockets.
- A crisp, oily crust. The bottom and edges turn deeply golden and slightly crunchy.
- A simple topping. Flaky salt, olive oil, and fresh rosemary are classic, though the bread is a wonderful canvas for other flavors.
This personal skillet version captures every one of those qualities in a fraction of the time and quantity.
Ingredients for Skillet Focaccia for One
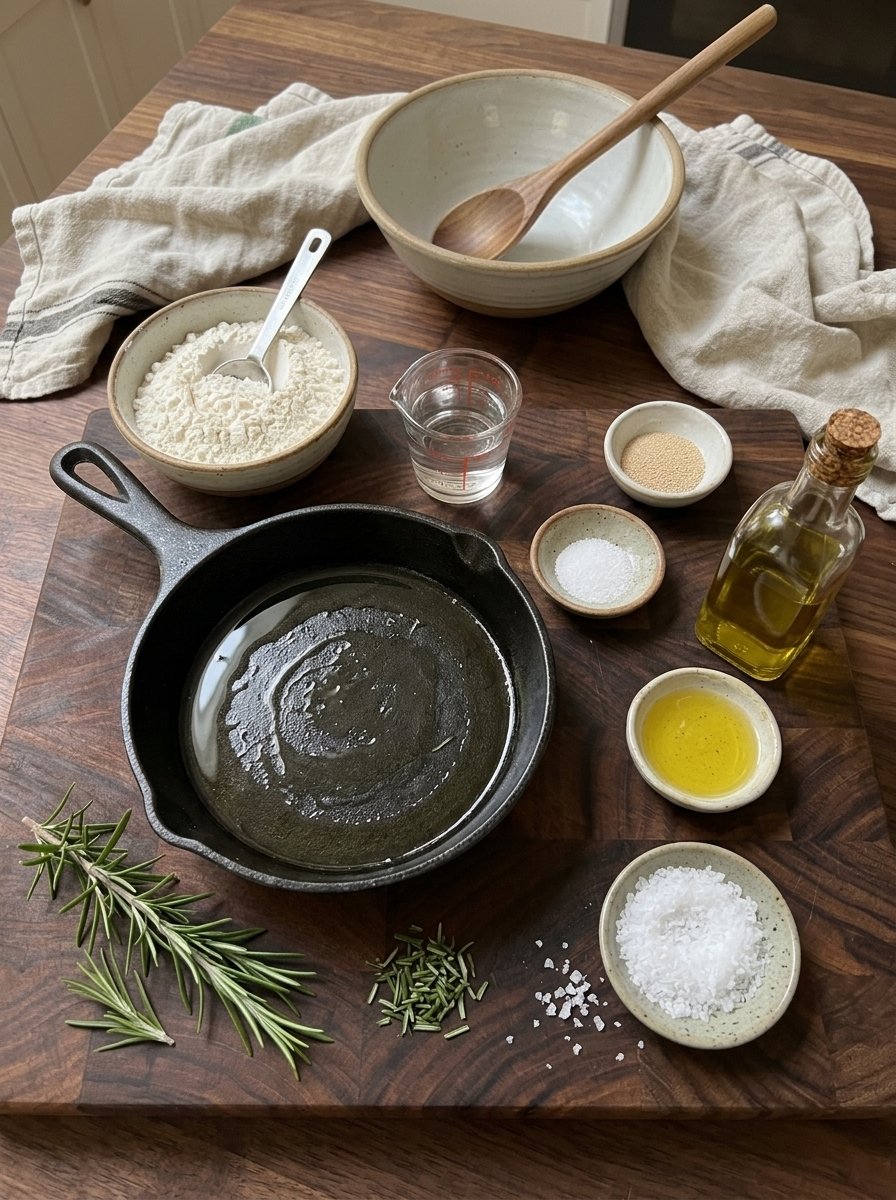
The quantities below make one personal-sized focaccia that serves one or two people.
For the Focaccia
- ½ cup + 2 tbsp (80 g) all-purpose flour
- ¼ cup (60 ml) lukewarm water
- ¼ tsp instant yeast
- ¼ tsp salt
- 1 tsp olive oil, for the dough
- 1–2 tbsp olive oil, for the skillet and topping
For the Topping
- Flaky sea salt, for sprinkling
- ½ tsp fresh rosemary, finely chopped (optional)
Equipment
- A small mixing bowl
- A spoon or spatula
- A small oven-safe skillet, 6–8 inches (15–20 cm) in diameter. Cast iron works beautifully.
- Plastic wrap or a clean kitchen towel
- A spatula for loosening the bread
Time and Yield at a Glance
- Prep time: about 10 minutes
- First rise: 1–1½ hours
- Second rise: 20–30 minutes
- Baking time: 15–20 minutes
- Total time: about 1 hour 45 minutes to 2 hours 30 minutes
- Yield: 1 personal-sized focaccia, serving 1–2 people
Most of that time is hands-off waiting. The actual work adds up to only a few minutes.
How to Make Skillet Focaccia: Step-by-Step
Step 1: Mix the Dough
In a small mixing bowl, combine the lukewarm water and the instant yeast. Let the mixture sit for about 2–3 minutes so the yeast has a moment to wake up.
Add the flour, salt, and 1 teaspoon of olive oil. Stir with a spoon or spatula until everything comes together into a soft, slightly sticky dough. Scrape down the sides of the bowl so that no flour is left behind.
There is no need to knead. Simply mix until no dry patches remain. The dough should look shaggy and a little tacky, and that is exactly what you want.
Step 2: Let the Dough Rise
Cover the bowl with plastic wrap or a clean kitchen towel. Set it in a warm, draft-free place and leave it for about 1 to 1½ hours, or until the dough looks puffy and has noticeably grown in size.
Because this is such a small batch, the exact timing depends on the temperature of your kitchen. In a cooler room it may need the full 1½ hours or a little longer; in a warm kitchen it may be ready sooner. Watch the dough rather than the clock. You are looking for visible puffiness and bubbles.
Step 3: Prepare the Skillet
Lightly grease a 6–8-inch (15–20 cm) oven-safe skillet with olive oil, coating both the bottom and the sides. Then drizzle a little extra olive oil across the bottom. This pooled oil is what helps the underside turn crisp and golden, almost like shallow frying.
Step 4: Shape the Dough
Lightly oil your hands, then gently transfer the risen dough into the prepared skillet. Stretch the dough toward the edges, taking care not to press out all of the air you worked to build during the first rise.
If the dough keeps springing back, that is normal. Let it rest for 5 to 10 minutes and then try stretching it again. The gluten relaxes during the rest and the dough becomes much more cooperative.
Step 5: Allow the Second Rise
Cover the skillet loosely with a clean kitchen towel or plastic wrap. Let the dough rise for another 20 to 30 minutes, until it looks soft, airy, and slightly puffed.
While it rests, preheat your oven to 400°F (200°C) so it is fully hot when the focaccia is ready to go in.
Step 6: Dimple and Season
This is the most fun step. Drizzle the surface of the dough with olive oil. Then, with oiled fingertips, gently press dimples all over the dough, reaching down toward the bottom without completely deflating it.
Sprinkle the top with flaky sea salt and, if you like, the chopped fresh rosemary. Finish with one last small drizzle of olive oil so some of it settles into the dimples.
Step 7: Bake the Focaccia
Place the skillet in the preheated oven and bake for about 15 to 20 minutes, until the focaccia is puffed, deeply golden brown, and crisp around the edges. The center should feel soft and airy while the bottom has a lightly crisp crust.
If the top needs a little more color, bake for another 1 to 2 minutes, watching closely so it does not over-brown.
Step 8: Cool and Serve
Carefully remove the hot skillet from the oven. A cast iron handle stays dangerously hot, so use an oven mitt or a thick towel. Let the focaccia rest for about 5 minutes.
Use a spatula to loosen the edges, then transfer the bread to a cutting board, or serve it straight from the skillet once it is safe to handle. Slice into wedges and enjoy while warm, when the crust is crisp and the center is soft and fluffy.
Tips for the Best Skillet Focaccia
Small details make a big difference with a recipe this simple. Keep these in mind.
Keep the dough slightly sticky. It is tempting to add extra flour when the dough feels tacky, but resist. A soft, wetter dough is what creates a tender, airy center. A dry dough bakes up dense.
Choose the right skillet. A small oven-safe skillet of 6–8 inches (15–20 cm) is ideal for a personal-sized loaf. If your pan is much larger, the dough will spread too thin and lose that thick, fluffy texture.
Give the dough enough time to rise. The dough should look puffy and bubbly before it goes in the oven. If it still looks flat and dense after the first rise, give it more time. Underproofed focaccia is the most common reason for a heavy result.
Be generous with the olive oil. Olive oil is not just flavor here; it is part of the cooking method. It helps the bottom and edges develop a golden, crisp texture, so do not skimp on the skillet.
Make deep dimples. Press your oiled fingertips gently but firmly into the dough. The dimples should be clear and visible, because they will puff back up slightly in the oven.
Customize the topping. Fresh rosemary is delicious, but flaky salt and olive oil on their own make a wonderfully simple focaccia. Use whichever suits your mood.
Common Mistakes to Avoid
Using water that is too hot. Lukewarm water wakes up the yeast gently. Water that is too hot can weaken or kill it, and the dough will not rise properly.
Skipping the rest when the dough fights back. If the dough springs back when you stretch it, do not force it. A 5–10 minute rest makes shaping easy.
Pressing out all the air. When transferring and stretching the dough, handle it gently. You want to keep as much of the airy structure as you can.
Under-oiling the pan. A dry skillet means a pale, soft bottom. Oil generously for that crunchy underside.
Pulling it out too early. Look for puffed, deeply golden edges rather than relying only on the timer, since ovens vary.
Variations and Topping Ideas
Once you have mastered the base recipe, it is easy to make it your own. The classic version with rosemary and flaky salt is hard to beat, but you can adapt the topping to what you have on hand. Keep any additions light so the dough can still rise and bake evenly.
- Salt and olive oil only. The purest version, and a favorite for dipping.
- Herb-infused oil. Use a little herb-infused olive oil for the final drizzle.
- Olives or sliced tomatoes. Press them gently into the dimples before baking, or serve them alongside.
Serving Ideas
This focaccia is wonderful on its own, but it also pairs well with plenty of meals.
- With olive oil for dipping. Serve warm with a small dish of extra-virgin olive oil.
- With soup or stew. Pair it with a small bowl of tomato soup or your favorite stew.
- With a simple meal. Enjoy it alongside a salad, pasta, or roasted vegetables.
- As a mini sandwich. Slice the focaccia horizontally and fill it with cheese and your favorite fillings.
- On a snack board. Serve with olives, sliced tomatoes, or a little herb-infused olive oil.
How to Store and Reheat Leftover Focaccia
This personal-sized focaccia tastes best freshly baked, but a little planning lets you enjoy leftovers too.
Room temperature. Let the bread cool completely, then store it in an airtight container at room temperature for up to 1 to 2 days.
Reheating. Place the focaccia in a 350°F (175°C) oven for about 4 to 6 minutes, until it is warmed through and lightly crisp again.
Freezing. You can freeze the cooled focaccia in a freezer-safe bag for up to 2 months. Thaw it at room temperature and reheat it in the oven before serving to bring back the texture.
Frequently Asked Questions
Do I need to knead this focaccia dough?
No. This is a no-knead recipe. You only need to stir the ingredients until no dry patches remain. The long rise gives the dough its structure and flavor.
What size skillet should I use?
A small oven-safe skillet between 6 and 8 inches (15–20 cm) works best. Cast iron is a great choice because it holds heat well and helps the bottom crisp up.
Can I make this without a skillet?
The recipe is designed around a small oven-safe skillet, which helps create the crisp, golden crust. If you use another small oven-safe pan of a similar size, generously oil it so the bottom can still turn golden.
Why is my dough so sticky?
A slightly sticky dough is intentional. It produces a soft, airy interior. Lightly oil your hands when handling it instead of adding more flour.
How do I know when the dough has risen enough?
It should look puffy and bubbly and noticeably larger than when you mixed it. The first rise usually takes 1 to 1½ hours, depending on how warm your kitchen is.
My dough keeps shrinking back when I stretch it. What should I do?
Let it rest for 5 to 10 minutes, then stretch it again. Resting relaxes the dough so it spreads more easily.
Is the rosemary necessary?
No. Rosemary is optional. Flaky sea salt and olive oil alone make a delicious, simple focaccia.
Can I use instant yeast and active dry yeast interchangeably?
This recipe is written for instant yeast. If you only have another type, check the package directions, as the proofing time and method can differ.
How many people does this serve?
The recipe makes one personal-sized focaccia that serves one hungry person or two people sharing, especially alongside soup or a salad.
How long does it keep?
It is best the day it is baked. Store leftovers in an airtight container at room temperature for 1 to 2 days, or freeze for up to 2 months.
Final Thoughts
Homemade bread does not have to be an all-day project or a commitment to a giant loaf. This skillet focaccia for one proves that a handful of pantry ingredients, a small pan, and a little patience can deliver a golden, crisp-edged, pillowy loaf that feels special. Mix it in minutes, let time do the work, press in those signature dimples, and enjoy a warm slice with a drizzle of olive oil.
If you try the recipe, experiment with the toppings and make it your own. Whether you keep it classic with rosemary and flaky salt or go simple with just oil and salt, this easy small-batch focaccia is a recipe you will come back to again and again.
Print
Easy Skillet Focaccia for One
Ingredients
The quantities below make one personal-sized focaccia that serves one or two people.
For the Focaccia
- ½ cup + 2 tbsp (80 g) all-purpose flour
- ¼ cup (60 ml) lukewarm water
- ¼ tsp instant yeast
- ¼ tsp salt
- 1 tsp olive oil, for the dough
- 1–2 tbsp olive oil, for the skillet and topping
For the Topping
- Flaky sea salt, for sprinkling
- ½ tsp fresh rosemary, finely chopped (optional)
Equipment
- A small mixing bowl
- A spoon or spatula
- A small oven-safe skillet, 6–8 inches (15–20 cm) in diameter. Cast iron works beautifully.
- Plastic wrap or a clean kitchen towel
- A spatula for loosening the bread
Instructions
In a small mixing bowl, combine the lukewarm water and the instant yeast. Let the mixture sit for about 2–3 minutes so the yeast has a moment to wake up.
Add the flour, salt, and 1 teaspoon of olive oil. Stir with a spoon or spatula until everything comes together into a soft, slightly sticky dough. Scrape down the sides of the bowl so that no flour is left behind.
There is no need to knead. Simply mix until no dry patches remain. The dough should look shaggy and a little tacky, and that is exactly what you want.
Cover the bowl with plastic wrap or a clean kitchen towel. Set it in a warm, draft-free place and leave it for about 1 to 1½ hours, or until the dough looks puffy and has noticeably grown in size.
Because this is such a small batch, the exact timing depends on the temperature of your kitchen. In a cooler room it may need the full 1½ hours or a little longer; in a warm kitchen it may be ready sooner. Watch the dough rather than the clock. You are looking for visible puffiness and bubbles.
Lightly grease a 6–8-inch (15–20 cm) oven-safe skillet with olive oil, coating both the bottom and the sides. Then drizzle a little extra olive oil across the bottom. This pooled oil is what helps the underside turn crisp and golden, almost like shallow frying.
Lightly oil your hands, then gently transfer the risen dough into the prepared skillet. Stretch the dough toward the edges, taking care not to press out all of the air you worked to build during the first rise.
If the dough keeps springing back, that is normal. Let it rest for 5 to 10 minutes and then try stretching it again. The gluten relaxes during the rest and the dough becomes much more cooperative.
Cover the skillet loosely with a clean kitchen towel or plastic wrap. Let the dough rise for another 20 to 30 minutes, until it looks soft, airy, and slightly puffed.
While it rests, preheat your oven to 400°F (200°C) so it is fully hot when the focaccia is ready to go in.
This is the most fun step. Drizzle the surface of the dough with olive oil. Then, with oiled fingertips, gently press dimples all over the dough, reaching down toward the bottom without completely deflating it.
Sprinkle the top with flaky sea salt and, if you like, the chopped fresh rosemary. Finish with one last small drizzle of olive oil so some of it settles into the dimples.
Place the skillet in the preheated oven and bake for about 15 to 20 minutes, until the focaccia is puffed, deeply golden brown, and crisp around the edges. The center should feel soft and airy while the bottom has a lightly crisp crust.
If the top needs a little more color, bake for another 1 to 2 minutes, watching closely so it does not over-brown.
Carefully remove the hot skillet from the oven. A cast iron handle stays dangerously hot, so use an oven mitt or a thick towel. Let the focaccia rest for about 5 minutes.
Use a spatula to loosen the edges, then transfer the bread to a cutting board, or serve it straight from the skillet once it is safe to handle. Slice into wedges and enjoy while warm, when the crust is crisp and the center is soft and fluffy.