When that first bite of warm sourdough bread graces your lips, it conjures up memories of cozy kitchen mornings and the comforting embrace of home. Imagine tearing apart a freshly baked loaf; the fragrant, crusty exterior gives way, revealing an airy interior with a slightly chewy texture. As you sink your teeth into it, the tangy flavor dances across your palate, leaving a lingering hint of sweetness and just the right amount of sourness. Every slice seems like a warm hug, inviting friends and family to gather around the table and share stories over buttered toast or hearty sandwiches. The experience is not just about the bread; it’s about the connection it fosters.
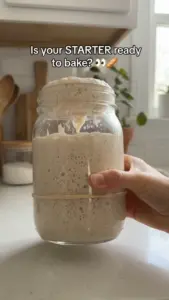
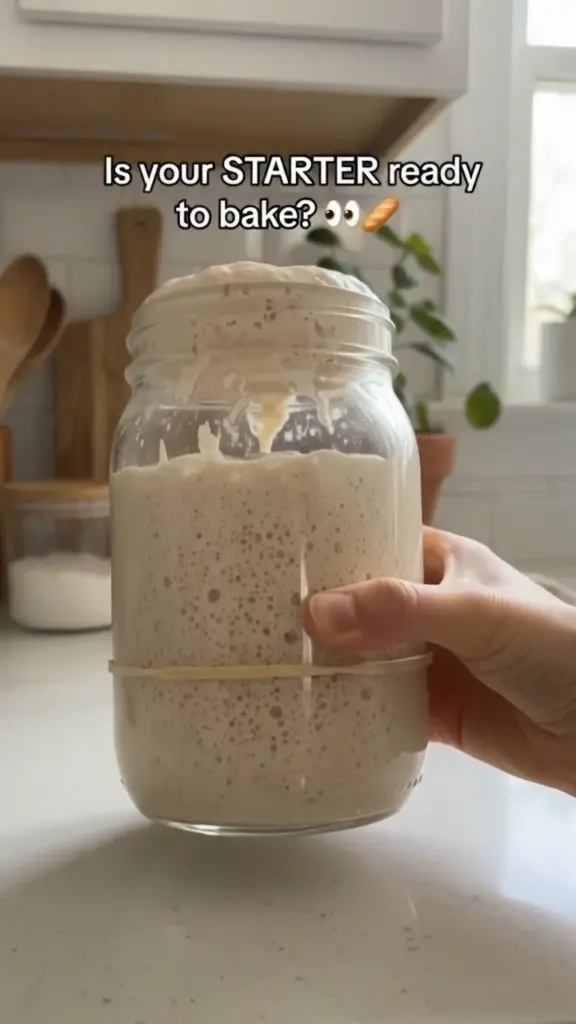
Feeling intrigued by the world of sourdough? You may already know that the heart of this journey lies in one essential ingredient: the sourdough starter. This magical concoction strikes the perfect balance of wild yeast and bacteria, bringing life to the dough you will transform into heavenly bread. But how can you tell when your sourdough starter is ready for the big bake? That delightful moment arrives when the starter bubbles with enthusiasm, doubles in size, and showcases a satisfying tang. In this article, we will explore not only how to identify this perfect readiness, but also the joy of creating your first loaf.
Why You’ll Love This Sourdough Starter
Embracing sourdough baking opens up a world of flavor possibilities. The benefits of using a sourdough starter extend beyond merely leavening bread. You will experience bread that boasts a rich depth of flavor with a perfect balance of tang and sweetness. The crusty exterior offers a satisfying crunch, while the interior remains soft and airy, creating a camera-worthy loaf that is just as delightful to look at as it is to eat.
Sourdough’s versatility knows no bounds; you can create anything from rustic boules to artisanal sandwich loaves or even pizzas. This bread not only feeds the belly but also nurtures the soul, making it an excellent centerpiece for both casual family dinners and extravagant gatherings. Best of all, controlling your starter allows you to explore various flours, hydration levels, and fermentation times, tailoring each loaf to match your taste.
Preparation Phase & Tools to Use
Creating a magnificent loaf starts with ensuring your sourdough starter is primed for action. You don’t need an extravagant kitchen setup; however, certain tools will make the process smoother. Here’s what you need:
- Glass Jar: Opt for a clear jar that shows off your starter’s growth. It should be wide enough for air circulation and easy access for feeding.
- Digital Scale: Accurate measurements will elevate your baking game, ensuring consistency and success.
- Spatula or Spoon: For easily mixing and transferring your starter, both tools work wonders.
- Plastic Wrap or Lids: Cover your starter to maintain moisture while allowing it to breathe.
Practical Preparation Tips
- Feed Regularly: Your starter craves nourishment; a consistent feeding schedule keeps it active and lively.
- Right Environment: Place your starter in a warm spot, ideally around 75°F – 80°F (24°C – 27°C), to encourage yeast growth.
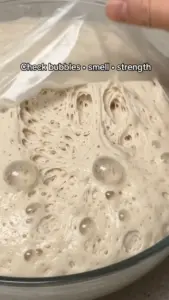
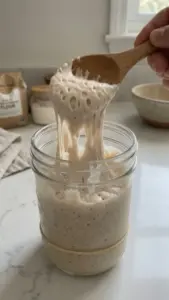
- Visual Clues: Look for bubbles and the volume increase after feeding; these are clear signs your starter is thriving.
Ingredients for Sourdough Starter
To create a lively sourdough starter, you’ll need only two simple ingredients:
- Flour: White, whole wheat, or rye flour all work effectively, each imparting a unique flavor and character to your starter. Feel free to experiment with different types.
- Water: Use filtered water to avoid chlorine, which can inhibit yeast development. Aim for room temperature or slightly warm water for the best results.
How to Make Sourdough Starter
- Combine Ingredients: In a clean glass jar, mix 100 grams of flour and 100 grams of water until a thick, paste-like texture forms.
- Mix Well: Using a spatula or spoon, ensure everything is fully incorporated, scraping down the sides for a uniform mixture.
- Let it Rest: Cover the jar with a loose lid or plastic wrap, allowing air to flow while retaining some moisture. Leave it at room temperature for 24 hours.
- Feed the Starter: After the first day, discard half of your mixture (about 100 grams) and add another 100 grams of flour and 100 grams of water. Mix thoroughly, cover, and let it rest.
- Repeat Daily: Continue this feeding process for 5-7 days. Your starter should start bubbling, doubling in size, and developing a tangy aroma.
Tips
- If you find your starter rising beautifully but not showing signs of sourness, extend the fermentation time slightly.
- Use a rubber band to mark the level of the starter for easy monitoring.
Chef’s Notes & Helpful Tips
- Make-Ahead Tips: If you plan to bake later in the week, keep your starter in the fridge after it has peaked. Feed it at least once a week to keep it in prime condition.
- Diverse Baking: Explore various bread recipes using the same starter. Every loaf will have its character, depending on flour choices and fermentation times.
- Customized Flavor: Enhance acidity by incorporating whole wheat or rye flours. You can also add herbs or spices for a unique twist.
Common Mistakes to Avoid
- Neglecting Feedings: Infrequent feedings can lead to a weak starter. Regular feeding keeps your culture vibrant.
- Ignoring Temperature: Incorrect temperature may stall fermentation. Find a consistent warm spot in your kitchen.
- Using Chlorinated Water: Tap water can hinder your starter’s growth. Always opt for filtered or bottled water.
What to Serve With Sourdough
Sourdough bread complements a wide array of delicious pairings:
- Butter and Jam: Spread creamy butter paired with your favorite fruit jam for a delightful breakfast.
- Soups: Enjoy a warm bowl of creamy tomato soup alongside crusty slices of sourdough, perfect for sopping.
- Cheese: A cheese platter featuring aged cheddar or tangy goat cheese pairs harmoniously with the bread’s flavor.
- Sandwiches: Use your sourdough as a base for gourmet sandwiches, layering with sliced meats, fresh veggies, and condiments.
- Salads: Pair with a fresh, tangy salad, offering delightful contrasts in textures and flavors.
- Dips: Serve with olive oil and balsamic vinegar for a tasty appetizer.
- French Toast: Transform stale sourdough into fluffy French toast, topped with maple syrup or fresh berries.
Storage & Reheating Instructions
Store your sourdough bread wrapped in a cloth or a paper bag at room temperature for a couple of days. If you wish to preserve it for longer, freeze slices in airtight bags, where they can last for up to three months. To reheat, toast slices in a toaster or oven until warmed through, reviving that crisp texture and tantalizing aroma.
Estimated Nutrition Information
Enjoy your sourdough bread in moderation! Each slice typically contains:
- Calories: Approximately 80-100
- Carbohydrates: About 20g
- Protein: 3g
- Fiber: 1g
- Fat: 0.5g
(Disclaimer: Nutritional values can vary based on specific ingredients and portion sizes.)
FAQs
-
How do I know my sourdough starter is ready?
Your starter is ready when it doubles in size, showcases plenty of bubbles, retains a tangy aroma, and passes the "float test"—a spoonful placed in water should float if it’s properly fed and active. -
Can I use whole wheat flour for my starter?
Absolutely! Whole wheat flour encourages a richer flavor and promotes faster yeast growth due to the higher nutrient content. -
What if my starter doesn’t bubble?
If your starter lacks bubbles, it may need more frequent feedings or a warmer environment. Remember that yeast development can vary, so patience is key. -
How long can I store my starter in the fridge?
You can store it in the fridge for up to two weeks without a feeding. However, feeding it weekly can ensure it remains strong. -
Can I dry out my starter?
Yes! You can dehydrate your starter for long-term storage. Spread it thinly on parchment paper, let it dry completely, and store in an airtight container for future use.
Conclusion
Embarking on the journey of sourdough baking, particularly nurturing your starter, brings not just delicious bread but also a sense of accomplishment and connection to your food. Every loaf tells a story—a story of patience, care, and love. So, whether you’re a seasoned baker or just dipping your toes into the world of sourdough, revel in the process. Allow those sensory experiences—the tantalizing aroma, the satisfying crunch, and the rich taste—to envelop you in the delightful art of baking. Grab that mixing bowl and let the magic unfold!
Print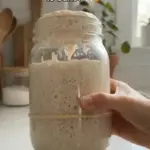
Sourdough Starter
- Total Time: 7 days
- Yield: 1 starter, enough for multiple loaves 1x
- Diet: Vegetarian
Description
A simple guide to creating and nurturing a sourdough starter for delicious homemade bread.
Ingredients
- 100 grams of flour (white, whole wheat, or rye)
- 100 grams of filtered water
Instructions
- Combine ingredients in a clean glass jar, mixing until a thick, paste-like texture forms.
- Mix well using a spatula or spoon, ensuring everything is fully incorporated.
- Let it rest at room temperature for 24 hours, covered with a loose lid or plastic wrap.
- Feed the starter by discarding half of the mixture and adding another 100 grams of flour and 100 grams of water.
- Repeat this feeding process daily for 5-7 days until bubbling occurs and the starter doubles in size.
Notes
Store the starter in the fridge if not baking within the week, but remember to feed it weekly to keep it active.
- Prep Time: 5 minutes
- Cook Time: 100 minutes
- Category: Baking
- Method: Fermentation
- Cuisine: Global
Nutrition
- Serving Size: 1 tablespoon
- Calories: 100
- Sugar: 0g
- Sodium: 0mg
- Fat: 0g
- Saturated Fat: 0g
- Unsaturated Fat: 0g
- Trans Fat: 0g
- Carbohydrates: 20g
- Fiber: 1g
- Protein: 3g
- Cholesterol: 0mg
Keywords: sourdough, bread, starter, baking, fermentation