No Bake Eclair Cake: An Easy, Crowd-Pleasing Dessert with Zero Oven Time
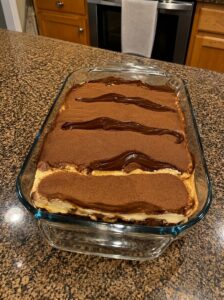
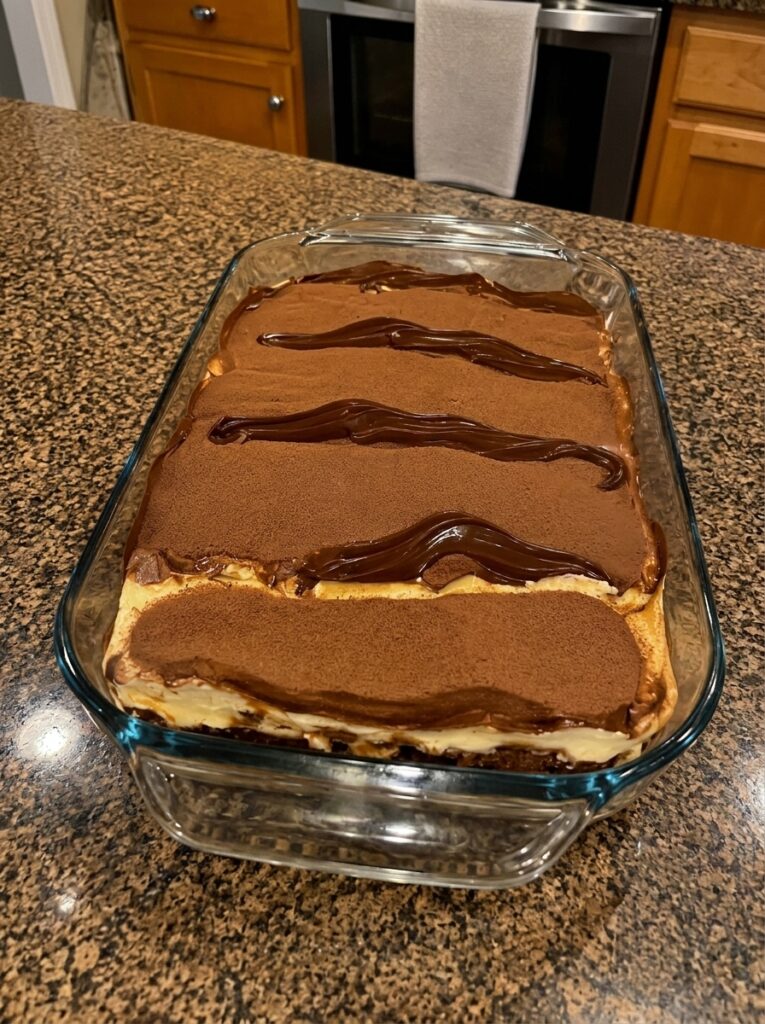
There’s something wonderfully satisfying about a dessert that tastes just as decadent as a classic French pastry, yet requires absolutely no baking and comes together with just a handful of ingredients. No Bake Eclair Cake transforms the flavors of a traditional chocolate eclair — layers of soft pastry, rich vanilla pudding, and glossy chocolate glaze — into an easy, make-ahead icebox cake. Layers of graham crackers soften in the refrigerator into a texture reminiscent of pastry, sandwiched between a creamy vanilla pudding filling and topped with a rich chocolate glaze.
What makes this dessert so beloved is how effortlessly it delivers big flavor with minimal effort. There’s no oven required, no complicated pastry technique, and no need for advanced baking skills — just layering graham crackers with a simple pudding mixture and letting the refrigerator do all the work. As the cake chills, the graham crackers absorb moisture from the pudding and soften into a texture remarkably similar to the choux pastry used in traditional eclairs, creating a dessert that tastes far more impressive than the effort it requires.
In this article, we’ll walk through a complete ingredient breakdown, detailed step-by-step instructions, expert tips for the best texture and easiest assembly, creative variation ideas, storage instructions, and answers to the most frequently asked questions about this beloved make-ahead dessert.
Why This Recipe Works So Well
No-bake icebox cakes have become a beloved category of dessert, and this eclair-inspired version brings together everything that makes the format so appealing:
It requires zero oven time. This is a fantastic dessert option for hot summer days, or anytime you want something impressive without heating up the kitchen.
The graham crackers transform into a pastry-like texture. As the cake chills in the refrigerator, the graham crackers absorb moisture from the pudding layer and soften into a texture strikingly similar to the choux pastry used in traditional eclairs.
It’s incredibly easy to assemble. With simple layering rather than any actual cooking or baking, this dessert is approachable for cooks of any skill level, including those just starting to bake.
It’s a fantastic make-ahead dessert. In fact, this cake needs time to chill and set properly, making it an ideal make-ahead option for parties, potlucks, or busy weeks when you want dessert ready to go.
It delivers all the classic eclair flavor. Rich vanilla pudding and a glossy chocolate topping capture the essence of a traditional eclair in a fraction of the time and effort.
Ingredients You’ll Need
A note on ingredients: since none were specified in the original request, the list below represents the classic, traditional version of this beloved no-bake dessert. Feel free to adjust proportions or flavors to your taste.
- 2 boxes (3.4 oz each) instant vanilla pudding mix — forms the creamy, rich filling that mimics the custard found in traditional eclairs
- 3 cups cold milk — used to prepare the instant pudding mix
- 8 oz frozen whipped topping, thawed (such as Cool Whip) — folded into the pudding for extra lightness and creaminess
- 1 box (14.4 oz) graham crackers — softens in the refrigerator to create pastry-like layers
- 1 cup semi-sweet chocolate chips — melted to form the glossy chocolate topping
- ½ cup heavy cream — combined with the chocolate chips to create a smooth, pourable ganache-style glaze
- 2 tablespoons butter — adds extra shine and smoothness to the chocolate topping
Step-by-Step Instructions
Step 1: Prepare the Pudding
In a large mixing bowl, whisk together the instant vanilla pudding mix and cold milk for about 2 minutes, until the mixture begins to thicken. Let it sit for a few minutes to fully set.
Step 2: Fold in the Whipped Topping
Once the pudding has thickened, gently fold in the thawed whipped topping until fully combined and smooth. This creates a lighter, creamier filling than pudding alone, closer to the texture of a traditional pastry cream.
Step 3: Prepare the Baking Dish
Have a 9×13-inch baking dish ready (no greasing needed, since this is a no-bake, layered dessert).
Step 4: Layer the First Graham Crackers
Arrange a single layer of graham crackers across the bottom of the dish, breaking pieces as needed to fit and fill in any gaps evenly.
Step 5: Add the First Pudding Layer
Spread about one-third of the pudding mixture evenly over the graham cracker layer, using an offset spatula or the back of a spoon to create an even layer.
Step 6: Repeat the Layers
Add a second layer of graham crackers directly over the pudding layer, followed by another one-third of the pudding mixture, spreading it evenly. Repeat once more with a third layer of graham crackers and the remaining pudding mixture, ending with a layer of pudding on top.
Step 7: Make the Chocolate Glaze
In a microwave-safe bowl, combine the chocolate chips, heavy cream, and butter. Microwave in 20 to 30 second intervals, stirring well between each, until the chocolate is fully melted and the mixture is smooth and glossy. Alternatively, this can be done on the stovetop over low heat, stirring constantly.
Step 8: Add the Chocolate Topping
Let the chocolate glaze cool for a few minutes so it’s no longer piping hot, then pour it evenly over the top layer of pudding, using an offset spatula to spread it into an even layer covering the entire surface.
Step 9: Chill
Cover the dish tightly with plastic wrap and refrigerate for at least 6 hours, though overnight is ideal. This chilling time is essential, as it allows the graham crackers to fully soften into that signature pastry-like texture.
Step 10: Slice and Serve
Once fully chilled and set, slice the cake into squares and serve directly from the dish. A sharp knife wiped clean between cuts will give you the cleanest slices.
Expert Tips for the Best Results
Don’t skip the chilling time. This is the most important step in the entire recipe — the graham crackers need time to fully absorb moisture from the pudding and soften properly. Cutting this time short will result in a cake with crunchy, dry layers rather than that signature soft, pastry-like texture.
Overnight chilling gives the best texture. While 6 hours is the minimum, letting the cake chill overnight results in the most tender, well-melded layers.
Let the chocolate glaze cool slightly before pouring. Pouring it while too hot can cause it to melt into the pudding layer beneath rather than sitting on top as a distinct glaze.
Break graham crackers as needed to fill gaps. It’s normal to need to break a few crackers to fully cover each layer, especially around the edges of the dish.
Use a sharp knife for clean slices. Wiping the knife clean between cuts helps achieve neater, more presentable squares, especially once the chocolate glaze has set.
Make it a day ahead for stress-free entertaining. Since this dessert needs time to chill and actually benefits from being made in advance, it’s an excellent choice for potlucks or gatherings where you want dessert ready without last-minute effort.
Delicious Variations to Try
This recipe is a wonderful base for experimentation. Here are some popular ways to switch things up:
Chocolate Pudding Version: Substitute chocolate instant pudding mix for the vanilla for an even more chocolate-forward dessert throughout.
Peanut Butter Addition: Swirl a few tablespoons of melted peanut butter into the chocolate glaze for a peanut butter and chocolate flavor combination.
Banana Eclair Cake: Add a layer of thinly sliced bananas between one of the pudding layers for a fun, fruity twist reminiscent of banana cream pie.
Coconut Topping: Sprinkle toasted shredded coconut over the finished chocolate glaze for added texture and a hint of tropical flavor.
Mini Individual Portions: Assemble the layers in individual cups or mason jars for a fun, portion-controlled presentation, perfect for parties or picnics.
Homemade Whipped Cream Version: Substitute freshly whipped heavy cream (sweetened with a bit of sugar) for the frozen whipped topping if you prefer to avoid store-bought whipped topping.
What to Serve With No Bake Eclair Cake
This dessert is rich and satisfying enough to stand entirely on its own, but a few accompaniments can round out the presentation:
- Fresh berries, such as strawberries or raspberries, add a bright, fresh contrast to the rich chocolate and vanilla flavors
- A dollop of extra whipped cream on each slice adds an extra touch of indulgence
- A cup of coffee or espresso pairs beautifully with the classic eclair flavor profile
- A scoop of vanilla ice cream on the side turns this into an even more decadent dessert
Storage Instructions
Refrigerating: Store the eclair cake covered tightly in the refrigerator for up to 4 to 5 days. Since this is a chilled, no-bake dessert, it should always be kept refrigerated rather than at room temperature.
Freezing: This cake can be frozen for up to 1 month, though the texture of the pudding layers may change slightly upon thawing. If freezing, wrap the dish tightly in plastic wrap and then foil, and thaw overnight in the refrigerator before serving.
Serving after storage: No reheating is needed or recommended for this dessert — simply slice and serve directly from the refrigerator.
Frequently Asked Questions
Why do I need to chill this cake for so long? The extended chilling time allows the graham crackers to fully absorb moisture from the pudding layers and soften into a texture similar to pastry. Without adequate chilling time, the crackers will remain crunchy rather than achieving that classic eclair-like texture.
Can I use homemade pudding instead of instant pudding mix? Yes, though instant pudding mix is recommended for its convenience and reliable thickening. If using homemade pudding, be sure it’s fully cooled and set before layering, and it may result in a slightly different texture than the instant version.
Can I use fresh whipped cream instead of frozen whipped topping? Yes. Whip 1 cup of heavy cream with 2 tablespoons of powdered sugar until stiff peaks form, and fold this into the pudding in place of the frozen whipped topping.
Why is my chocolate glaze too thick to spread? This can happen if the glaze cools too much before you try to spread it. If it becomes too firm, gently reheat it for a few seconds in the microwave to loosen it back to a pourable consistency.
Can I make this dessert dairy-free? This recipe relies heavily on dairy for the pudding, whipped topping, and chocolate glaze, so a dairy-free version would require substituting plant-based pudding mix, whipped topping, and cream, and results may vary depending on the specific products used.
How far in advance can I make this cake? This cake can be made up to 2 days in advance of serving, and in fact benefits from the extra chilling time, making it an excellent make-ahead dessert for parties or gatherings.
How many servings does this recipe make? This recipe, made in a standard 9×13-inch dish, typically yields 12 to 15 servings, depending on how the squares are cut.
Final Thoughts
No Bake Eclair Cake proves that you don’t need an oven or advanced baking skills to create a genuinely impressive, crowd-pleasing dessert. With soft, pastry-like graham cracker layers, a creamy vanilla pudding filling, and a glossy chocolate topping, this icebox cake captures all the beloved flavors of a classic eclair in an easy, make-ahead format.
Whether you’re preparing dessert for a potluck, a family gathering, or simply craving something sweet without turning on the oven, this recipe delivers every time. Save it, bookmark it, or print it out — because once this creamy, chocolatey no-bake eclair cake comes out of the refrigerator, it’s guaranteed to become a regular request at your next gathering.