Introduction: The Easiest Focaccia You Will Ever Bake
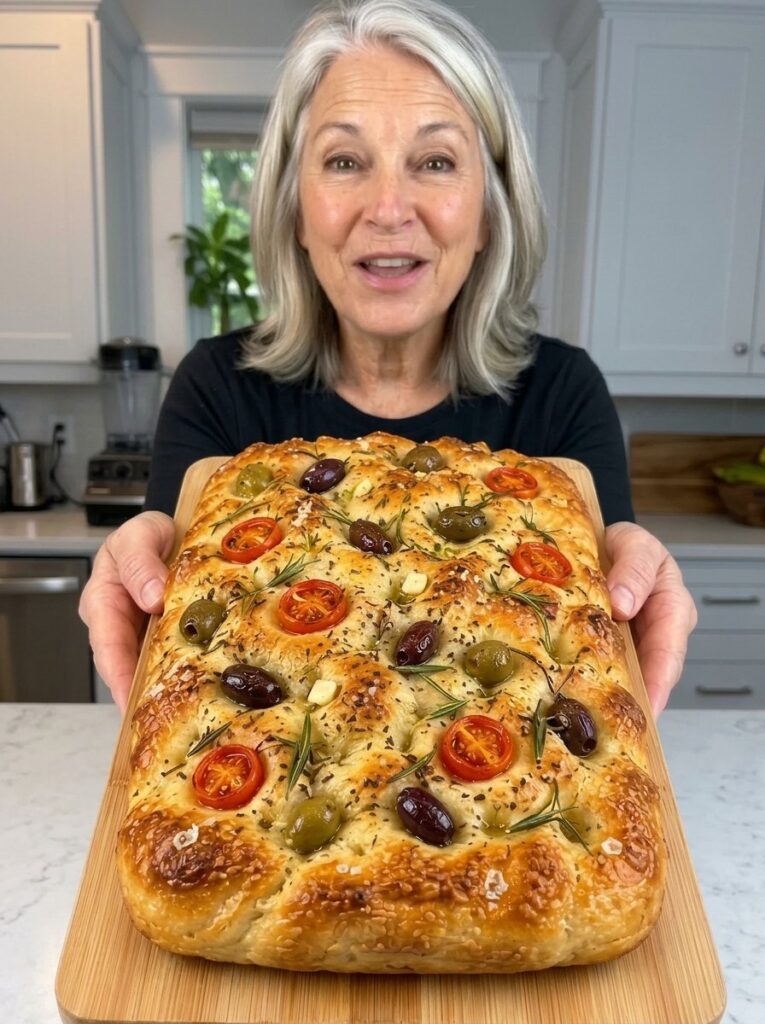
There is something almost magical about pulling a pan of golden, olive oil–soaked focaccia out of the oven. The edges are crisp, the bottom is fried to perfection in olive oil, the inside is soft and full of airy bubbles, and the top is dotted with briny olives and fragrant rosemary. Now imagine getting all of that without kneading, without a stand mixer, and without a huge batch that goes stale before you can finish it.
That is exactly what this no-knead mini olive focaccia delivers. It is a small-batch recipe built for a single 8-inch square pan, which makes it ideal for weeknight dinners, small households, and anyone who wants fresh homemade bread without committing to a giant loaf. You stir a handful of pantry ingredients together in one bowl, let time do the work, dimple the dough with your fingertips, and bake.
Whether you are a complete beginner who has never worked with yeast or an experienced baker looking for a reliable, low-effort focaccia, this recipe is a keeper. In this guide, you will find the full ingredient list, detailed step-by-step instructions, troubleshooting advice, flavor variations, serving ideas, and storage tips so your focaccia turns out beautifully every time.
Why You Will Love This No-Knead Olive Focaccia
Before we get to the recipe, here is why this version deserves a spot in your regular rotation:
- No kneading required. A wet, sticky dough does all the gluten development for you as it rests. You only need a spoon and a bowl.
- Small-batch size. The recipe makes one small focaccia in an 8-inch square pan, yielding about 4 to 6 servings. There is no waste and no need to freeze half a tray.
- Simple, affordable ingredients. Flour, water, yeast, salt, olive oil, and a little sugar make the dough. Olives, rosemary, and flaky salt make the topping.
- Bakery-style texture. Expect a crisp, golden crust, a tender and open crumb, and those signature deep olive oil dimples.
- Flexible timing. You can bake it the same day in about two hours, or let the dough rest overnight in the fridge for deeper flavor.
- Endlessly versatile. It works as an appetizer, a side for soup or pasta, or the base for a Mediterranean-style sandwich.
What Is Focaccia?
Focaccia is a flat, oven-baked Italian bread that is closely related to pizza dough but is thicker, softer, and far richer in olive oil. Traditional focaccia is dimpled before baking so that pools of olive oil collect on the surface, then finished with coarse salt and herbs. The result is a bread that is crisp and almost fried on the bottom, pillowy in the middle, and deeply savory on top.
Olive focaccia takes this classic and adds pitted olives, which bake into the dough and become slightly caramelized and intensely flavorful. Paired with rosemary, the combination is one of the most beloved flavor pairings in Mediterranean cooking.
Ingredients for No-Knead Mini Olive Focaccia
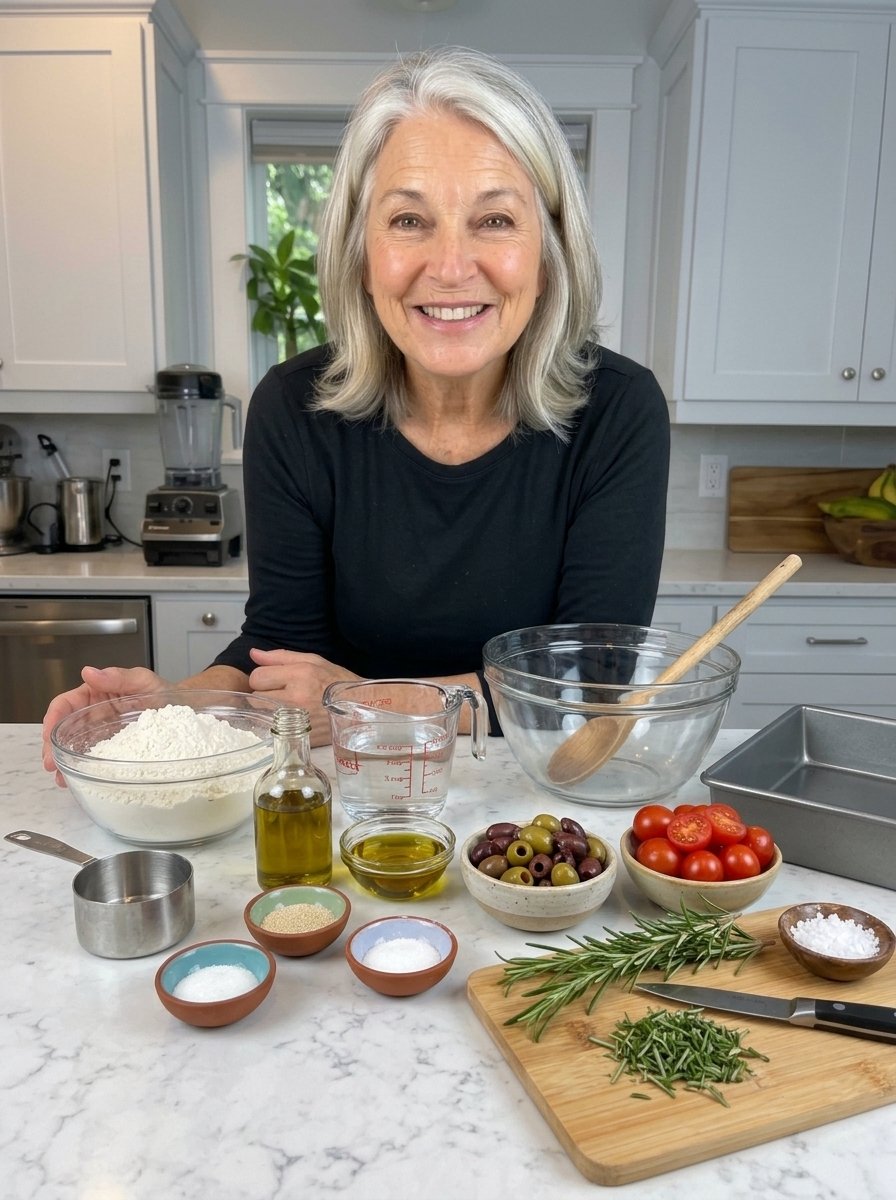
The ingredient list is short, so quality matters. Use good olive oil and olives you actually enjoy eating on their own.
For the Dough
- 2 cups all-purpose flour or bread flour (250 g)
- ¾ cup lukewarm water (180 ml)
- 1 teaspoon instant yeast (3 g)
- ¾ teaspoon salt (4 g)
- 1 tablespoon olive oil (15 ml)
- ½ teaspoon granulated sugar (optional)
For the Topping
- 2 to 3 tablespoons extra-virgin olive oil
- ⅓ cup pitted olives, halved or sliced (about 50 g)
- 1 teaspoon fresh rosemary, finely chopped, or ½ teaspoon dried rosemary
- Flaky sea salt, to taste
- Freshly ground black pepper, optional
Ingredient Notes
Flour: All-purpose flour gives a soft, tender crumb, while bread flour has more protein and produces a slightly chewier, taller focaccia. Both work well, so use whichever you have.
Yeast: Instant yeast can be mixed directly into the flour. If you only have active dry yeast, dissolve it in the lukewarm water for 5 to 10 minutes first, and expect the rise to take a little longer.
Water: Lukewarm means comfortably warm to the touch, not hot. Water that is too hot can damage the yeast and stop the dough from rising.
Olives: Green olives, Kalamata, or a mix all work. Choose pitted olives to avoid any accidents, and drain them well.
Olive oil: Focaccia is an olive oil bread, so this is the place to use your best extra-virgin bottle.
Tips for the Best Mini Olive Focaccia
A few small habits make a big difference in the final texture and flavor:
- Keep the dough wet and sticky. Focaccia dough should be softer than regular bread dough. Resist the urge to add extra flour, because a wetter dough creates a lighter, more open crumb.
- Give the dough enough time. A longer rise develops better flavor and a lighter texture. Look for a dough that has doubled and is covered in bubbles.
- Drain and dry the olives. Excess brine and moisture can make the topping soggy. Pat the olives dry with a paper towel before using them.
- Be generous with olive oil. The oil is responsible for the golden bottom, crisp edges, and rich flavor. Do not skimp on it in the pan or on top.
- Make deep dimples. Press your oiled fingertips firmly into the dough, nearly to the bottom of the pan, without tearing it. The dimples hold the oil and keep the toppings in place.
- Customize your herbs. Rosemary is classic with olives, but thyme and oregano are lovely alternatives.
- Use the right pan. An 8-inch square pan or a similarly sized small baking dish gives the right thickness for this amount of dough.
How to Make No-Knead Mini Olive Focaccia (Step by Step)
Step 1: Mix the Dough
In a large mixing bowl, combine the flour, instant yeast, salt, and optional sugar. Add the lukewarm water and 1 tablespoon of olive oil. Stir with a wooden spoon or spatula until a sticky, shaggy dough forms and no dry patches of flour remain. There is no need to knead. The dough will look rough at this stage, and that is exactly right.
Step 2: Let the Dough Rise
Cover the bowl with plastic wrap or a clean kitchen towel and leave it in a warm place for about 1 to 1½ hours, or until the dough has doubled in size and looks airy with bubbles across the surface.
For deeper flavor, you can refrigerate the covered dough overnight. Let it sit at room temperature for about 30 to 60 minutes before shaping so it relaxes and becomes easier to handle.
Step 3: Prepare the Baking Pan
Lightly grease an 8-inch square baking pan or small baking dish with olive oil. Add about 1 tablespoon of olive oil to the bottom and spread it evenly. This oil prevents sticking and gives the focaccia its crisp, golden bottom.
Step 4: Transfer the Dough
Using a lightly oiled spatula, gently transfer the risen dough into the prepared pan. Turn it once so both sides are coated with oil. Gently stretch the dough toward the corners. If it resists, let it rest for 10 to 15 minutes and try again. Avoid pressing out all the air, since those bubbles are what make the crumb light.
Step 5: Allow the Second Rise
Cover the pan loosely and let the dough rest for another 25 to 40 minutes, until it is puffy and spreads more easily across the pan. Toward the end of this rise, preheat your oven to 425°F (220°C).
Step 6: Add the Olive Oil Dimples
Drizzle 1 to 2 tablespoons of olive oil over the dough. With clean, oiled fingertips, press deep dimples across the entire surface. Press firmly enough to create little pockets without tearing the dough. The olive oil should settle into the dimples, creating the signature focaccia texture.
Step 7: Add the Olives and Rosemary
Scatter the pitted olives evenly over the dough, pressing some pieces into the dimples so they stay put during baking. Sprinkle with chopped rosemary, flaky sea salt, and black pepper if you like. Finish with a small drizzle of olive oil for extra flavor.
Step 8: Bake Until Golden
Bake in the preheated oven for about 20 to 25 minutes, until the focaccia is golden brown around the edges and lightly crisp on top. For a deeper golden crust, bake another 2 to 3 minutes, watching the olives and rosemary closely so they do not burn.
Step 9: Cool Slightly
Remove the pan from the oven and let the focaccia rest for 5 to 10 minutes. Carefully lift it out of the pan and transfer it to a wire rack to keep the bottom crisp. For an extra-rich finish, brush the warm surface lightly with olive oil.
Step 10: Slice and Enjoy
Cut the focaccia into squares or small rectangles with a sharp knife or bread knife. Serve warm, while the edges are crisp and the inside is soft, airy, and fragrant.
Recipe Details at a Glance
- Prep time: 15 minutes
- First rise: 1 to 1½ hours
- Second rise: 25 to 40 minutes
- Bake time: 20 to 25 minutes
- Cooling time: 5 to 10 minutes
- Total time: approximately 2 hours 5 minutes to 2 hours 55 minutes
- Yield: 1 small focaccia, about 4 to 6 servings
- Oven temperature: 425°F (220°C)
Troubleshooting: Common Focaccia Problems and Fixes
Even simple recipes can go sideways. Here is how to fix the most common issues.
My dough did not rise.
The usual causes are old yeast, water that was too hot or too cold, or a cool kitchen. Check the expiration date on your yeast, use lukewarm water, and move the bowl to a warmer spot, such as inside the oven with only the light on. A longer rise will often rescue a slow dough.
My focaccia is dense.
Density often comes from too much flour, too little rise time, or pressing out all the air when shaping. Keep the dough wet, give it the full rise, and handle it gently when moving it into the pan.
The dough is too sticky to handle.
Stickiness is normal for focaccia. Instead of adding flour, oil your hands, spatula, and pan. Oil is the best tool for handling wet dough.
The olives burned.
Olives and herbs sitting on top of the dough can darken quickly. Press the olives into the dimples so they are partly covered with oil, and keep an eye on the pan during the last few minutes. If the top is browning too fast, loosely tent the pan with foil.
The topping is soggy.
Excess moisture from brined olives is the usual culprit. Drain them well and pat them dry before scattering them on the dough.
The bottom is pale.
A pale bottom usually means too little oil in the pan or an oven that is not hot enough. Use the full tablespoon of olive oil in the pan and make sure your oven is fully preheated to 425°F (220°C). Baking on a lower rack can also help the bottom brown.
Delicious Variations to Try
Once you have mastered the base recipe, you can easily make it your own.
- Cherry tomato and olive focaccia: Press halved cherry tomatoes into the dimples along with the olives for bursts of sweetness and color.
- Garlic and rosemary focaccia: Add thin slices or small pieces of garlic to the dimples. Tuck them under a little oil so they soften rather than scorch.
- Lemon and thyme focaccia: Swap rosemary for fresh thyme and add a little lemon zest after baking.
- Cheesy olive focaccia: Sprinkle grated Parmesan or a little mozzarella over the top for the final 5 minutes of baking.
- Italian herb focaccia: Use oregano or a blend of dried Italian herbs in place of rosemary.
- Spicy focaccia: Add a pinch of red pepper flakes with the salt for a gentle kick.
What to Serve with Olive Focaccia
This focaccia is wonderful on its own, but it also fits into almost any meal.
- Olive oil dip: Serve warm pieces with extra-virgin olive oil, freshly cracked black pepper, and a pinch of sea salt.
- Soup companion: Pair it with tomato soup, minestrone, or creamy vegetable soup for dunking.
- Mediterranean sandwiches: Slice the focaccia horizontally and fill it with mozzarella, roasted vegetables, tomatoes, and fresh basil.
- Pasta night: Serve alongside spaghetti, baked pasta, or creamy Alfredo dishes.
- Cheese board: Add it to a platter with olives, cheese, roasted peppers, and your favorite spreads.
- Herb garlic bread: Brush the warm focaccia with garlic-infused olive oil and sprinkle with fresh parsley.
How to Store, Freeze, and Reheat Focaccia
Room temperature: Once completely cooled, store the focaccia in an airtight container for up to 2 days. The crust will soften slightly during storage.
Refrigerator: Refrigeration can make focaccia go stale more quickly, so room-temperature storage is preferable if you will eat it within a couple of days.
Freezer: Cut the cooled focaccia into portions and freeze in a freezer-safe bag for up to 2 months.
Reheating: Warm it in a 350°F (175°C) oven for 5 to 8 minutes to refresh the edges. If reheating from frozen, allow a little extra time.
Make-ahead tip: Prepare the dough the night before and refrigerate it in a covered bowl. The next day, transfer it to the oiled pan, let it become puffy, add the toppings, and bake. This is a great way to enjoy fresh focaccia with minimal effort on the day you serve it.
Frequently Asked Questions
Can I make this focaccia without kneading?
Yes. This recipe relies on a wet dough and a long rise rather than kneading. Time allows gluten to develop on its own, giving you a soft, airy texture with almost no effort.
Can I use bread flour instead of all-purpose flour?
Absolutely. Bread flour produces a slightly chewier, taller focaccia, while all-purpose flour gives a softer, more tender crumb. Either option works with the same measurements.
Can I use active dry yeast instead of instant yeast?
Yes. Dissolve the active dry yeast in the lukewarm water for 5 to 10 minutes until foamy, then continue with the recipe. The rise may take a bit longer.
Can I make the dough ahead of time?
Yes. Refrigerate the covered dough overnight, then let it sit at room temperature for 30 to 60 minutes before shaping. The slow rest also improves flavor.
What size pan should I use?
An 8-inch square pan or a similarly sized small baking dish is ideal for this amount of dough. A larger pan will produce a thinner focaccia, so you may need to shorten the baking time.
Why is my focaccia not crispy on the bottom?
Make sure you use enough olive oil in the pan, preheat the oven fully, and cool the focaccia on a wire rack instead of leaving it to steam in the pan.
Can I freeze focaccia?
Yes. Cool it completely, cut it into portions, and freeze in a freezer-safe bag for up to 2 months. Reheat in a 350°F (175°C) oven for 5 to 8 minutes.
Can I use dried rosemary?
Yes. Use ½ teaspoon of dried rosemary in place of 1 teaspoon of fresh. Crumble it between your fingers to release its aroma before sprinkling it over the dough.
How many people does this recipe serve?
The recipe yields one small focaccia, which serves about 4 to 6 people as a side or appetizer.
Final Thoughts
This no-knead mini olive focaccia proves that great bread does not have to be complicated. With a handful of simple ingredients, a sticky dough, and a little patience, you get a bakery-style focaccia with crisp golden edges, a soft and airy middle, and pockets of olive oil, briny olives, and fragrant rosemary on top.
Because the recipe is scaled to a small pan, it is perfect for everyday cooking. Bake it for a cozy bowl of soup, a pasta dinner, a sandwich lunch, or simply to enjoy warm with a bowl of good olive oil. Once you try it, you will likely find yourself making it again and again, tweaking the toppings with tomatoes, garlic, or fresh herbs to match the season.
Print
No-Knead Mini Olive Focaccia
Ingredients
The ingredient list is short, so quality matters. Use good olive oil and olives you actually enjoy eating on their own.
For the Dough
- 2 cups all-purpose flour or bread flour (250 g)
- ¾ cup lukewarm water (180 ml)
- 1 teaspoon instant yeast (3 g)
- ¾ teaspoon salt (4 g)
- 1 tablespoon olive oil (15 ml)
- ½ teaspoon granulated sugar (optional)
For the Topping
- 2 to 3 tablespoons extra-virgin olive oil
- ⅓ cup pitted olives, halved or sliced (about 50 g)
- 1 teaspoon fresh rosemary, finely chopped, or ½ teaspoon dried rosemary
- Flaky sea salt, to taste
- Freshly ground black pepper, optional
Ingredient Notes
Flour: All-purpose flour gives a soft, tender crumb, while bread flour has more protein and produces a slightly chewier, taller focaccia. Both work well, so use whichever you have.
Yeast: Instant yeast can be mixed directly into the flour. If you only have active dry yeast, dissolve it in the lukewarm water for 5 to 10 minutes first, and expect the rise to take a little longer.
Water: Lukewarm means comfortably warm to the touch, not hot. Water that is too hot can damage the yeast and stop the dough from rising.
Olives: Green olives, Kalamata, or a mix all work. Choose pitted olives to avoid any accidents, and drain them well.
Olive oil: Focaccia is an olive oil bread, so this is the place to use your best extra-virgin bottle.
Instructions
In a large mixing bowl, combine the flour, instant yeast, salt, and optional sugar. Add the lukewarm water and 1 tablespoon of olive oil. Stir with a wooden spoon or spatula until a sticky, shaggy dough forms and no dry patches of flour remain. There is no need to knead. The dough will look rough at this stage, and that is exactly right.
Cover the bowl with plastic wrap or a clean kitchen towel and leave it in a warm place for about 1 to 1½ hours, or until the dough has doubled in size and looks airy with bubbles across the surface.
For deeper flavor, you can refrigerate the covered dough overnight. Let it sit at room temperature for about 30 to 60 minutes before shaping so it relaxes and becomes easier to handle.
Lightly grease an 8-inch square baking pan or small baking dish with olive oil. Add about 1 tablespoon of olive oil to the bottom and spread it evenly. This oil prevents sticking and gives the focaccia its crisp, golden bottom.
Using a lightly oiled spatula, gently transfer the risen dough into the prepared pan. Turn it once so both sides are coated with oil. Gently stretch the dough toward the corners. If it resists, let it rest for 10 to 15 minutes and try again. Avoid pressing out all the air, since those bubbles are what make the crumb light.
Cover the pan loosely and let the dough rest for another 25 to 40 minutes, until it is puffy and spreads more easily across the pan. Toward the end of this rise, preheat your oven to 425°F (220°C).
Drizzle 1 to 2 tablespoons of olive oil over the dough. With clean, oiled fingertips, press deep dimples across the entire surface. Press firmly enough to create little pockets without tearing the dough. The olive oil should settle into the dimples, creating the signature focaccia texture.
Scatter the pitted olives evenly over the dough, pressing some pieces into the dimples so they stay put during baking. Sprinkle with chopped rosemary, flaky sea salt, and black pepper if you like. Finish with a small drizzle of olive oil for extra flavor.
Bake in the preheated oven for about 20 to 25 minutes, until the focaccia is golden brown around the edges and lightly crisp on top. For a deeper golden crust, bake another 2 to 3 minutes, watching the olives and rosemary closely so they do not burn.
Remove the pan from the oven and let the focaccia rest for 5 to 10 minutes. Carefully lift it out of the pan and transfer it to a wire rack to keep the bottom crisp. For an extra-rich finish, brush the warm surface lightly with olive oil.
Cut the focaccia into squares or small rectangles with a sharp knife or bread knife. Serve warm, while the edges are crisp and the inside is soft, airy, and fragrant.