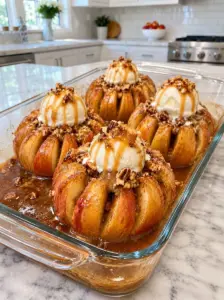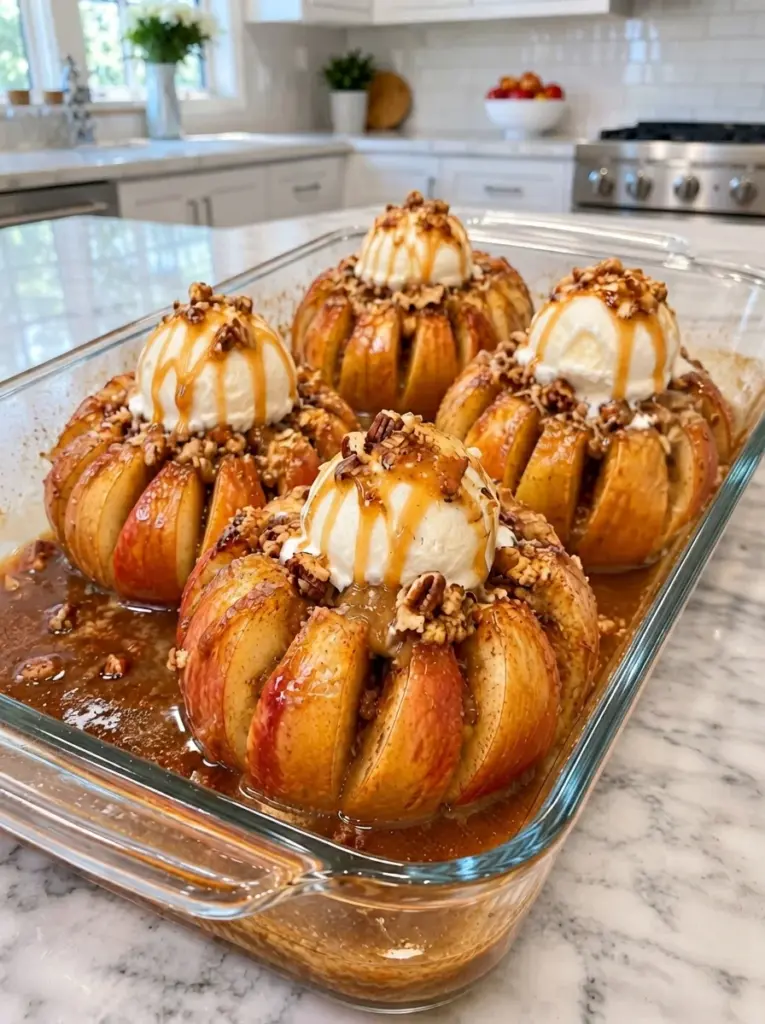
Oven-Baked Bloomin’ Apples turn a familiar baked apple into a decorative individual dessert. The fruit is cut into connected sections, brushed with cinnamon-brown-sugar butter, and baked until tender. As the sections relax, the apple opens into a loose flower shape, ready for caramel sauce and a scoop of vanilla ice cream.
The ingredients are simple: firm apples, butter, brown sugar, warm spices, vanilla, and lemon juice. A little chopped pecan or walnut adds texture, while the baking juices become a buttery sauce to spoon over the finished dessert.
The shaping takes a little patience, but it does not need to be elaborate. Keep the bottom of each apple intact, make evenly spaced cuts, and let the oven soften the fruit before trying to open the petals widely. A slightly rustic bloom is easier to achieve than a perfectly symmetrical flower.
This article expands the supplied recipe and clarifies the cutting instructions. It has not been independently kitchen-tested. Apple variety, ripeness, size, and depth of cutting affect the baking time and final shape.
What to Expect
The finished apples should be tender enough to eat with a spoon or fork while retaining their connected bases. The outer sections may open more than the inner ones, and different apples may bloom to different degrees.
The sauce is a cinnamon-butter syrup made from brown sugar, butter, lemon juice, and released apple juices. It can taste caramel-like, but it is not the same as a separately cooked caramel sauce. The optional caramel drizzle supplies that distinct topping.
A firm apple can retain some bite even when ready. If you prefer a very soft baked apple, allow more time, recognizing that the petals may become more fragile.
This dessert is best served warm after a short rest. The filling and syrup can remain much hotter than the apple skin suggests, so give the centers time to cool to a comfortable eating temperature.
Ingredients
Bloomin’ Apples
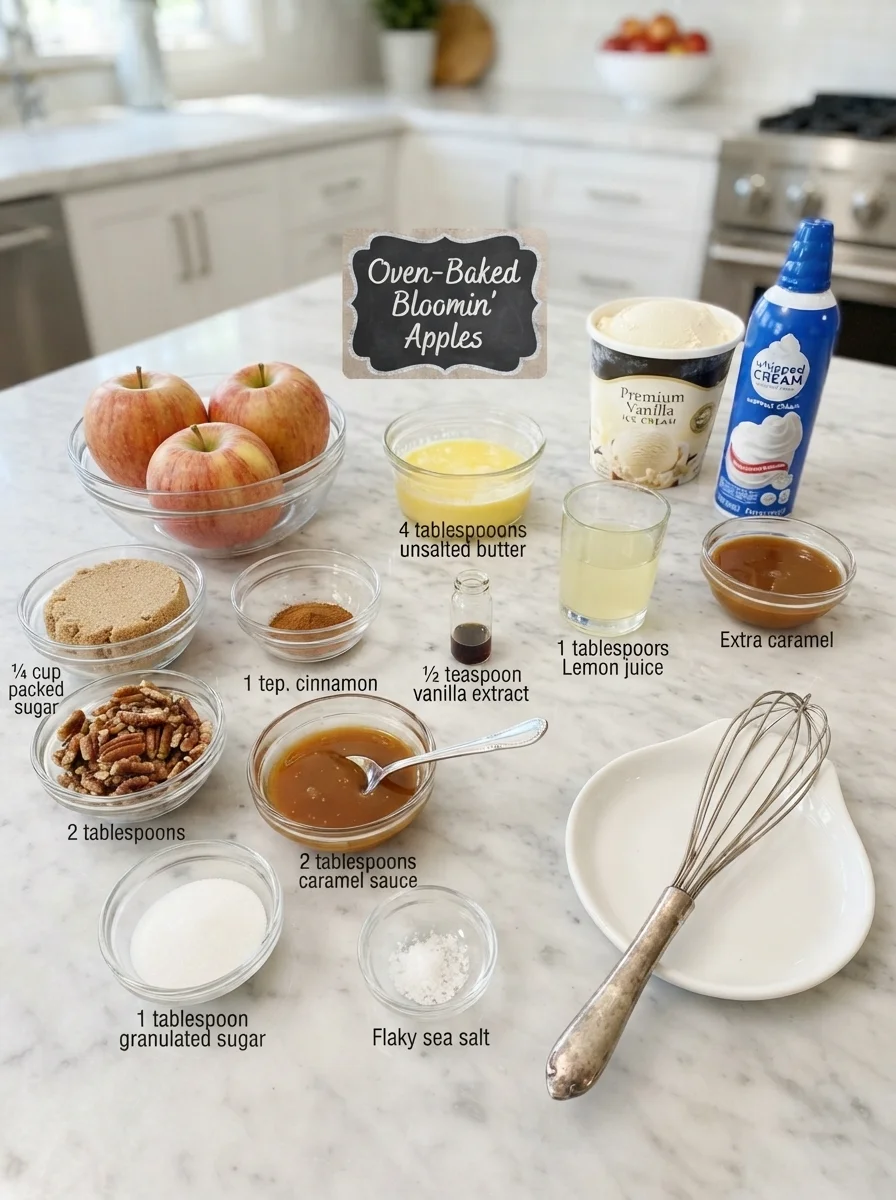
- 4 medium firm apples, such as Honeycrisp, Gala, or Fuji
- 4 tablespoons unsalted butter, melted
- 1/4 cup packed brown sugar
- 1 teaspoon ground cinnamon
- 1/4 teaspoon ground nutmeg
- 1/2 teaspoon vanilla extract
- 1 tablespoon lemon juice
- A little butter or cooking spray for the baking dish
Topping
- 2 tablespoons chopped pecans or walnuts
- 2 tablespoons caramel sauce, divided among the apples
- 1 tablespoon granulated sugar, optional
- A small pinch of flaky sea salt, optional
Serving Options
- Vanilla ice cream
- Extra caramel sauce
- Whipped cream
Yield: Four individual baked apples.
The listed tablespoon of lemon juice goes into the cinnamon butter. If you need extra lemon juice to brush the apples during a brief make-ahead step, use a little additional juice and note that it is separate from the measured sauce ingredient.
Choosing the Apples
Firm fruit supports the bloom
Choose apples that feel firm and have no large bruises, soft spots, or damaged skin. Similar sizes make it easier to bake all four together.
Honeycrisp and Fuji are useful starting choices for a sweet dessert with some structure. Gala can also work, but individual apples vary in ripeness and how readily they soften.
An apple that is already soft will be harder to cut neatly and more likely to collapse during baking. A very large, dense apple may need considerably longer than the supplied timing.
Size matters as much as variety
Four medium apples fit the intended amount of cinnamon butter. Very large fruit creates more cut surface and may spread the mixture thinly.
Do not assume that all apples of one named variety behave alike. A stored apple and a freshly harvested apple can differ in texture. Check each fruit during baking rather than removing all four automatically at the same moment.
Keep the peel
The peel helps the sections retain their shape and gives the outer petals color. Wash thoroughly before cutting, but do not use soap or household cleaning products on the fruit.
If you prefer peeled baked apples, treat that as a texture variation. Without skin, the outer sections can become more delicate and the decorative bloom may be less distinct.
Ingredient Notes
Butter and brown sugar create the glaze
Melt the butter gently and stir it with the brown sugar. The mixture may remain slightly grainy before baking; it does not need to become a perfectly clear syrup in the bowl.
Light or dark brown sugar can be used, with dark brown sugar giving a stronger molasses note. Pack the measuring cup consistently rather than loosely sprinkling sugar into it.
Salted butter is a possible substitution, but reduce or omit the optional finishing salt. No extra salt is required in the base mixture.
Cinnamon and nutmeg should complement the fruit
The stated cinnamon gives a warm flavor without needing a thick spice coating. Nutmeg is stronger, so measure rather than shaking generously over the bowl.
You can omit nutmeg if preferred. The cinnamon, vanilla, and apple juices are enough to make a complete dessert.
Nuts are optional for texture
Chop the pecans or walnuts into small pieces so they settle between sections rather than forcing the petals apart.
They may soften a little where they sit in syrup and toast where exposed. If they begin darkening before the apples are ready, use the loose foil cover again.
For a nut-free serving, omit them and check the caramel and other toppings for relevant allergen information.
Caramel is a finishing sauce
Use a pourable caramel sauce and warm it gently if needed. Two tablespoons across four apples provides a modest drizzle; extra sauce is optional.
Do not add a large quantity to the dish at the start, where it can become overly thick or dark during baking. Finishing after the apples have rested gives more control.
Equipment
Use a stable cutting board, a sharp small knife, a melon baller or sturdy small spoon, a pastry brush, and a baking dish that holds four apples upright with a little space between them.
Choose a dish with sides deep enough to contain the buttery juices. A very wide dish spreads the sauce into a thin layer that can reduce quickly, while a tightly packed dish makes basting and removal awkward.
Have foil available for the covered stage and a spoon for basting. A broad serving spoon or spatula helps support the apple base when transferring it to a bowl.
Understanding the Cutting Method
The supplied directions mention turning the apple stem-side down while also keeping the bottom intact. That can be confusing. For this clarified method, keep the stem opening facing upward, with the natural bottom resting securely on the board.
Core from the top without cutting through the bottom. Then make radial cuts from the hollow center toward the outside, stopping above the base. The sections remain connected by an uncut layer at the bottom.
This produces a simple petal-like bloom. More elaborate methods involving concentric rings and inverted cutting create a different pattern and are not necessary for this version.
The half-inch uncut base is a guide. Keep enough fruit intact to support the apple and contain the filling. Do not force a knife deeply into a slippery apple to match a measurement exactly.
How to Make Oven-Baked Bloomin’ Apples
1. Heat the oven and prepare the dish
Preheat the oven to 375°F with a rack near the center. Lightly grease the baking dish.
Arrange the whole apples in the dish briefly to confirm they fit upright with some room around them. Remove them for cutting.
Prepare the cinnamon butter ingredients before slicing so the cut fruit does not wait unnecessarily on the counter.
2. Core carefully from the top
Wash and dry the apples. Remove the stem and use a melon baller or small spoon to scoop out the seed core from the top.
Leave the bottom intact. Check the cavity as you work rather than driving an apple corer all the way through, which would create a hole for the filling to escape.
Remove seeds and tough core material while keeping a reasonable wall of fruit around the center. A very wide hollow can make the sections fragile.
3. Create connected petals
Set the apple upright on its natural bottom, with the opening facing up. Make evenly spaced radial cuts through the upper fruit, working outward from the hollow center and stopping about half an inch above the base.
Aim for roughly eight to twelve connected sections, depending on apple size and how comfortably you can cut. Keep your fingers away from the blade path and rotate the fruit carefully between cuts.
Do not cut completely through the bottom. The goal is a connected apple that can open as it softens, not separate wedges.
Gently test the sections with your fingers, but do not pry hard. Raw firm apple may not fan widely, and forcing it can snap the base. The oven will do much of the softening.
4. Mix the cinnamon butter
Whisk the melted butter, packed brown sugar, cinnamon, nutmeg, vanilla, and tablespoon of lemon juice together.
Stir again just before filling if the mixture separates slightly. A little graininess from sugar is normal at this stage.
Do not heat it into a candy mixture. It only needs to be combined and fluid enough to brush between the cuts.
5. Fill and coat
Place the apples upright in the prepared dish. Divide the cinnamon butter among them, spooning a little into each center and brushing some over the tops and into accessible cuts.
Use gentle pressure to open a gap only as far as the fruit allows. Do not try to fill every cut by forcing a stiff section sideways.
If a little mixture runs into the dish, leave it there for basting. The baking juices are part of the finished sauce.
6. Add the nuts
Divide the chopped pecans or walnuts among the centers and a few gaps. Scatter lightly rather than packing the cavities tightly.
Add the optional granulated sugar if desired. It increases sweetness and can encourage surface browning, but the dessert already contains brown sugar and caramel.
7. Bake covered first
Cover the dish loosely with foil and bake for about twenty minutes. The covered stage helps the apples begin softening without exposing the tops to the full drying heat throughout.
Remove the foil carefully, directing escaping steam away from your hands and face. Check the apples before continuing uncovered.
8. Finish uncovered and baste
Bake uncovered for another fifteen to twenty minutes as an initial guide. Spoon some of the warm juices over the apples during this stage.
Check tenderness with a small knife or skewer in a thick section near the center. The fruit should yield to your preference without the base falling apart.
Larger or firmer apples may need additional time, sometimes considerably more than forty minutes total. If the tops or nuts are darkening before the center softens, loosely cover again and continue.
If the dish is becoming dry before the apples are ready, add a small splash of hot water only if suitable for your baking dish and its manufacturer guidance. Avoid sudden temperature changes with glass dishes.
9. Encourage the bloom gently
Once softened, the sections may relax outward on their own. If needed, use a spoon to ease them apart very gently while keeping the base supported.
Do not try to create a wide flower by pulling on hot, fragile wedges. A partially opened apple is still attractive and easier to transfer intact.
10. Rest and finish
Remove the dish from the oven and let stand for at least five minutes. Check that the filling has cooled enough to serve comfortably; dense centers can retain heat longer.
Drizzle the two tablespoons caramel sauce across the four apples. Add a tiny pinch of flaky salt if desired.
Lift each apple with support beneath its base and place in a dessert bowl. Spoon some baking juices around it and add ice cream or whipped cream just before serving.
Tips for Tender Apples That Keep Their Shape
Use similar-sized fruit so the batch cooks more evenly. If one apple finishes early, remove it carefully instead of overbaking it while waiting for a larger one.
Keep the base intact. It is the main support holding the bloom together, not simply a decorative detail.
Let heat open the petals. Raw apples can be too stiff to fan safely, so a modest initial opening is enough.
Watch the sauce as well as the fruit. A dish that is too broad or an extended uncovered bake can reduce the juices before the center is tender.
Rest before moving. Very hot apple sections are delicate, and the syrup can cause burns if it spills during transfer.
Serving Ideas
Vanilla ice cream offers a cool contrast to the warm cinnamon fruit. Add it at the last moment so it does not melt into a puddle before the bowl reaches the table.
Whipped cream is a lighter-looking finish, while a spoonful of plain yogurt provides a tangier alternative. Each changes the sweetness and nutrition of the serving.
A little extra caramel can be offered separately. Let guests decide rather than covering the apple so heavily that its shape disappears.
For a dessert table, individual bowls are easier than moving the apples repeatedly from a large platter. The syrup stays contained and the fruit remains supported.
Make-Ahead Planning
Measure the brown sugar, spices, nuts, and caramel ahead. Whole apples can be washed and dried before preparation.
Cut the apples close to baking for the cleanest appearance. If preparing a little earlier, brush exposed surfaces with a little additional lemon juice, cover, and refrigerate.
The tablespoon of lemon juice in the measured cinnamon butter is still needed; do not use it all for brushing and then omit it from the mixture without recognizing the change.
A cold apple may take longer to bake than one prepared immediately before going into the oven. Check tenderness rather than relying on the shortest timing.
For guests, the simplest plan is to bake near serving time and have the bowls and toppings ready. Reheated apples can be enjoyable but are more delicate and may not hold exactly the same shape.
Storage and Reheating
Store leftover apples and their baking juices in a shallow covered container at 40°F or below and use within three days. Keep ice cream and whipped cream separate.
Refrigerate promptly, keeping room-temperature exposure within two hours, or one hour when the surroundings exceed 90°F. Follow USDA leftover handling guidance.
Reheat an individual apple gently in the microwave in short intervals or in a covered dish at 325°F. Add a spoonful of reserved juices to help prevent drying. Heat leftovers to 165°F according to USDA reheating guidance.
The sections may soften further after reheating. Support the base when moving and avoid repeatedly reheating the entire batch.
Freezing is not recommended when the bloom shape matters. Thawing can soften the fruit and make the connected petals fragile.
Variations
Nut-free: Omit the pecans or walnuts. Check prepared caramel and toppings for any allergen information relevant to your guests.
Walnut finish: Use walnuts instead of pecans for a slightly different flavor. Chop small and watch exposed pieces during the uncovered bake.
Extra cinnamon: Add a modest extra pinch if you enjoy a stronger spice flavor. More spice can become bitter or dusty if it is not balanced by the butter and fruit juices.
Salted caramel: Use a salted caramel sauce and omit the optional flaky salt until you taste the combination.
Simpler presentation: If cutting a bloom is inconvenient, prepare a separate baked-apple version with a hollow center and the same flavorings. The timing and filling distribution will differ, but the dessert does not depend on a perfect flower to taste good.
Troubleshooting
The apple breaks into wedges
The cuts may have reached through the base, or the raw sections may have been forced apart. Keep a thicker uncut bottom next time and let the oven soften the fruit before opening it widely.
The center is still firm
The apple may be large, dense, or cold from refrigeration. Continue baking, loosely covering if the top is already colored. A fixed forty-minute limit is less useful than testing the thick fruit near the core.
The petals collapse
The apple may have been very ripe, cut too thinly, or baked beyond the texture needed to hold its shape. Choose firmer fruit and check earlier next time.
The sauce is dark and sticky before the fruit is ready
The dish may be too wide or the uncovered stage too long. Cover loosely and assess moisture, using the dish manufacturer’s guidance before adding any hot water. Avoid scorching by monitoring the juices during an extended bake.
The apples do not open much
The cuts may be shallow or the variety may hold its shape firmly. Ease softened sections apart gently with a spoon. A restrained bloom is preferable to breaking the base.
Frequently Asked Questions
Do I turn the apples upside down to cut them?
Not in this clarified radial-cut method. Keep the stem opening upward and the natural bottom intact. This avoids ambiguity about which end is meant to remain connected.
Can I remove the core with a standard corer?
Only if you can stop before cutting through the bottom. A melon baller or small spoon gives more control over the depth of the cavity.
Can I omit caramel sauce?
Yes. The cinnamon-butter baking juices provide flavor on their own. Omitting caramel reduces sweetness and changes the calorie estimate.
Can I make smaller portions?
Smaller apples can be used, but the filling amount and cooking time should be adjusted. Cut carefully because there is less room for a central cavity and connected sections.
What is the estimated nutrition?
The supplied 280-calorie figure may be low when butter, nuts, and caramel are all included. With typical medium apples, an illustrative estimate is roughly 320–360 calories per apple before optional granulated sugar, extra caramel, or ice cream. Protein is low, often around 1–2 grams. Calculate from actual ingredients and apple size for precision.
Print
Oven-Baked Bloomin’ Apples
Description
- Prep: Approximately 15–25 minutes, depending on cutting experience
- Bake: About 35–40 minutes initially; allow longer until tender
- Rest: At least 5 minutes
- Total: Approximately 55–70 minutes or more for larger apples
- Servings: 4 individual apples
- Method: Oven-baked
Ingredients
Bloomin’ Apples
- 4 medium firm apples, such as Honeycrisp, Gala, or Fuji
- 4 tablespoons unsalted butter, melted
- 1/4 cup packed brown sugar
- 1 teaspoon ground cinnamon
- 1/4 teaspoon ground nutmeg
- 1/2 teaspoon vanilla extract
- 1 tablespoon lemon juice
- A little butter or cooking spray for the baking dish
Topping
- 2 tablespoons chopped pecans or walnuts
- 2 tablespoons caramel sauce, divided among the apples
- 1 tablespoon granulated sugar, optional
- A small pinch of flaky sea salt, optional
Serving Options
- Vanilla ice cream
- Extra caramel sauce
- Whipped cream
Yield: Four individual baked apples.
The listed tablespoon of lemon juice goes into the cinnamon butter. If you need extra lemon juice to brush the apples during a brief make-ahead step, use a little additional juice and note that it is separate from the measured sauce ingredient.
Instructions
1. Heat the oven and prepare the dish
Preheat the oven to 375°F with a rack near the center. Lightly grease the baking dish.
Arrange the whole apples in the dish briefly to confirm they fit upright with some room around them. Remove them for cutting.
Prepare the cinnamon butter ingredients before slicing so the cut fruit does not wait unnecessarily on the counter.
2. Core carefully from the top
Wash and dry the apples. Remove the stem and use a melon baller or small spoon to scoop out the seed core from the top.
Leave the bottom intact. Check the cavity as you work rather than driving an apple corer all the way through, which would create a hole for the filling to escape.
Remove seeds and tough core material while keeping a reasonable wall of fruit around the center. A very wide hollow can make the sections fragile.
3. Create connected petals
Set the apple upright on its natural bottom, with the opening facing up. Make evenly spaced radial cuts through the upper fruit, working outward from the hollow center and stopping about half an inch above the base.
Aim for roughly eight to twelve connected sections, depending on apple size and how comfortably you can cut. Keep your fingers away from the blade path and rotate the fruit carefully between cuts.
Do not cut completely through the bottom. The goal is a connected apple that can open as it softens, not separate wedges.
Gently test the sections with your fingers, but do not pry hard. Raw firm apple may not fan widely, and forcing it can snap the base. The oven will do much of the softening.
4. Mix the cinnamon butter
Whisk the melted butter, packed brown sugar, cinnamon, nutmeg, vanilla, and tablespoon of lemon juice together.
Stir again just before filling if the mixture separates slightly. A little graininess from sugar is normal at this stage.
Do not heat it into a candy mixture. It only needs to be combined and fluid enough to brush between the cuts.
5. Fill and coat
Place the apples upright in the prepared dish. Divide the cinnamon butter among them, spooning a little into each center and brushing some over the tops and into accessible cuts.
Use gentle pressure to open a gap only as far as the fruit allows. Do not try to fill every cut by forcing a stiff section sideways.
If a little mixture runs into the dish, leave it there for basting. The baking juices are part of the finished sauce.
6. Add the nuts
Divide the chopped pecans or walnuts among the centers and a few gaps. Scatter lightly rather than packing the cavities tightly.
Add the optional granulated sugar if desired. It increases sweetness and can encourage surface browning, but the dessert already contains brown sugar and caramel.
7. Bake covered first
Cover the dish loosely with foil and bake for about twenty minutes. The covered stage helps the apples begin softening without exposing the tops to the full drying heat throughout.
Remove the foil carefully, directing escaping steam away from your hands and face. Check the apples before continuing uncovered.
8. Finish uncovered and baste
Bake uncovered for another fifteen to twenty minutes as an initial guide. Spoon some of the warm juices over the apples during this stage.
Check tenderness with a small knife or skewer in a thick section near the center. The fruit should yield to your preference without the base falling apart.
Larger or firmer apples may need additional time, sometimes considerably more than forty minutes total. If the tops or nuts are darkening before the center softens, loosely cover again and continue.
If the dish is becoming dry before the apples are ready, add a small splash of hot water only if suitable for your baking dish and its manufacturer guidance. Avoid sudden temperature changes with glass dishes.
9. Encourage the bloom gently
Once softened, the sections may relax outward on their own. If needed, use a spoon to ease them apart very gently while keeping the base supported.
Do not try to create a wide flower by pulling on hot, fragile wedges. A partially opened apple is still attractive and easier to transfer intact.
10. Rest and finish
Remove the dish from the oven and let stand for at least five minutes. Check that the filling has cooled enough to serve comfortably; dense centers can retain heat longer.
Drizzle the two tablespoons caramel sauce across the four apples. Add a tiny pinch of flaky salt if desired.
Lift each apple with support beneath its base and place in a dessert bowl. Spoon some baking juices around it and add ice cream or whipped cream just before serving.