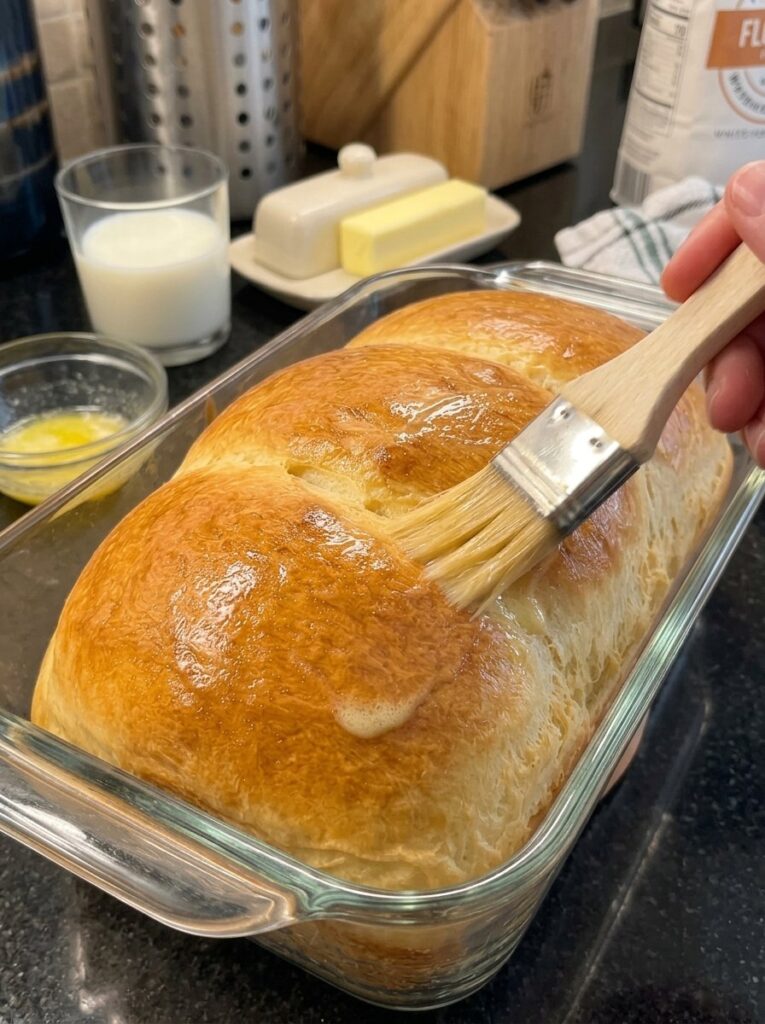
There is something almost magical about pulling a golden, fragrant loaf of bread out of your own oven. The smell fills the kitchen, the crust crackles as it cools, and the first slice reveals a pillowy, tender crumb that tastes like it came from a neighborhood bakery. The best part? This no-knead milk bread asks for almost nothing in return. No stand mixer, no kneading, no complicated shaping, and no special equipment beyond a bowl, a spatula, and a standard loaf pan.
If you have ever been intimidated by homemade bread, this recipe is the perfect place to start. With a handful of pantry staples, a little patience while the dough rises, and a simple stir-and-pour method, you can bake a soft, fluffy, lightly sweet loaf that works for breakfast toast, sandwiches, French toast, or simply warm slices spread with butter.
In this complete guide, you will find the full ingredient list, a detailed step-by-step method, expert tips for a perfect rise, troubleshooting advice, creative variations, serving ideas, storage instructions, and answers to the most common questions about milk bread. Let’s get baking.
Why You’ll Love This No-Knead Milk Bread
There are plenty of bread recipes out there, but this one earns its place in your regular rotation for several reasons:
- No kneading required. The dough comes together with a wooden spoon in just a few minutes. There is no flour-dusted counter, no sore arms, and no need to learn kneading technique.
- No stand mixer needed. Everything is mixed in one bowl by hand, which means less cleanup and no bulky appliance.
- Soft, tender crumb. Milk, butter, and an egg enrich the dough, creating a loaf that stays soft and fluffy instead of dry or crusty.
- Simple, everyday ingredients. You probably already have everything in your kitchen: flour, milk, yeast, sugar, salt, butter, and an egg.
- Beginner-friendly. The method is forgiving, the steps are clear, and the sticky dough is exactly what you want.
- Incredibly versatile. One loaf can become toast, sandwiches, French toast, cinnamon toast, and more.
- Great flavor. A touch of sugar and the richness of butter give the bread a gentle sweetness that makes it irresistible on its own.
Most of the active work takes about 15 minutes. The rest of the time is hands-off while the yeast does the work for you.
What Is Milk Bread?
Milk bread is a style of soft, enriched bread made with milk in place of some or all of the water found in traditional bread recipes. It is popular in many baking traditions, and it is loved for its tender texture, delicate sweetness, and ability to stay soft for days. You may know it as the pillowy sandwich loaf found in Asian bakeries, or as the soft sliced bread that makes fantastic toast.
So why does milk make bread softer? Milk contains fats, sugars, and proteins that change the way the dough bakes. The fat tenderizes the crumb by coating gluten strands, the natural milk sugars encourage a golden crust, and the liquid adds richness that plain water simply cannot provide. The result is a loaf with a fine, even crumb and a subtle, creamy flavor.
Traditional milk bread often relies on extensive kneading or special starter techniques to build structure. This version skips all of that. By using a wetter, stickier dough and giving it enough time to rise, the gluten develops on its own, and you still end up with a wonderfully soft loaf. It is the easiest way to enjoy the texture of bakery milk bread at home.
Ingredients for No-Knead Milk Bread
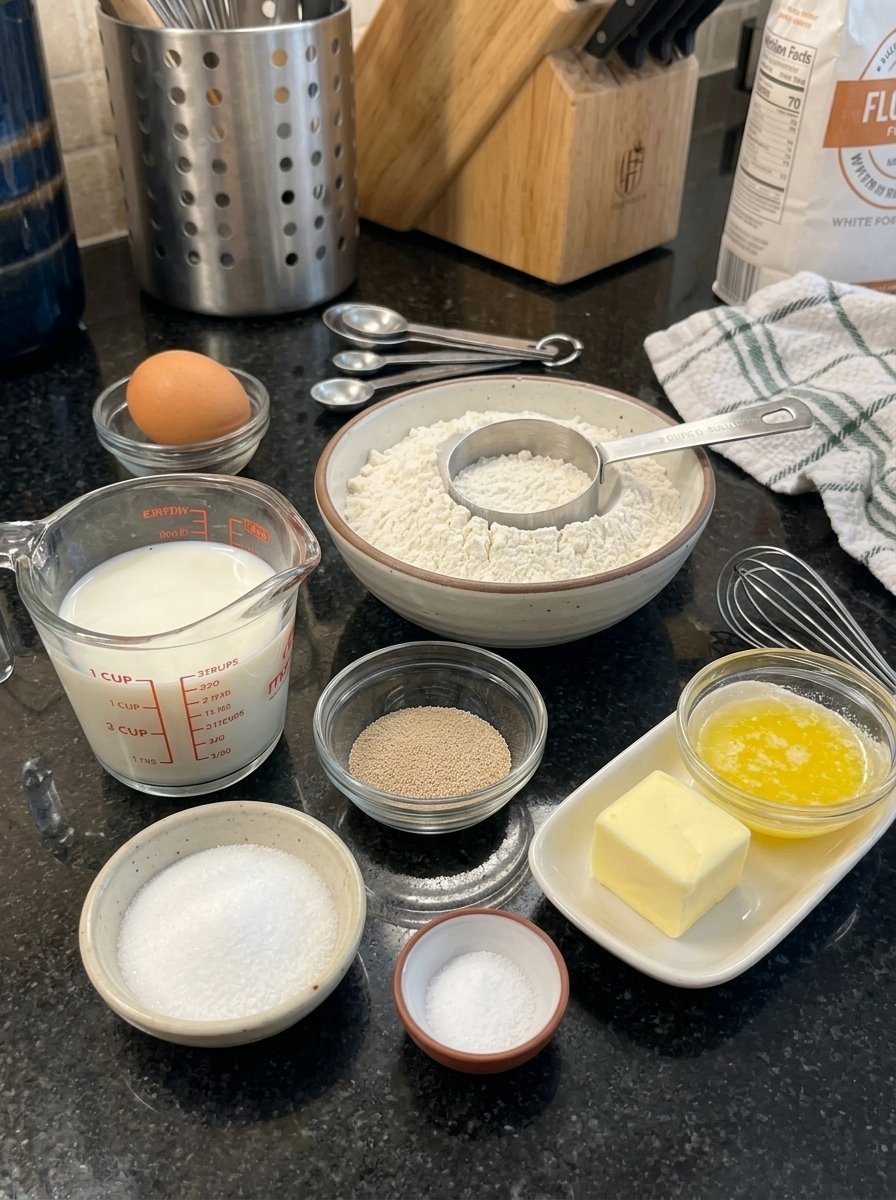
Here is everything you need to make one standard loaf, which yields about 10 to 12 slices:
- 3 cups (375 g) all-purpose flour or bread flour
- 1 cup (240 ml) warm milk, about 100–110°F (38–43°C)
- 2¼ teaspoons (7 g) instant yeast
- 3 tablespoons (38 g) granulated sugar
- 1 teaspoon (6 g) salt
- 4 tablespoons (56 g) unsalted butter, melted and slightly cooled
- 1 large egg, at room temperature
- 1 tablespoon milk or melted butter, for brushing the top (optional)
Ingredient Notes and Substitutions
Flour. All-purpose flour gives a soft, tender loaf, while bread flour has more protein and produces a slightly chewier, more structured crumb. Either one works beautifully, so use what you have on hand. For the most accurate results, weigh your flour with a kitchen scale.
Milk. Whole milk gives the richest flavor and softest texture, but 2% milk also works. In a pinch, you can use a plant-based milk, though the crumb may be a little less rich. Make sure it is warm, not hot.
Yeast. This recipe uses instant yeast, which can be mixed directly into the wet ingredients. If you only have active dry yeast, you can use the same amount, but allow it to sit in the warm milk and sugar for about 5 to 10 minutes until foamy before adding the other ingredients. Expect the rise to take a little longer.
Sugar. Sugar feeds the yeast and adds a gentle sweetness. Granulated sugar is ideal, but you can substitute the same amount of honey or caster sugar.
Butter. Unsalted butter lets you control the salt level. If you only have salted butter, reduce the added salt slightly. Let the melted butter cool a bit so it does not scramble the egg or harm the yeast.
Egg. The egg adds richness, color, and structure. Use it at room temperature so it blends smoothly into the dough.
Tips for the Best Milk Bread
A few small details make a big difference in the final loaf. Keep these in mind before you begin:
- Use warm, not hot, milk. Warm milk activates the yeast. If it is too hot, it can damage the yeast and prevent the dough from rising. Aim for 100–110°F (38–43°C). If you do not have a thermometer, the milk should feel comfortably warm on your wrist, never uncomfortably hot.
- Measure the flour carefully. Too much flour is the most common reason homemade bread turns out dense. Use a kitchen scale whenever possible. If you are using measuring cups, spoon the flour into the cup and level it off rather than scooping directly from the bag.
- Expect a sticky dough. Because this is a no-knead recipe, the dough should be soft and slightly sticky. Resist the urge to add lots of extra flour. The moisture is what creates that fluffy interior.
- Consider bread flour for extra structure. All-purpose flour works well, but bread flour can give the loaf a slightly chewier bite and a taller rise.
- Let the dough rise fully. The dough should become puffy and nearly double in size. Rising time depends on the temperature of your kitchen, so watch the dough rather than the clock.
- Brush with butter after baking. A little melted butter on the warm loaf creates a soft, glossy, delicious crust.
- Wait before slicing. It is tempting to cut into the loaf right away, but letting it cool allows the crumb to set so the slices stay neat and fluffy.
How to Make No-Knead Milk Bread (Step by Step)
Follow these ten simple steps for a perfect loaf every time.
Step 1: Prepare the Milk Mixture
In a large mixing bowl, combine the warm milk, granulated sugar, and instant yeast. Stir gently until the sugar dissolves. Add the melted butter and the egg, then whisk until everything is well combined and the mixture looks smooth and uniform.
Step 2: Mix the Dough
Add the flour and salt to the wet ingredients. Stir with a wooden spoon or sturdy spatula until no dry flour remains. The dough should look soft, sticky, and slightly shaggy. This is exactly right. You do not need to knead it or bring out a stand mixer.
Step 3: Let the Dough Rise
Cover the bowl with plastic wrap or a clean kitchen towel. Place it in a warm, draft-free spot for about 60 to 90 minutes, or until the dough has doubled in size. A cooler kitchen may need extra time. An oven with only the light turned on is a handy warm spot for rising dough.
Step 4: Prepare the Loaf Pan
Lightly grease a standard 9 × 5-inch (23 × 13 cm) loaf pan with butter or cooking spray. Once the dough has risen, gently stir it with a spatula to release some of the larger air pockets. This helps create an even, fine crumb.
Step 5: Shape the Dough
Lightly grease your hands or your spatula so the sticky dough is easier to handle. Transfer the dough into the prepared pan and gently spread it toward the corners. Smooth the top as evenly as possible so the loaf bakes with an attractive, level dome.
Step 6: Let It Rise Again
Cover the pan loosely and let the dough rise for another 30 to 45 minutes, or until it looks puffy and has risen noticeably above its original level. Try not to let it overproof, because an overproofed loaf can collapse in the oven.
Step 7: Preheat the Oven
Toward the end of the second rise, preheat your oven to 350°F (175°C). If you like, gently brush the top of the dough with a little milk to encourage a lightly golden crust.
Step 8: Bake Until Golden
Bake for 30 to 35 minutes, until the top is golden brown and the loaf is cooked through. If the top browns too quickly, loosely cover it with aluminum foil for the remaining time. For perfect doneness, the center should reach about 190–200°F (88–93°C) when checked with an instant-read thermometer.
Step 9: Cool the Bread
Remove the loaf from the oven and let it rest in the pan for about 10 minutes. Carefully transfer it to a wire rack. For an extra-soft crust, brush the top with melted butter while the bread is still warm. Allow it to cool for at least 30 to 45 minutes before slicing so the crumb can set properly.
Step 10: Slice and Enjoy
Use a serrated knife to slice the bread with a gentle sawing motion. Serve it warm with butter, jam, or honey, or use it to build your favorite sandwiches.
Troubleshooting: Common Milk Bread Problems
Even simple recipes can have off days. Here is how to fix the most common issues.
My dough did not rise. The most likely culprits are expired yeast or milk that was too hot or too cold. Check the date on your yeast, and use a thermometer to make sure the milk is between 100 and 110°F. Also make sure your rising spot is warm enough. Cooler rooms simply need more time.
My bread is dense. This usually comes from too much flour or too little rising time. Weigh your flour, avoid adding extra, and let the dough become puffy and nearly doubled before moving on.
The loaf collapsed or has a sunken top. The dough probably overproofed during the second rise. Next time, bake it as soon as it looks puffy and has risen above the original level of the dough, rather than waiting for it to climb too high.
The crust is too dark. Every oven is different. Tent the loaf loosely with aluminum foil partway through baking, and consider moving the rack to a lower position.
The inside seems gummy. The loaf may have been underbaked or sliced too soon. Use an instant-read thermometer to confirm the center reaches 190–200°F (88–93°C), and let the bread cool fully before cutting.
The crust is hard. Brush the warm loaf with melted butter right after baking, and store it in an airtight container or bread bag once it has completely cooled.
Delicious Variations to Try
Once you have mastered the classic recipe, it is easy to make it your own:
- Honey milk bread. Replace the granulated sugar with an equal amount of honey for a warm, floral sweetness.
- Cinnamon swirl loaf. After the first rise, spread the dough in the pan and swirl a mixture of cinnamon and sugar through it before the second rise.
- Cheesy herb bread. Fold in a handful of shredded cheese and a teaspoon of dried herbs for a savory loaf that is fantastic with soup.
- Raisin or dried fruit loaf. Stir in raisins, cranberries, or chopped dried apricots for a sweet, chewy surprise.
- Whole wheat blend. Replace up to one cup of the flour with whole wheat flour for a nuttier flavor. The dough may need a touch more time to rise.
- Dinner rolls. Divide the risen dough into a greased baking dish or muffin tin to make soft, pull-apart rolls. Reduce the baking time and watch them closely.
Serving Ideas for Homemade Milk Bread
This soft loaf is incredibly versatile. Here are some of the best ways to enjoy it:
- Classic buttered slices. Spread warm bread with butter for a simple, comforting treat.
- Breakfast toast. Toast a slice and top it with jam, honey, peanut butter, or cream cheese.
- Sweet French toast. Dip thick slices in an egg-and-milk mixture and cook in a buttered skillet until golden. Milk bread soaks up custard beautifully without falling apart.
- Homemade sandwiches. The soft slices are perfect for egg sandwiches, grilled cheese, or your favorite lunch fillings.
- Cinnamon toast. Add butter, cinnamon, and a little sugar for a sweet snack.
- Bread pudding. Day-old slices make a wonderfully rich bread pudding or breakfast casserole.
How to Store Milk Bread
Proper storage keeps your loaf soft and fresh for as long as possible.
- Room temperature: Store the completely cooled loaf in an airtight container or bread bag for up to 3 days.
- Refrigerator: Refrigeration can dry out homemade bread, so room-temperature storage is preferable for short-term use.
- Freezer: Slice the cooled loaf and freeze the slices in a freezer-safe bag for up to 2 to 3 months. Place parchment paper between slices if you like, so you can pull out one at a time.
- Reheating: Warm a slice in the toaster or microwave briefly. For a softer texture, cover it with a slightly damp paper towel and microwave for just a few seconds.
Frequently Asked Questions
Can I make this milk bread without a stand mixer?
Yes. This is a true no-knead, no-mixer recipe. A wooden spoon or sturdy spatula is all you need to bring the dough together.
Why is my no-knead dough so sticky?
A sticky dough is normal and desirable here. The extra moisture helps the bread bake up soft and fluffy. Lightly grease your hands or spatula instead of adding more flour.
Can I use bread flour instead of all-purpose flour?
Absolutely. Bread flour has a higher protein content, which gives the loaf a slightly chewier texture and more structure. All-purpose flour gives a softer, more tender result. Both work well.
Can I use active dry yeast instead of instant yeast?
Yes. Use the same amount, but dissolve it in the warm milk and sugar for 5 to 10 minutes until foamy before continuing. The rise may take slightly longer.
How do I know when the dough has doubled?
The dough should look puffy, domed, and roughly twice its original size, with bubbles visible on the surface. If you press a floured finger gently into it, the indentation should fill back in slowly.
What size pan should I use?
A standard 9 × 5-inch (23 × 13 cm) loaf pan is ideal. A slightly smaller pan will give a taller loaf, while a larger pan will give a flatter one.
Can I make the dough ahead of time?
You can slow the first rise in the refrigerator for several hours or overnight, then bring the dough back toward room temperature and continue with the recipe. Expect the timing to vary.
Can I make this recipe dairy-free?
You can substitute a plant-based milk and a dairy-free butter alternative. The flavor and softness will be slightly different, but the loaf will still be delicious.
How long does homemade milk bread stay fresh?
The loaf stays soft for up to 3 days at room temperature in an airtight container. For longer storage, slice and freeze it for 2 to 3 months.
Why did my loaf collapse?
The most common cause is overproofing during the second rise. Bake the loaf when it is puffy and just above the original dough level, and avoid letting it rise too far.
Final Thoughts
This soft and fluffy no-knead milk bread proves that great homemade bread does not have to be complicated. With simple ingredients, a sticky stir-together dough, and a bit of patience, you can bake a tender, golden loaf that rivals anything from the bakery. It is perfect for beginners, busy bakers, and anyone who simply wants the comfort of fresh bread without the fuss.
Print
Soft & Fluffy No-Knead Milk Bread
Ingredients
Here is everything you need to make one standard loaf, which yields about 10 to 12 slices:
- 3 cups (375 g) all-purpose flour or bread flour
- 1 cup (240 ml) warm milk, about 100–110°F (38–43°C)
- 2¼ teaspoons (7 g) instant yeast
- 3 tablespoons (38 g) granulated sugar
- 1 teaspoon (6 g) salt
- 4 tablespoons (56 g) unsalted butter, melted and slightly cooled
- 1 large egg, at room temperature
- 1 tablespoon milk or melted butter, for brushing the top (optional)
Ingredient Notes and Substitutions
Flour. All-purpose flour gives a soft, tender loaf, while bread flour has more protein and produces a slightly chewier, more structured crumb. Either one works beautifully, so use what you have on hand. For the most accurate results, weigh your flour with a kitchen scale.
Milk. Whole milk gives the richest flavor and softest texture, but 2% milk also works. In a pinch, you can use a plant-based milk, though the crumb may be a little less rich. Make sure it is warm, not hot.
Yeast. This recipe uses instant yeast, which can be mixed directly into the wet ingredients. If you only have active dry yeast, you can use the same amount, but allow it to sit in the warm milk and sugar for about 5 to 10 minutes until foamy before adding the other ingredients. Expect the rise to take a little longer.
Sugar. Sugar feeds the yeast and adds a gentle sweetness. Granulated sugar is ideal, but you can substitute the same amount of honey or caster sugar.
Butter. Unsalted butter lets you control the salt level. If you only have salted butter, reduce the added salt slightly. Let the melted butter cool a bit so it does not scramble the egg or harm the yeast.
Egg. The egg adds richness, color, and structure. Use it at room temperature so it blends smoothly into the dough.
Instructions
Follow these ten simple steps for a perfect loaf every time.
In a large mixing bowl, combine the warm milk, granulated sugar, and instant yeast. Stir gently until the sugar dissolves. Add the melted butter and the egg, then whisk until everything is well combined and the mixture looks smooth and uniform.
Add the flour and salt to the wet ingredients. Stir with a wooden spoon or sturdy spatula until no dry flour remains. The dough should look soft, sticky, and slightly shaggy. This is exactly right. You do not need to knead it or bring out a stand mixer.
Cover the bowl with plastic wrap or a clean kitchen towel. Place it in a warm, draft-free spot for about 60 to 90 minutes, or until the dough has doubled in size. A cooler kitchen may need extra time. An oven with only the light turned on is a handy warm spot for rising dough.
Lightly grease a standard 9 × 5-inch (23 × 13 cm) loaf pan with butter or cooking spray. Once the dough has risen, gently stir it with a spatula to release some of the larger air pockets. This helps create an even, fine crumb.
Lightly grease your hands or your spatula so the sticky dough is easier to handle. Transfer the dough into the prepared pan and gently spread it toward the corners. Smooth the top as evenly as possible so the loaf bakes with an attractive, level dome.
Cover the pan loosely and let the dough rise for another 30 to 45 minutes, or until it looks puffy and has risen noticeably above its original level. Try not to let it overproof, because an overproofed loaf can collapse in the oven.
Toward the end of the second rise, preheat your oven to 350°F (175°C). If you like, gently brush the top of the dough with a little milk to encourage a lightly golden crust.
Bake for 30 to 35 minutes, until the top is golden brown and the loaf is cooked through. If the top browns too quickly, loosely cover it with aluminum foil for the remaining time. For perfect doneness, the center should reach about 190–200°F (88–93°C) when checked with an instant-read thermometer.
Remove the loaf from the oven and let it rest in the pan for about 10 minutes. Carefully transfer it to a wire rack. For an extra-soft crust, brush the top with melted butter while the bread is still warm. Allow it to cool for at least 30 to 45 minutes before slicing so the crumb can set properly.
Use a serrated knife to slice the bread with a gentle sawing motion. Serve it warm with butter, jam, or honey, or use it to build your favorite sandwiches.