Creating your own sourdough starter is like welcoming a little microbe family into your kitchen, unleashing a delicious chain of events that ultimately leads to the creation of beautifully baked bread. Imagine the aromatic warmth of freshly baked sourdough enveloping your senses as you slice through its crusty exterior, revealing a tender, airy crumb peppered with delightful air pockets. Each bite offers a perfect combination of tartness and depth, sending your taste buds dancing with joy. This is the magic of sourdough—the result of patience, love, and the lively fermentation process that transforms simple ingredients into something extraordinary.
As you nurture this bubbly concoction over the days, a symphony of fermentation unfolds. The fragrant scent of the starter wafts through your kitchen, creating an inviting atmosphere that becomes synonymous with home. You can feel the connection to centuries of baking tradition; sourdough has graced tables across the world, from rustic farmhouses to modern urban lofts. Whether it’s a lazy Sunday brunch or an elegant dinner party, sourdough bread always brings an element of comfort and charm, elevating any meal to something memorable.
Why You’ll Love This Sourdough Starter
Creating a sourdough starter isn’t just about baking bread; it’s about embracing the joy of nourishing your creativity in the kitchen. This bubbly mixture yields a depth of flavor unmatched by commercial yeasts. With a gentle tang and robust character, sourdough bread enhances any meal while also offering health benefits thanks to its natural fermentation process. It improves digestibility and leads to a bread that you can enjoy without the guilt.
Sourdough invites endless culinary adventures. Pair it with a luscious spread of creamy butter and local honey for breakfast, or make decadent sandwiches filled with ripe avocado and a sprinkle of sea salt for a quick lunch. From artisanal pizza crusts to fluffy pancakes, the possibilities are boundless. Not to mention, there’s simply something enchanting about serving homemade bread to family and friends—witnessing their delight as they experience the fruits of your labor fills the heart with joy and pride.
Preparation Phase & Tools to Use
Before diving into the fermentation adventure, gather a few essential tools that will ease your sourdough starter journey. Each one plays a crucial role in ensuring your starter thrives:
- Glass jar or container: A transparent vessel lets you observe the growth of your starter. Opt for a size that holds at least 16 ounces to accommodate the expanding mixture.
- Mixing spoon or spatula: Choose a wooden or silicone utensil, which does not react with the acidic nature of the starter.
- Kitchen scale: This tool provides precision to your measurements, while also making it easy to scale recipes up or down.
- Sufficient workspace: A warm, draft-free area is ideal for fermentation. Consider finding a cozy spot on your kitchen counter.
Preparation tips:
- Always ensure your tools are clean and free of any residual ingredients that could interfere with the fermentation process.
- Keep the container loosely covered to protect it from dust while allowing your sourdough to breathe.
Ingredients for Sourdough Starter
The backbone of your sourdough starter lies within a handful of simple ingredients. Each has a role to play:
-
Whole-wheat or rye flour: These flours are rich in nutrients compared to regular white flour. They fuel the fermentation process and encourage the growth of wild yeasts. If you don’t have these flours on hand, all-purpose flour can work but might yield a less vibrant starter.
-
Strong white bread flour: This flour provides the structure your starter needs for a robust rise and is used for daily feeding once your starter has matured.
-
Filtered or bottled water: Using chlorine-free water is essential since chlorine can hinder yeast activity. Filtered water ensures the starter develops all the flavors and textures you desire.
How to Make Sourdough Starter
Creating your own sourdough starter is a beautiful process, filled with anticipation and delightful surprises:
-
Mix your flours and water: In your glass jar, combine equal parts of whole-wheat or rye flour and water—about 50 grams of each works well. Stir until the mixture comes together; it should resemble a thick pancake batter.
-
Cover and rest: Loosely cover the jar with a lid or a clean cloth, allowing air to circulate while keeping contaminants at bay. Set it on your counter at room temperature for 24 hours.
-
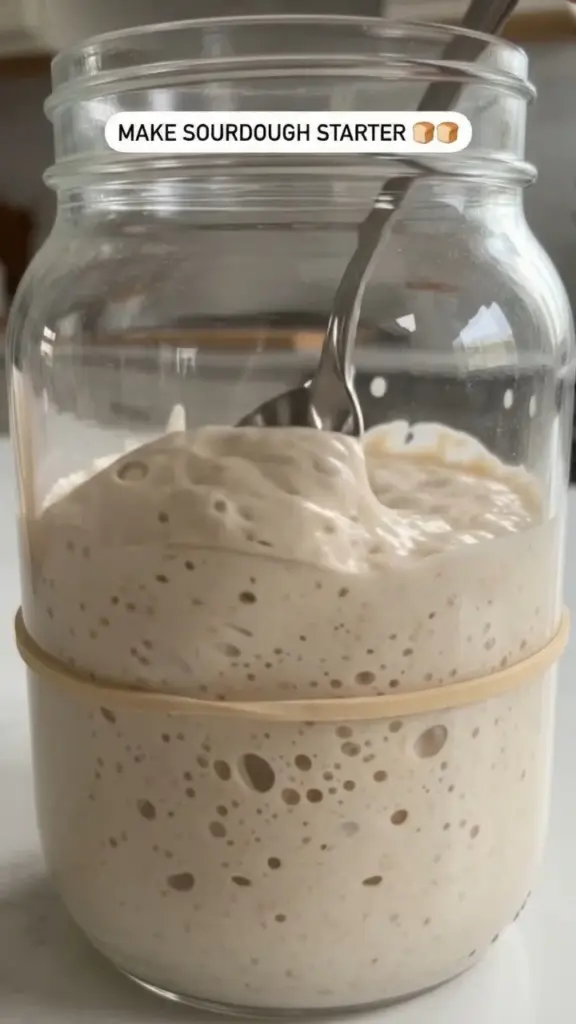
Daily feedings begin: After the first 24 hours, you’ll start feeding your starter. Discard half of the mixture (this helps maintain balance). Add 50 grams of strong white bread flour and 50 grams of water, mixing well. Repeat this feeding process daily until your starter becomes bubbly and doubles in size, typically within 5-7 days.
-
Ready to use: Once your starter is puffed, bubbly, and has a pleasant sour aroma, it’s time to bake! A mature starter will add character to any bread recipe you choose.
Chef’s Notes & Helpful Tips
-
Make-ahead tips: If you anticipate not using your starter for a while, you can refrigerate it. Feed it at least once a week while it’s in the fridge to keep it healthy. When you’re ready to bake, give it a few feedings at room temperature to wake it up.
-
Cooking alternatives: Beyond bread, use your starter to create pancakes, waffles, or even deliciously tangy bagels.
-
Customization ideas: Experiment with different types of flours during the feeding process—spelt, oat, or even a gluten-free blend to see how it affects flavor and texture.
Common Mistakes to Avoid
-
Neglecting the feedings: Daily feedings are essential for a strong starter. If neglected, it might run out of food and stop bubbling.
-
Using chlorinated water: Chlorine can kill the friendly yeasts. Stick to filtered or bottled water to give your starter the best chance to thrive.
-
Storing in a cold area: Yeasts love warmth, so choose a cozy spot for your starter. If it’s too chilly, fermentation will slow down.
-
Not discarding some starter: This keeps your mixture balanced, ensuring the right concentration of yeast and bacteria for growth.
What to Serve With Sourdough Starter
Once your sourdough starter is ready for action, let your culinary creativity shine with these scrumptious pairings:
- Classic butter and sea salt: A slice of warm sourdough with creamy butter and a sprinkle of flaky sea salt is pure bliss.
- Avocado toast: Top with smashed avocado, lemon juice, and chili flakes for a trendy breakfast sensation.
- Charcuterie boards: Stack slices with rich cheeses, cured meats, and seasonal fruits for a delightful spread.
- Soups and stews: Nothing warms the soul quite like tearing off a piece of crusty sourdough dipped into velvety soup.
- Paninis: Stuff with your favorite fillings and grill for toasty perfection.
- Bruschetta: Classic diced tomatoes and basil topping transforms simple toast into an elegant appetizer.
Storage & Reheating Instructions
To maintain the quality of your starter:
- Fridge: Keep your starter in the refrigerator for up to two weeks without feeding. If longer, feed it weekly.
- Freezer: For longer storage, pour your starter into a zip-top bag and freeze. When ready to use, thaw and feed until bubbly again.
- Reheating: Simply warm your sourdough in the toaster or oven for that delightful crusty experience, but avoid the microwave to maintain the texture.
Estimated Nutrition Information
While every starter’s nutritional profile may vary, a rough estimate for a 100-gram serving would be:
- Calories: 300
- Carbohydrates: 63g
- Protein: 10g
- Fat: 1g
- Fiber: 3g
Please note that the nutritional values may differ based on the specific ingredients and amounts used.
FAQs
1. How can I tell if my starter is healthy?
A healthy starter doubles in size within a few hours after feeding, exudes a tangy aroma, and has a smooth texture with bubbles.
2. My starter isn’t bubbling. What should I do?
Ensure you’re using the right flour and room temperature water. If it’s too cool, fermentation slows down. Give it more time and keep it warm.
3. Can I use my starter on the day it gets bubbly?
While you might get some rise, wait until it has been consistently doubling in size for at least a few feeds to ensure robust flavor and rise.
4. Why does my starter smell bad?
Should your starter smell off or sour in a bad way, it could be a sign of over-fermentation or unwanted bacteria. Discard it and start fresh if you see any signs of mold.
5. Can I use my starter to bake right away?
Wait until your starter is fully mature—a healthy, active starter ensures better flavor, texture, and rise in your baked goods.
Conclusion
Embarking on the journey to make your own sourdough starter not only fills your kitchen with delightful aromas but also initiates you into a timeless culinary tradition. With each feeding, you cultivate a living culture, one that gifts you beautifully crusty, tangy-sweet loaves of bread that you can cherish. So, roll up your sleeves, gather your ingredients, and dive into the world of sourdough; it awaits with warmth, history, and a touch of magic just for you. Enjoy the delightful rewards of your patience and passion—your taste buds will thank you!
Print
Sourdough Starter
- Total Time: 7 days
- Yield: 1 starter 1x
- Diet: Vegetarian
Description
Create your own sourdough starter with simple ingredients and patience, unleashing the delightful tang and depth of flavor for your homemade bread.
Ingredients
- 50g whole-wheat or rye flour
- 50g strong white bread flour
- 100g filtered or bottled water
Instructions
- Mix your flours and water: In your glass jar, combine equal parts of whole-wheat or rye flour and water.
- Cover and rest: Loosely cover the jar with a lid or cloth, allowing air circulation for 24 hours.
- Begin daily feedings: After 24 hours, discard half of the mixture and add 50g of strong white bread flour and 50g of water.
- Repeat the feeding process daily until your starter is bubbly and doubles in size, typically within 5-7 days.
- Use when your starter is puffed, bubbly, and has a pleasant sour aroma.
Notes
Ensure all tools are clean before use. Use filtered water and maintain a warm environment for best results.
- Prep Time: 10 minutes
- Cook Time: 0 minutes
- Category: Breads
- Method: Fermentation
- Cuisine: Baking
Nutrition
- Serving Size: 100 grams
- Calories: 300
- Sugar: 0g
- Sodium: 10mg
- Fat: 1g
- Saturated Fat: 0g
- Unsaturated Fat: 0g
- Trans Fat: 0g
- Carbohydrates: 63g
- Fiber: 3g
- Protein: 10g
- Cholesterol: 0mg
Keywords: sourdough starter, homemade bread, fermentation, baking